Content outdated
For up-to-date documentation see Create a C++ console app project.In this first C++ tutorial, you will learn how to write (and run!) your first C++ program, “Hello, World!”. Along the way you will learn a little C++ history, see how to configure a C++ console application in Visual Studio 2017, walk through code structure, and see how code is built.
Acknowledgements
This tutorial series is a remix of C++: A General Purpose Language and Library Jump Start, an all-day course presented by Kate Gregory and James McNellis and hosted on Microsoft Virtual Academy and the evolution of that content as beginner and intermediate courses on EdX by Gerry O’Brien. Combined, these courses have been used by thousands of developers to learn more about C++.
The original content has been adapted for article format. Code has been migrated to Visual Studio 2017 and will take advantage of the good stuff for C++ developers in Visual Studio 2017. Screenshots and other behaviors will be from Visual Studio 2017. Code has been changed to reflect modern views on correctness, style, or usage where appropriate.
Prerequisites
There are plenty of resources for new and experienced C++ developers. We recommend the C++ Primer, 5th Edition by Lippman, Lajoie, and Moo. It uses modern constructs without revisiting older techniques that are better left in the past. Visit isocpp.org for a list of helpful resources, the latest C++ news, and pointers to interesting content across the internet.
You do not need experience with C or C++. If you are returning to C++ after a long break, welcome back.
This tutorial will be hands-on and coding oriented, so follow along! You can use Visual Studio Community, a fully-featured, extensible, free IDE for creating modern applications in C++ for Windows, Linux, and other platforms. You can also use use different compilers like GCC and Clang in Visual Studio.
Brief History of C++
Designed by Bjarne Stroustrup, C++ has been around for more than three decades. Born in 1979 as C with Classes, it retains backward compatibility with C with improvements in data abstraction and support for object oriented programming and generic programming.
C and C++ are popular because they are portable and can be compiled, without major changes, across different compilers or different computer hardware, operating systems, CPU architectures, or device form factors. Each platform or operating system may have different compilers available from different providers such as Microsoft, Intel, or the open source community.
C++ is continually evolving to keep pace with the needs of modern developers. C++ exists under the stewardship of a standards committee and became an international standard in 1998 with revisions in 2011, 2014, and 2017. It continues to be updated as a part of the standards committee work.
C++ is used in thousands of applications, dozens of which you have probably already used in one form or another today!
Creating an Empty Console Project
Most of the code you encounter while learning C++ can be run using simple text input with text output directly to a console window. These tutorials will use an empty project configured as a console application. You can add new source files and code and see the results on the command line.
Here is how you create an empty console project in Visual Studio 2017:
- Launch Visual Studio 2017.
- On the menu bar, choose File, New, Project.
- In the Visual C++ category, choose Empty Project and then name the project. Choose a name that gives some indication of contents – for example, “HelloWorld” for a tutorial or “GuessTheNumber” for a number guessing application.
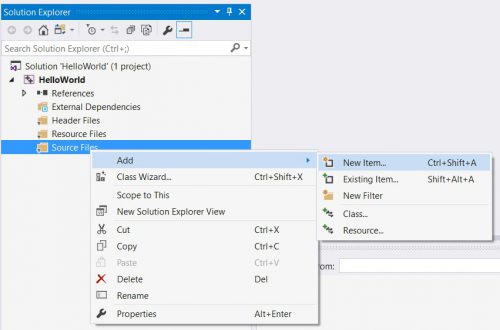
- In Solution Explorer, right-click Source Files then choose Add, New Item.

- In Add New Item, choose C++ File (.cpp) and then name the file. Again, the name should reflect the file contents. For example, “HelloWorld” for tutorial code or “WidgetClass” for the Widget implementation. Click Add.
- You now have an empty project ready for tutorial code or other C or C++ code. If you want basic template code that will build and is suitable for experimentation, copy the code below into the new C++ file, then press CTRL-F5 to build and run.
int main()
{
return 0;
}
This code is nothing more than an empty shell, ready for your exploration into C++.
There are other types of application you will no doubt explore as you become proficient in C++ and work on real C++ projects.
Hello World!
Time for the traditional first C++ demo, “Hello, World!”. History is a little unclear on the origin of this as the canonical sample for C++, but it might be traced back to Kernighan and Ritchie.
To create the Hello, World! application:
- Create an empty console project and name it “HelloWorld”; use that name for the cpp source file as well.
- In the empty “HelloWorld.cpp” file, enter the following code:
#include <iostream>
int main()
{
  std::cout << "Hello, World!" << std::endl;
  return 0;
}
- Press CTRL-F5 to run the program. When you are asked if you want to build it, click Yes. This is the first time you have run the program, so Visual Studio needs to build it.
- Do you see it run? If you are running inside an IDE like Visual Studio, the output window likely closed before you could see the greeting. You can do a couple of things to fix this.
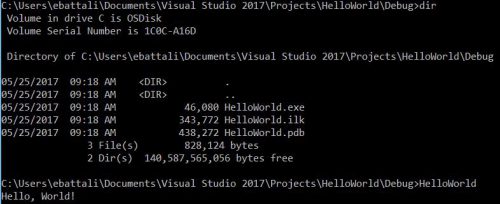
You can run the program from the command line. In Windows, launch an instance of the command prompt, move to the debug directory of your project, then type in
helloworld. This screenshot shows the files in the directory along with program output: You can also add a statement that waits for you to press any key prior to exiting the
 mainfunction Add the following statement before return 0:std::cin.ignore();Press CTRL-F5 to re-run the program. Hit a key to end the program.
Congratulations on your first C++ program. Let’s take a closer look. Line numbers have been added for reference and are not part of the program code.
1 #include <iostream>
2
3 int main()
4 {
5   std::cout << "Hello World!" << std::endl;
6   return 0;
7 }
Line 1: This is known as a preprocessor directive. It instructs the compiler to locate the file that contains code for a library known as iostream. This library contains code that allows for input and output to streams, such as the console window.
Line 3: Every C++ program must have a function known as main(). It is referred to as the entry point for the application when you start execution of the program on your computer. The int portion is the return type of the method. The empty parentheses () after the name indicate that this a function and that it takes no arguments, in other words, there are no parameters for passing in values. You will learn more about variable types, return value and arguments in the future.
Line 4: Function bodies in C++ start with an open curly brace.
Line 5: This code uses cout (pronounced “see out”) to send the text “Hello World!” and a newline/line flush (endl) to the console for output and display. The std:: prefix to these two commands is a way of indicating that they are part of a namespace known as std. The :: is used to indicate that cout and endl are part of the std namespace. [Trivia alert! cout looks like a method here, but there’s actually more happening behind the scenes. But it’s not something you have to worry about as a beginner.]
Also notice that the line ends with a semi-colon. C++ statements are terminated with semi-colons.
Line 6: The return statement is used to end a function when a value is expected to be sent back to a caller. In this case, the caller is the operating system and the value returned is an integer value of 0. If the program reaches this statement, returning a value of 0 is an indication to the operating system that the code executed successfully. Programmers return 0 to indicate successful execution and non-zero values to indicate that an error had occurred in the program somewhere.
Line 7: This line closes out the body of the function main() and is necessary so the compiler knows where the function or method ends, but is also used for other purposes that will be covered later in the course on variable scope and visibility.
There are more complicated applications, but the cool thing about C++ is that every scrap of syntax and library you learn to write a console application you can use to write any other kind of application at all.
How Code is Built
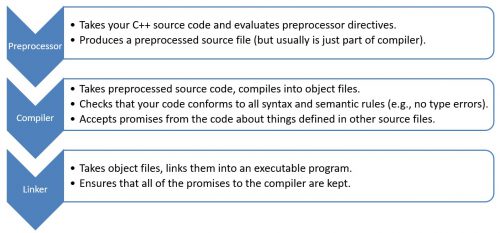
When you build C++ code, three major things happen: preprocessing, compiling and linking.
First, a tool called the preprocessor goes through your code and manipulates it a little bit. The output of the preprocessor goes to the compiler.
The compiler makes sure that you’ve used the syntax of supporting libraries and the C++ language itself correctly. Punctuation, variable definitions, and other syntactic elements all must adhere to standards. Real C++ applications can have lots of files, potentially even thousands, and each one must be compiled individually. The output of compilation is called an object file.
After every source file has been compiled, the linker links object files together into the application that is executed by the computer processor. The linker makes sure any promises you made in code are being kept. For example, in Hello, World, std::cout is defined elsewhere. The linker must resolve the call when it pulls in the iostream library.
These steps are critical to understand what happens when you get error messages. Error messages can point out small issues before they snowball into larger issues. Error messages can also help identify whether the mistake is a compiler or linker error — or some other problem. Reading error messages is vital to solving problems!
Review
In this C++ tutorial, you created a Visual Studio C++ console project and created your first C++ program, Hello World. Along the way, you learned how C++ code is built (preprocessor, compile, link), the basic structure of C++ applications, and a little bit of C++ history.
If you have any feedback or suggestions for us, please reach out. We can be reached via the comments below, via email (ebattali@microsoft.com or visualcpp@microsoft.com) and you can provide feedback via Help > Report A Problem in the product, or via Developer Community. You can also find us on Twitter (@VisualC) and Facebook (msftvisualcpp).
Thanks to Kate Gregory – Partner, Gregory Consulting Limited; and James McNellis – Microsoft Senior Software Development Engineer, for allowing us to utilize some of their video lectures, demonstrations, and content. Thanks also to Gerry O’Brien, Microsoft Learning Experience, for curriculum design and assistance.


0 comments