

On a recent episode of Azure Cosmos DB Live TV, I discussed building Java apps with Azure Cosmos DB and Spring Cloud. The focus of the discussion was how to use Spring Cloud Azure, an open-source project that provides seamless Spring integration with Azure services and gives developers a Spring-idiomatic way to connect and consume Azure services, with only a few lines of configuration and minimal code changes.
Each starter project in Spring Cloud Azure includes all the dependencies and transitive dependencies needed to begin application development with Azure services. For example, if you want to get started using Azure Cosmos DB for data persistence, you must include the spring-cloud-azure-starter-cosmos dependency in your project.
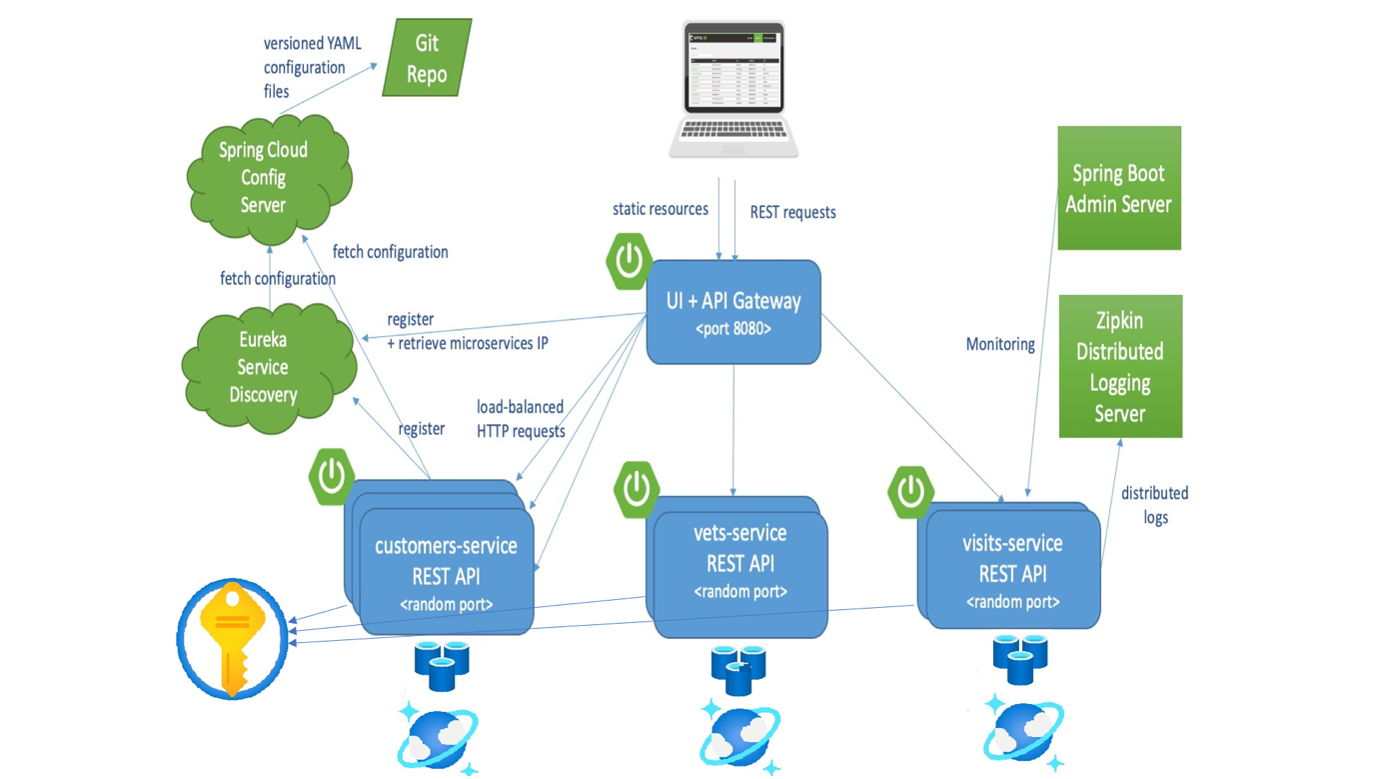
This blog shows you how to deploy an existing Java Spring Cloud application to Azure. The Spring Petclinic Microservices project (forked from here) is built around small independent services (a few hundred lines of code), running in their own JVM and communicating over HTTP via a REST API.
In its default configuration, Petclinic uses an in-memory database (HSQLDB) which gets populated at start-up with data. This fork utilizes Azure Key Vault for credential storage, Azure Cosmos DB, fronted by an instance of Azure Cache for Redis, for data persistence.
What will you experience
- Build existing Spring microservice applications
- Provision azure resources required for the applications
- Run the applications locally with Azure Cosmos DB backend, Azure Cache for Redis, and using Azure Key Vault for storing secrets
What you will need
Clone and build the samples repository
git clone https://github.com/Azure-Samples/azure-spring-boot-samplesChange directory and build the project
cd azure-spring-boot-samples/spring-petclinic-microservices
mvn clean package -DskipTests
This will take a few minutes.
Provision Azure Resources Required to Run This Sample
Terraform must authenticate to Azure to create infrastructure.
In your terminal, use the Azure CLI tool to setup your account permissions locally.
az loginYour browser window will open and you will be prompted to enter your Azure login credentials. After successful authentication, your terminal will display your subscription information. You do not need to save this output as it is saved in your system for Terraform to use.
You have logged in. Now let us find all the subscriptions to which you have access…
[
  {
    "cloudName": "AzureCloud",
    "homeTenantId": "home-Tenant-Id",
    "id": "subscription-id",
    "isDefault": true,
    "managedByTenants": [],
    "name": "Subscription-Name",
    "state": "Enabled",
    "tenantId": "0envbwi39-TenantId",
    "user": {
      "name": "your-username@domain.com",
      "type": "user"
    }
  }
]
If you have more than one subscription, specify the subscription-id you want to use with command below:
az account set --subscription <your-subscription-id>Provision the Resources
After login Azure CLI with your account, now you can use the terraform script to create Azure Resources.
Run with Bash
# In the root directory of the sample
# Initialize your Terraform configuration
terraform -chdir=./terraform init

# Apply your Terraform Configuration
terraform -chdir=./terraform apply -auto-approve
Run with Powershell
# In the root directory of the sample
# Initialize your Terraform configuration
terraform -chdir=terraform init

# Apply your Terraform Configuration
terraform -chdir=terraform apply -auto-approve
It may take a few minutes to run the script. After successful running, you will see prompt information like below:
azurerm_resource_group.main: Creating...
azurerm_key_vault.kv_account: Creating...
azurerm_redis_cache.redis: Creating...
azurerm_cosmosdb_account.application: Creating...
azurerm_redis_cache.redis: Still creating...
azurerm_key_vault.kv_account: Still creating...
azurerm_cosmosdb_account.application: Still creating...
...
azurerm_cosmosdb_account.application: Still creating...
azurerm_redis_cache.redis: Still creating...
azurerm_key_vault.kv_account: Still creating...
azurerm_key_vault.kv_account: Still creating...
azurerm_redis_cache.redis: Still creating...
...

Apply complete! Resources: 11 added, 0 changed, 0 destroyed.

Outputs:
...
You can go to Azure portal in your web browser to check the resources you created.
Export Output to Your Local Environment
In the same window you ran the terraform command, run the command below to export its environment values:
Run with Bash
source ./terraform/setup_env.sh
Run with Powershell
terraform\setup_env.ps1make sure keyvault.env file is created at the root of the repo.
Starting services locally with docker-compose
In order to start entire infrastructure using Docker, you have to build images by executing command below from a project root:
mvn clean install -P buildDocker -DskipTests
Once images are ready, you can start them with a single command.
docker-compose up
Containers startup order is coordinated with dockerize script. After starting services it takes a while for API Gateway to be in sync with service registry, so don’t be scared of initial Spring Cloud Gateway timeouts. You can track services availability using Eureka dashboard available by default at http://localhost:8761.
If certain on your services don’t start-up, we recommend running “docker-compose down” and then “docker-compose up” until all the services are available.
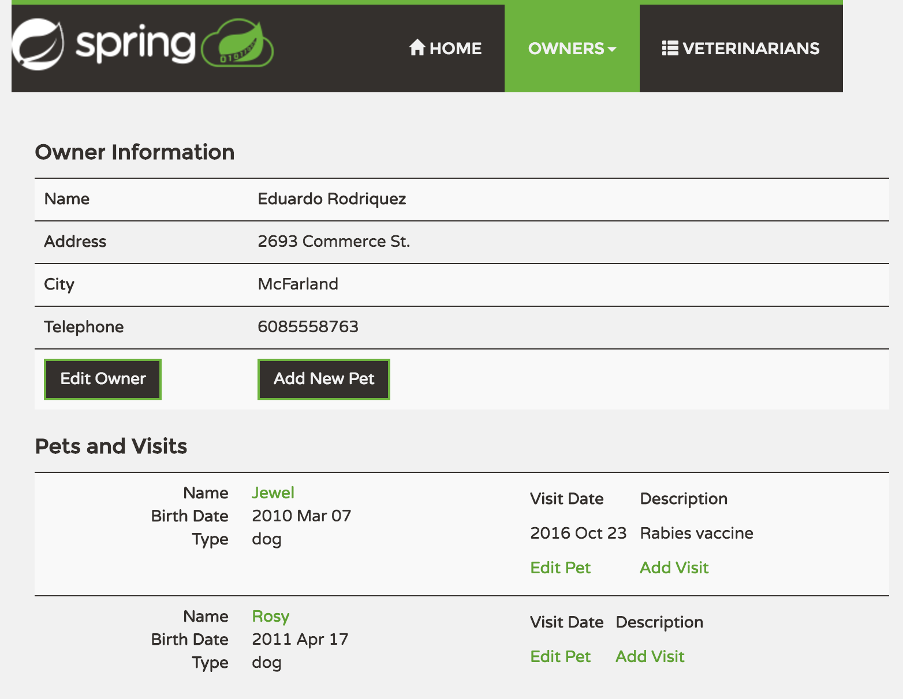
You can then access the petclinic here: http://localhost:8080/
Azure Cache for Redis fronting Azure Cosmos DB
Azure Cache for Redis is a fully managed Redis cache hosted by Azure. It has a very inexpensive first tier, and for our current use-case, it’s a perfect choice as we tried to be budget-conscious and as it can scale out without any trouble for us.
Our example is already setup for Azure Cache for Redis with the following dependency in the “spring-petclinic-customers-service/pom.xml” file:
    <dependency>
      <groupId>org.springframework.boot</groupId>
      <artifactId>spring-boot-starter-data-redis</artifactId>
    </dependency>
And we configured the Azure Cosmos DB database and Redis cache in the “spring-petclinic-customers-service/src/main/resources/application.yaml” Spring Boot configuration file:
      cosmos:
        database: end2endsample
        endpoint: ${cosmosdburi}
        key: ${cosmosdbkey}
        populate-query-metrics: true
  cache:
    type: redis
  redis:
    host: ${redisuri}
    password: ${redispassword}
    port: 6380
    ssl: true
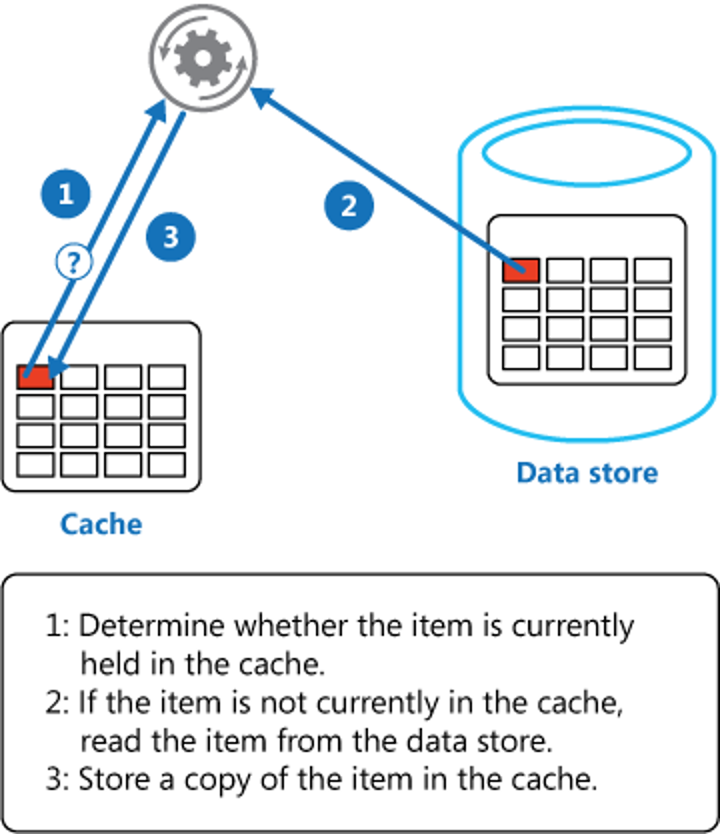
Next, let’s invalidate the cache and monitor it on the Azure Portal.
In the Customer Service project, you will notice the “Cacheable” and “CacheEvict” annotations on the “customers/web/OwnerResource.java” class:
    /**
     * Read List of Owners
     */
  @GetMapping
  @Cacheable("owners")
  public List<Owner> findAll() {
    List<Owner> list = new ArrayList<>();
    ownerRepository.findAll().forEach(list::add);
    return list;
  }

    /**
     * Clears the cache for all Owners
     */
  @GetMapping(value = "/clearcache")
  @CacheEvict("owners")
  @ResponseStatus(HttpStatus.NO_CONTENT)
  public void clearAllCache() {}
So whenever you access the URL http://localhost:8080/api/customer/owners it will return and cache the list of owners into the Azure Redis cache.
To clear the cache open a new browser window and access the URL http://localhost:8080/api/customer/owners/clearcache (it will return a blank screen).
When you go back and list all the owners (http://localhost:8080/api/customer/owners), you’ll notice a delay as the cache is hydrated again with a complete list of Owner objects.
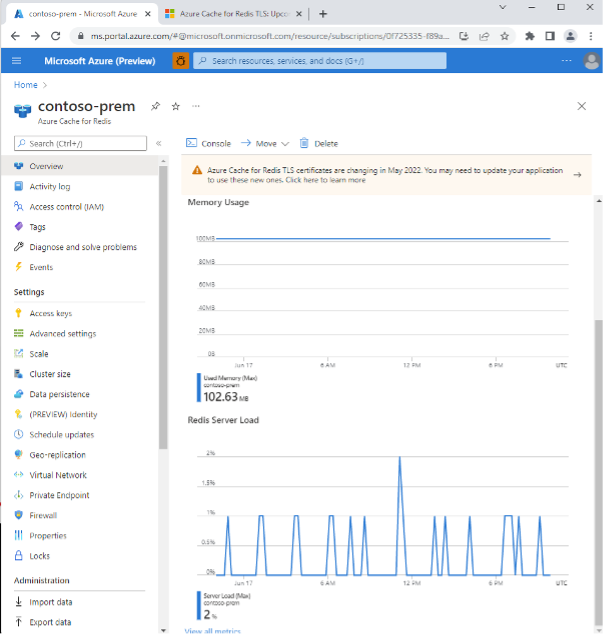
To view basic cache metrics in the Azure portal. On the left, select Overview. You see the following predefined monitoring charts: Memory Usage and Redis Server Load. These charts are helpful summaries that allow you to take a quick look at the state of your Customer object cache.
Clean Up Resources
Stop the docker container running with the following command:
docker-compose down
After running the sample, if you don’t want to run the sample again, remember to destroy the Azure resources you created to avoid unnecessary billing.
The terraform destroy command terminates resources managed by your Terraform project. To destroy the resources you created:
Run with Bash
az group delete –name $(terraform -chdir=./terraform output -raw resource_group_name) –yes
Run with Powershell
az group delete –name $(terraform -chdir=terraform output -raw resource_group_name) –yes
Conclusion
Using Spring Boot, Spring Cloud, Azure Cosmos DB, and Azure Cache for Redis together can help to create a robust and scalable microservices architecture. Spring Boot makes it easy to create standalone, production-grade applications that can be easily deployed and run. Spring Cloud provides a set of tools for building cloud-native applications, including support for service discovery, configuration management, and distributed tracing. Azure Cosmos DB is a globally distributed, multi-model database service that can be used as a data store for microservices. Azure Cache for Redis is an in-memory data structure store that can be used to improve the performance and scalability of a microservices architecture.
In summary, using these tools together can help to create a microservices architecture that is easy to develop, maintain, and scale.
Watch the full episode here:
Samples
- Git Repo: https://github.com/Azure-Samples/azure-spring-boot-samples/tree/spring-cloud-azure_v4.4.1/spring-petclinic-microservices
- Spring Cloud Azure:6.0.0-beta.3 has released, this is a milestone version to support Spring boot 3.
- Understanding the Spring Petclinic application
Get Started with Java in Azure Cosmos DB
- Azure Cosmos DB Java SDK v4 technical documentation
- Java SDK v4 getting started sample application
- Azure Cosmos DB Spring Data Sample
- Cosmic Works Java
- Release notes and additional resources
- Exploring the Async API (reactor programming)
About Azure Cosmos DB
Azure Cosmos DB is a fast and scalable distributed NoSQL database, built for modern application development. Get guaranteed single-digit millisecond response times and 99.999-percent availability, backed by SLAs, automatic and instant scalability, and open-source APIs for MongoDB and Cassandra. Enjoy fast writes and reads anywhere in the world with turnkey data replication and multi-region writes.
To easily build your first database, watch our Get Started videos on YouTube and explore ways to dev/test free
0 comments