
This is the third in a six-part blog series where we will demonstrate the application of Zero Trust concepts for securing federal information systems with Microsoft Azure. In this third blog of the series we will explore how to leverage Azure Sentinel for security monitoring in Zero Trust models. Additional blogs in the series will include leveraging policy, investigating insider attacks and monitoring supply chain risk management.
This blog series is coauthored by TJ Banasik, CISSP-ISSEP, ISSAP, ISSMP, Sr. Program Manager, Azure Global Customer Engineering, Mark McIntyre, CISSP, Senior Director, Enterprise Cybersecurity Group and Adam Dimopoulos, Azure Global Customer Engineering.
Also, join us at Microsoft Ignite The Tour Government in Washington, D.C on Feb.7 for our session Zero Hype: Practical Steps Towards Zero Trust (Session ID 86540).
How do we conduct security monitoring for zero trust?
The Microsoft Zero Trust vision paper outlines three principles of Zero Trust: Verify Explicitly, Least Privilege Access and Assume Breach. These principles include strategy recommendations such as continuously measuring trust and risk. Zero Trust requires security monitoring to ensure both trustworthiness of users and resources. Security monitoring is optimally based in a Security Information and Event Management (SIEM) solution which aggregates logs across the environment for security insights. Zero Trust highlights several key areas of security monitoring which include file, email, web, network and access controls.
Defining Zero Trust governance based on federal standards
Governance definition is a critical precursor to any Zero Trust initiative. For this blog we’ve leveraged TIC 3.0 for Zero Trust access control policies and aligned with respective NIST CSF and NIST SP 800-53 controls.
- Trusted Internet Connections (TIC) is a federal cybersecurity initiative to enhance network and perimeter security across the United States federal government. The TIC initiative is a collaborative effort between the Office of Management and Budget (OMB), the Department of Homeland Security (DHS) Cybersecurity and Infrastructure Security Agency (CISA), and the General Services Administration (GSA).[i] The TIC 3.0: Volume 3 Security Capabilities Handbook provides various security controls, applications and best practice for risk management in federal information systems.
- NIST Cybersecurity Framework. The National Institute of Standards and Technology (NIST) developed the Cybersecurity Framework to address risks highlighted in the Cybersecurity Enhancement Act of 2014 with a goal to identify “a prioritized, flexible, repeatable, performance-based, and cost effective approach, including information security measures and controls that may be voluntarily adopted by owners and operators of critical infrastructure to help them identify, assess, and manage cyber risks.”[ii] The Framework for Improving Critical Infrastructure Cybersecurity outlines these principles.
- NIST SP 800-53 R4. This publication “provides a catalog of security and privacy controls for federal information systems and organizations and a process for selecting controls to protect organizational operations (including mission, functions, image, and reputation), organizational assets, individuals, other organizations, and the Nation from a diverse set of threats including hostile cyber-attacks, natural disasters, structural failures, and human errors (both intentional and unintentional).”[iii] NIST SP 800-53 Rev 4 outlines the security and privacy controls for federal information systems and organizations.
In Azure Government, we cross-reference TIC 3.0, NIST Cybersecurity Framework and NIST SP 800-53 Rev4 to align requirements for implementing Zero Trust models. Our third focus point is security monitoring for Zero Trust and these documents have a wealth of information aligned to these principles. The diagram below highlights the key takeaways and requirements from the standards.
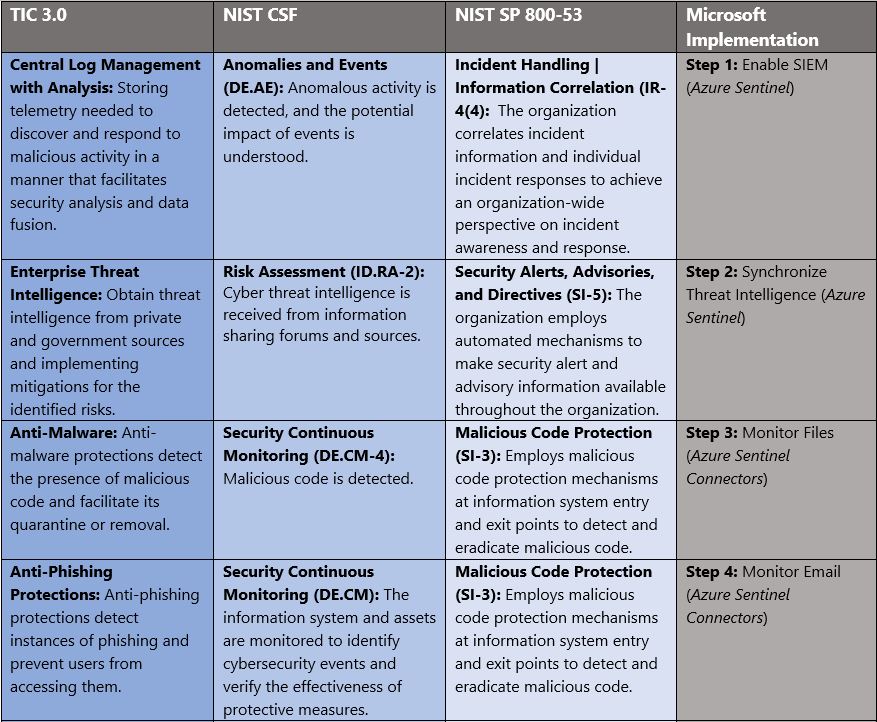

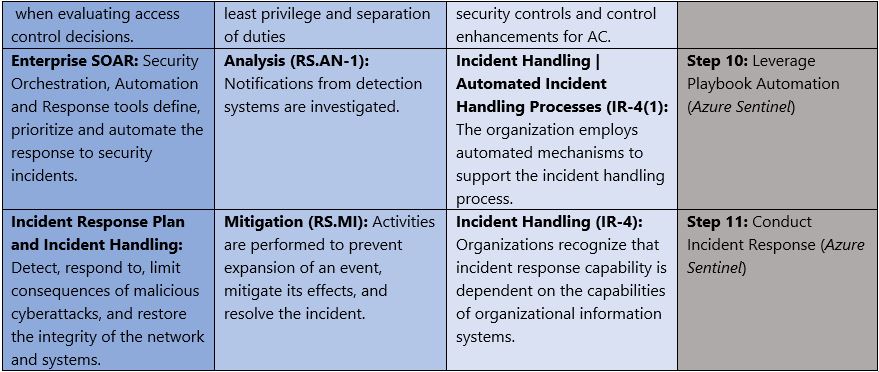
Monitoring Cloud Security for Zero Trust with Azure Sentinel
Microsoft Azure Government has developed an 11-step process for monitoring cloud security in federal information systems which is aligned with the security monitoring principles within the NIST, OMB, and CISA Zero Trust frameworks. Microsoft Azure has several offerings for security monitoring including Azure Sentinel, Azure DDoS Protection, Azure Firewall, Azure Web Application Firewall and Network Security Groups. It’s important to note that Azure Sentinel is currently only available in the Azure Commercial cloud, but stay tuned to Azure Government for updates.
- Azure Sentinel is a scalable, cloud-native, security information event management (SIEM) and security orchestration automated response (SOAR) solution.
- Azure DDoS Protection protects against Distributed denial of service (DDoS) attacks which are some of the largest availability and security concerns facing customers that are moving their applications to the cloud.
- Azure Firewall is a managed, cloud-based network security service that protects your Azure Virtual Network resources. It’s a fully stateful firewall as a service with built-in high availability and unrestricted cloud scalability.
- Azure Web Application Firewall protects your applications from common web vulnerabilities such as SQL injection and cross-site scripting, and lets you customize rules to reduce false positives.
- Network Security Group contains security rules that allow or deny inbound network traffic to, or outbound network traffic from, several types of Azure resources.
11 steps to monitoring cloud security for Zero Trust with Azure Sentinel
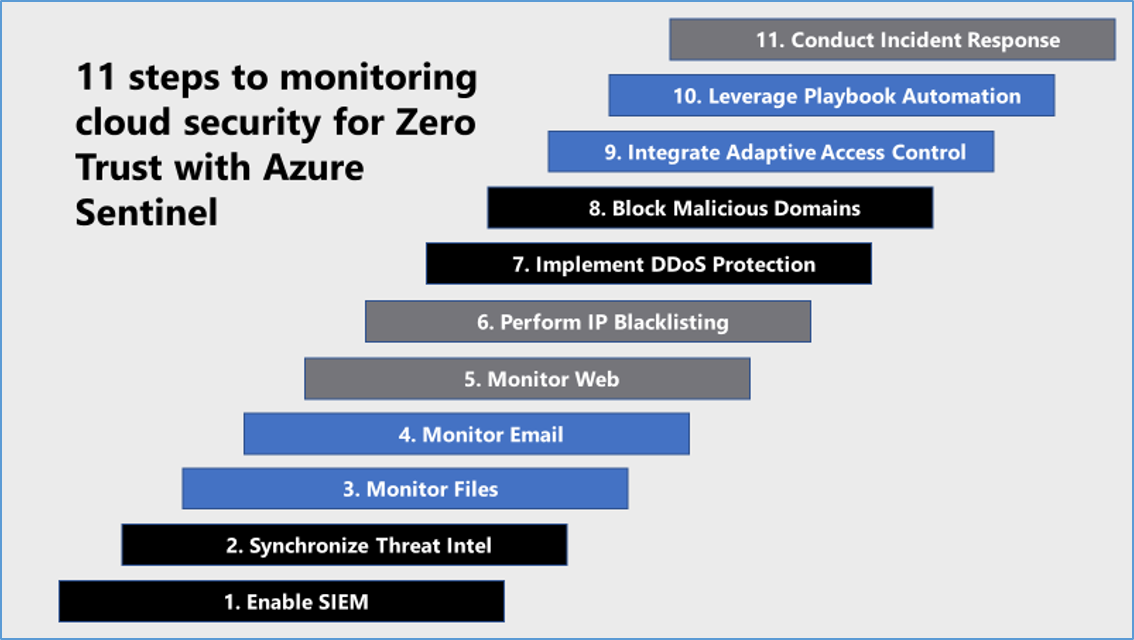
1) Enable Security Information Event Management (SIEM)
Leveraging a Security Information and Event Management (SIEM) platform is a key requirement to monitoring cloud security for Zero Trust. SIEMs allow security operations teams to aggregate, deduplicate, and correlate logging into actionable security insights. Microsoft Azure Sentinel is a scalable, cloud-native, security information event management (SIEM) and security orchestration automated response (SOAR) solution. Azure Sentinel delivers intelligent security analytics and threat intelligence across the enterprise, providing a single solution for alert detection, threat visibility, proactive hunting, and threat response. Azure Sentinel is your birds-eye view across the enterprise alleviating the stress of increasingly sophisticated attacks, increasing volumes of alerts, and long resolution timeframes.
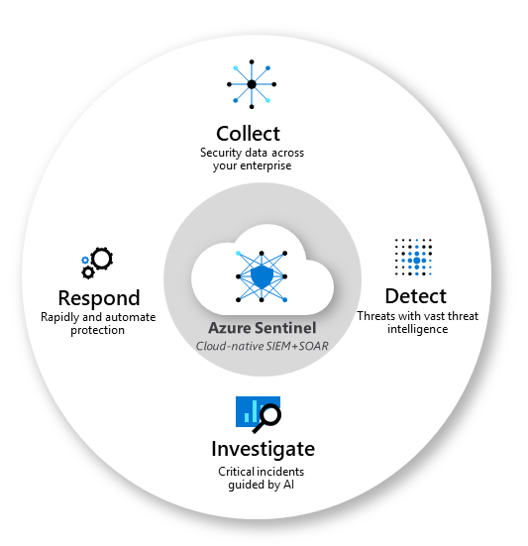
- Collect data at cloud scale across all users, devices, applications, and infrastructure, both on-premises and in multiple clouds.
- Detect previously undetected threats, and minimize false positives using Microsoft’s analytics and unparalleled threat intelligence.
- Investigate threats with artificial intelligence, and hunt for suspicious activities at scale, tapping into years of cyber security work at Microsoft.
- Respond to incidents rapidly with built-in orchestration and automation of common tasks.
To onboard Azure Sentinel, you first need to connect to your security sources. Azure Sentinel comes with a number of connectors for Microsoft solutions, available out of the box and providing real-time integration, including Microsoft Threat Protection solutions, and Microsoft 365 sources, including Office 365, Azure AD, Azure ATP, and Microsoft Cloud App Security, and more. Enabling Azure Sentinel is accomplished via the steps below:
- Sign into the Azure Portal. Select the subscription in which Azure Sentinel will be created.
- Search for and select Azure Sentinel.
- Select Add
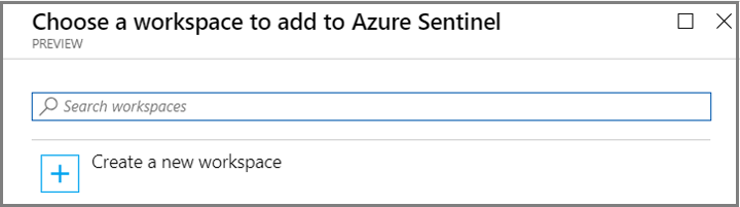
- Select the workspace you want to use or create a new one. You can run Azure Sentinel on more than one workspace, but the data is isolated to a single workspace.
- Select Add Azure Sentinel.
- Click Data collection.
- Select your respective data sources. Not there are tiles for each data source you can connect. For example, click Azure Active Directory. If you connect this data source, you stream all the logs from Azure AD into Azure Sentinel. You can select what type of logs you want to get – sign-in logs and/or audit logs.
- Select desired workbooks to get pre-built security insight dashboards for your data sources.
After your data sources are connected, your data starts streaming into Azure Sentinel and is ready for you to start working with. You can view the logs in the built-in dashboards and start building queries in Log Analytics to investigate the data. For more information, see Quickstart: On-board Azure Sentinel.
2) Synchronize Threat Intelligence
Azure Sentinel lets you import the threat indicators your organization is using, which can enhance your security analysts’ ability to detect and prioritize known threats. Several features from Azure Sentinel then become available or are enhanced:
- Analytics includes a set of scheduled rule templates you can enable to generate alerts and incidents based on matches of log events from your threat indicators.
- Workbooks provide summarized information about the threat indicators imported into Azure Sentinel and any alerts generated from analytics rules that match your threat indicators.
- Hunting queries allow security investigators to use threat indicators within the context of common hunting scenarios.
- Notebooks can use threat indicators when you investigate anomalies and hunt for malicious behaviors.
You can stream threat indicators to Azure Sentinel by using one of the integrated threat intelligence platform (TIP) products listed in the next section, connecting to TAXII servers, or by using direct integration with the Microsoft Graph Security tiIndicators API. Connecting Azure Sentinel to a threat intelligence platform is accomplished via the steps below:
- Register an application in Azure Active Directory to get an application ID, application secret, and Azure Active Directory tenant ID. You need these values for when you configure your integrated TIP product or app that uses direct integration with Microsoft Graph Security tiIndicators API.
- Configure API permissions for the registered application: Add the Microsoft Graph Application permission ReadWrite.OwnedBy to your registered application.
- Ask your Azure Active Directory tenant administrator to grant admin consent to the registered application for your organization. From the Azure portal: Azure Active Directory > App registrations > <app name> > View API Permissions > Grant admin consent for <tenant name>.
- Configure your TIP product or app that uses direct integration with Microsoft Graph Security tiIndicators API to send indicators to Azure Sentinel by specifying the following:
- The values for the registered application’s ID, secret, and tenant ID.
- For the target product, specify Azure Sentinel.
- For the action, specify alert.
- In the Azure portal, navigate to Azure Sentinel > Data connectors and then select the Threat Intelligence Platforms (Preview)
- Select Open connector page, and then Connect.
- To view the threat indicators imported into Azure Sentinel, navigate to Azure Sentinel – Logs > SecurityInsights, and then expand ThreatIntelligenceIndicator.
Azure Sentinel provides the capability to leverage the Microsoft Graph Security, integrate with MISP Open Source Threat Intelligence Platform, Palo Alto Networks MineMeld, Threat Connect Platform, and/or API integration with respective threat intelligence platforms. For more information, see Connect data from threat intelligence providers.
3) Monitor Files
Azure Sentinel has several built-in rules for monitoring files for suspicious actions and malware. By using Fusion technology that’s based on machine learning, Azure Sentinel can automatically detect multistage attacks by combining anomalous behaviors and suspicious activities that are observed at various stages of the kill-chain. Azure Sentinel then generates incidents that would otherwise be very difficult to catch. These incidents encase two or more alerts or activities. By design, these incidents are low volume, high fidelity, and high severity. Customized for your environment, this detection not only reduces false positive rates but can also detect attacks with limited or missing information. For more information on defending against malware with endpoint security in federal information systems, see Securing the endpoint: designing SaaS service implementations to meet federal policy.
4) Monitor Email
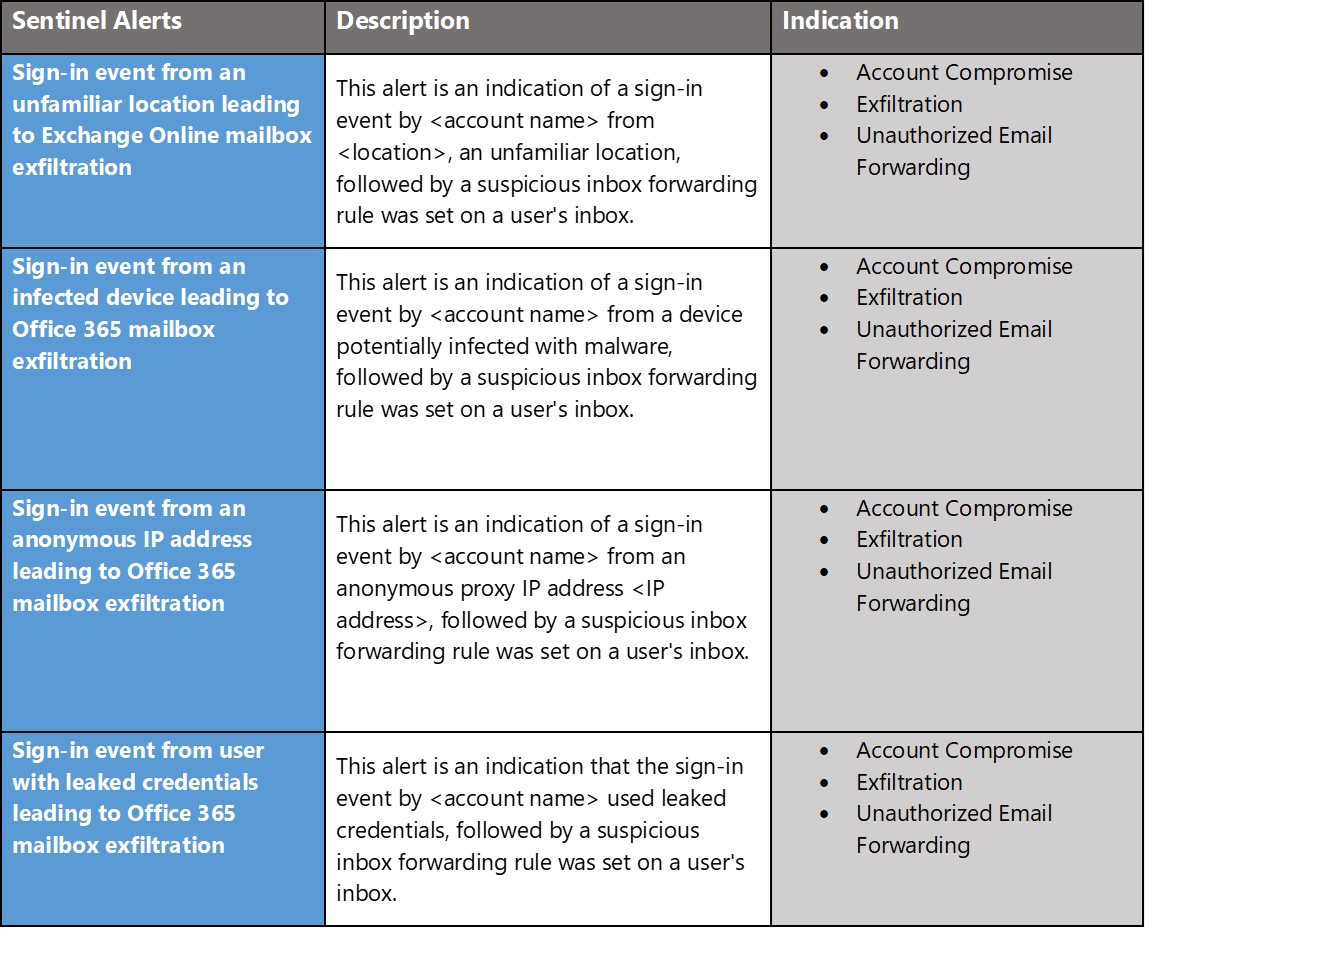
Azure Sentinel also has several built-in rules for monitoring suspicious email activity. These rules are synchronized with identity rules for fusion-based detections. These rules draw from multiple data sources including Azure AD Identity Protection, Office 365, and Microsoft Cloud App Security. Below is a summary of rules which can be readily deployed to your environment for email monitoring. For more information, see Advanced multistage attack detection in Azure Sentinel.
5) Monitor Web
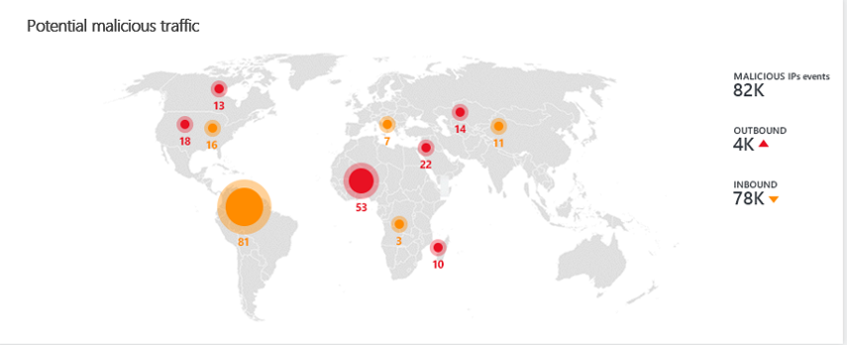
Monitoring the web includes traffic analysis for incoming and outbound web traffic. Azure Sentinel detects potential malicious events and when traffic is detected to and from sources known to be malicious, Azure Sentinel alerts you on the map. For more information, see Quickstart: Get started with Azure Sentinel.
Azure can also defend against malicious inbound traffic against web applications. You can stream logs from the Azure Application Gateway’s Microsoft web application firewall (WAF). This WAF protects your applications from common web vulnerabilities such as SQL injection and cross-site scripting, and lets you customize rules to reduce false positives. Follow these instructions to stream your Microsoft Web application firewall logs into Azure Sentinel. For more information, see Connect data from Microsoft web application firewall.
- In the Azure Sentinel portal, select Data connectors.
- In the Data connectors page, select the WAF
- Go to Application Gateway resource and choose your WAF.
- Select Diagnostic settings.
- Select + Add diagnostic setting under the table.
- In the Diagnostic settings page, type a Name and select Send to Log Analytics.
- Under Log Analytics Workspace select the Azure Sentinel workspace.
- Select the log types that you want to analyze. We recommended: ApplicationGatewayAccessLog and ApplicationGatewayFirewallLog.
- To use the relevant schema in Log Analytics for the Microsoft web application firewall alerts, search for AzureDiagnostics.
6) Perform IP Blacklisting
IP Blacklisting allows an organization to block access to IP addresses which are dangerous or a possible threat to the organization. Network Security Groups contain security rules that allow or deny inbound network traffic to, or outbound network traffic from, several types of Azure resources. Security teams can leverage Network Security Groups for blacklisting IPs and this logging is available in Sentinel for creation of custom alerting rules. For more information, see Security groups and Azure Sentinel: Collecting logs from Microsoft Services and Applications.
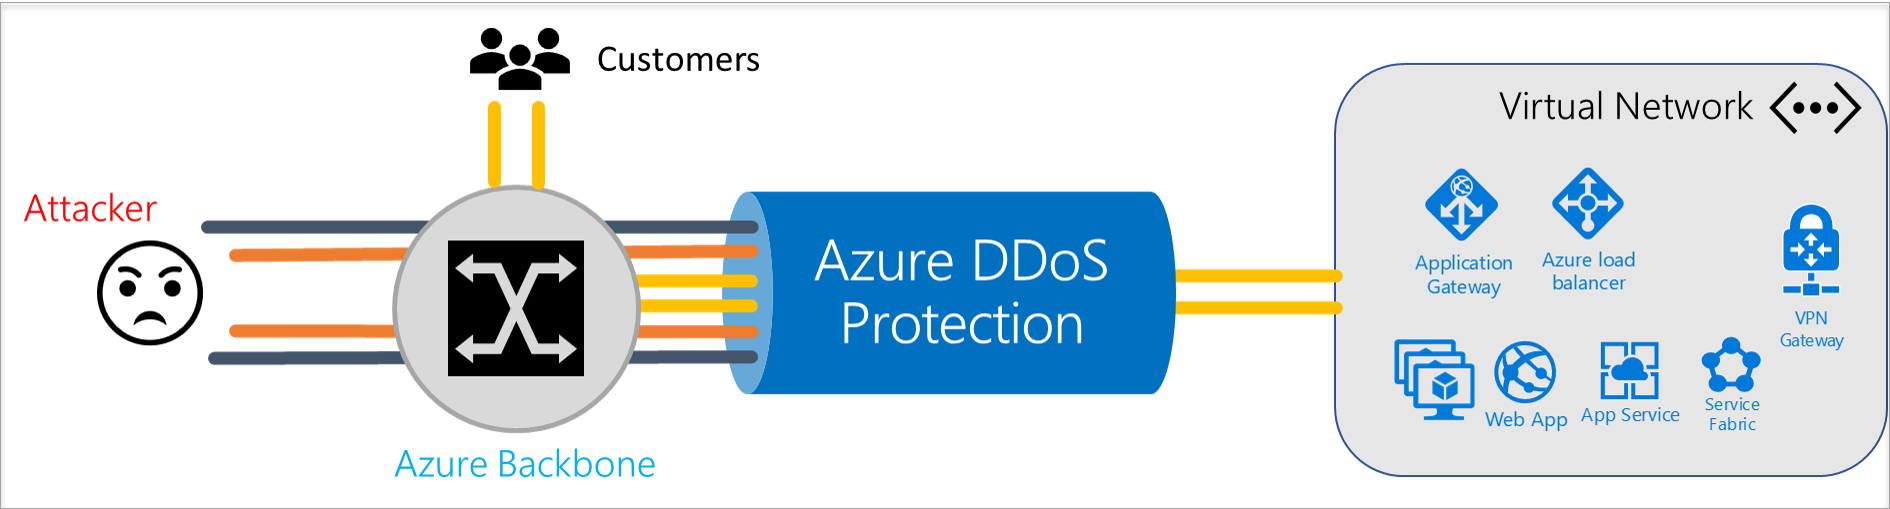
7) Implement DDoS Protection
Resiliency is another key concept for zero trust as attackers can launch Distributed Denial of Service (DDOS) attacks to make your network unavailable. Azure DDoS Protection Standard provides enhanced DDoS mitigation features. It’s automatically tuned to help protect your specific Azure resources in a virtual network. Protection is simple to enable on any new or existing virtual network, and it requires no application or resource changes. It has several advantages over the basic service, including logging, alerting, and telemetry. For more information, see Azure DDoS Protection – Designing resilient solutions.
8) Block Malicious Domains
Blocking malicious domains allows an organization to block access to domains which are dangerous or a possible threat to the organization. Azure Firewall is a managed, cloud-based network security service that protects your Azure Virtual Network resources. It’s a fully stateful firewall as a service with built-in high availability and unrestricted cloud scalability. You can centrally create, enforce, and log application and network connectivity policies across subscriptions and virtual networks. Azure Firewall uses a static public IP address for your virtual network resources allowing outside firewalls to identify traffic originating from your virtual network. The service is fully integrated with Azure Monitor for logging and analytics. Security teams can leverage Azure Firewall for blocking dangerous domains and this logging is available in Sentinel for creation of custom alerting rules. For more information, see What is Azure Firewall? and Azure Sentinel: Collecting logs from Microsoft Services and Applications.
9) Integrate Adaptive Access Control
Azure Sentinel has direct integration with Azure Active Directory (AAD) for proactive monitoring and even Playbook Automation for blocking suspicious logins such as a sign-in from an unexpected geographic location. Refer to Step 1: Enable Azure Sentinel for onboarding the Azure Active Directory (AAD) data source into Azure Sentinel. For more information on Adaptive Access Control, refer to the first blog in our series: Implementing Zero Trust with Microsoft Azure: Identity and Access Management.
10) Leverage Playbook Automation
A security playbook is a collection of procedures that can be run from Azure Sentinel in response to an alert. A security playbook can help automate and orchestrate your response and can be run manually or set to run automatically when specific alerts are triggered. Security playbooks in Azure Sentinel are based on Azure Logic Apps, which means that you get all the power, customizability, and built-in templates of Logic Apps. Each playbook is created for the specific subscription you choose, but when you look at the Playbooks page, you will see all the playbooks across any selected subscriptions.

Follow these steps to create a new security playbook in Azure Sentinel:
- Open the Azure Sentinel
- Under Management, select Playbooks.
- In the Azure Sentinel – Playbooks (Preview) page, click Add button.
- In the Create Logic app page, type the requested information to create your new logic app, and click Create.
- Select Blank Logic App.
- You are taken to the Logic App Designer where you can either build new or edit the template. For more information on creating a playbook with Logic Apps.
- Type Azure Sentinel in the Search all connectors field and select When a response to an Azure Sentinel alert is triggered.
- Use the Get entities functions, which enable you to get the relevant entities from inside the Entities list, such as accounts, IP addresses and hosts.
- Now you can define what happens when you trigger the playbook. You can add an action, logical condition, switch case conditions, or loops. For more information, see Tutorial: Set up automated threat responses in Azure Sentinel.
11) Conduct Incident Response
Azure Sentinel enables blue teams and incident responders to leverage data sources, machine learning and threat intelligence to detect, respond and eradicate the threat. Azure Sentinel enables incident responders to move from reactive to proactive incident response with hunting queries. To help security analysts look proactively for new anomalies that weren’t detected by your security apps, Azure Sentinel’s built-in hunting queries guide you into asking the right questions to find issues in the data you already have on your network. With Azure Sentinel hunting, you can take advantage of the following capabilities:
- Built-in queries: These built-in hunting queries are developed by Microsoft security researchers on a continuous basis, adding new queries, and fine-tuning existing queries to provide you with an entry point to look for new detections and figure out where to start hunting for the beginnings of new attacks.
- Powerful query language with IntelliSense: Built on top of a query language that gives you the flexibility you need to take hunting to the next level.
- Create your own bookmarks: Bookmarks let you save items for later, to be used to create an incident for investigation. For more information about bookmarks, see Use bookmarks in hunting.
- Use notebooks to automate investigation: Notebooks encapsulate all the hunting steps in a reusable playbook that can be shared with others in your organization.
- Query the stored data: The data is accessible in tables for you to query. For example, you can query process creation, DNS events, and many other event types.
- Links to community: Leverage the power of the greater community to find additional queries and data sources.
Start hunting with Azure Sentinel via the steps below:
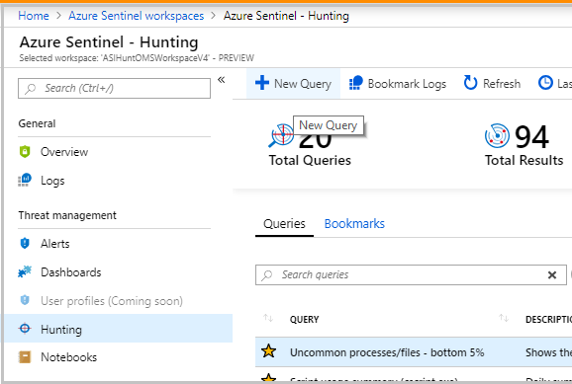
- In the Azure Sentinel portal, click Hunting.
- When you open the Hunting page, all the hunting queries are displayed in a single table. The table lists all the queries written by Microsoft’s team of security analysts as well as any additional query you created or modified.
- Click Run query in the hunting query details page to run any query without leaving the hunting page. The number of matches is displayed within the table. Review the list of hunting queries and their matches. Check out which stage in the kill chain the match is associated with.
- Perform a quick review of the underlying query in the query details pane or click View query result to open the query in Log Analytics. At the bottom, review the matches for the query.
- Click on the row and select Add bookmark to add the rows to be investigated – you can do this for anything that looks suspicious.
- Then, go back to the main Hunting page and click the Bookmarks tab to see all the suspicious activities.
- Select a bookmark and then click Investigate to open the investigation experience. You can filter the bookmarks. For example, if you’re investigating a campaign, you can create a tag for the campaign and then filter all the bookmarks based on the campaign.
After you’ve discovered which hunting query provides high value insights into possible attacks, you can also create custom detection rules based on your query and surface those insights as alerts to your security incident responders. For more information, see Hunt for threats with Azure Sentinel.
Learn more about Zero Trust with Microsoft
Here are some of the best resource to learn more about Zero Trust in the cloud with Microsoft:
- Reach the Optimal State in your Zero Trust Journey
- The Zero Trust Maturity Model
- Zero Trust: A New Era of Security
- Implementing a Zero Trust Security Model at Microsoft
- Zero Trust Strategy: What Good Looks Like
- Securing Mobile: Designing SaaS Service Implementations to Meet Federal TIC Policy
Be sure to check out the other topics we have covered in this series:
- Implementing Zero Trust with Microsoft Azure: Identity and Access Management
- Protecting Cloud Workloads for Zero Trust with Azure Security Center
- Enforcing Policy for Zero Trust with Azure Policy
- Insider Threat Monitoring for Zero Trust with Microsoft Azure
- Supply Chain Risk Management for Zero Trust with Microsoft Azure
For more information on Zero Trust, join us at Microsoft Ignite The Tour Government in Washington, D.C on Feb.7 for our session Zero Hype: Practical Steps Towards Zero Trust.
Bookmark the Security blog to keep up with our expert coverage on security matters and follow us at @MSFTSecurity or visit our website for the latest news and updates on cybersecurity.
Are you a federal government agency that needs help with cybersecurity? Reach out to TJ Banasik or Mark McIntyre for additional details on the content above, or if you have any other questions about Microsoft’s cybersecurity investments for the federal government.
[i] Cybersecurity and Infrastructure Security Agency. (2019, December 1). Trusted Internet Connections 3.0: Volume 3 Security Capabilities Handbook. Retrieved January 22, 2020, from https://www.cisa.gov/sites/default/files/publications/Draft%20TIC%203.0%20Vol.%203%20Security%20Capabilities%20Handbook.pdf
[ii] National Institute of Standards and Technology. (2018, April 16). Framework for Improving Critical Infrastructure Cybersecurity. Retrieved January 22, 2020, from https://nvlpubs.nist.gov/nistpubs/CSWP/NIST.CSWP.04162018.pdf
[iii] National Institute of Standards and Technology. (2013, April 1). NIST Special Publication 800-53: Security and Privacy Controls for Federal Information Systems and Organizations. Retrieved January 22, 2020, from https://nvlpubs.nist.gov/nistpubs/SpecialPublications/NIST.SP.800-53r4.pdf
So my client doesn’t trust any shared infra type things, like logic apps or functions on consumption plan. Got anything that docs those environments are ‘trusted’, aka no memory probe from other processes, et al. They trust ‘less than zero’ without doc. GREAT article series. Thanks…
Joe,
Thanks for your question and for following our Zero Trust with Azure blog series. This is certainly an understandable concern and we have several resources to address your question. The first resource details how to leverage Integration Service Environments (ISEs) for Azure Logic Apps. The second resource lays out architectural plans for TIC within federal information system while highlighting options for securing PaaS services including hosting a dedicated service, leveraging network service endpoints and/or forced tunneling. The third resource provides general recommendations for securing logic apps. We hppe this answers your question and supports your client's requirements, thank...