This blog was contributed by guest author Russ Williams, Cloud Solution Architect
So you’ve heard the buzz about bots and “conversational AI” at Microsoft’s Build 2018 Conference. You’re starting to get excited about ideas you have for bots in your organization. But then you learn that Azure Government doesn’t support the Azure Bot Service yet, so you start to think your ideas will have to be put on hold… or do they? Turns out, there is a way to begin exploring bots in Azure Government that’s really easy! The approach does require that you have access to both Azure Commercial and Azure Government subscriptions but you could create a trial Azure Commercial subscription if you’re eager to begin exploring the potential of Conversational AI in your organization.
The Azure Bot Service helps you build, connect, deploy, and manage intelligent bots to interact naturally with your users on websites, apps, Cortana, Microsoft Teams, Skype, Slack, Facebook Messenger, and more.
Now’s the time to get started so your bot will be ready to go when the Bot Service becomes available in Azure Government. In this post I’ll explain how this works and show you how to use the Azure Bot Service to deploy a bot in Azure Government
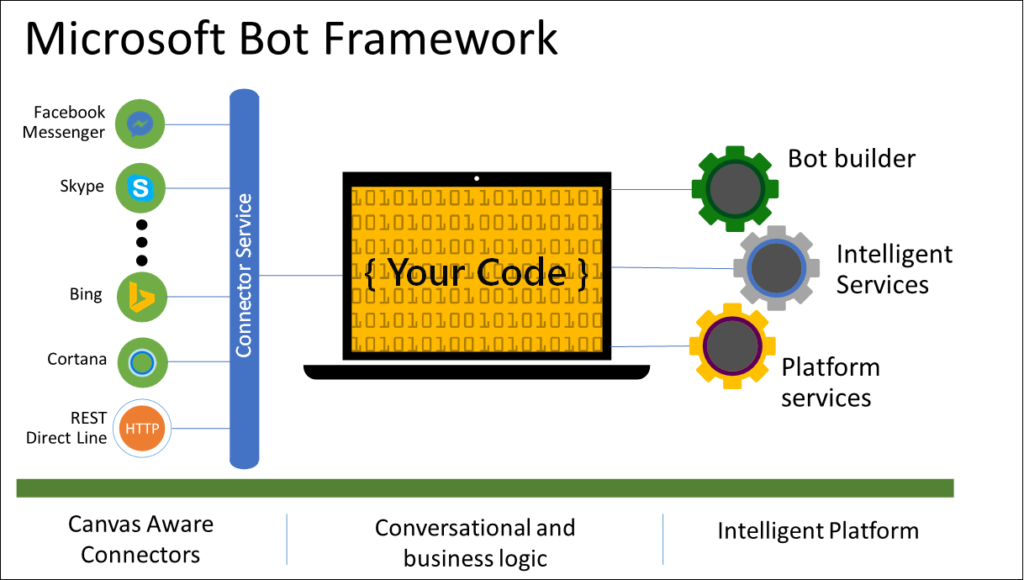
Let’s begin with a high-level overview of what we are about to do. You’ll first build an intelligent platform to develop a conversational bot, then connect this to messaging clients. Connecting your bot to messaging clients requires a Bot Channels Registration (Connector Service in the diagram below) which isn’t yet available in Azure Government, so we’ll set that up in Azure Commercial and point it to the Azure Government bot. So it’s just the Connector Service that’s hosted in Azure Commercial, the bot itself will be hosted in Azure Government.
So, these are the two primary tasks I’ll explain in this post: 1. How to build and deploy your bot to Azure Government 2. How to connect your bot to messaging clients like Facebook Messenger, Slack, SMS, etc.
Task 1 – Build and Deploy to Azure Government
The first task can be carried out entirely in Visual Studio 2017 (earlier versions of Visual Studio could be used but the steps will be slightly different). Here are the steps:
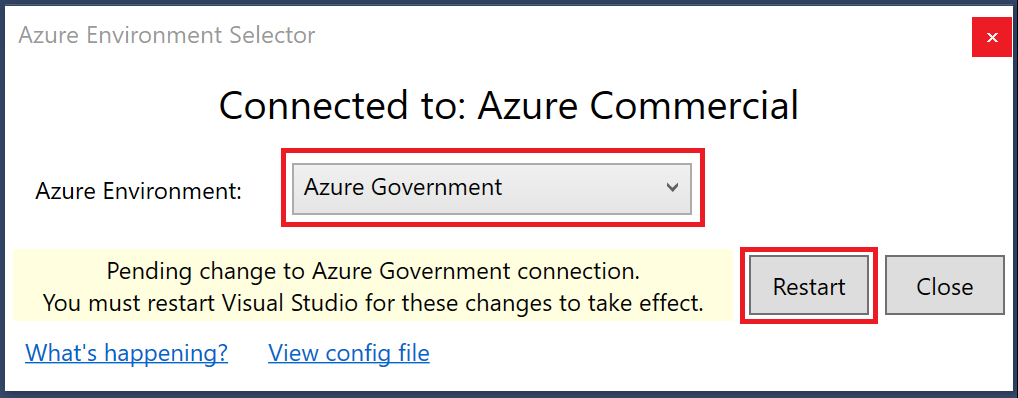
1. If you have Visual Studio version 15.6.4 or later, the Azure Environment Selector is no longer necessary and you can skip to step 3, otherwise, download and install the Azure Environment Selector which you can find here 2. In Visual Studio 2017, select Tools | Azure Environment Selector and then choose Azure Government in the dropdown and click Restart.
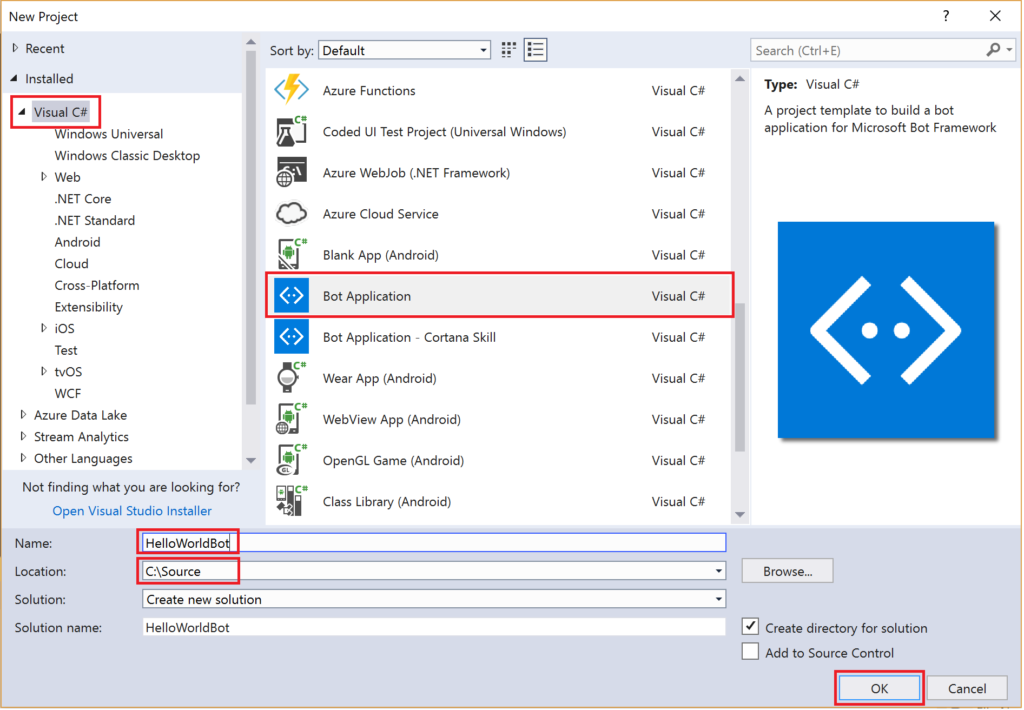
3. Now create the bot project by selecting File | New | Project and in the New Project dialog select the Visual C# template folder and then scroll down a bit and select the Bot Application template. Give you bot a Name and Location and then click OK.
 4. Next press F6 to Build the solution
5. In the Solution Explorer, right-click the project and select Publish.
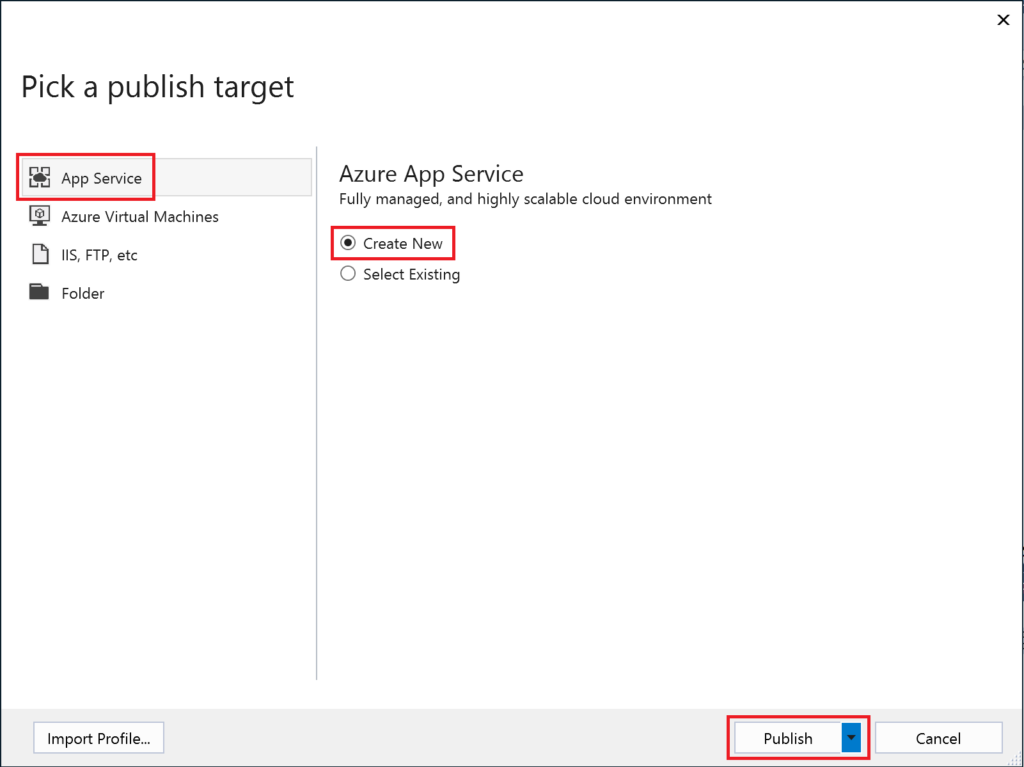
6. On the publishing dialog, make sure App Service target is selected and choose the Create New option and then click Publish.
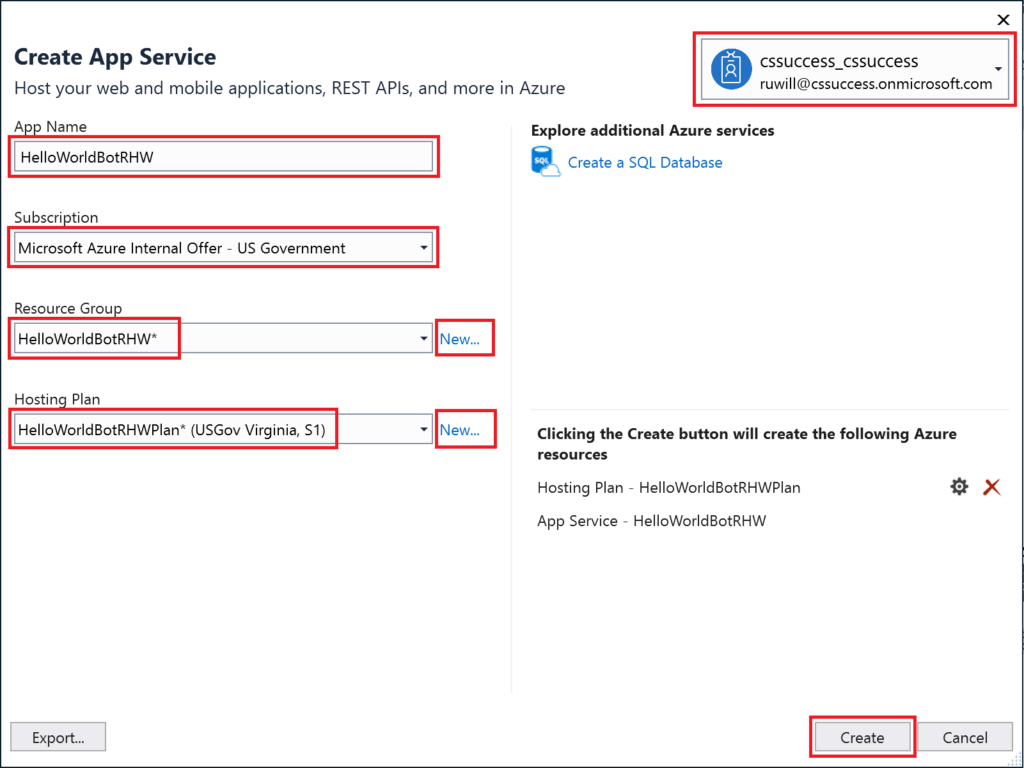
7. On the Create App Service dialog, make sure you have selected your Azure Government subscription and then enter an App Name. Next, click New to create a new Resource Group to hold your bot. To keep things clean for the demo bot, let’s click New and create a new Hosting Plan (see Step 8). Lastly, click Create.
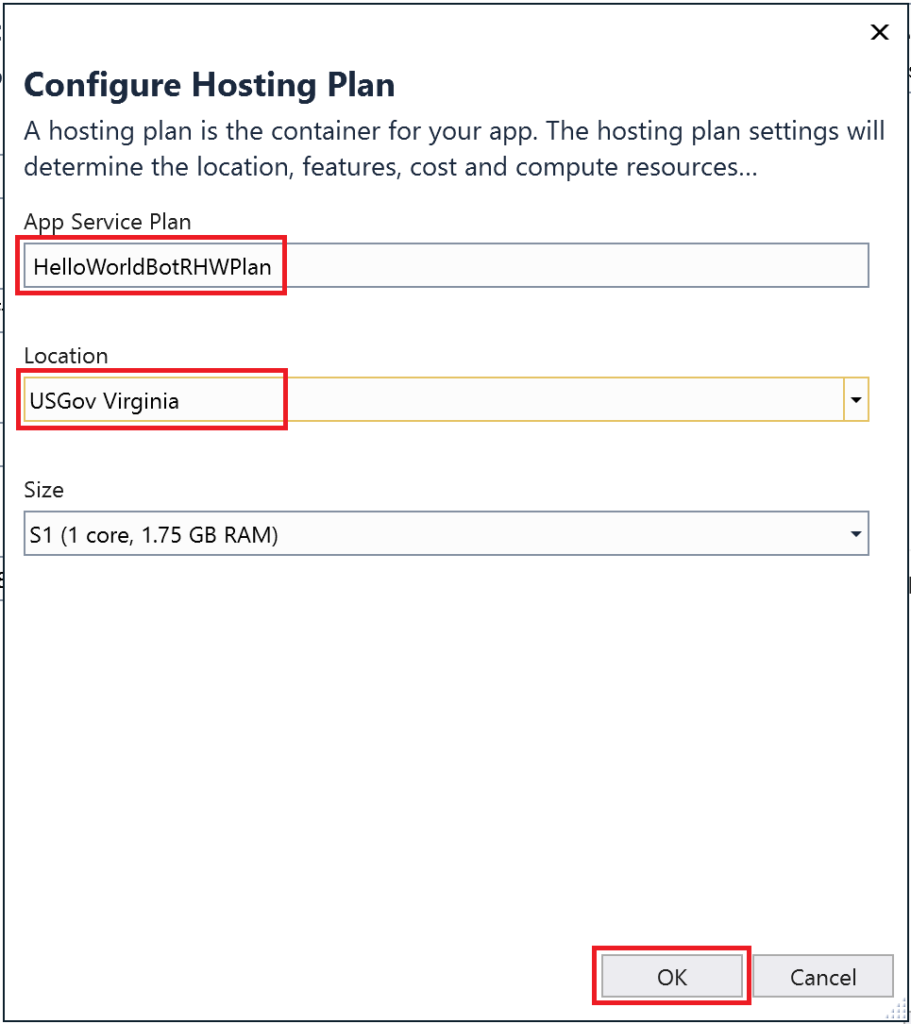
8. If you did choose to create a new service plan, you’ll see the dialog below. Provide a name for your App Service Plan and choose the Location where you want your bot to run and click OK.
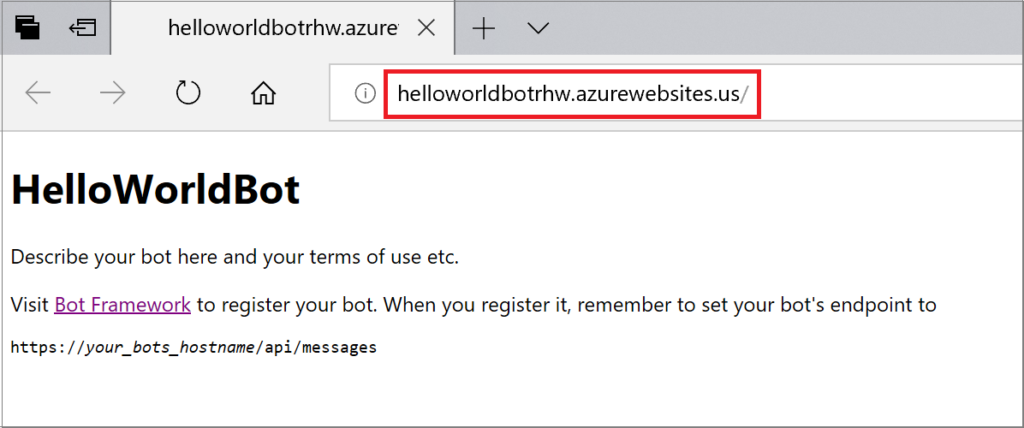
9. When publishing finishes, the default bot webpage will pop up in the browser. Copy and URL from browser and paste into something like Notepad and make the following edits to it: • Change http to https • Append “/api/messages” to the end so it looks like https://helloworldbotrhw.azurewebsites.us/api/messages • Of course, you’ll replace “helloworldbotrhw” with the App Name you specified in Step 7 • This is the bot messaging endpoint you’ll need later when you create your Bot Channels Registration in Task 2
Task 2 – Connect You Bot to Messaging Clients
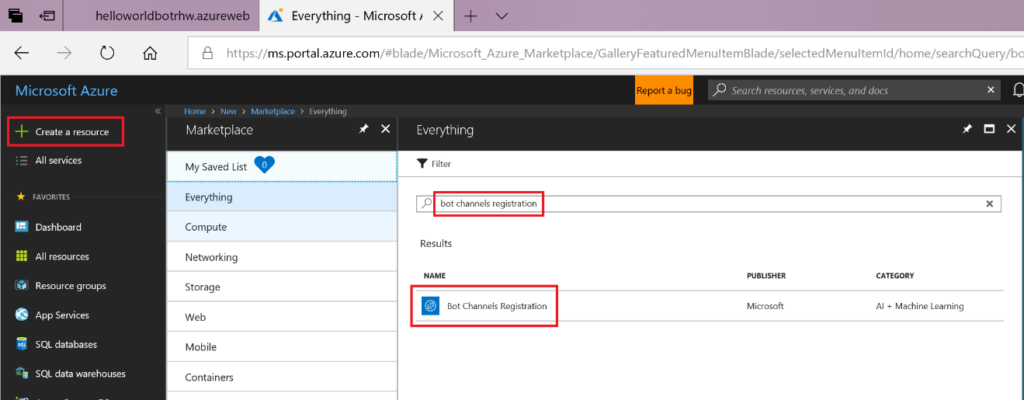
1. Now browse to commercial portal (https://portal.azure.com) and Create a New Resource and type in “bot channels registration” into Search field and hit enter and then choose Bot Channels Registration and click Create on the Create blade that pops up.
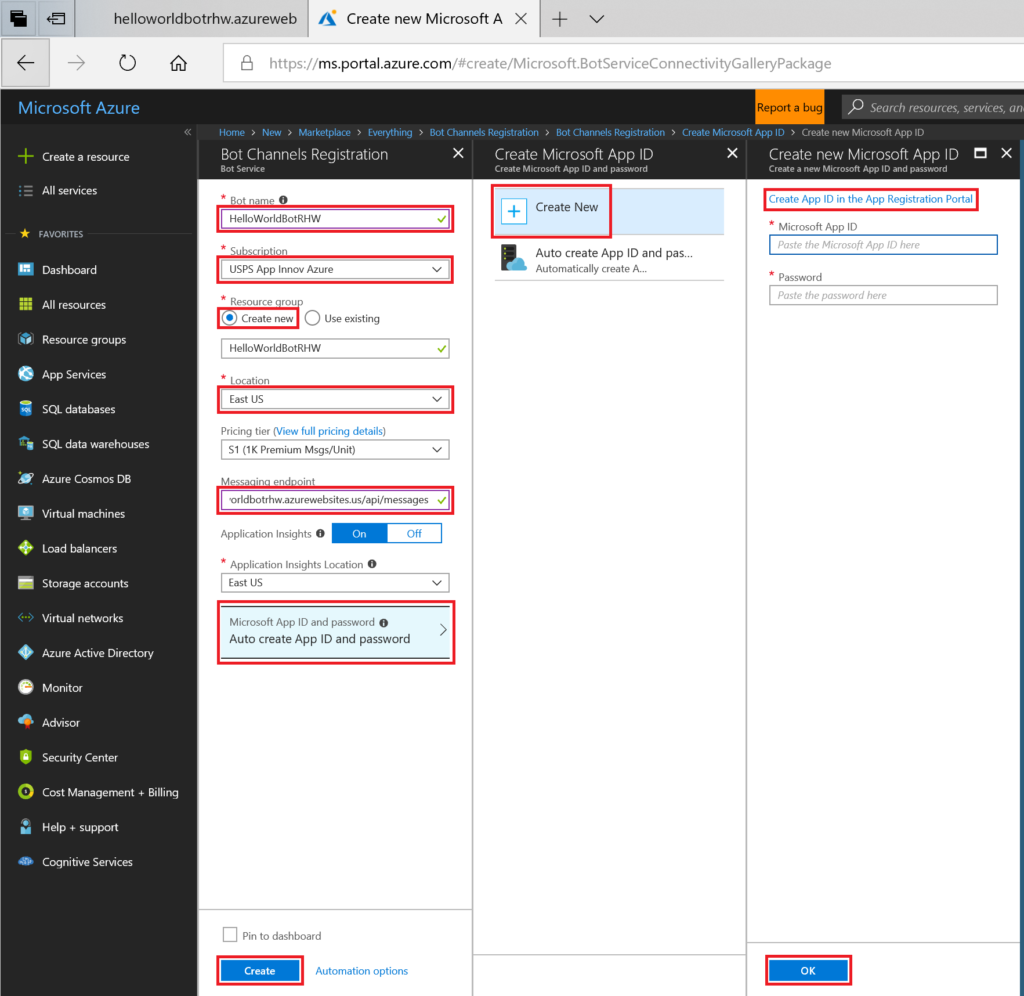
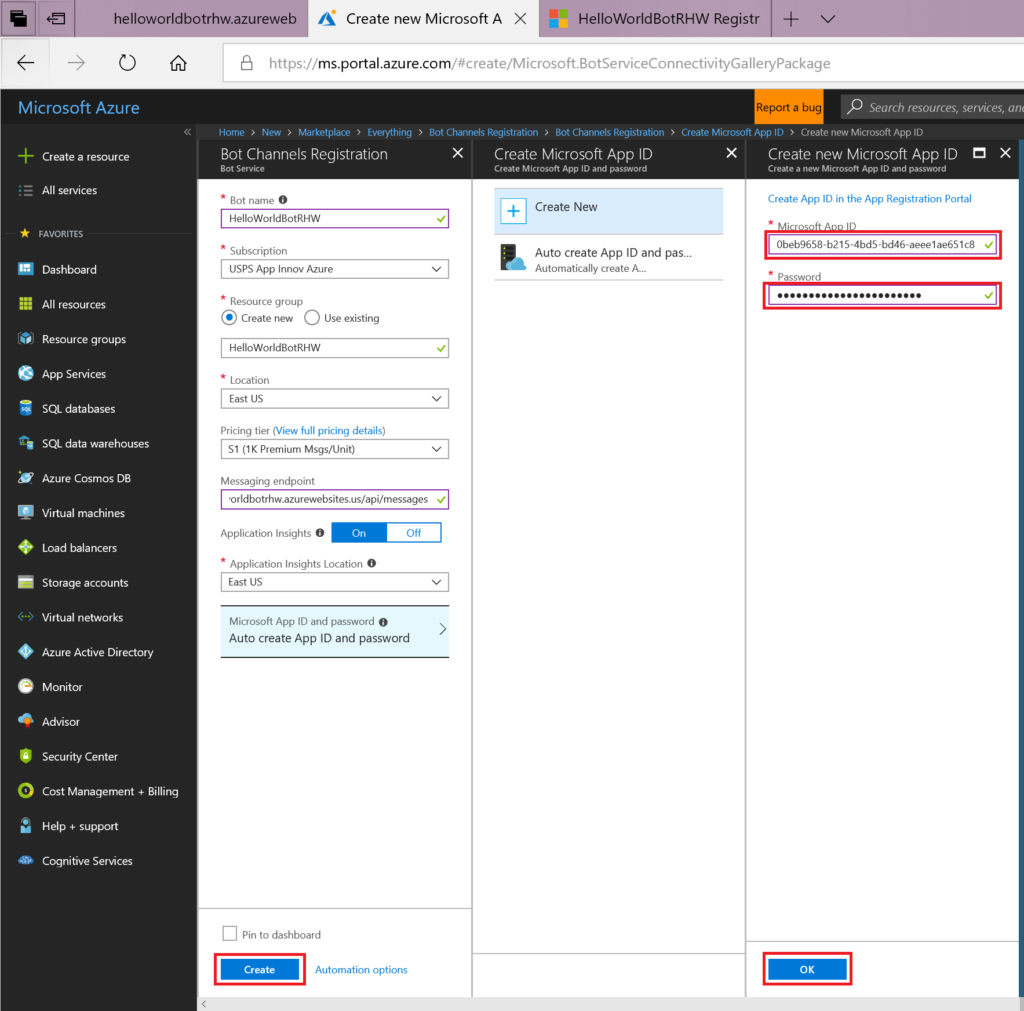
2. On the Channels Registration blade, give your bot a globally unique name. You can use the same name that you provided for App Name back in Step 7 in Task 1. Choose the correct subscription and select Create New for Resource Group. Select the Location where the new channel registration should live and then paste in the Messaging Endpoint that you crafted back in Step 9 in Task 1. Next, click Auto create App ID and password which will open the Create App ID blade. Click the Create New and then click the Create App ID in the App Registration Portal. This will open the App Registration portal in a new browser tab and ask you to sign in. Use the same identity you use to sign in to the Azure Commercial portal.
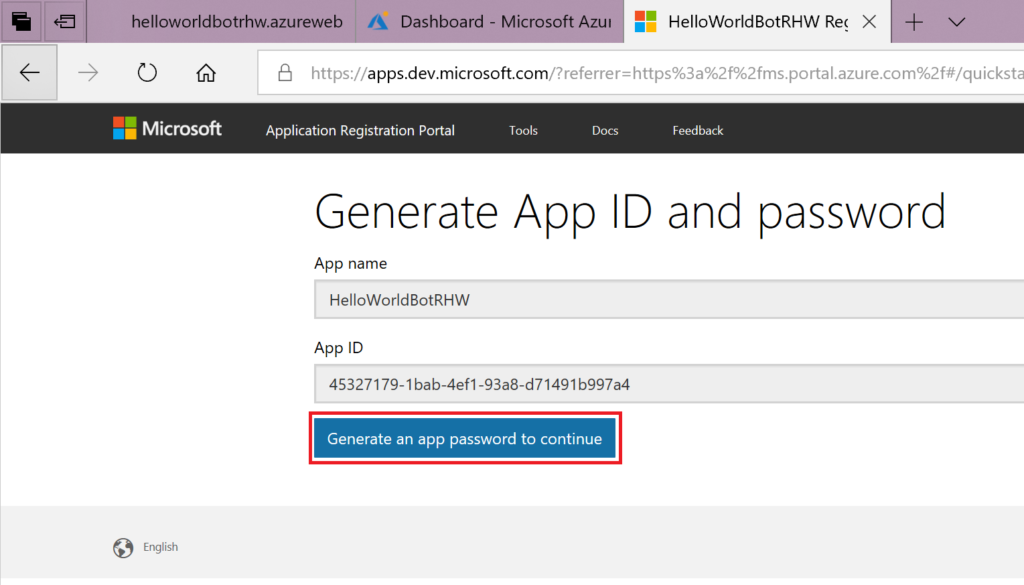
 3. In the App Registration portal, click the Generate an app password to continue button.
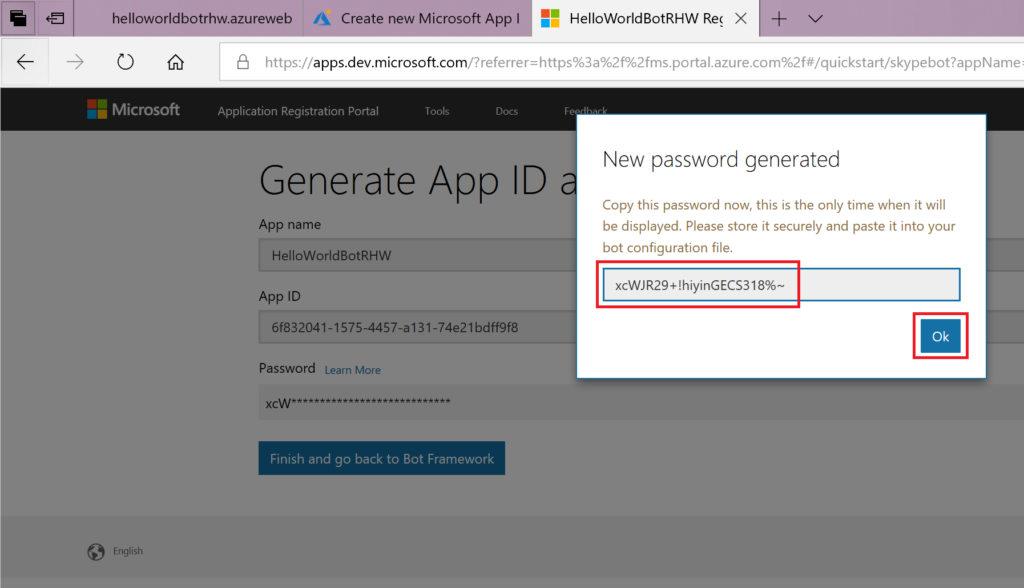
4. You’ll need to copy and save this password for use later and then click OK.
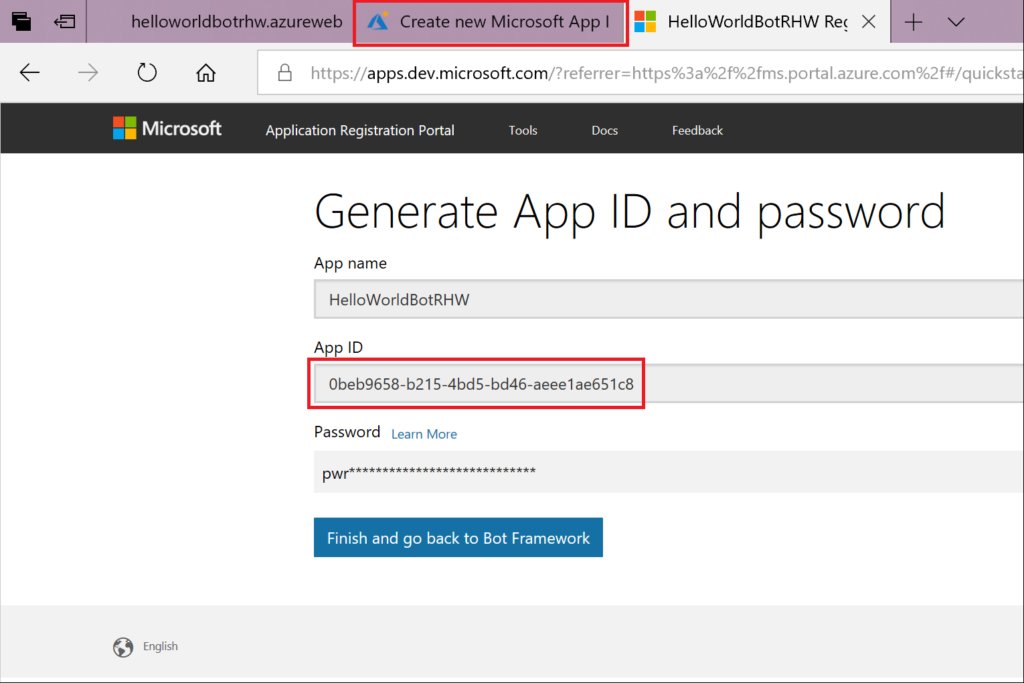
5. You also need to copy and save the App ID since we’ll need it in the next step too. The Finish and go back to Bot Framework button does not work so you’ll have to manually flip back to Azure Commercial portal tab in your browser.
6. After you flip back to the Azure Commercial portal, paste the App ID and Password you saved from the previous steps into their respective fields and then click OK and, finally, click Create.
7. Now, switch back to Visual Studio and copy and paste App ID and password from the previous step and paste them into web.config file as shown below: <appSettings> <!– update these with your BotId, Microsoft App Id and your Microsoft App Password–> <add key=”BotId” value=”” /> <add key=”MicrosoftAppId” value=”0beb9658-b215-4bd5-bd46-aeee1ae651c8” /> <add key=”MicrosoftAppPassword” value=”xcWJR29+!hiyinGECS318%~” /> </appSettings>
Note: You should never store the app password in the web.config for production applications and instead store it in Azure Key Vault so the password is safe and then write code to retrieve it from Azure Key Vault.
8. Since we updated the web.config we’ll need to right-click the project in the Solution Explorer and select Publish to re-publish the app. Since we’ve already published once we can just click the Publish button on the Publishing page to start the re-publishing process.
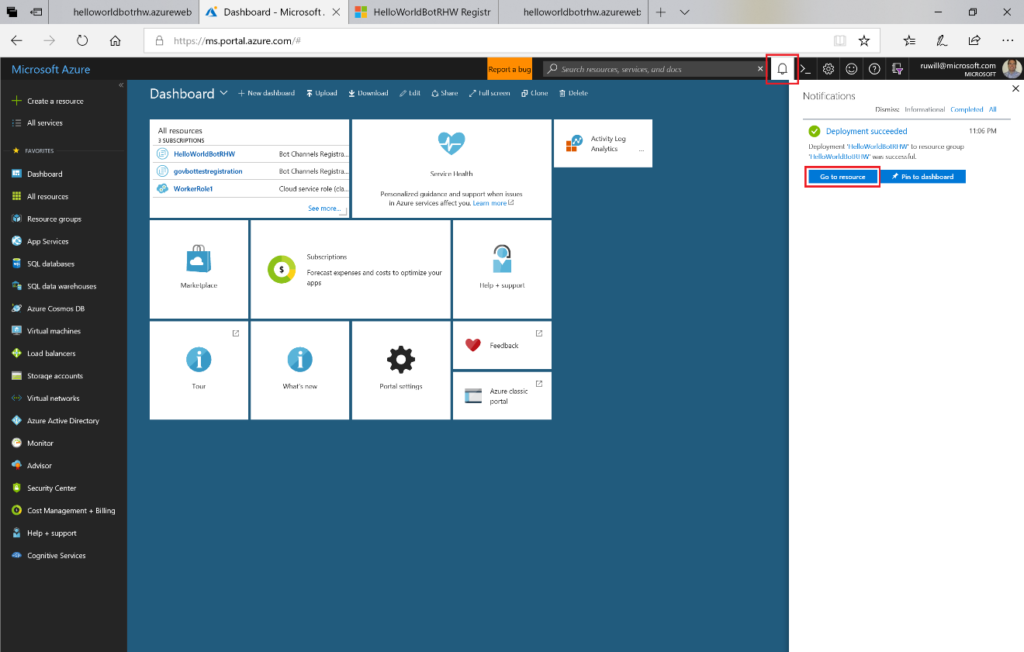
9. Switch back to the Azure Commercial portal and click the “Bell” icon in upper right portion of screen and when the creation process is finished, you’ll see a Go to Resource button that you can click.
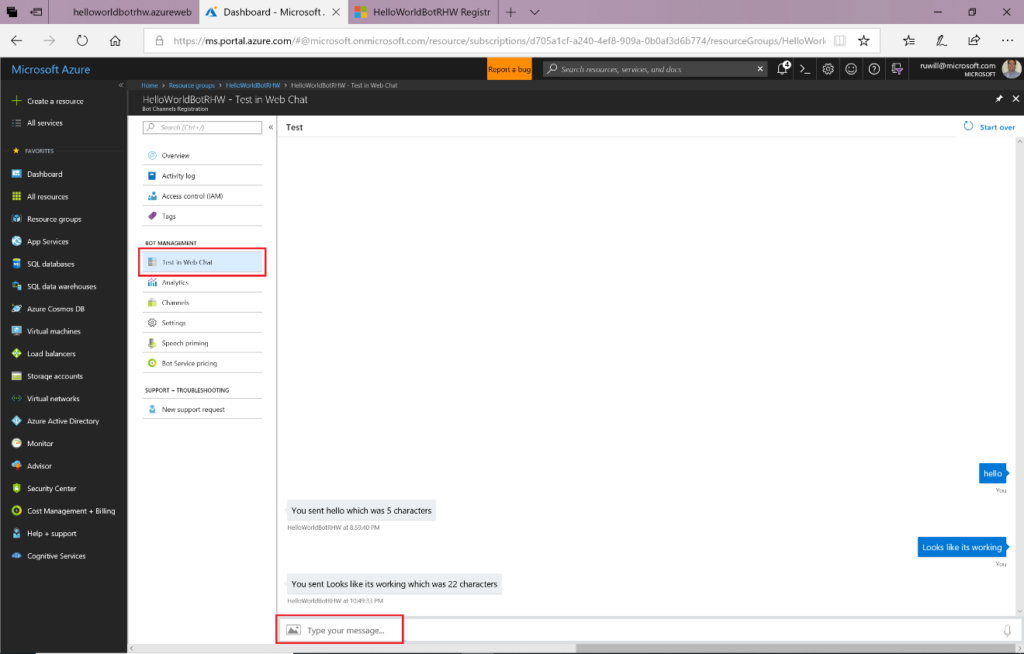
10. Click Test in Web Chat from left hand menu in the blade and type “hello” at bottom of test windows and hit Enter and you should see what you typed echoed back to you with a word count.
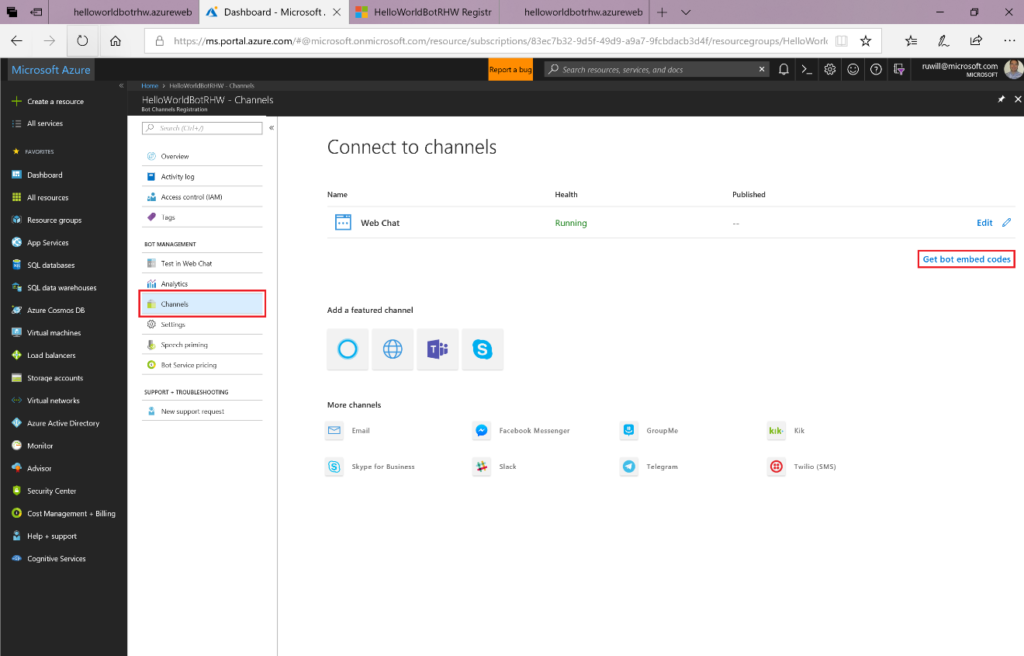
11. Now that we’ve used the portal to prove the Bot Channel Registration is working, let’s create a real messaging client and use it to send messages to your bot. To do this, click Channels from left hand menu in the blade and then click Get bot embeded codes.
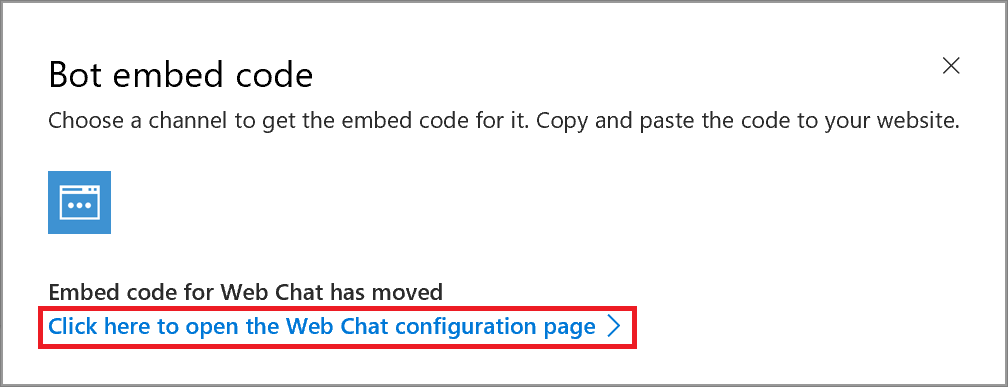
12. In the Bot embed code dialog, click Click here to open the Web Chat configuration page link.
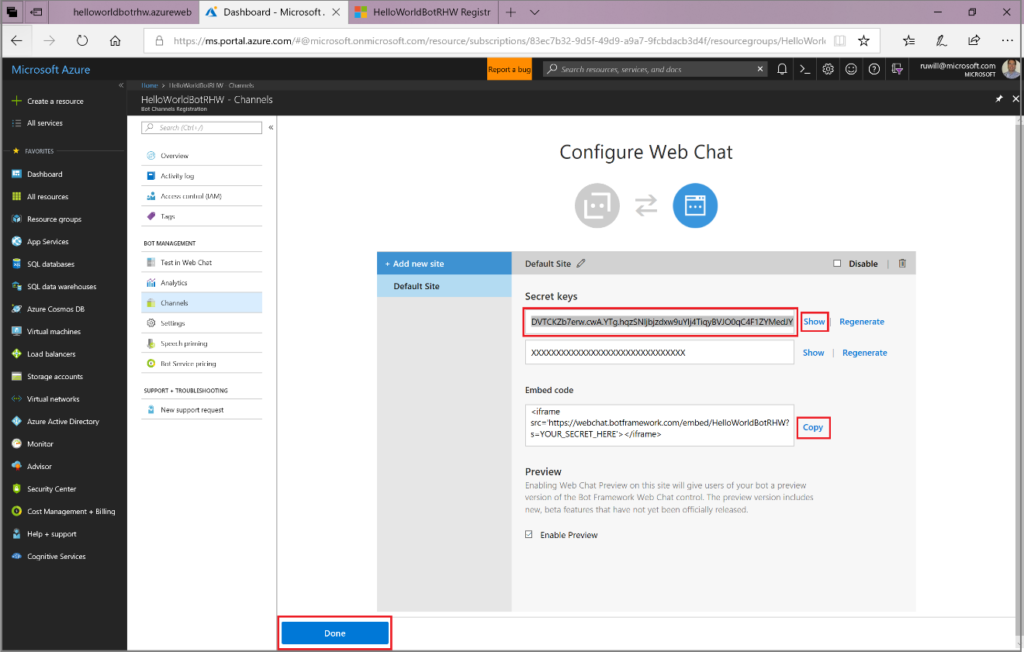
13. Now click the Show button next to the Secret Keys entry field and then click in the Secret key entry field and enter Control-A and then Control-C to copy the secret key and save it somewhere. Next, click Copy next to the Embed Code and save it somewhere and then click Done.
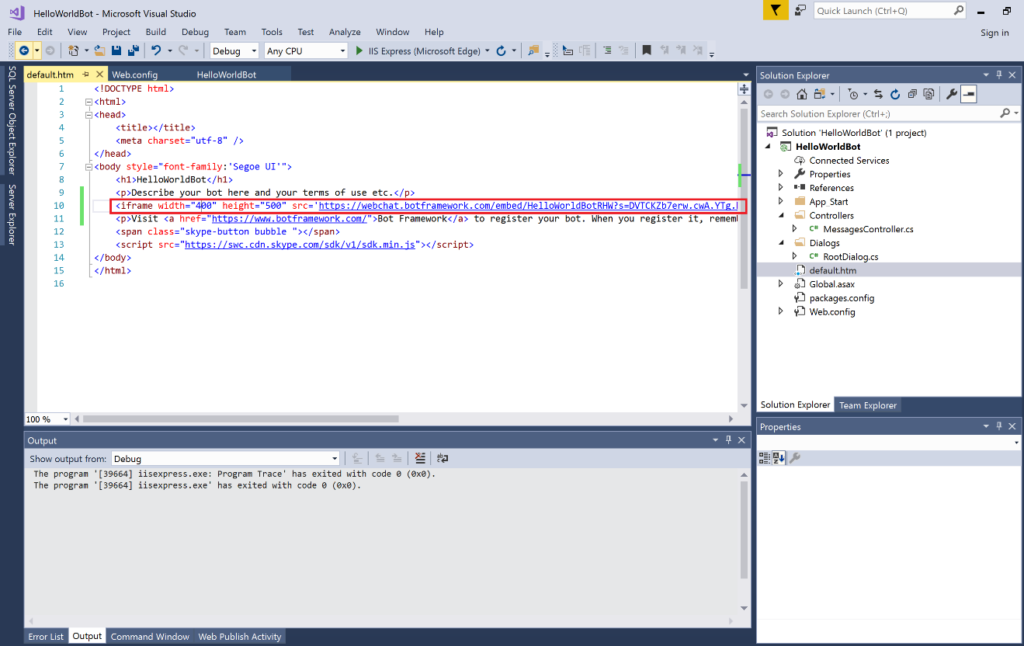
14. Edit the Embed Code (i.e. the <iFrame /> you just saved) and replace YOUR_SECRET_HERE with the secret key you saved in the previous step and then add width=”400″ height=”500″ so it looks something like this: <iframe width=”400″ height=”500″ src=’https://webchat.botframework.com/embed/HelloWorldBotRHW?s=DVTCKZb7erw.cwA.YTg.hqzSNljbjzdxw9uYlj4TiqyBVJO0qC4F1ZYMedJYltM’></iframe>
15. Now copy the <iFrame /> string you edited in the previous step and switch to Visual Studio and open default.htm and paste it in somewhere reasonable.
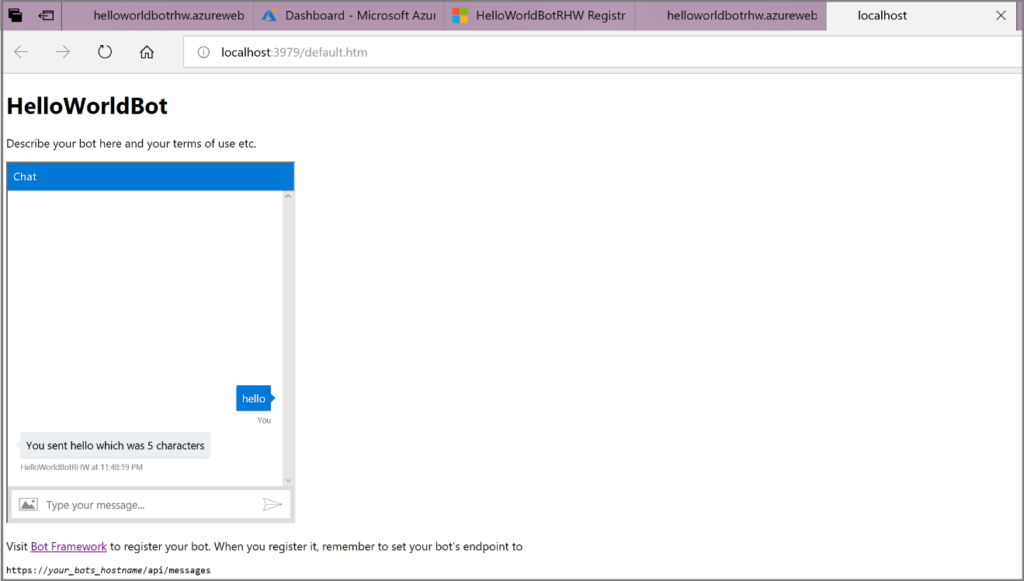
16. Hit F5 to run the app and test it out by typing in Hello and hitting Enter key. When you have proven that the Web Chat Channel is working locally, you can republish the bot by repeating Step 8 in Task 2 so the world can try out your new bot!
Next Steps Now that you have the foundation of the Microsoft Bot Framework working, you can enable any of the other channels you see on the Channels blade from Step 11 on Task 2. You can then expand your exploration by incorporating LUIS, QnA Maker, and other Cognitive Services to build solutions that truly unlock the power of Conversational AI.
We welcome your comments and suggestions to help us improve your Azure Government experience. To stay up to date on all things Azure Government, be sure to subscribe to our RSS feed and to receive emails by clicking “Subscribe by Email!” on the Azure Government Blog.


0 comments