

Guest Post
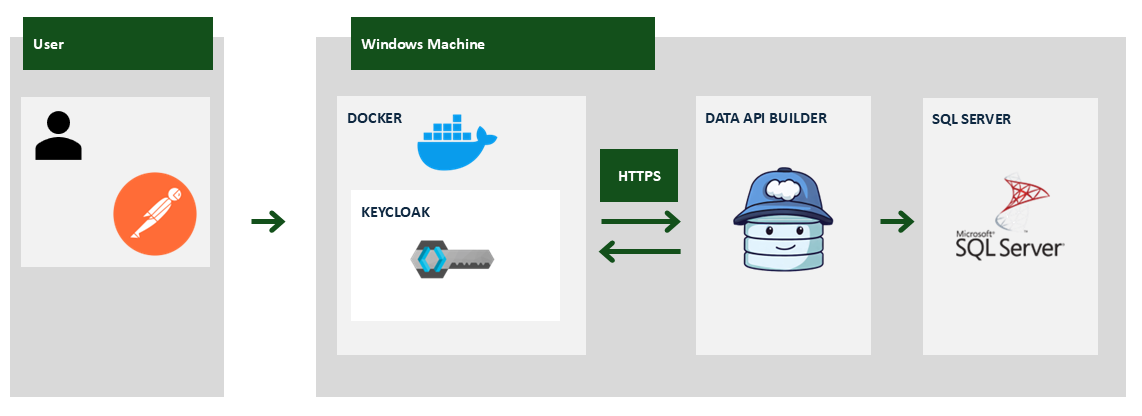
Alessio Tugnoli is a Data Engineer at IBM and a SME within the Data & AI practice. He delivers modern data warehouse solutions, leveraging his expertise in SQL, Python, distributed systems, and Azure Cloud — with Docker always present in his toolbox. Passionate about cybersecurity, he is constantly exploring, testing, and sharing new technologies. Thanks Alessio!In this article, we’ll explore how to create a secure, on-premises API using Data API Builder (DAB), Keycloak, and SQL Server. You’ll learn to set up JSON Web Token (JWT) authentication with Role-Based Access Control (RBAC), Attribute-Based Access Control (ABAC), and Row-Level Security (RLS), ideal for secure business scenarios.
Want to replicate this setup?
All the configuration files, SQL scripts, and Docker setup used in this article are available here: https://github.com/yougnoli/secure-onprem-api-dab-keycloak-sqlserver
Technologies Overview
- Data API Builder (DAB): A cross-platform tool from Microsoft that allows developers to easily expose REST and GraphQL APIs directly from databases, with built-in support for secure authentication, authorization, and integration with Azure and on-premises environments.
- Keycloak: An open-source identity management solution that provides comprehensive authentication and authorization capabilities, including JWT-based security with protocols such as OpenID Connect, OAuth2, and SAML.
- SQL Server: Microsoft’s enterprise-grade database solution that supports advanced security measures, including RLS for granular data protection.
What We’ll Cover
- Installing and configuring Data API Builder
- Setting up SQL Server for RLS
- Securely integrating Keycloak with JWT tokens and setting up for RBAC and ABAC
- Validating API security with Postman
RBAC and ABAC Explained
In this implementation, security is managed using two key methodologies:
- RBAC (Role-Based Access Control): Assigns permissions to roles rather than individuals, simplifying permission management. Users are given roles (like
reader) which determine their allowed operations. - ABAC (Attribute-Based Access Control): Uses dynamic attributes (e.g., privacy levels assigned to users) to determine access. It allows for flexible policies that adapt to user attributes, ensuring users can access only the data they’re authorized for.
An example of RBAC and ABAC in the configuration file:

Prerequisites
Step 1: Install Data API Builder
Follow Microsoft’s official installation guide: Installing the Data API Builder CLI.
Step 2: Configure SQL Server (local installation)
On our local Windows machine, SQL Server will be running alongside Data API Builder, simplifying our environment setup.
Use the following SQL script to create the database and Orders table necessary for implementing security configurations:
CREATE DATABASE Test;
GO

CREATE LOGIN Oscar WITH PASSWORD = 'SecurePassword123!';
CREATE LOGIN Hannah WITH PASSWORD = 'AnotherSecurePassword456!';
GO

USE Test;
GO

CREATE USER Oscar FOR LOGIN Oscar;
CREATE USER Hannah FOR LOGIN Hannah;
GO

ALTER ROLE db_datareader ADD MEMBER Oscar;
ALTER ROLE db_datareader ADD MEMBER Hannah;
GO

CREATE TABLE Orders (
    id INT IDENTITY(1,1) PRIMARY KEY,
    username NVARCHAR(100) NOT NULL,
    orderid INT NOT NULL,
    privacyLevel INT NOT NULL,
    info NVARCHAR(255)
);
GO

INSERT INTO Orders (username, orderid, privacyLevel, info)
VALUES
('Oscar', 1001, 1, 'Order details for Oscar #1'),
('Oscar', 1002, 1, 'Order details for Oscar #2'),
('Hannah', 1003, 1, 'Order details for Hannah #1'),
('Oscar', 1004, 3, 'Order details for Oscar #3'),
('Oscar', 1005, 2, 'Order details for Oscar #4'),
('Hannah', 1006, 2, 'Order details for Hannah #2');
GO
This SQL script creates an Orders table with a privacyLevel column by allowing granular data access control. Orders are associated with users Oscar and Hannah, and will be used for validating our RLS and ABAC configurations.
Implement Row-Level Security:
CREATE FUNCTION dbo.f_Orders(@username varchar(max))
RETURNS TABLE
WITH SCHEMABINDING
AS RETURN SELECT 1 AS fn_securitypredicate_result
WHERE @username = CAST(SESSION_CONTEXT(N'preferred_username') AS varchar(max));
GO

CREATE SECURITY POLICY dbo.SecurityPolicy_Orders
ADD FILTER PREDICATE dbo.f_Orders(username)
ON dbo.Orders;
GO
This RLS configuration ensures that only rows matching the current user’s username (provided by Keycloak in the preferred_username claim) are visible. The username is passed to SQL Server via the session context, enabled by setting set-session-context to true in the Data API Builder (dab-config.json) configuration file.
Step 3: Environment Variables
To avoid hardcoding sensitive information, create .env for sensitive configurations:
# SQL Server connection string
SQL_CONNECTION_STRING=Server=localhost; User Id=sa; Database=Test; password=VeryStrongPassword123$; TrustServerCertificate=True; Encrypt=True;
# HTTPS configuration for DAB
ASPNETCORE_URLS=https://localhost:5001;http://localhost:5000
This approach improves the security and maintainability of the project by allowing sensitive data to be separated from the source code.
Step 4: Creating a Self-Signed Certificate for HTTPS
It’s essential for Keycloak (or any JWT provider) to run over HTTPS because DAB requires secure communication to fetch and validate JWT signing keys. If using a self-signed certificate, you must install it on the host machine running DAB.
Folder Structure
The final structure of our demo solution will look like this:
project-root/
│
├── Dockerfile
├── dab-config.json
├── .env
└── certs/
    ├── keycloak.crt
    └── keycloak.key
(Note: Some files and folders will be created in later steps.)
Generate Certificate
Install WSL if needed (via PowerShell as administrator):
wsl --installGenerate the self-signed certificate using WSL terminal (in the certs folder):
openssl req -x509 -newkey rsa:4096 -keyout keycloak.key -out keycloak.crt -days 365 -nodes -subj "/CN=localhost"Install Certificate on Windows
Transfer keycloak.crt from WSL to Windows, then:
- Double-click
keycloak.crt - Follow the wizard and install it in the “Trusted Root Certification Authorities” store.
Step 5: Setup Keycloak with Docker
Keycloak is an open-source identity and access management solution providing robust authentication and authorization capabilities using standards such as OpenID Connect, OAuth2, and SAML. For this demo, Keycloak will be configured to run securely over HTTPS within a Docker container.
The following Dockerfile sets up Keycloak, copies the previously generated HTTPS certificate and private key into the container, configures the admin credentials, and starts the Keycloak server in HTTPS mode:
FROM quay.io/keycloak/keycloak:latest
# Copy certificates to container
COPY certs/keycloak.crt /etc/x509/https/tls.crt
COPY certs/keycloak.key /etc/x509/https/tls.key
# Set environment variables for admin user
ENV KEYCLOAK_ADMIN=admin
ENV KEYCLOAK_ADMIN_PASSWORD=admin
# Launch the server with HTTPS configuration
ENTRYPOINT ["/opt/keycloak/bin/kc.sh", "start", "--https-certificate-file=/etc/x509/https/tls.crt", "--https-certificate-key-file=/etc/x509/https/tls.key", "--hostname-strict=false"]- The
FROMinstruction uses the latest official Keycloak Docker image. - SSL certificates are copied into the container to enable HTTPS.
- Admin credentials are set via environment variables.
- Keycloak server is launched with HTTPS explicitly configured.
Build the Docker image with the following command:
docker build -t keycloak-https .
Then, run the container in detached mode, mapping port 8443 on the host to port 8443 in the container:
docker run -d --name keycloak-https -p 8443:8443 keycloak-https
Once the Keycloak container is running, you can access the administration UI by navigating to:
https://localhost:8443Log in using the default admin credentials:
- Username:
admin - Password:
admin
After successfully logging in, you will be ready to configure users, roles, and JWT tokens within Keycloak.
Step 6: Keycloak Configuration for Secure API
Creating a Realm
A Realm in Keycloak is a security domain that encapsulates users, roles, and clients into an isolated security management context.
- Select Create Realm from the left menu.
- Provide a Realm name (e.g.,
TestDAB).
Disabling Mandatory Actions for Testing
To simplify testing:
- Authentication from the left menu > Required Actions: disable all mandatory actions like email verification and password updates.
Setting up Roles and Attributes (RBAC & ABAC)
To support ABAC policies in DAB, create a privacy attribute for users:
- Realm Settings from the left menu > User Profile: Add new attribute (
privacyLevel, Required field: On).

We will find this attribute in the Users section when we create users.
To support RBAC, create a reader role in Realm roles to determine the permissions available to users:
- Realm roles from the left menu > Create role: Enter new Role name (
reader).
Creating Users
Add users corresponding to those created earlier in the SQL Server database:
- From the left menu, click Users, then select Create new user.
- Create users:
- Username:
Oscar - privacyLevel:
2
- Username:
- From the upper tab, click Credentials and set a permanent password after disabling the temporary option.
- From the upper tab, click Role mapping > Assign role > Filter by realm roles (in the table at the top left) > Assign the
readerrole.
Configure similarly for the Hannah user profile.
Creating a Client Scope for reader Role and privacyLevel Attribute
To have the claims associated in the token with the created role and attribute, create the client scopes:
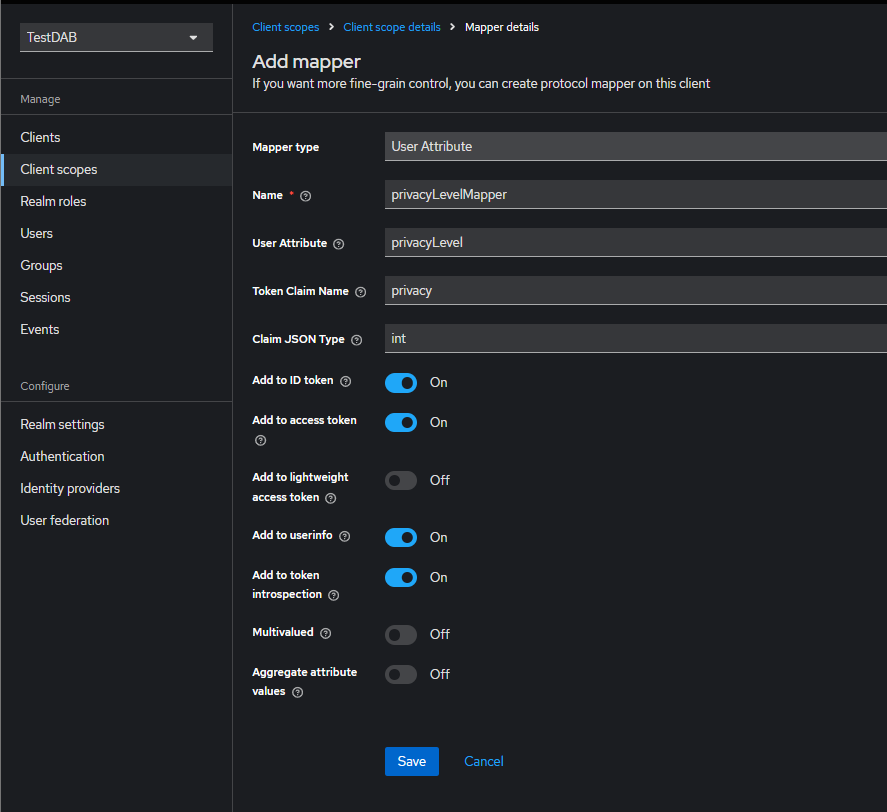
privacyLevel Attribute:
- From the left menu, click Client Scopes, then select Create client scope.
- Name:
privacyLevelScope - Type: Default
- Include in token scope: On
- Name:
- From the upper tab, click Mappers > Configure a new mapper > User Attribute
- Name:
privacyLevelMapper - User Attribute:
privacyLevel - Claim JSON Type: int
- Name:
reader Role:
- From the left menu, click Client Scopes, then select Create client scope.
- Name:
rolesScope - Type: Default
- Include in token scope: On
- Name:
- From the upper tab, click Mappers > Configure a new mapper > User Realm Role
- Name:
rolesMapper - Multivalued: On
- Claim JSON Type: String
- Name:

Configuring a Client
The Client represents the application protected by Keycloak. Create the client with the following settings:
- From the left menu, click Clients, then select Create client.
- Client ID:
dab-client - Authentication flow: Direct access grants (“Resource Owner Password Credentials Grant”). Useful for quick testing, but not ideal in production because the client has access to username/password of user.

Leave the remaining settings as default.
Finally, associate the scopes (privacyLevelScope, rolesScope) created to the dab-client under Clients > dab-client > Client Scopes upper tab > Add client scope.
Note: they may have been imported automatically to the client. Verify in the list.

Add as Default.
Step 7: Testing the JWT Token in Postman
After configuring Keycloak, it is essential to verify that JWT tokens are generated correctly. This test will confirm that the authentication setup using the Resource Owner Password Credentials Grant method works as expected.
To obtain a JWT token from Keycloak, we’ll perform a POST request in Postman to the token endpoint of our configured realm.
- Method:
POST - URL:
https://localhost:8443/realms/TestDAB/protocol/openid-connect/token
In the Body section of our Postman request, select the x-www-form-urlencoded tab and include the following parameters:
| Key | Value | Description |
|---|---|---|
grant_type |
password |
Specifies the OAuth2 grant type |
client_id |
dab-client |
The Keycloak client ID you created |
username |
Oscar |
Username of the user for whom you’re generating the token |
password |
(User’s password) | The user’s password configured earlier in Keycloak |
This configuration allows Postman to send an authentication request to Keycloak, specifying that we want to obtain a JWT token for the user Oscar through the dab-client application.
When correctly configured, Keycloak responds with a JSON payload containing the JWT token within the access_token field.
To verify that our JWT token is correctly structured and contains the expected claims, copy the access_token value from the response in Postman and go to jwt.io:
- Paste the token into the “Encoded” section.
- Ensure the following claims match the configuration in our
dab-config.json(Step 8) file and our Keycloak setup:
-
iss(issuer URL)aud(audience)roles(assigned roles andreader)preferred_username(username)privacy(privacy attribute level)
Keycloak might include additional claims. If necessary, unnecessary claims can be removed through the Client Scopes settings in Keycloak for cleaner token management.
Step 8: Creation of the dab-config.json Configuration File
The dab-config.json file is the core configuration of Data API Builder (DAB). It defines how DAB connects and interacts with the SQL Server database, manages authentication, and specifies how data entities will be exposed through REST APIs and GraphQL.
Here’s the complete configuration file tailored for our scenario:
{
  "$schema": "https://github.com/Azure/data-api-builder/releases/download/v1.2.10/dab.draft.schema.json",
  "data-source": {
    "database-type": "mssql",
    "connection-string": "@env('SQL_CONNECTION_STRING')",
    "options": {
      "set-session-context": true
    }
  },
  "runtime": {
    "rest": {
      "enabled": true,
      "path": "/api",
      "request-body-strict": true
    },
    "graphql": {
      "enabled": true,
      "path": "/graphql",
      "allow-introspection": true
    },
    "host": {
      "cors": {
        "origins": ["*"],
        "allow-credentials": false
      },
      "authentication": {
        "provider": "AzureAD",
        "jwt": {
          "audience": "account",
          "issuer": "https://localhost:8443/realms/TestDAB"
        }
      },
      "mode": "development"
    }
  },
  "entities": {
    "Orders": {
      "source": {
        "object": "dbo.Orders",
        "type": "table"
      },
      "graphql": {
        "enabled": true,
        "type": {
          "singular": "Order",
          "plural": "Orders"
        }
      },
      "rest": {
        "enabled": true
      },
      "permissions": [
        {
          "role": "reader",
          "actions": [
            {
              "action": "read",
              "policy": {
                "database": "@item.privacyLevel lt @claims.privacy"
              }
            }
          ]
        }
      ]
    }
  }
}
Explanation of dab-config.json
data-source: Defines the database type (mssql) and securely references the SQL connection string using environment variables defined in the.envfile.set-session-context: This parameter is crucial as it enables DAB to pass JWT claims (e.g., username from Keycloak) into SQL Server’s session context. This allows SQL Server to enforce security policies such as Row-Level Security (RLS) accurately, based on the authenticated user’s identity.- Authentication Configuration:
provider: Set toAzureAD, which in this context means that DAB will validate JWT tokens provided by external identity providers compatible with OpenID Connect (such as Keycloak).- JWT Configuration:
audience: Must exactly match theaudclaim present in the JWT token generated by Keycloak (accountin this case).issuer: Must match the URL of your Keycloak realm (e.g.,https://localhost:8443/realms/TestDAB). This ensures that tokens are validated correctly.
- Entities Section (
Orders):- Defines how the SQL Server table (
dbo.Orders) is exposed via REST and GraphQL APIs. - Permissions: Implements both RBAC and ABAC:
- Assigns the
readerrole to users, aligning with RBAC principles. - Includes an ABAC-based policy, explicitly comparing the user’s JWT token
privacyclaim (@claims.privacy) to the database’sprivacyLevelcolumn. Users will only be able to read records with a privacy level lower than their assigned attribute.
- Assigns the
- Defines how the SQL Server table (
With this configuration, we’re now ready to start Data API Builder by executing the following command at the level of the dab-config.json file:
dab startStep 9: Final Test – Validate Secure API with Keycloak and DAB via Postman
Now that your environment is fully configured, it’s time to verify that the authentication and authorization setup is working correctly. We’ll use Postman to simulate API requests authenticated by JWT tokens issued by Keycloak:
| Property | Value |
|---|---|
| Method | GET |
| URL | https://localhost:5001/api/Orders |
| Authorization Header | Bearer <your_access_token> |
| Additional Headers | X-MS-API-ROLE: reader |
Make sure to replace [your_access_token] with the JWT token retrieved previously.
Orders table associated with the authenticated user (Oscar). For example:{
"value": [
{
"id": 1,
"username": "Oscar",
"orderid": 1001,
"privacyLevel": 1,
"info": "Order details for Oscar #1"
},
{
"id": 2,
"username": "Oscar",
"orderid": 1002,
"privacyLevel": 1,
"info": "Order details for Oscar #2"
}
]
}This result confirms that:
- RBAC: Only users assigned the
readerrole can read the Orders entity. - ABAC: Data access is correctly restricted based on the user’s assigned
privacylevel. - RLS: Users see only rows matching their username, thanks to SQL Server’s session context.
Final Considerations
This setup demonstrates a practical, secure configuration suitable for testing and development environments. Before moving to production, consider enhancing this solution with certificates from a trusted Certificate Authority (CA), implementing more granular security policies within Keycloak, and integrating robust auditing and logging mechanisms to ensure secure and traceable operations.
Thanks for reading the article and good work with Data API Builder and Keycloak!
0 comments