If you’ve ever used an application that didn’t include search functionality, you’ll know how important search is to help you find what you’re looking for. Whether you’re building an e-commerce site, an internal website for your company, or any other type of application, it’s important to help users quickly find what they’re looking for and search does just that.
With Azure Cognitive Search and the Azure SDKs, you can build a search application from scratch or infuse search into an existing application in just a few minutes. This blog post will walk you through the process of building and deploying a simple search application with Azure Cognitive Search and the new Azure SDK for Javascript/Typescript. We’ll first create an Azure Function to encapsulate the search client and query logic. After that, we’ll deploy a React template using Azure Static Web Apps to integrate our Azure Functions with a front-end.
This sample uses a demo search service and index hosted by Microsoft. To use this sample, you just need an IDE and access to an Azure subscription.
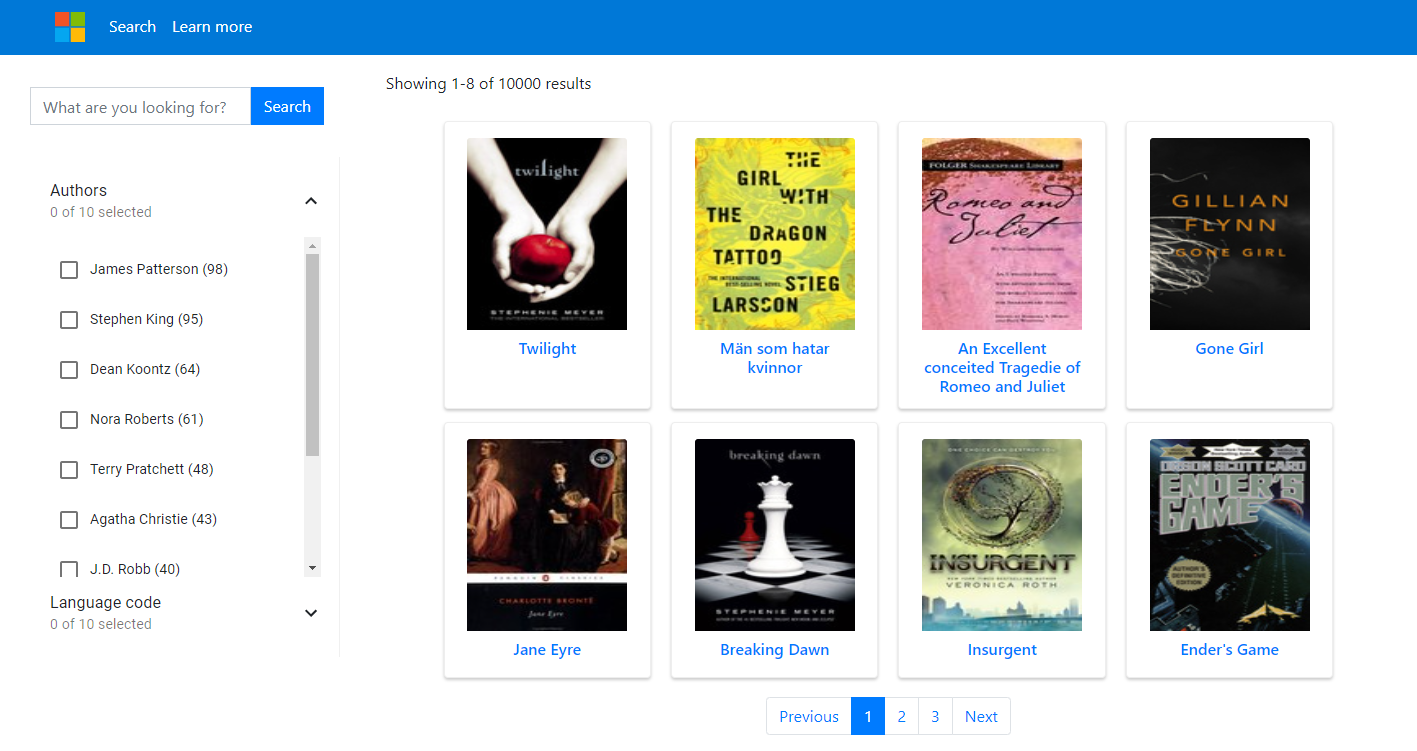
By the end of this post, you’ll know how to deploy a sample application that looks like this:

You can find the full code for this blog post at: aka.ms/search-react-template.
You can find the demo website at: aka.ms/azs-good-books.
Thinking through the search user experience
At a high level, there are three pieces of search functionality we need to add to an application to provide an intuitive search experience.
- Search – provides search functionality for the application.
- Suggest – provides suggestions as the user is typing in the search bar.
- Document Lookup – looks up a document by id to retrieve all of its contents for the details page.
Building the application
Connecting to a search index
For this blog post, I’ve created a search index using the goodbooks-10k dataset that that is publicly available using the following connection information:
"SearchServiceName": "azs-playground",
"SearchIndexName": "good-books",
"SearchAPIKey": "03097125077C18172260E41153975439"
The index consists of 10,000 popular books that we’ll search over in our application.
Forking the repo
If you want to follow along with this blog post, navigate to the repo and select Use this template.

This will create your own copy of the code that you can deploy and edit as you please.
Building the Azure Functions
With our search index and codebase in place, we’re ready to start building our application. The repo follows a pattern for Azure Static Web Apps that we’ll be using to build and deploy the application. The functions containing search logic can be found in the api folder.
One important consideration when building an application is keeping your API keys secure. It’s a best practice to design our application in a way that your API keys aren’t accessible from the client.
Azure Functions combined with the Azure SDKs are a simple and effective way to keep our keys out of users’ reach. These functions can also encapsulate any business logic you want to incorporate into the search experience such as security trimming or additional query proccesing.

Creating a search client
With all that said, we’re ready to get to the code. The api/search/index.js file contains the Azure Function for search that we’ll walk through below.
First, we import the @azure/search-documents library from the SDK as follows:
const { SearchClient, AzureKeyCredential } = require("@azure/search-documents");
Next, we declare a SearchClient. This client is declared outside of the main function so that we don’t create a new SearchClient every time the Azure Function is called.
const indexName = process.env["SearchIndexName"];
const apiKey = process.env["SearchApiKey"];
const searchServiceName = process.env["SearchServiceName"];

// Create a SearchClient to send queries
const client = new SearchClient(
    `https://${searchServiceName}.search.windows.net/`,
    indexName,
    new AzureKeyCredential(apiKey)
);

module.exports = async function (context, req) {
    // main function logic
    // remainder of code goes here
}
Note that the API key and other search service parameters are read in using process.env. This prevents our API key from being checked into source control and also gives us the flexibility to change these parameters from the Azure portal. For local development, these parameters are pulled from local.settings.json which should look like this:
{
  "IsEncrypted": false,
  "Values": {
    "AzureWebJobsStorage": "",
    "FUNCTIONS_WORKER_RUNTIME": "node",
    "SearchApiKey": "03097125077C18172260E41153975439",
    "SearchServiceName": "azs-playground",
    "SearchIndexName": "good-books",
    "SearchFacets": "authors*,language_code"
  }
}
If you need to limit access to the application or search index, this logic should be handled in the application layer. Fortunately, Azure Static Web Apps makes it easy to add authentication and authorization to help secure your data.
Defining helper functions
Before the core function logic, we also define two helper function. The first function reads in the facets from proccess.env and gets the types of facets. We do this because we need to create filters differently for fields that are arrays. Array fields should be followed by a * in the application settings such as authors* above:
// parses facets and their types
const readFacets = (facetString) => {
    let facets = facetString.split(",");
    let output = {};
    facets.forEach(function (f) {
        if (f.indexOf('*') > -1) {
            output[f.replace('*', '')] = 'array';
        } else {
            output[f] = 'string';
        }
    })
    return output;
}
The next function will take our filters and convert them into odata syntax that the search service can understand:
// creates filters in odata syntax
const createFilterExpression = (filterList, facets) => {
    let i = 0;
    let filterExpressions = [];

    while (i < filterList.length) {
        let field = filterList[i].field;
        let value = filterList[i].value;

        if (facets[field] === 'array') {
            filterExpressions.push(`${field}/any(t: search.in(t, '${value}', ','))`);
        } else {
            filterExpressions.push(`${field} eq '${value}'`);
        }
        i += 1;
    }

    return filterExpressions.join(' and ');
}
Adding the search logic
To start off the core function logic, we read in the parameters from the HTTP request. The facets parameter also comes from process.env because facets are used to create a UI component and are normally consistent across searches:
let q = (req.query.q || (req.body && req.body.q));
const top = (req.query.top || (req.body && req.body.top));
const skip = (req.query.skip || (req.body && req.body.skip));
const filters = (req.query.filter || (req.body && req.body.filters));
const facets = readFacets(process.env["SearchFacets"]);
For some basic error handling, we next check if the query string, q, is undefined or empty, and we set it to * if it is. Searching * tells the search service to search everything:
// If search term is empty, search everything
if (!q || q === "") {
    q = "*";
}
Now that the parameters are read in, we use them to create a searchOptions variable that adds additional parameters to the search:
// Creating SearchOptions for query
let searchOptions = {
    top: top, // number of results to return
    skip: skip, // number of results to skip; used for paging
    includeTotalCount: true, // includes the total number of results
    facets: Object.keys(facets), // facets to display on the web page
    filter: createFilterExpression(filters, facets) // filter to apply to the query
};
Next, we send our query to the service to get the search results:
// Sending the search request
const searchResults = await client.search(q, searchOptions);
Finally, we loop through the searchResults object to get the results and use them to create an HTTP response object that will be returned from our function:
// Getting results for output
const output = [];
for await (const result of searchResults.results) {
    output.push(result);
}

// Creating the HTTP Response
context.res = {
    // status: 200, /* Defaults to 200 */
    headers: {
        "Content-type": "application/json"
    },
    body: {
        count: searchResults.count,
        results: output,
        facets: searchResults.facets
    }
};
Handling errors
We’ll also want to do some basic error handling to make the application easier to debug. We do this by adding a simple try catch around our search logic. If our search logic fails, we’ll return a 400 and some details regarding the failure:
try {
    // search logic from above
} catch (error) {
    // logging the error
    context.log.error(error);

    // Creating the HTTP Response
    context.res = {
        status: 400,
        body: {
            innerStatusCode: error.statusCode || error.code,
            error: error.details || error.message
        }
    };
}
And with that, you have an Azure Function ready to add search functionality to an application. In the repo, you’ll find similar functions for suggestions and document lookup.
Deploying the application with Azure Static Web Apps
With the serverless function complete, we’re ready to connect the search functionality to a front end. In the src folder of the repo there is a React template that’s ready to go. Azure Static Web Apps will host both the front end and the back end of our application making the development and deployment of the application a seamless experience.
No changes are required to run this with the sample index.
To deploy the full application, you first need to create a Static Web App in the Azure portal. Click the button below to create one:
This will walk you through the process of creating the web app and connecting it to your GitHub repo.
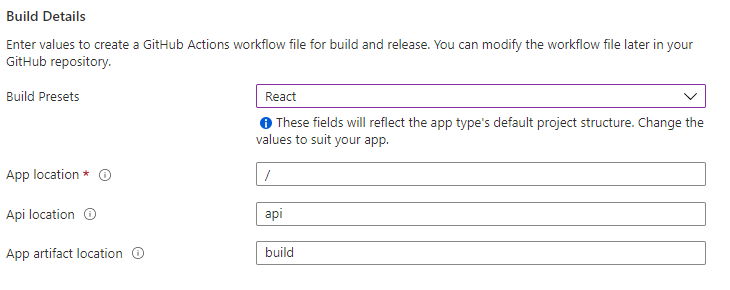
After connecting to the repo, you’ll be asked to include some build details. Set the Build Presets to React and then leave the other default values:

Once you create the static web app, it will automatically deploy the web app to a URL you can find within the portal.

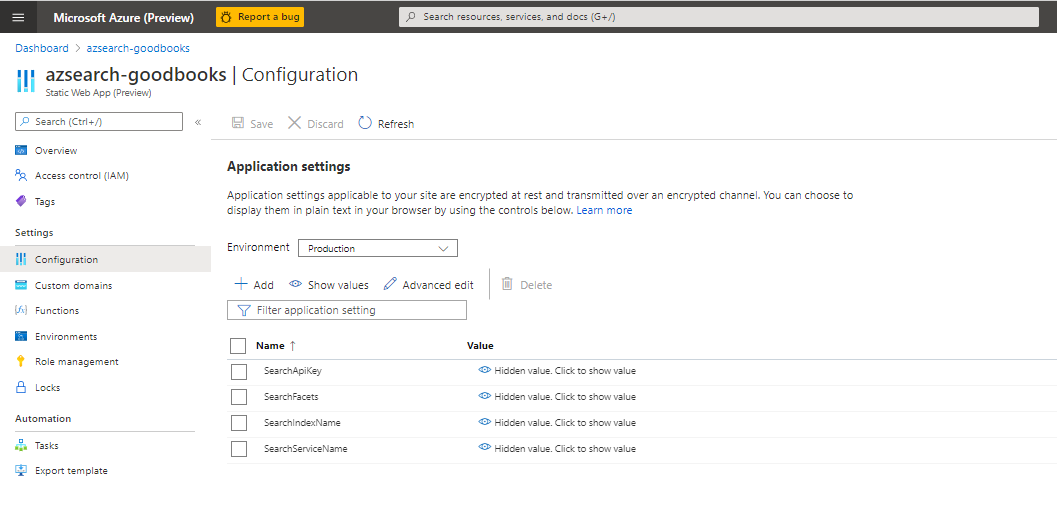
The last thing you need to do is select configuration and then edit the application settings to add the credentials from local.settings.json. It may take a few minutes for this blade to become available in the portal.

This post won’t dig into some of the details on building Azure Static Web Apps. However, they’re a valuable tool and if you’re interested in learning more about them, check out the documentation.
Use your own index
After deploying this sample, I’d encourage you to try it out with your own search index.
Up until now, you’ve been working with an existing index, but creating and loading an index with your own data is straightforward. You can create an index in the Azure portal, use the REST APIs, or use any of the Azure SDKs such as the new Azure SDK for Javascript/TypeScript that we used in this blob post. Please see the Azure Cognitive Search documentation for more information on how to get started.
There are two main changes you’d need to make to use your own index:
1. Edit application settings in the portal
Navigate to the Azure portal -> find your Azure Static Web App -> select configuration -> edit the application settings.
2. Update Result and Detail components
Much of the UI won’t require customization, however, if you integrate a new index with this template, you’ll likely need to update the Results component and the Details component to reflect the fields in your index.
To give an example, the following code renders the results on the search page in src/components/Results/Result/Result.js. The properties id, image_url, and original_title of props.document all correspond to fields in the search index and should be updated to reflect the fields in your own search index:
<div className="card result">
    <a href={`/details/${props.document.id}`}>
        <img className="card-img-top" src={props.document.image_url} alt="book cover"></img>
        <div className="card-body">
            <h6 className="title-style">{props.document.original_title}</h6>
        </div>
    </a>
</div>
Check out the docs folder of the repo for more detail on customizing the web app.
Azure SDK Blog Contributions
Thank you for reading this Azure SDK blog post! We hope that you learned something new and welcome you to share this post. We are open to Azure SDK blog contributions. Please contact us at azsdkblog@microsoft.com with your topic and we’ll get you setup as a guest blogger.
Azure SDK Links
- Azure SDK Website: aka.ms/azsdk
- Azure SDK Intro (3 minute video): aka.ms/azsdk/intro
- Azure SDK Intro Deck (PowerPoint deck): aka.ms/azsdk/intro/deck
- Azure SDK Releases: aka.ms/azsdk/releases
- Azure SDK Blog: aka.ms/azsdk/blog
- Azure SDK Twitter: twitter.com/AzureSDK
- Azure SDK Design Guidelines: aka.ms/azsdk/guide
- Azure SDKs & Tools: azure.microsoft.com/downloads
- Azure SDK Central Repository: github.com/azure/azure-sdk
- Azure SDK for .NET: github.com/azure/azure-sdk-for-net
- Azure SDK for Java: github.com/azure/azure-sdk-for-java
- Azure SDK for Python: github.com/azure/azure-sdk-for-python
- Azure SDK for JavaScript/TypeScript: github.com/azure/azure-sdk-for-js
- Azure SDK for Android: github.com/Azure/azure-sdk-for-android
- Azure SDK for iOS: github.com/Azure/azure-sdk-for-ios
- Azure SDK for Go: github.com/Azure/azure-sdk-for-go
- Azure SDK for C: github.com/Azure/azure-sdk-for-c
- Azure SDK for C++: github.com/Azure/azure-sdk-for-cpp


0 comments