This is a guest post by Slava Chernikoff, Principal Engineer at Binwell.
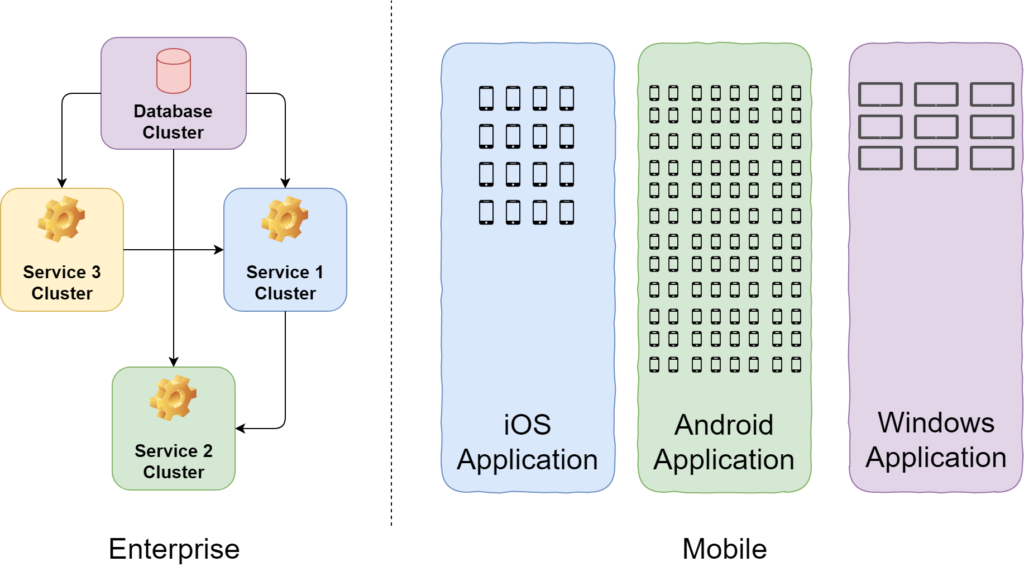
Mobile DevOps falls under the umbrella of enterprise DevOps, since mobile applications are primarily a user interface for interacting with external IT systems. Mobile teams tend to have a much smaller scale, however, plus has its own unique challenges in multiple platforms and devices. You can find the high-level difference between mobile and enterprise applications in Figure 1.
Our focus in this blog is helping you setup a mobile CI/CD solution using Visual Studio App Center.
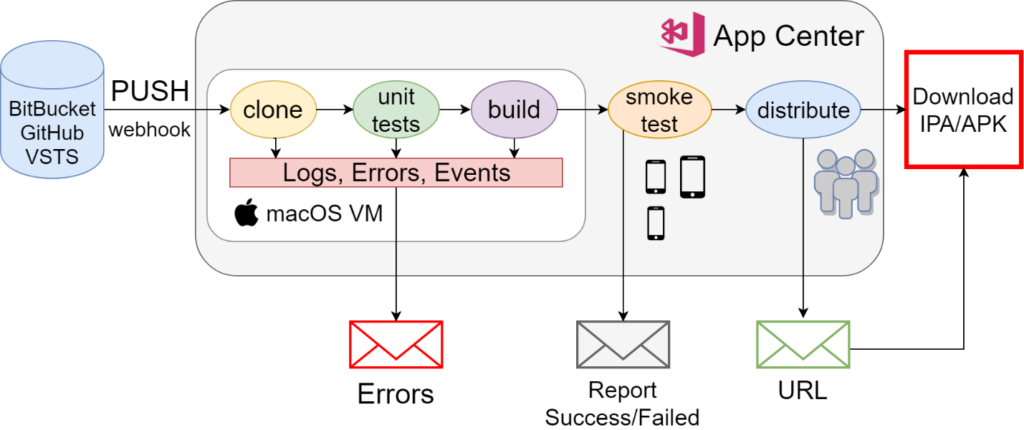
Toolkits for building and publishing installation packages have been around for a long time. Typically, this is a set of scripts that is used on the build machine in the mobile development team. Figure 2 shows the general process of Mobile CI/CD. Recently however, cloud services have started to gain popularity for the implementation of CI/CD, which is where App Center comes into play.
1.1 Build Tools
You can run the CI/CD-pipeline either independently or via your enterprise collaboration tool command – in our case, Slack, or automatically for every push to the repository. With cloud CI/CD it is better to configure the automatic option, as this will shorten the way of receiving information about errors. Below are the necessary settings for the build pipeline in App Center (add the project in App Center, connect the code repository and configure Build for different branches – see Figure 3).
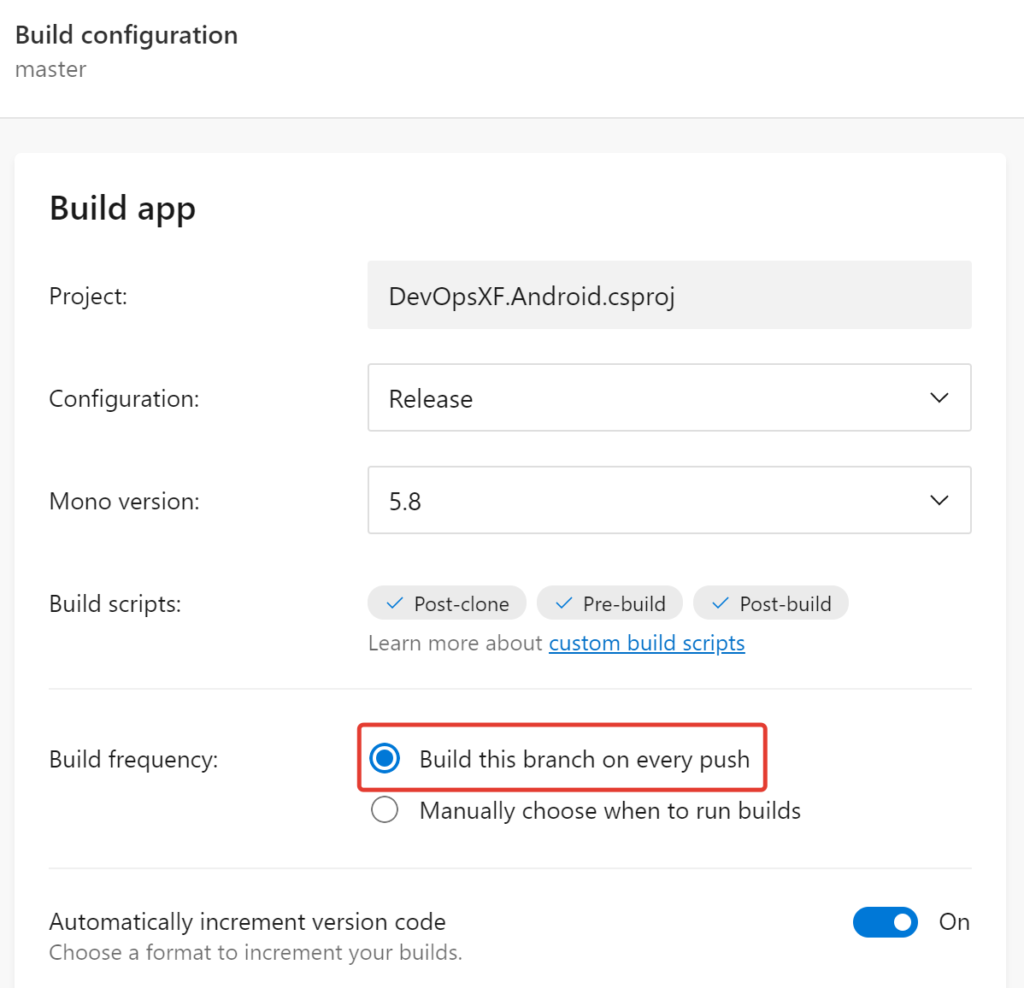
Manual mode is best left for more complex scenarios – for example, preparing a separate assembly for A/B testing, or running a wider set of functional tests before delivery to beta users.
In order to run test automation in App Center from your build configuration, you need to write bash-scripts for iOS/Android and put them in the project folder:
- appcenter-post-clone.sh – starts right after the remote repository is cloned on the build-machine (mac for iOS/Android). You can run unit tests here:
- appcenter-pre-build.sh – it is executed before the application build, here it is possible, for example, to write BUILD_ID in the application version (x.y.BUILD_ID);
- appcenter-post-build.sh – starts immediately after the successful building of the application. At this step, you can run custom Smoke tests on real smartphones/tablets or advanced Acceptance or tests.
Since the building (including packaging and signing) of actual mobile applications takes quite a long time (more than 5-10 minutes), you can run unit-tests on post-clone or pre-build steps, this will allow quick diagnostics of key mechanisms. But Smoke testing, which is highly recommended in mobile development, should be done after the build. This will verify that the application, at least, will run on real smartphones with the required OS versions.
1.2 Cloud Build Machines
In order to build applications in the App Center, virtual Macs working on Apple hardware are used. These machines have a rich set of tools that you can also use in your bash scripts – see Figure 4.
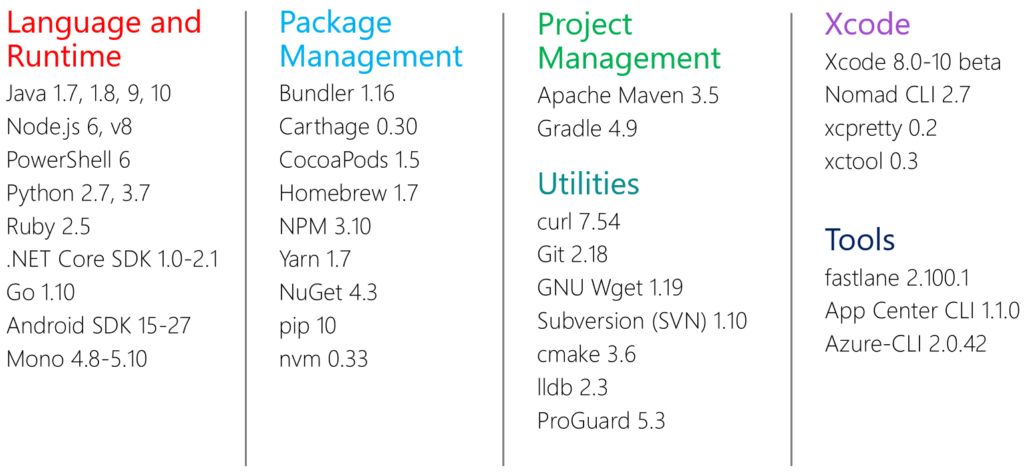
For more details on App Center Cloud Build Machines: https://docs.microsoft.com/en-us/appcenter/build/software
And then we’ll look at the scripts themselves.
1.3 Custom Scripts for Build Steps
If you have not written shell scripts for bash, then you need to practice a little and read the documentation: bing.com/search?q=bash+for+beginners
In our example, we created an automatic CI/CD pipeline for the master branch in the repository on GitHub: https://github.com/SlavaChernikoff/DevOpsXF.
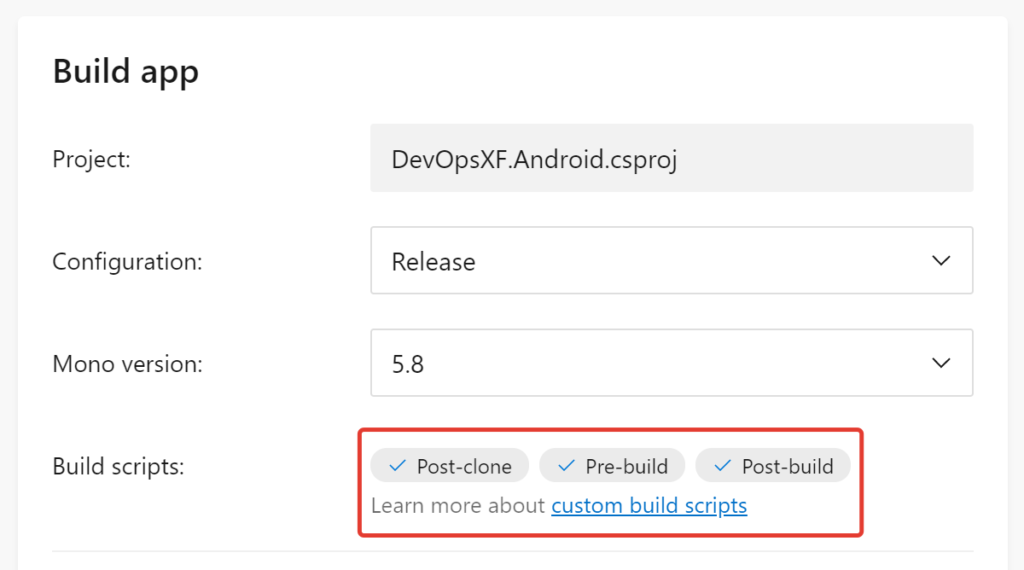
As you can see in Figure 5, App Center automatically found our scripts that were added to the project folder (where the .xcodeproj, build.gradle, .csproj, .sln or package.json files are located).

When writing scripts, it may be necessary to use bash environment variables – an external script or the program writes its variable to the bash session, for example APPCENTER_SOURCE_DIRECTORY and this allows to use the value of this variable in your scripts. Key pre-defined environment variables in App Center:
| APPCENTER_BUILD_ID | Build number – increases by 1 for each build start |
| APPCENTER_BRANCH | The repository branch from which to run the build |
| APPCENTER_OUTPUT_DIRECTORY | The folder in which the build results will be stored – IPA/APK packages, other binary files |
| APPCENTER_TRIGGER | How the build script was started – manually on the App Center web site (“manual” value) or automatically when pushing into the repository (“continuous”) |
Read more: docs.microsoft.com/en-us/appcenter/build/custom/variables
You can also configure your environment variables in the build parameters (see Figure 7).
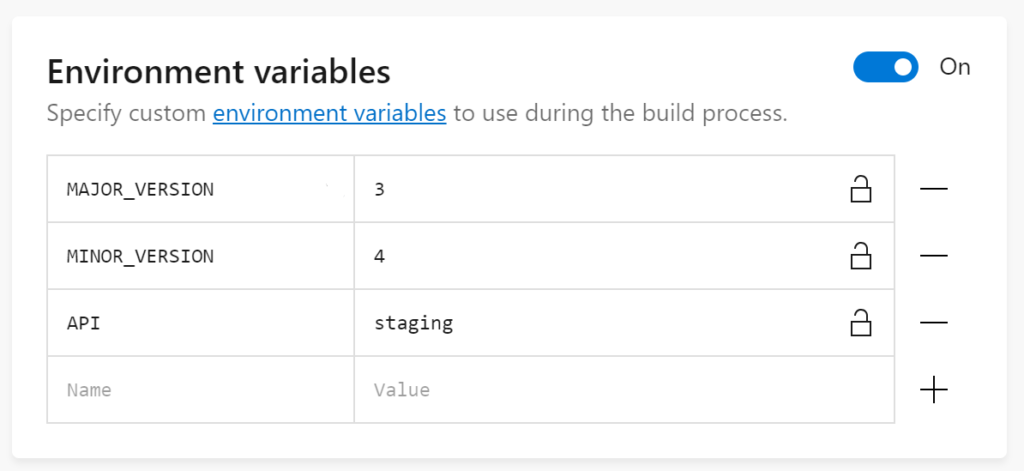
In your scripts, you can use the variables $MAJOR_VERSION and $MINOR_VERSION, as shown in the example for appcenter-pre-build.sh. In your scripts you can also modify your application source code with regular expressions and shell tools/commands.
Now let’s look at each script separately. We’ll start with the post-clone step, which will start Unit-tests. All examples are provided for Xamarin based Android project.
appcenter-post-clone.sh
| #!/usr/bin/env bash -e
echo “Found Unit test projects:” find $APPCENTER_SOURCE_DIRECTORY -regex ‘.*UnitTests.*\.csproj’ -exec echo {} \; echo echo “Run Unit test projects:” find $APPCENTER_SOURCE_DIRECTORY -regex ‘.*UnitTests.*\.csproj’ | xargs dotnet test; |
As you can see, the script searches for folders with .csproj-files (Visual Studio projects), the name of which contains UnitTests and runs unit-tests based on NUnit or MSTest. In our example, unit-tests are implemented on with .NET Core and MSTest. You can use any familiar tools for unit-testing, depending on the framework which you will use to develop application.
appcenter-pre-build.sh
| #!/usr/bin/env bash -e
MANIFEST=”$APPCENTER_SOURCE_DIRECTORY/DevOpsXF.Android/Properties/AndroidManifest.xml” NEW_VERSION=${MAJOR_VERSION}.${MINOR_VERSION}.${APPCENTER_BUILD_ID} sed -i -e “s/versionName=\”.*\”/versionName=\”${NEW_VERSION}\”/g” $MANIFEST |
In this step, you can add BUILD_ID to the version of the application in the format MAJOR_VERSION.MINOR_VERSION.BUILD_ID. We can also perform any additional actions here before the build.
appcenter-post-build.sh
| #!/usr/bin/env bash -e
uiTestProjectName=”DevOpsXF.UITests” appFileName=”com.binwell.DevOpsXF.apk” locale=”ru_RU” if [ “$APPCENTER_BRANCH” == “master” ]; then msbuild $APPCENTER_SOURCE_DIRECTORY/$uiTestProjectName/ /p:Configuration=Release appcenter test run uitest –app $appName –devices “slavachernikoff/Smoke” –test-series “Smoke” –include-category “Smoke” \ –app-path $APPCENTER_OUTPUT_DIRECTORY/$appFileName –locale $locale –build-dir $APPCENTER_SOURCE_DIRECTORY/$uiTestProjectName/bin/Release \ –token $APPCENTER_TOKEN fi |
If the build has reached this step, then you have APK/IPA installation package. For many teams, the CI/CD pipeline was interrupted at this step, as it was required to check on actual devices, and on-premise device farms for UI-tests was a luxury. The provided script uses the App Center Test Cloud for automatic custom Smoke tests (based on Xamarin.UITest) to run the application. More details about automatic testing will be covered in the next article.
2. Automatic Testing as Part of Mobile CI/CD
As we mentioned earlier, mobile development has 3 distinct problem areas:
- Different screen resolutions of devices. Regardless of the number of pixels or aspect ratio, the application interface should be correctly displayed on all devices.
- Different operation systems and their versions. The application should work correctly on a wide range of operation systems, each of them has its own features and limitations.
- Different CPU architectures. The smartphones and tablets themselves are constantly improving, but we should not forget about the older devices produced five years ago, which can still be in use by the actual users.
However, part of the code can be easily covered by automatic tests based on Unit Testing tools. Let’s look at the typical architecture of mobile application – Figure 8.

Full tests coverage is more reasonable to carry out in 2 directions:
- unit-tests (functional, integration) for a Data Access Layer (or Repositories).
- UI-tests (functional, regression) for Business Logic and User Interface layers.
Covering all layers of mobile application with Unit Tests is not possible, and it also reduces the speed of development. More details on automatic testing, will be covered in future article, now it’s important to say that the automatic CI/CD pipeline can include Unit and UI tests with App Center Test.
Conclusion
The mobile CI/CD approach allows you to simplify and accelerate the process of creating a quality product. Cloud Mobile CI/CD pipeline based on App Center allows to “configure-and-forget” environment for build, test and distribute. In this article we explained mobile development pitfalls and how to avoid them with automation.
In my next post, I’ll focus on automatic testing (Unit and UI): Stay tuned!
About the author
Slava Chernikoff is Principal Engineer at Binwell (link: https://binwell.com), and is a Microsoft MVP and Xamarin Certified Developer. He is an experienced mobile cross-platform and native developer, an author of popular articles and guides about Mobile DevOps and Xamarin, and a regular conference speaker. He was previously was honored as Nokia Champion and Qt Certified Developer and is a Microsoft MVP and Xamarin Certified Developer.

0 comments