


Ever wondered what happens behind the scenes when you chat with GitHub Copilot in VS Code? Let’s pull back the curtain and explore how this AI coding assistant processes your prompts, from local workspace scanning to interacting with OpenAI’s language models.
This article explains how GitHub Copilot extension processes user prompts—including the steps from local VS Code indexing to sending/receiving data from the Copilot proxy and ultimately interacting with OpenAI-based models. The write-up includes what happens when you reference your workspace (e.g., using @workspace) and how many trips occur.
Understanding the GitHub Copilot Chat Flow
GitHub Copilot serves as your AI pair programmer in VS Code, offering many features with 2 primary ones being :
- Inline suggestions that automatically complete code as you type
- Copilot Chat for interactive coding assistance and workspace-aware responses
When you interact with Copilot Chat, it processes your input through three stages:
- Context gathering from your local workspace
- Secure transmission to GitHub’s proxy server
- AI processing using OpenAI models
This exploration covers the technical journey of your queries—from encryption and networking to @workspace handling—revealing how Copilot transforms your questions into contextual coding assistance.
The three main pillars of GitHub Copilot when you type @workspace in Copilot chat
GitHub Copilot’s architecture rests on three main components:
- Copilot Extension (on VS Code)
-
- The local component that captures your prompt, identifies relevant code from your workspace, and formats the data before sending it out.
2. Copilot Proxy (Cloud)
-
- Sits between your local extension and the OpenAI backend.
-
- Handles rate-limiting, authentication, security checks, and forwarding requests to/from the model. These are often referred to as filters.
3. Backend LLM
-
- The large language model (LLM) that processes your prompt (plus relevant context) and returns AI-generated suggestions or explanations.
Detailed End-to-End Flow
Let’s imagine you open the Copilot Chat in VS Code and type:
“Explain the function in my @workspace that processes user login.”
Below is the step-by-step breakdown:
Step A: Developer Prompt
- You open the Copilot Chat panel (or a sidebar) in VS Code.
- You type your question, referencing @workspace to indicate you want Copilot to look at relevant code or files in your project.
Step B: Local Context Gathering
- The Copilot extension checks your local index—an internal representation of all the files in your workspace and project structure. It identifies:
-
- The files or directories that might relate to “user workspace”
-
- The relevant function or code snippets from your workspace.
2. The extension decides how much of that context (code or descriptions) it can bundle into the request. (Copilot typically has limits to prevent sending entire large codebases.)
Step C: Tokenization & Packaging
- The extension tokenizes the prompt and the relevant code context into a format expected by the language model (similar to GPT tokens).
- It then constructs a JSON payload that includes:
-
- The user’s chat message.
-
- The selected code snippets or textual context (especially if you used @workspace).
-
- Metadata (extension version, user session, etc.).
3. The extension encrypts the data at the transport layer (using TLS/HTTPS) to ensure its secure when sent over the internet.
Step D(optional): Traffic from IDE sent to Internal Corporate Proxy (e.g., Zscaler)
- The traffic from the IDE can be routed through internal corporate proxy for additional controls/governance
- Before sending the context to copilot proxy server, can be intercepted by customers corporate proxy (Zscaler/etc)
Step E: Send Request to Copilot Proxy
- HTTPS Request (let’s call this request #1) is initiated from VS Code to the Copilot proxy.
- This request is the main communication carrying your prompt + workspace context.
- There are other requests like sending telemetry data. We will keep this flow out of scope for this article.
Step F: Copilot Proxy Processing
- The Copilot proxy receives your request.
- It might do sanitization, compliance checks, or rate-limiting.
- The proxy then forwards your request, still encrypted, to the backend-LLM. GitHub copilot has multi-model support when it comes to invoking the backend LLM
Step G: OpenAI Model Response
- The large language model (LLM) analyzes the prompt + code context to generate a suitable response.
- The model’s output is typically streamed back to the Copilot proxy in chunks.
Step H: Response Routing
- The Copilot proxy receives the partial or complete model response.
- It may apply post-processing filters (e.g., removing disallowed content).
- The final or streaming response is then sent back to the Copilot extension.
- No request or response is stored at the proxy or LLM end.
Step I: VS Code Receives Response
- HTTPS Response (let’s call this response #1) arrives at the Copilot extension.
- The extension parses the data and displays it in the Copilot Chat panel.
- If the response contains code blocks, the developer can copy/paste or insert them directly into the editor.
Optional Step J: Additional Queries
- Each new chat query repeats this cycle (one more request and response).
- Auto-completions (inline suggestions) can generate additional network calls in the background, especially as you type.
- All network calls (arrow from extension to proxy and back) typically occur over TLS (HTTPS).
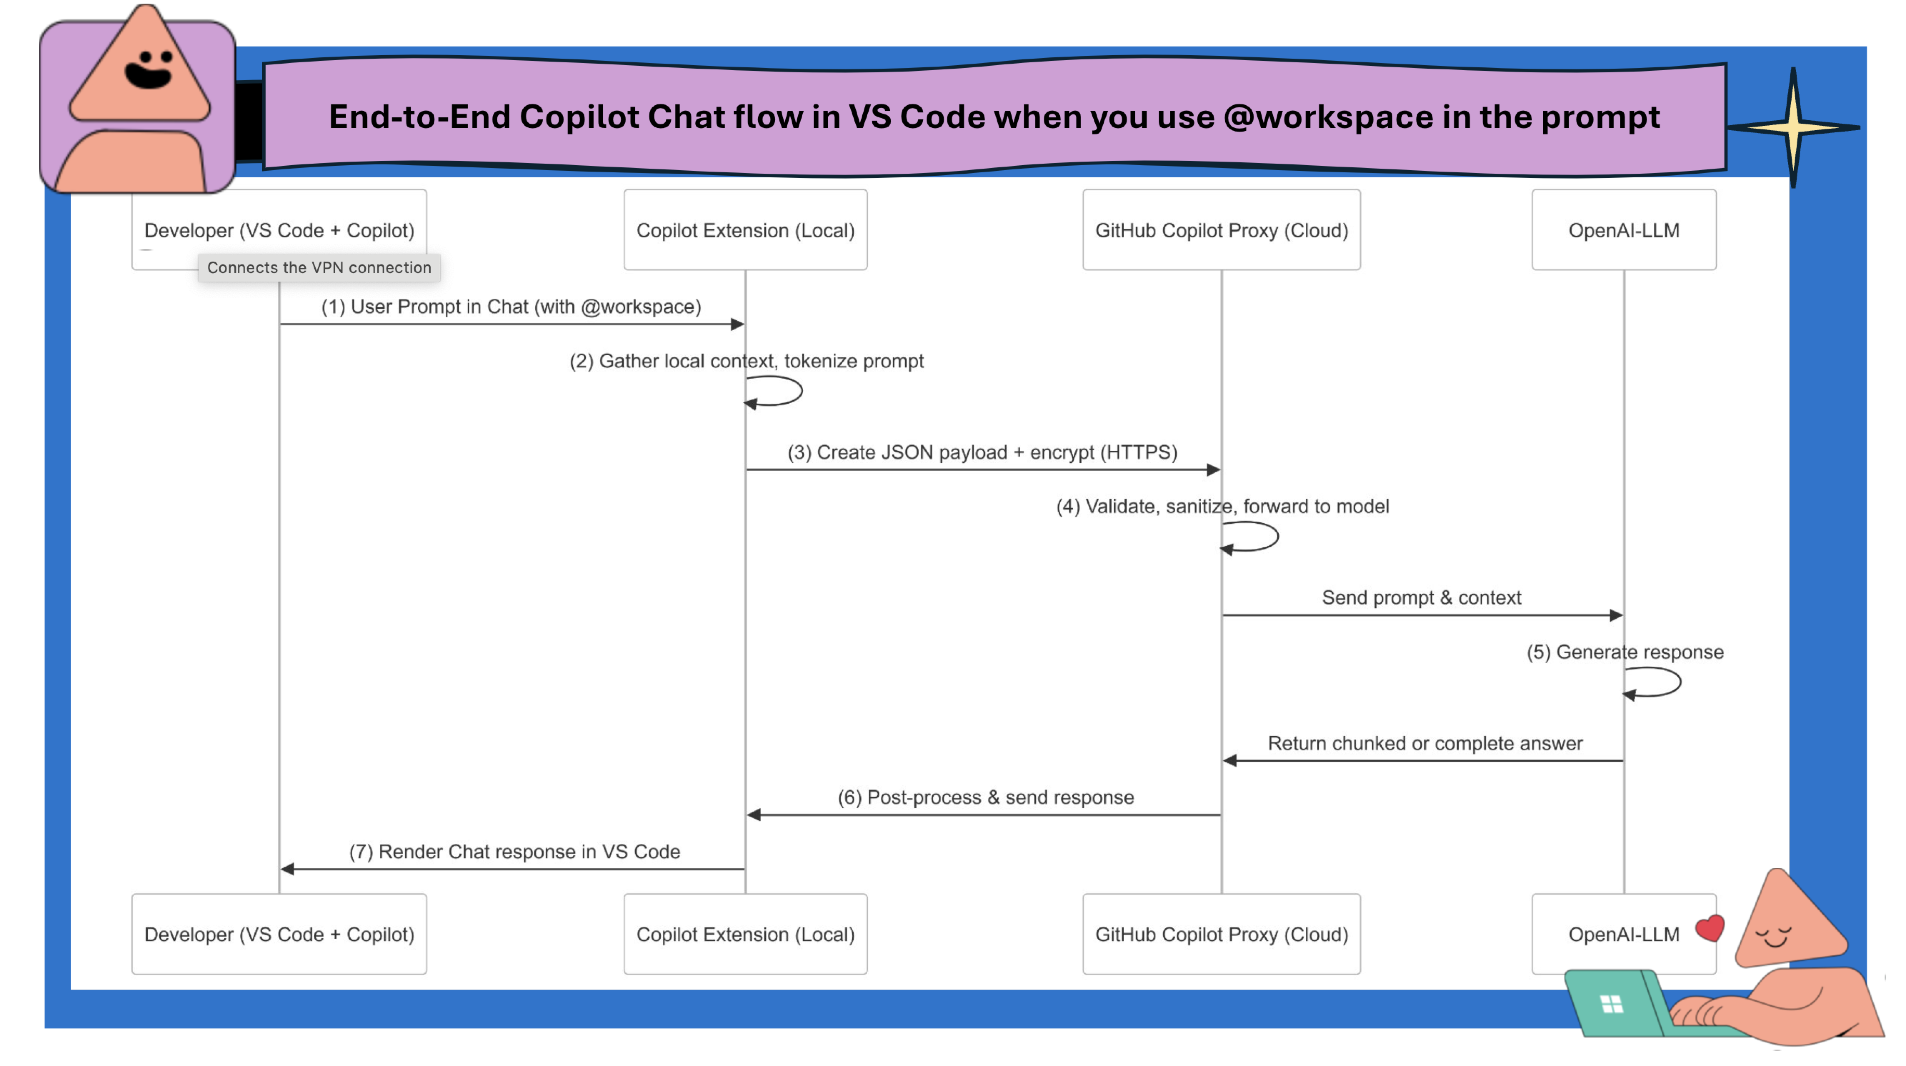
Visualizing the Flow
Below is a simplified Sequence diagram illustrating the core components and request/response flow with OpenAI backend LLM:
Network Round Trips
- One main request per Chat message: When you type a new question or follow-up, the extension initiates at least one round trip to the proxy.
- Streaming Responses: The model might stream the answer in chunks, meaning you may see partial text appear in your chat window in real-time—but it still counts as part of a single request/response session.
- Inline Completion Checks: As you type in the editor (outside Chat), Copilot can send repeated small requests for updated code completions. This is separate from Chat’s flow but uses the same Copilot proxy.
@workspace Variable Usage
When you reference @workspace:
- The Copilot extension attempts to map your request to the relevant code or files in your VS Code workspace.
- It uses a local index that might store partial information about your project’s files (function signatures, class names, etc.).
- Only the most relevant code snippets or lines are packaged into the request (respecting size limits and privacy considerations).
- This approach gives the model additional context to produce more accurate or code-specific answers.
Secure Communication
Encrypted Traffic
- All traffic between your local extension and the Copilot proxy goes over TLS/HTTPS.
How secure is communication from your local workstation?
- Your data is protected by TLS v1.2.
- Most modern TLS v1.2 configurations use (EC)DHE (Diffie-Hellman Ephemeral) key exchange, which provides forward secrecy. This means:
-
- Even if you have the server’s private key, you cannot decrypt traffic that used ephemeral keys.
-
- Each TLS session has its own unique key material that is not derivable from just the static server certificate/private key.
- For the average user, the content of prompts and responses is not directly visible to intermediate network nodes.
Key Takeaways
- Local Indexing: The extension scans your workspace to provide relevant context.
- One Round Trip per Prompt: Each chat question triggers at least one request/response cycle with the Copilot proxy and the OpenAI model.
- Secure by Default: HTTPS/TLS v1.2 with HTTP Strict transport security enabled, ensures your prompts and code are encrypted in transit.
- Streaming Responses: The chat may return data in chunks for a smoother, near real-time experience.
- @workspace: A special reference that helps Copilot locate relevant code sections in your project, improving the quality and specificity of answers.
- Storage of Code/Prompts: GitHub Copilot doesn’t store prompt and suggestions processed and sent.
Conclusion
GitHub Copilot Chat orchestrates a sophisticated workflow that combines local analysis with cloud AI processing. Your code queries follow a secure path:
- Local indexing analyzes your workspace
- TLS encryption protects data in transit
- AI models generate contextual responses
The result: real-time, context-aware coding assistance that understands your project’s specifics while maintaining security. This enables Copilot to deliver precise suggestions that align with your codebase—turning natural language questions into actionable coding insights.
0 comments
Be the first to start the discussion.