
This is a special guest post from the Infragistics. Infragistics Ultimate UI Controls for Xamarin is a range of productivity tools and beautiful UI controls that are ready to be customized and dropped right into your Xamarin.Forms projects for a lightning-fast native UI.
Are you ready to speed up the process of writing your cross-platform mobile app with Xamarin.Forms? If you’re new to Xamarin app development, or even if you’ve developed a few mobile apps, we know that most developers want to get started on a project as quickly as possible.
Xamarin provides many great resources to help you get started, but it can take some time before you’re ready to start writing your business logic, especially if you are new to mobile development. Infragistics Ultimate UI for Xamarin aims to speed up this process.
Infragistics Ultimate UI for Xamarin (which you can download and try for free) enables you to write fast and run fast with a brand new set of feature-rich, high performing controls, as well as a revolutionary new Productivity Pack that will change the way you create Xamarin applications.
I’d love to write about all the great controls you get in Ultimate UI for Xamarin. However, in this post I want to focus on the productivity tools Infragistics has just released that could change the way you write Xamarin.Forms applications:
- Infragistics AppMap
- Infragistics Xamarin.Forms Toolbox
- Infragistics Control Configurators
AppMap
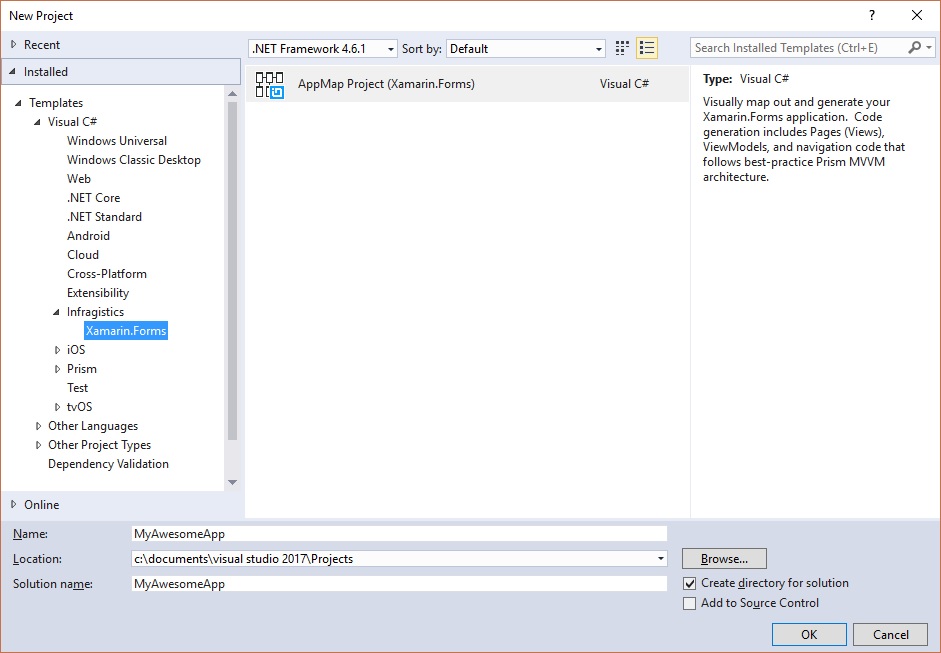
Creating Xamarin.Forms applications one page at a time can be a time consuming task. How convenient would it be to simply whiteboard out your next app, then have an entire MVVM-based Xamarin.Forms app generated with the click of a button? That’s exactly what the Infragistics AppMap does. From File > New, select the Infragistics AppMap Project (Xamarin.Forms):
Next, you can use the Infragistics Xamarin.Forms Project Wizard to choose the platforms you want to target. This is one of my favorite features, because I don’t always want to target every available platform.
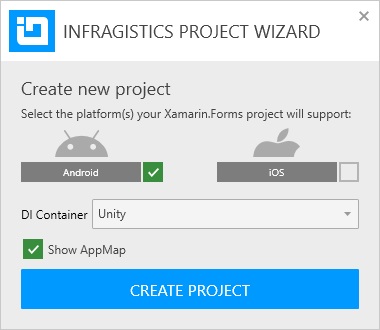
Pay special attention to the checkbox that says Show AppMap;this is what you should really care about. Once you’ve selected your desired platforms and chosen your container (we’ll come back to this later), click the Create Project button to get to the brand new AppMap dialog.
![]()
As soon as the dialog appears, you’ll feel right at home with an intuitive UI modeled after a mixture of Microsoft Visio and Microsoft Visual Studio. As you can see, Infragistics AppMap gives you the ability to drag various types of Xamarin.Forms pages from the toolbox onto the design surface and arrange them as you see fit. You can also create connections between the pages that represent either child relationships (such as a TabbedPage with Tabs), or how each page will navigate to others.
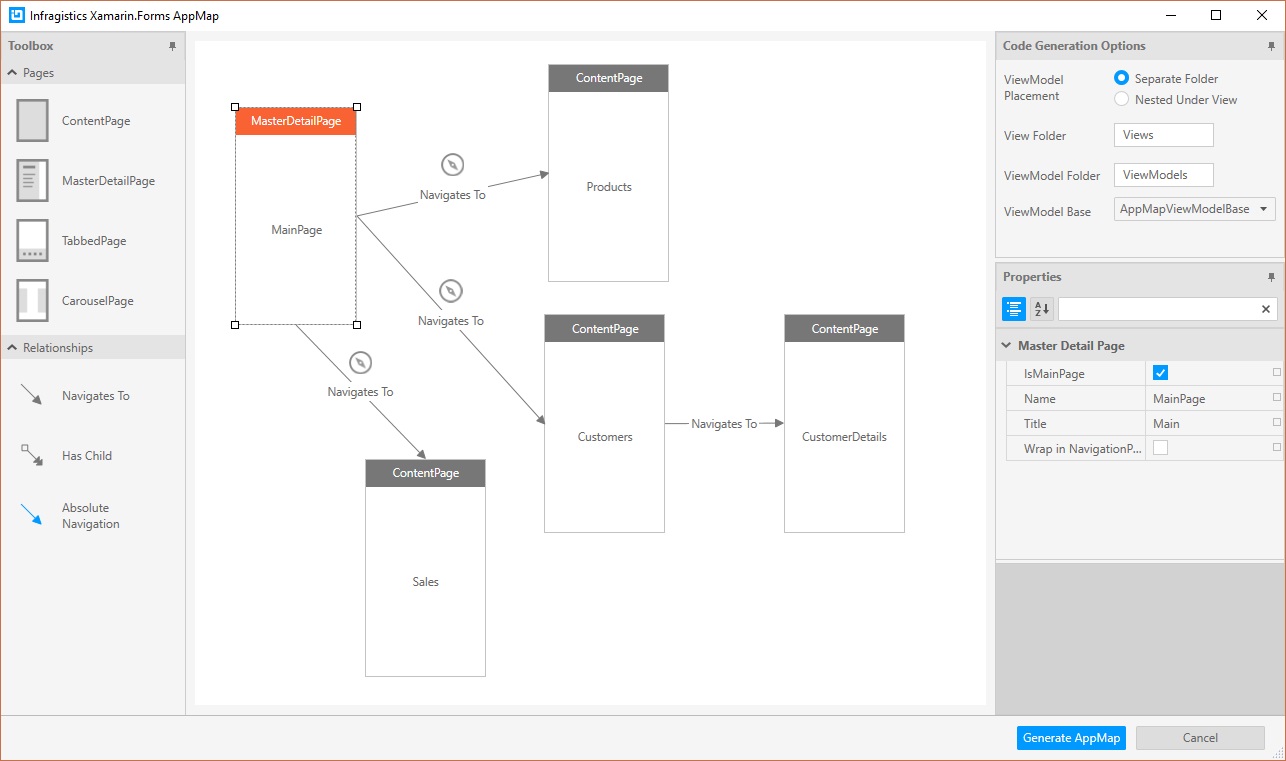
Once you’re done designing the application in the AppMap designer, simply click the Generate AppMap button and watch the magic happen. Visual Studio will generate the Views, ViewModels, and all of the navigation code for you. You don’t have to do anything but press F5 to run the app—what use to take hours to do can now be done in just a few minutes!
There are many more features available in AppMap; you can take a deeper dive into it by watching this introduction video.
How does Infragistics do it?
To make a long story short, AppMap generates a Prism application.
For AppMap to generate a well architected MVVM application based on best patterns and practices, it must have some type of application framework to enable the generation of reliable MVVM-friendly code. Infragistics determined that the Prism Library was the best Xamarin.Forms application framework available and based all generated code on features available in Prism.
Most notably, what makes AppMap possible is the powerful URI-based navigation framework that Prism provides. Also, remember when you had to choose a container in the Infragistics Xamarin.Forms New Project Dialog? Well, this is because Prism leverages dependency injection (DI) and requires the use of a container. Prism provides just about everything you need to be successful in writing an MVVM-friendly Xamarin.Forms application.
For more information on Prism, or to get the source, you can find the Prism Library GitHub here.
Infragistics Xamarin.Forms Toolbox
After you’ve generated the entire application using Infragistics AppMap, you can start adding controls and other elements to your pages. If you’re coming from other platforms such as WPF, ASP.NET WebForms, or WinForms, you’ll notice that there’s no designer or toolbox. This is why we created the world’s first Xamarin.Forms Toolbox to increase your productivity!
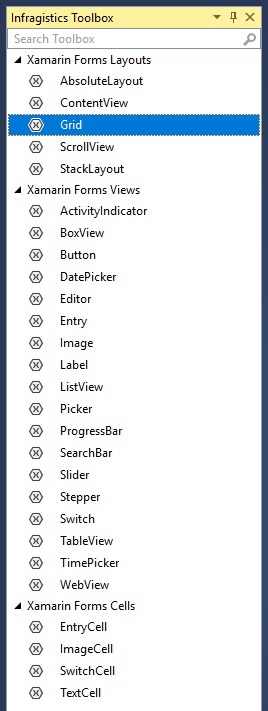
As you can see, the Infragistics Xamarin.Forms Toolbox provides all of the standard Xamarin.Forms Layouts, Views, and Cells available out-of-the-box from Xamarin. This makes it super simple to drag an element from the toolbox and drop it onto your XAML file, which will insert the XAML snippet at the drop point.
It gets better. Not only does the toolbox provide your standard drag and drop behavior, it also provides extended XAML snippets when you hold the CTRL key while dragging. When you hold the CRTL key and drop a control onto the XAML file, a full XAML snippet is created that provides much more generated code. For example, when you want to create a Grid, chances are you want to have a few rows and columns created. Don’t write that all the XAML by hand! Just hold the CTRL key and let the toolbox do the work for you.
...
Powered by NuGet
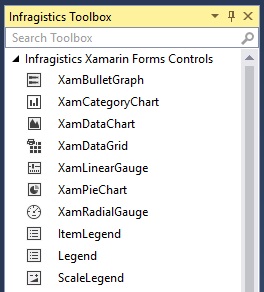
Not only is the Infragistics Xamarin.Forms Toolbox the world’s first toolbox for Xamarin.Forms, it’s also powered by NuGet packages. Yes, you read that right: powered by NuGet! Since Infragistics also ships a ton of great Xamarin controls, it makes sense that they would show up in the toolbox whenever they’re added to your project.
To try this, simply add one of Infragistics Xamarin.Forms controls to your project via the NuGet Manager and keep an eye on the toolbox. For every Infragistics NuGet package you add to your solution, an entry for that control will be added to the Infragistics Xamarin.Forms Toolbox.
Now, drag an Infragistics control from the toolbox and drop it onto your XAML file. Two things happen; first, and most obvious, is that the control is added to the XAML.
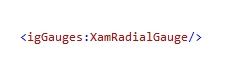
Second, which is even more amazing, is that if you look at the top of your XAML file, the xmlns declaration for the control has been added automatically, which is a huge timesaver. No more looking at docs or trying to use IntelliSense to try to find the namespace of the control you want to use. VS2015 doesn’t include IntelliSense, so this new toolbox is especially handy in saving you time and headaches there. What’s even better is that if you already have an existing XMLNS defined, the toolbox recognizes and uses it, rather than creating another one.
<ContentPage
  xmlns:igGauges="clr-namespace:Infragistics.XamarinForms.Controls.Gauges;assembly=Infragistics.XF.Gauges"
  xmlns="http://xamarin.com/schemas/2014/forms"
  xmlns:x="http://schemas.microsoft.com/winfx/2009/xaml"
...

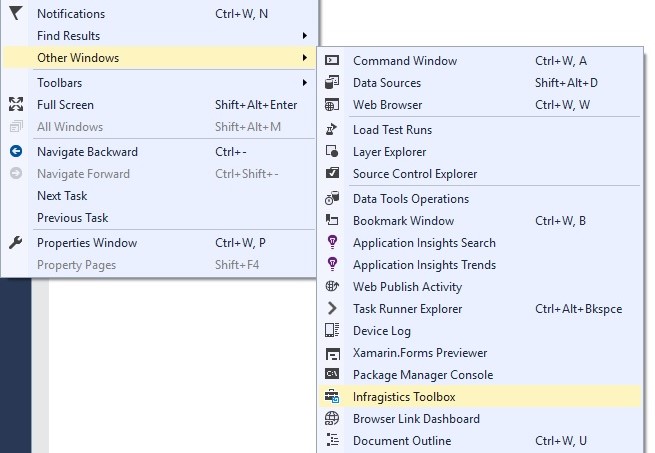
Tip: When you first install Infragistics Ultimate UI for Xamarin, the toolbox is not shown in VS. You must manually display the toolbox by going to View > Other Windows > Infragistics Toolbox in Visual Studio.
To see the Infragistics Toolbox in action, check out this video.
Control Configurators
After you’ve designed and generated your entire application using AppMap and laid out your page’s structure by dragging and dropping controls from the Infragistics Xamarin.Forms toolbox, the last step is to start styling your controls, binding your controls to data, and configuring your controls to meet your application requirements.
There’s only one problem with the last step: Xamarin.Forms doesn’t include a designer. This is where the game-changing Infragistics Control Configurator comes into play; the Control Configurator is a dialog you can launch from the XAML editor that allows you to visually configure every aspect of your controls without having to run the project each time for a preview.
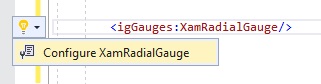
How do you launch it? After you drag an Infragistics Xamarin.Forms control into your XAML editor, click the control name to place your mouse cursor in the control XAML. When you do this, you will see the Visual Studio Suggestion Light Bulb appear. Open the suggestion light bulb and you will see a menu option called “Configure [ControlName]”. Since I’m using the XamRadialGauge, the menu item says “Configure XamRadialGauge.” Personally, I like to use the CTRL+. shortcut to launch the suggestion lightbulb.
Once you see the menu item, click it. You’ll see a dialog appear that has a design surface containing the control and many options.
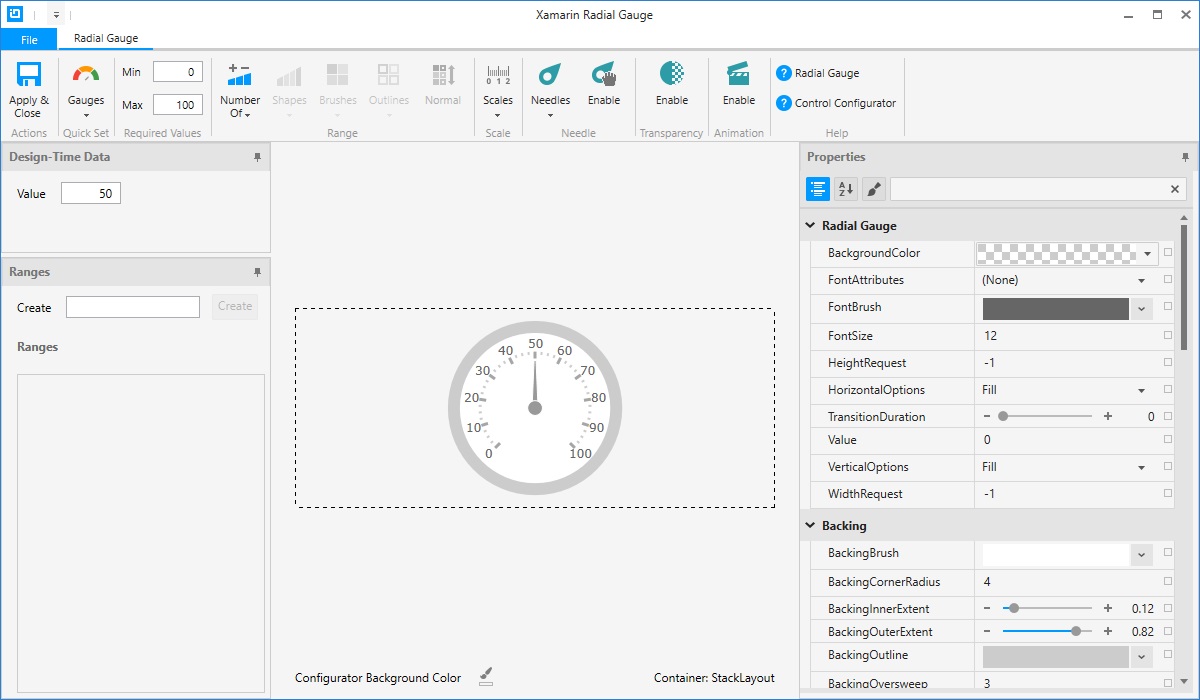
All the Control Configurators have a common layout: ribbon at the top, a property grid on the right, and on the left you’ll get several other options depending on the configurator you are using.
This example is using the XamRadialGauge Control Configurator, so the ribbon contains options to easily modify the ranges, the scale, and the needle. It even has QuickSets that allow you to use a predefined template to get you close to the gauge you have in mind.

If you want more control than what the ribbon menus can give you, jump into the property grid and start modifying every little property until you’re happy. No matter what you do, you’ll see the changes visually reflected on the design surface.
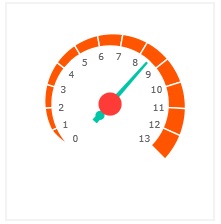
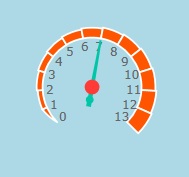
This example uses one of the many QuickSets to create a gauge:
The next step is to data bind the Value property of the XamRadialGauge to a property in the ViewModel. You may be thinking you have to do this in XAML, but you don’t. Infragistics has provided an awesome data binding editor to use on any bindable property. Just find the property you want in the property grid and click on the little square to the right of the property value.
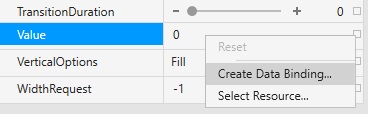
Next, click the Create Data Binding menu option. You’ll see a dialog appear that you can use to create your binding exactly as you see fit. Set the binding path, mode, converter (yes, it will automatically find all your converters), and provide a string format.
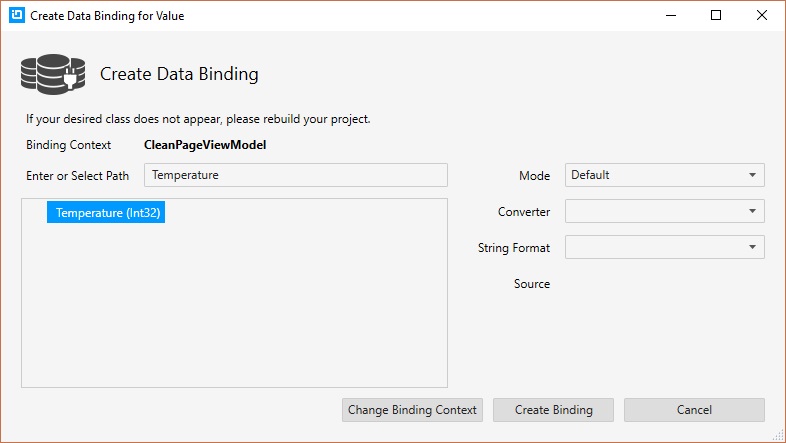
Once the dialog launches, notice it automatically finds the BindingContext (ViewModel) for you using a convention of [PageName]ViewModel. If the dialog guessed wrong (or couldn’t find it), you can set the BindingContext yourself by picking it from a list of available classes.
Once you have configured the control exactly as you want it, hit the “Apply & Close” button.

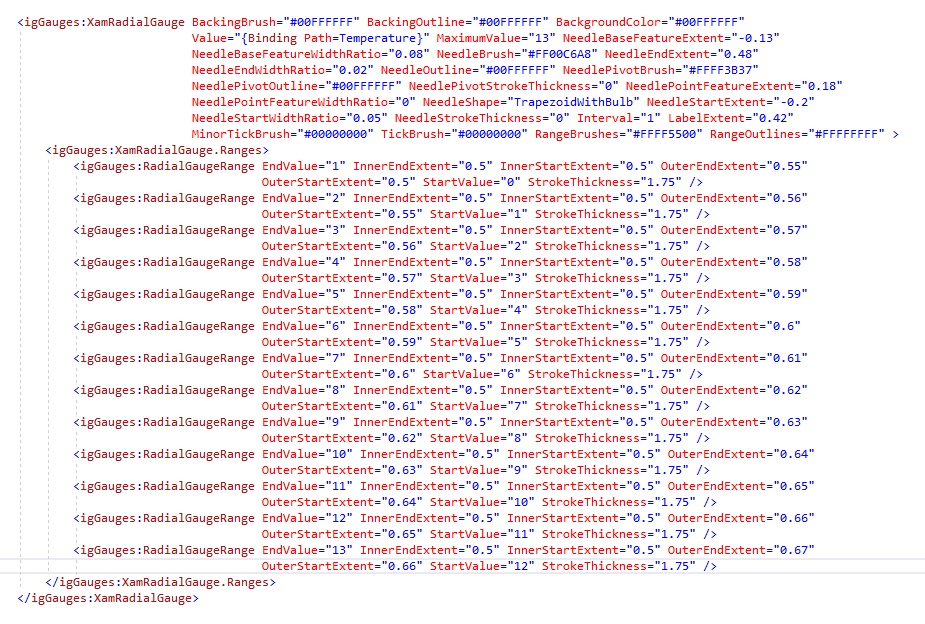
BAM! Check out all the XAML code that was automatically generated for you:
Now, I know your brains are oozing out of your head right about now, but there’s more. After you generate all your XAML, make a change to the background color or another property (in this example, I’m changing the background to LightBlue), then select the XamRadialGauge and show the Control Configurator again.
Yep, it not only allows you to generate XAML, but it also reads it in and the Control Configurator will show you exactly what your XAML does.
Infragistics ships configurator for the following controls:
- Bullet Graph
- Linear Gauge
- Radial Gauge
- Pie Chart
- Data Grid
For a more detailed look at using the Control Configurators, you can check out this video.
Automatic Updates
The best part about all these new productivity tools is that they are hosted on the Visual Studio Marketplace. This means that Infragistics can (and will) be pushing updates on a continuous delivery schedule to keep your installed extensions automatically updated. You don’t have to do anything —simply let Visual Studio manage all the updating for you. You just concentrate on writing apps and being productive!
Try it Yourself
I don’t know about you, but I’m really excited about all of these new productivity tools for Xamarin.Forms development. Don’t get me wrong, the Infragistics Xamarin.Forms controls are equally awesome, but these productivity tools are going to change the way you write Xamarin.Forms applications going forward. From File > New to production, Infragistics has set a new bar for Xamarin.Forms productivity.
The best part is that you can try these out for yourself right now. Head over to Infragistics and download a trial of Infragistics Ultimate UI for Xamarin today, and you’ll be able to design, lay out, and build cross-platform mobile apps using Xamarin.Forms in a matter of minutes instead of hours. Brian Lagunas is a Microsoft MVP, a Xamarin MVP, a Microsoft Patterns & Practices Champion, and co-leader of the Boise .NET Developers User Group (NETDUG). Brian works at Infragistics as a Product Manager for all things XAML, which includes the award-winning WPF, Silverlight, Windows Phone, Windows Store, and Xamarin.Forms control suites.