
There’s no doubt that one of the biggest announcements from Apple this year was the iPhone X. The new Super Retina display is edge-to-edge on the device, creating an immersive experience we had yet to see on iPhones. With the new screen changes on the iPhone X, developers may be asking themselves, “What do I have to do update my app?” Let’s take a look at how you can start getting your app ready for the iPhone X.
Explore Your App With the iPhone X Simulator
The first step in testing if your app is ready for the iPhone X is to update your Xamarin.iOS version to 11+ and download and install Xcode 9. If you haven’t already done that, check out the documentation on getting started with iOS 11. Once the tooling is updated, you’ll be able to launch your app in the new iPhone X simulator and start exploring how your app behaves.
Pay particular attention to areas of your application that are not using Auto Layout or present content that is full screen. If your application supports landscape, remember to rotate the simulator and check that the UI still looks great in that orientation as well. If your application launches on the iPhone X and doesn’t take on the full resolution of the device, the most common reason for that is a missing Launch Screen Storyboard. You can review the documentation for more information on getting that set up.

Keep Your Layouts Safe
There may not be many updates needed for the iPhone X if you’re already using Auto Layout for your UI, since UIKit and Auto Layout will do most of the heavy lifting for you. However, you might find some constraints or manual layout techniques that need to be adjusted. iOS 11 introduced a new layout guide named SafeAreaLayoutGuide to help with these scenarios. The SafeAreaLayoutGuide allows you to constrain view positions to an area of the screen that is safe for all iPhones. Using this will help make sure that content isn’t clipped by the rounded device corners, home indicator, or the sensor housing.
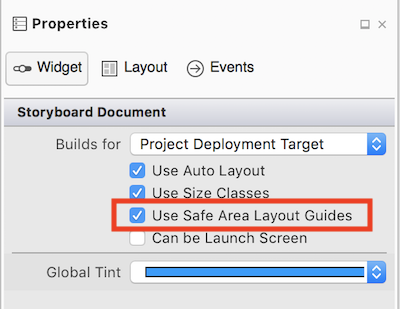
To start using the SafeAreaLayoutGuide with the iOS Designer, make sure to enable it via your Storyboard properties. To do this:
- Click in an empty area of your Storyboard.
- Select the Properties panel in Visual Studio to see the setting.
- Create a constraint with Auto Layout. You will see dashed green lines indicating the safe area.
Updating Apps UI Display on iPhone X
Pay attention to areas of your app UI that are full screen and make sure they don’t get clipped or hidden behind the home indicator. If you’re working with a Xamarin.Forms-based project, be sure to check out Making iOS 11 Even Easier with Xamarin.Forms.
There are also some great resources available from Apple on updating for the iPhone X, with plenty of videos and guides on common pitfalls. If you’re still catching up on iOS 11, be sure to check out our introduction to iOS 11 documentation for all of the details on what’s new, as well as more information on updating your apps for iOS 11.