Triggers were introduced in Xamarin.Forms 1.3 along with Behaviors, which we covered previously. Triggers allow you to declaratively express actions in XAML that are executed when a specified condition is met. Xamarin.Forms support four types of triggers:
- Property Trigger – executed when a property on a control is set to a particular value.
- Data Trigger – same as the property trigger but uses data binding.
- Event Trigger – occurs when an event occurs on the control.
- Multi Trigger – allows multiple trigger conditions to be set before an action occurs.
Let’s take a look at each one in detail.
Property Trigger
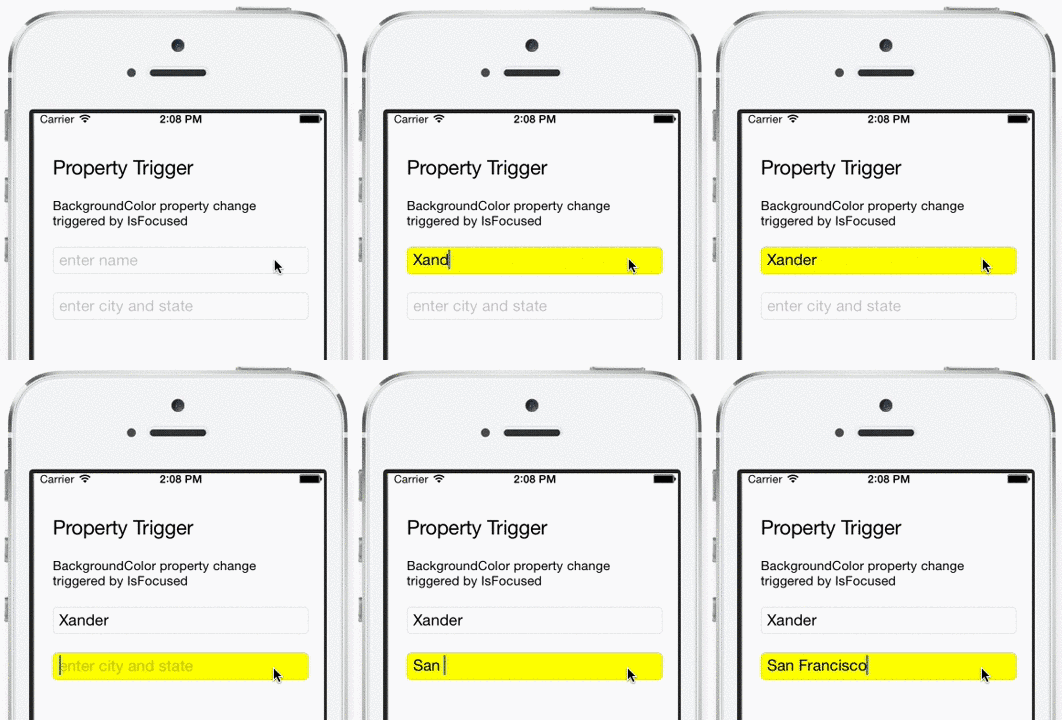
Property Triggers (represented by the Trigger element) are added to a control’s Triggers collection. The Setter collection inside is executed when a specified property equals the specified value.

Wouldn’t it be nice to provide some visual indicator that an input control has focus? To achieve this, we can set the BackgroundColor property when the property IsFocused of the Entry element is true.
<Entry Placeholder="enter name">
    <Entry.Triggers>
        <Trigger TargetType="Entry"
             Property="IsFocused" Value="True">
            <Setter
                Property="BackgroundColor"
                Value="Yellow" />
        </Trigger>
    </Entry.Triggers>
</Entry>
Alternatively, we can set them in styles so that they can be attached to every Entry element in the screen.
<ContentPage.Resources>
   <ResourceDictionary>
     <Style TargetType="Entry">
       <Setter Property="AnchorX" Value="0" />
       <Style.Triggers>
         <Trigger  TargetType="Entry"
                   Property="IsFocused"
                   Value="True">
           <Setter Property="BackgroundColor"
                   Value="Yellow" />
         </Trigger>
       </Style.Triggers>
     </Style>
   </ResourceDictionary>
</ContentPage.Resources>
Data Trigger
DataTriggers are very similar to PropertyTriggers, except that instead of specifying the Property, we specify the Binding for the trigger. This Binding generally refers to another VisualElement’s property on the page or it could reference a property in a ViewModel.
The code below shows how to disable the button when the entry’s Text.Length property is 0.
<StackLayout Spacing="20">
<Entry x:Name="emailAddress" Text="" Placeholder="email address"/>
<Button Text="Send">
  <Button.Triggers>
    <DataTrigger TargetType="Button"
         Binding="{Binding Source={x:Reference emailAddress},
                                           Path=Text.Length}"
         Value="0">
      <Setter Property="IsEnabled" Value="False" />
    </DataTrigger>
  </Button.Triggers>
</Button>
</StackLayout>
Event Trigger
Event Triggers execute user-defined code when a specified event occurs.
In the above Property Trigger example, we saw how to change the background color of an Entry element based on the IsFocused property entirely in XAML. Alternatively, we can use an Event Trigger to execute an action written in C# based on the TextChanged event of an entry to perform some basic validation.
Define the TriggerAction in code
Every action that we define has to inherit from TriggerAction<T> where T is the element to which a trigger is attached. When a trigger is fired, the Invoke method will be called. In the code below, we change the Entry’s BackgroundColor to indicate whether the input is valid or not.
public class NumericValidationTriggerAction : TriggerAction<Entry>
{
   protected override void Invoke (Entry entry)
   {
      double result;
      bool isValid = Double.TryParse (entry.Text, out result);
      entry.BackgroundColor =
            isValid ? Color.Default : Color.Red;
   }
}
TriggerAction in XAML
To use the C# code, just declare a namespace for the assembly (xmlns:local in this sample) and add the NumericValidationTriggerAction element to the event trigger:
<Style TargetType="Entry">
<Style.Triggers>
    <EventTrigger Event="TextChanged">
        <local:NumericValidationTriggerAction />
    </EventTrigger>
</Style.Triggers>
</Style>
Multi Trigger
A MultiTrigger looks similar to a Trigger or DataTrigger except there can be more than one condition. All the conditions must be true before the Setters are triggered.
In the code below, we enable the button when either the email or the phone entries are filled in by the user. Each condition is true when the length of the text input is zero (ie. nothing has been entered). When both conditions are true (ie. both are empty) then the trigger’s Setters are called, which in this case disables the button. When either have text entered, the overall condition becomes false and the button is enabled.
<Style TargetType="Button">
<Style.Triggers>
  <MultiTrigger TargetType="Button">
    <MultiTrigger.Conditions>
      <BindingCondition
          Binding="{Binding Source={x:Reference email},
                            Path=Text.Length}"
          Value="0" />
      <BindingCondition
          Binding="{Binding Source={x:Reference phone},
                            Path=Text.Length}"
          Value="0" />
    </MultiTrigger.Conditions>

    <Setter Property="IsEnabled" Value="False" />
  </MultiTrigger>
</Style.Triggers>
</Style>
To see how to build a “require all” trigger (like you’d use in a login page, for example) check out our Triggers sample on GitHub that uses an IValueConverter along with a MultiTrigger.
For even more information on Xamarin.Forms, be sure to check out the detailed documentation.

I have some Entry and a Button. Need check all Entry is not null to IsEnable Button. How to do that? (MVVM) Thank!
This is excellent. Thank you for pointing this feature out -> I was just about to dive down a very unproductive rabbit hole