
Xamarin.Forms 4.0 introduced amazing new features to help streamline development when building beautiful mobile apps with C#. The main highlight was the new Xamarin.Forms Shell, which seeks to reduce the complexity of building mobile apps by providing fundamental app architecture features. Such as a full visual hierarchy, common navigation experience, URI-based routing, and integrated search handling.
In this blog, you will see how easy it is to setup the new Xamarin.Forms Shell with different types of navigation schemes and how to navigate to sub-pages.
Quick Start
Shell introduces a simple container for your mobile applications. Rather than wrestling with a combination of MasterDetailPage, TabbedPage, and NavigationPage, just start your application with a Shell and begin adding pages.
Visual Studio provides a new template project for Shell, but you can also quickly add Shell to any application. To better grasp the simplicity, start with a blank project (Blank Forms App). Then add a new XAML file to your library project named AppShell.xaml and extend the Shell type instead of ContentPage (for example). It should look like this:
<?xml version="1.0" encoding="UTF-8"?>
<Shell
    xmlns="http://xamarin.com/schemas/2014/forms"
    xmlns:x="http://schemas.microsoft.com/winfx/2009/xaml"
    xmlns:local="clr-namespace:YourApp"
    x:Class="YourApp.AppShell">

</Shell>
And the code behind:
namespace YourApp
{
    public partial class AppShell : Shell
    {
        public AppShell()
        {
            InitializeComponent();
        }
    }
}
To now use this in your application, set the MainPage in App.xaml.cs:
namespace YourApp
{
    public partial class App : Application
    {
        public App()
        {
            InitializeComponent();

            MainPage = new AppShell();
        }
    }
}
That’s it! Now all that’s left to do is add your content to the AppShell.xaml.
Filling your App Shell
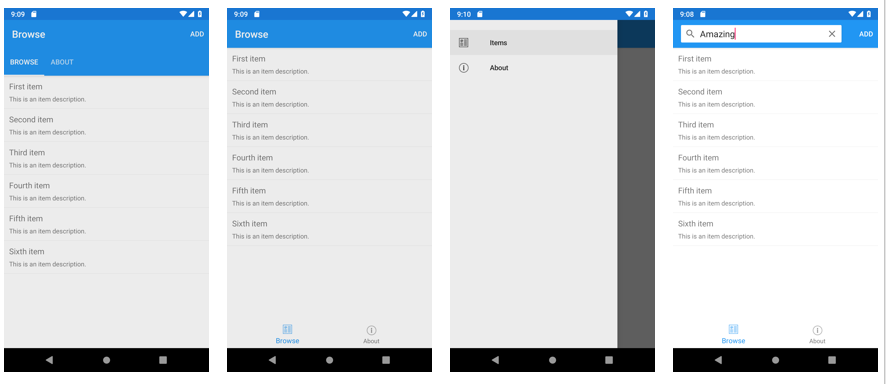
Shell provides 3 types of common mobile navigation UI: flyout menu, bottom tabs, and top tabs. Let’s take a look at each type, and then you can mix and match them as needed for your application.
The Flyout
If you want a flyout, also referred to as a hamburger menu or a side-drawer, then you’ll specify FlyoutItems like this:
<Shell>
    <FlyoutItem Title="Home" Icon="home.png">
        <ShellContent ContentTemplate="{DataTemplate pages:HomePage}"/>
    </FlyoutItem>
    <FlyoutItem Title="Library" Icon="library.png">
        <ShellContent ContentTemplate="{DataTemplate pages:LibraryPage}"/>
    </FlyoutItem>
    <FlyoutItem Title="Contact" Icon="contact.png">
        <ShellContent ContentTemplate="{DataTemplate pages:ContactPage}"/>
    </FlyoutItem>
</Shell>
In  the above example, your application will display three menu items including an icon and a label. For more information on how to customize the flyout such as adding a header, creating other menu items, and customizing the look of the menu items with data templates, check out our flyout documentation.
Keeping Grounded with Bottom Tabs
Many applications prefer to use bottom tabs as the root navigation pattern, and that’s equally as simple. Specify Tabs like this:
<Shell>
    <TabBar>
        <Tab Title="Home" Icon="home.png">
            <ShellContent ContentTemplate="{DataTemplate pages:HomePage}"/>
        </Tab>
        <Tab Title="Library" Icon="library.png">
            <ShellContent ContentTemplate="{DataTemplate pages:LibraryPage}"/>
        </Tab>
        <Tab Title="Contact" Icon="contact.png">
            <ShellContent ContentTemplate="{DataTemplate pages:ContactPage}"/>
        </Tab>
    </TabBar>
</Shell>
Now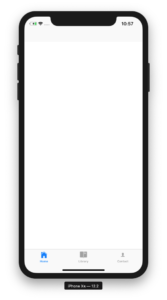 the application will render three bottom tabs with icons. Because the code above declared a
 TabBar, the flyout will be hidden by default. You can explicitly set the flyout behavior using FlyoutBehavior="None" on the Shell. The TabBar is optional, but you may like it for adding clarity and for later specifying named routes.
Lifting Up To Top Tabs
Shell 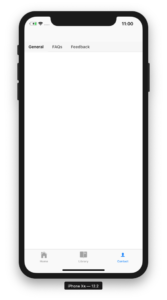 doesn’t stop there! When you have content within a
 Tab that you wish to show via a top tab bar, you can describe additional ShellContent at the same level like this:
<Shell>
    <TabBar>
        <Tab Title="Home" Icon="home.png">
            <ShellContent ContentTemplate="{DataTemplate pages:HomePage}"/>
        </Tab>
        <Tab Title="Library" Icon="library.png">
            <ShellContent ContentTemplate="{DataTemplate pages:LibraryPage}"/>
        </Tab>
        <Tab Title="Contact" Icon="contact.png">
            <ShellContent Title="General" ContentTemplate="{DataTemplate pages:ContactPage}"/>
            <ShellContent Title="FAQs" ContentTemplate="{DataTemplate pages:FAQsPage}"/>
            <ShellContent Title="Feedback" ContentTemplate="{DataTemplate pages:FeedbackPage}"/>
        </Tab>
    </TabBar>
</Shell>
Now when viewing the “Contact” bottom tab, the user will see 3 tabs at the top for sub-sections.
Taking You There with Navigation
Navigation should be simple, easy, natural, fast, and powerful. By building upon a new paradigm of page management, Shell establishes a foundation for all of that by default use of data templates, routes, and a powerful new syntax for navigation.
Before you start to worry that you might need to refactor all of an existing application’s navigation, Shell’s new URI based navigation service adds route-based navigation to the existing INavigation service. It’s not a replacement, although you may eventually love it and never use PushAsync again. All your existing navigation will still work.
Let’s first look at how Shell uses templates, manages routes, and then how you can navigate anywhere in your application by URI.
Templates
When adding your ContentPages to the Shell instance, you should by default use the ContentTemplate property as demonstrated above. This makes sure that Shell can instantiate your pages on demand instead of loading them all up front and slowing your application startup.
Read more about data templates on docs.
Routes
Shell assigns a route to every element in your Shell, but you should name them as best fits your needs.
<Shell>
    <TabBar>
        <Tab Route="home" Title="Home" Icon="home.png">
            <ShellContent ContentTemplate="{DataTemplate pages:HomePage}"/>
        </Tab>
        <Tab Route="library" Title="Library" Icon="library.png">
            <ShellContent ContentTemplate="{DataTemplate pages:LibraryPage}"/>
        </Tab>
        <Tab Route="contact" Title="Contact" Icon="contact.png">
            <ShellContent ContentTemplate="{DataTemplate pages:ContactPage}"/>
        </Tab>
    </TabBar>
</Shell>
Each page now has a declared route with which you can target those pages from anywhere in your application, including view models.
await Shell.Current.GoToAsync("//contact");In the above example, the navigation service will climb the application from your current position until it finds a matching route to execute and then navigate to it using the expected screen transition. When going from a tab to another tab, the navigation will be an instant cross-fade.
What about navigating to pages not included in your Shell? Navigating to relative routes? Modal pages? Passing querystring data? Managing the page stack? Navigation is a deep topic! To learn more about URI navigation and those topics, head over to the Shell navigation documentation.
Making Shell Beautiful
Sure, the screenshots above are bare. Can Shell support creating beautiful and expressive applications? During April and May, we invited you to participate in challenges for Visual and CollectionView. What may have escaped notice is that all of those projects started with Xamarin.Forms Shell. Check out the pull requests for nearly 100 examples that use Shell.

For more details on styling the Shell elements, check out our new Xaminal sample in the Shell documentation.
FAQs
- Should I migrate my app to use Shell? That depends mostly on whether or not you want to use the new navigation service or wish to simplify your navigation UI. The transition is super easy to try out: just add a Shell as described above and fill out the Shell.
- What will become of TabbedPage, MasterDetailPage, and NavigationPage? They will continue to serve their purpose and be supported, so you can be confident in using them. New features and experiences will, however, be focused on Shell.
- Will Shell be coming to UWP? There is an open pull request that implements Shell on UWP. Keep any eye out there for progress.
- Does Shell support RTL? Yes, it does! All of your content and navigation will respond as you would expect. The flyout menu itself will continue to appear from the left; if you wish to change this, you’ll want to create a custom renderer and take control of the flyout transition.
- What’s next for Shell? This is just the beginning. Shell enables new interactions, transitions, and experiences that we look forward to introducing in the coming releases. Stay tuned for opportunities to help guide us in prioritizing new features through surveys, interviews, and more challenges.
Learn More
For more details on using Shell, check out our updated documentation:
If live coding is your thing or you want to see Xamarin.Forms in action, follow me on Twitch as I’m building a Xamarin.Forms showcase app using Xamarin.Forms latest features, and hosting amazing guests along the way. The app is open source and you can participate too!
Update to Xamarin.Forms 4.0.0 Today
Xamarin.Forms 4.0.0 includes tons of improvements in addition to Shell. Check out the release notes for all the details.
To update your existing projects, open your Visual Studio NuGet package manager, check the pre-release box, and install Xamarin.Forms 4.0.0 along with any related packages such as Material Components with Visual or Maps.
Feedback is always welcome! If you encounter any problems or have suggestions, please open up an issue on GitHub.
Reference apps on GitHub:
Hello, is it possible to apply badge icon to hamburger icon using shell control
This article is great
But I have an inquiry : When I use Shell all my pages in the project should start with Shell
It is not possible for the project to have other pages ContentPage and pages Shell
And if that is possible, how can I go from page ContentPage to page Shell?
Is it possible to pass an argument to the page constructor when using the ContentTemplate property to describe/load the page? Normally I use the x:Argument syntax.
In shell, i added flyout behavior as disabled just to have tabs but its not getting disabled. I am using latest version of xamarin form.
Same here! If I use the shell and set up FlyoutBehavior to “Disabled” it doesn’t work as expected.
I am looking to migrate a classic iOS app over to Xamarin Forms, so I am kicking off with embedding XF in the iOS app. Is there a way to implement Shell in that environment so that I can take advantage of some of these features – or doesn’t it make sense? Thanks!
The example for a Flyout is incomplete I think. You can’t add a ShellContent element directly to a FlyoutItem. That gives an error “A value of type ‘ShellContent’ cannot be added to a collection or dictionary of type ‘IList’.”. It needs another element like <Tab> first, just like the other examples. Just thought i’d mention it.
A nice and meaningfull intro. Thank you for that.
What I think is missing so far, is a how to tackle the Dependency Injection in Shell.
It would be great to point to or create a nice working example ASAP.
Thanks again,
Lucian
I can't get into the Shell think. I read almost every blog/tutorial and also tried to make a Shell app from scratch. But after many hours in VS19 and XF4 I'm lost. Shell is getting a led down for me.
Why do we have ShellSection, ShellItem, ShellContent, MenuItem, FlyoutItem and what's the difference between them?
What's the point of having a tab bar and the exact same pages in the flyout hamburger menu? It's UX bad. And every XF exanple has it.
When I'm adding in XAML a ShellItem or MenuItem to Shell I'm getting a error that they are...
This sounds great but I can’t use it until it’s complete with UWP. I can start development and nurture in UWP if this is something that’s definitely going to be added soon. Can anyone speak to that or should new projects wait?
Hi Michael, we have a PR here and will be conducting discussions and review next week about it. https://github.com/xamarin/Xamarin.Forms/pull/6015
Are there any plans to include shell for macOS?
Can you share some post about like work with MVVM with Shell using autofac or another and share some post about like work with Login (when I Logout and I try show the Login Page the App converted crazy)?
The login scenario keeps coming up, so we’ll definitely share some guidance on that soon. For issues with the app going crazy, definitely file an issue for us to look into please.
Thanks for the suggestion about MVVM with Shell and autofac.