
I’ve spent hours of development time trying to optimize Android’s ListView to make scrolling through items smooth, followed by similar amounts of time attempting to optimize and configure Android’s GridView if I wanted to display more than one column of data at a time. These days of struggling to remember the correct pattern (and copy and paste the code from adapter to adapter) are now over, thanks to the introduction of Android’s RecyclerView. The RecyclerView has been around for a while now, having been introduced in Support Library v7 as an NuGet package so you can use it in all of the applications you’re currently developing. Today, we’ll take a look at integrating the RecyclerView into an app with some similar paradigms of the ListView.

Adding the NuGet
The first step is to add the NuGet package to your Android project. This will give you direct access to the widget in code and for Android XML.
Integrate Widget
Just like any other Android widget, you can simply add the RecyclerView directly into your existing Android XML or even replace your ListView with a RecyclerView:
Item Layout
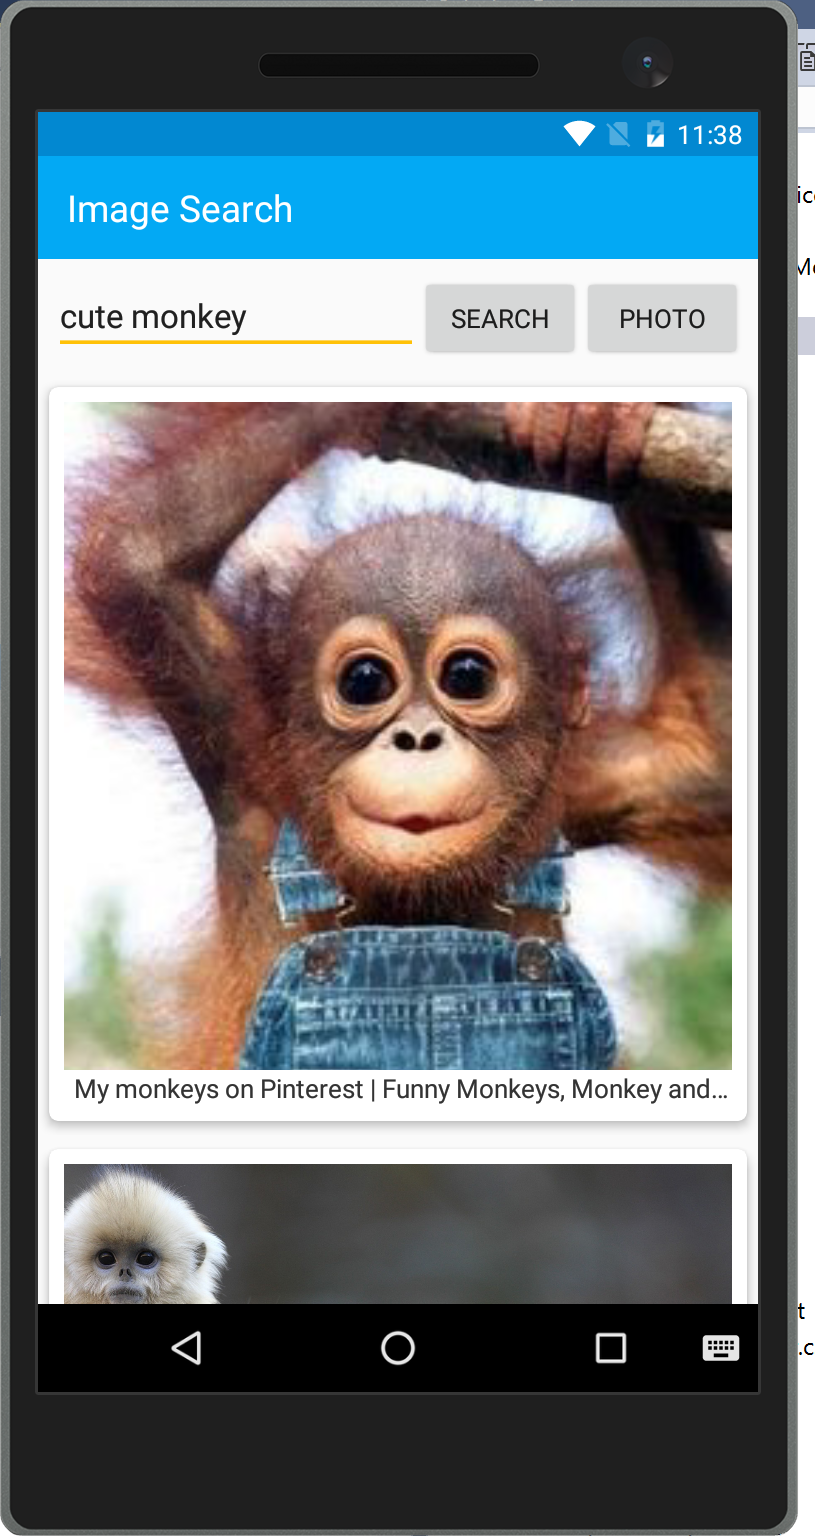
For this app, I’m displaying a list of images that are inside of a CardView to add a nice drop shadow:
Bringing It All Together
With the main layout and item layout all set up, it’s time to bring them together and start displaying items. The RecyclerView has three required classes that need to be implemented for each:

- RecyclerView.ViewHolder: Caches references to the views in your item layout file so that resource lookups are not repeated unnecessarily.
- RecyclerView.Adapter: Provides a binding from your app’s data set (which is specific to your app) to item views that are displayed within the RecyclerView.
- RecyclerView.LayoutManager: Positions items within the RecyclerView.
RecyclerView ViewHolder & Adapter
The ViewHolder seem familiar if you have optimized ListViews in the past. This class must be a subclass of RecyclerView.ViewHolder and has one job, which is to cache all views by finding them by their ID.
    public class ImageAdapterViewHolder : RecyclerView.ViewHolder
    {
        public ImageView Image { get; private set; }
        public TextView Caption { get; private set; }

        public ImageAdapterViewHolder(View itemView) : base(itemView)
        {
            Image = itemView.FindViewById(Resource.Id.imageView);
            Caption = itemView.FindViewById(Resource.Id.textView);
        }
    }
This ViewHolder is used in the main adapter, which actually inflates the view and sets the properties on each widget. It must inherit from RecyclerView.Adapter and then implement three methods to handle layout inflating, binding, and the count of items that are to be displayed.
    class ImageAdapter : RecyclerView.Adapter
    {
        Image[] images;
        Activity activity;

        public ImageAdapter(Activity activity, Image[] images)
        {
            this.images = images;
            this.activity = activity;
        }

        // Create new views (invoked by the layout manager)
        public override RecyclerView.ViewHolder OnCreateViewHolder(ViewGroup parent, int viewType)
        {
            //Setup and inflate your layout here
            var id = Resource.Layout.item;
            var itemView = LayoutInflater.From(parent.Context).Inflate(id, parent, false);

            return new ImageAdapterViewHolder(itemView);
        }

        // Replace the contents of a view (invoked by the layout manager)
        public override void OnBindViewHolder(RecyclerView.ViewHolder viewHolder, int position)
        {
            var item = images[position];

            // Replace the contents of the view with that element
            var holder = viewHolder as ImageAdapterViewHolder;
            holder.Caption.Text = item.Title;
            Picasso.With(activity).Load(item.ImageLink).Into(holder.Image);
        }

        public override int ItemCount => images.Count;
    }
With the adapter in place, it’s time to tie it together with the RecyclerView in the Main Activity:
    [Activity(Label = "Image Search", MainLauncher = true, Icon = "@drawable/icon")]
    public class MainActivity : AppCompatActivity
    {
        RecyclerView recyclerView;
        RecyclerView.LayoutManager layoutManager;
        ImageAdapter adapter;
        Image[] images;

        protected override int LayoutResource
        {
            get { return Resource.Layout.main; }
        }
        int count = 1;

        protected override void OnCreate(Bundle bundle)
        {
            base.OnCreate(bundle);
            SetContentView(Resource.Id.main);

            //Create Images here
            images = new [] { new Image { Caption = "Baboon", Image = "http://upload.wikimedia.org/wikipedia/commons/thumb/9/96/Portrait_Of_A_Baboon.jpg/314px-Portrait_Of_A_Baboon.jpg" } };

            //Setup RecyclerView
            adapter = new ImageAdapter(this, images);

            recyclerView = FindViewById(Resource.Id.recyclerView);

            recyclerView.SetAdapter(adapter);
        }
    }
Managing the Layout
The last part is to set the LayoutManager. This allows complete customization of how items in the list are laid out. Built into the RecylerView library are a few default layout managers to get started, including the LinearLayoutManager and the GridLayoutManager.
LinearLayoutManager
This manager will layout items either horizontally or vertically:
layoutManager = new LinearLayoutManager(this, LinearLayoutManager.Vertical, false);
recyclerView.SetLayoutManager(layoutManager);
GridLayoutManager
This manager allows a set number of columns in a list, which is great for displaying multiple images in a list:
layoutManager = new GridLayoutManager(this, 2);
recyclerView.SetLayoutManager(layoutManager);

The beautiful part of the LayoutManager is that you can change them at any time for customization depending on the type of device the app is running on.
Learn More
This is just the beginning of what’s possible with the RecyclerView and its immense power. Be sure to read through our complete documentation on how to customize the item decoration, add click handlers, and a lot more. You can find the source code for this example on my GitHub page.