
Office 365 is Microsoft’s cloud-based solution providing access to services like Mail, Calendar, Contacts (using Exchange Online), Storage (using OneDrive) and Collaboration tools (using SharePoint Online). These services are backed by Azure’s robust infrastructure and use Microsoft Azure Active Directory (AD) to authenticate, authorize and grant access to users.  However, developers like us have always want to extend these services in some way. For this reason, Microsoft has released Client Libraries for Office 365 and, good news, they are Portable Class Libraries! This means these libraries can be used in Xamarin.Android and Xamarin.iOS applications. You can read more in the official post from Microsoft.
In this post, we’ll build a Xamarin.Android app, which will connect to the Office 365 service. We’ll extend this app to show data from our Office 365 subscription. The app will talk to our Office 365 Exchange Inbox and fetch mails from there. The overall app will look similar to the screenshots shown below:

Step 1: Get the Tooling
To build apps that can connect with Office 365, we need to install the necessary tooling support. For Visual Studio:
- On the Visual Studio menu, click Tools->Extensions and Updates->Updates.
- You should see the update available for Office 365 API Tools.
- Click Update to update to the latest version.
–OR–
- Download the extension and install it manually.
Step 2: Create Xamarin.Android Application
For this sample, we’ll choose the default Android app template and extend this app to use Office 365 libraries.
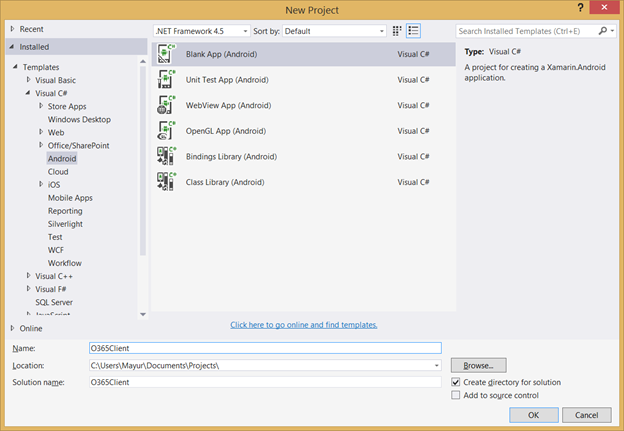
- In Visual Studio, File > New > Project
- Select C# > Android and Blank App (Android) project template
- Give project a name (in my case O365Client) and click ‘OK’
This will create a default “Hello World” app, which shows the incremental number of clicks of a button.
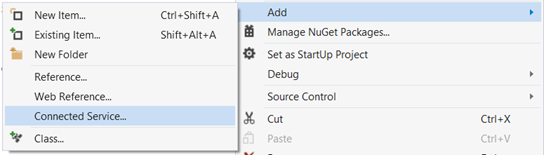
Step 3: Add Office 365 Connected Service
To use Office 365 Services from this app, we need to add libraries and reference the services. Simply right click the project in the Solution Explorer and add a connected service.
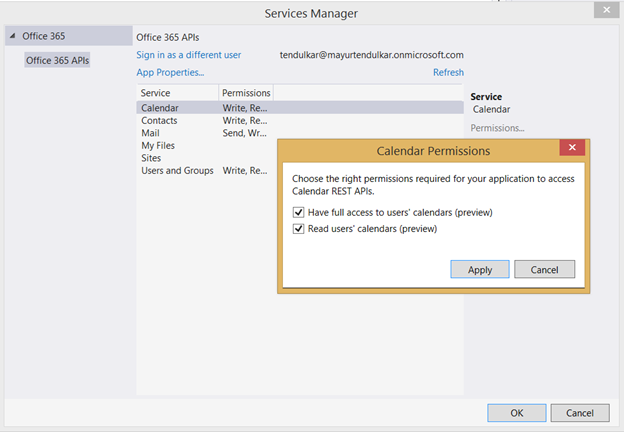
On the next screen, sign in with your Office 365 Account:

Now, select the service which you want to access and give it a permission and click “OK”:
Step 4: Using the Services
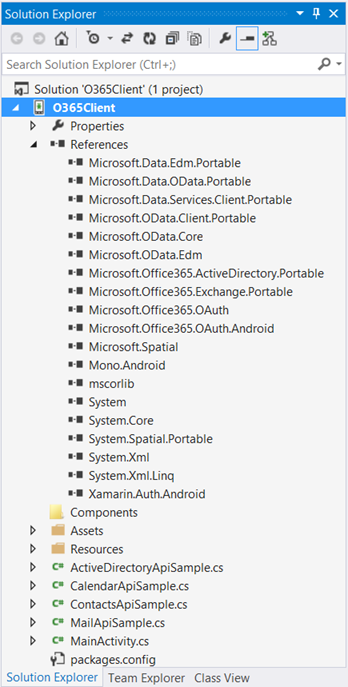
In the Solution Explorer, you’ll find that the tooling has added the required assemblies as well as some C# files with sample code:
[Application]
public class MyGlobalDeclaration : Android.App.Application
{
  public MyGlobalDeclaration (IntPtr handle, JniHandleOwnership transfer) : base(handle, transfer)
  {
  }
  public static List Messages { get; set;}
  public override void OnCreate()
  {
    base.OnCreate();
    Messages = new List ();
  }
}
To show data in a specific format (Inbox layout) we need to add a custom adapter, which will populate this view. Add a new class to the project and modify it as displayed below:
public class HomeScreenAdapter : BaseAdapter
{
  List items; Activity context;
  public HomeScreenAdapter(Activity context, IEnumerable items) : base()
  {
     this.context = context;
     this.items = items.ToList();
  }
  public override long GetItemId(int position)
  {
    return position;
  }
  public override IMessage this[int position]
  {
    get { return items[position]; }
  }
  public override int Count
  {
    get { return items.Count; }
  }
  public override View GetView(int position, View convertView, ViewGroup parent)
  {
    View view = convertView; // re-use an existing view, if one is available
    if (view == null) // otherwise create a new one
    view = context.LayoutInflater.Inflate(Android.Resource.Layout.SimpleListItem2, null);
    view.FindViewById(Android.Resource.Id.Text1).Text = items[position].Subject;
    view.FindViewById(Android.Resource.Id.Text2).Text = items[position].From.Address;
    view.Tag = items [position].Id;
    return view;
   }
}
Now, let’s modify ‘MainActivity.CS’ to show our Inbox.First, the activity needs to inherit from ListActivity to display records in a list mode:
public class MainActivity : ListActivity
To authenticate against the Inbox in Office 365 i.e. Exchange, we’ll declare two endpoints:
const string ExchangeResourceId = "https://outlook.office365.com";
const string ExchangeServiceRoot = "https://outlook.office365.com/ews/odata";
This is the perfect time to authenticate, we’ll write the EnsureClientCreated method, which will create an Office365 client that we can use to call the services. To execute this method we’ll pass the current activity as the context.
private async Task EnsureClientCreated(Context context)
{
  Authenticator authenticator = new Authenticator(context);
  var authInfo = await authenticator.AuthenticateAsync(ExchangeResourceId);
  return new ExchangeClient(new Uri(ExchangeServiceRoot), authInfo.GetAccessToken);
}
Once the client is ready we can call GetMessages, which gets messages from our Office 365 Inbox.
public async Task GetMessages(Context context)
{
  var client = await EnsureClientCreated(context);
  var messageResults = await (from i in client.Me.Inbox.Messages
      orderby i.DateTimeSent descending
      select i).ExecuteAsync();
  MyGlobalDeclaration.Messages = messageResults.CurrentPage.ToList ();
  ListAdapter = new HomeScreenAdapter(this, MyGlobalDeclaration.Messages);
  return messageResults.CurrentPage;
}
However, we’re yet to call GetMessages method in our code. Modify the OnCreate method as shown below to call this method and fetch messages.
protected override void OnCreate(Bundle bundle)
{
  base.OnCreate(bundle);
  GetMessages (this);
}
When the user clicks on a particular email message, we want to show that message. First, add an OnListItemClick method, which, when clicked, will pass the Email’s ID to next activity, which we’ll add later.
protected override void OnListItemClick (ListView l, View v, int position, long id)
{
  var bodyActivity = new Intent (this, typeof(MessageBodyActivity));
  bodyActivity.PutExtra ("Id", v.Tag.ToString());
  StartActivity (bodyActivity);
}
Now, we’ll add a new layout and activity for the detailed message. To do this, go to Resources > Layouts and add a new Android Layout. I’ve given it a name “Message.axml”. Modify this file as shown below to include our view.
<!--?xml version="1.0" encoding="utf-8"?-->
Here, add a new Android Activity to the project and modify it with following code to display the message and sender’s email ID.
[Activity (Label = "Email:")]
public class MessageBodyActivity : Activity
{
  protected override void OnCreate (Bundle bundle)
  {
    base.OnCreate (bundle);
    var id = Intent.GetStringExtra ("Id");
    if(string.IsNullOrWhiteSpace(id))
      return;

    var message = MyGlobalDeclaration.Messages.FirstOrDefault (m => m.Id == id);

    if(message == null)
      return;

    SetContentView (Resource.Layout.Message);
    var fromText = FindViewById (Resource.Id.fromText);
    var bodyText = FindViewById (Resource.Id.bodyText);
    fromText.Text = message.From.Address;
    bodyText.SetText(Html.FromHtml(message.Body.Content), TextView.BufferType.Spannable);
  }
}
This completes our amazing Office 365-enabled mobile app! Debug the application, and login with your Office 365 account. This should show all the mails in your inbox, and, if you click on any mail item, it should take you to its detailed view.
I want to reiterate here that you are not just limited to fetching mails from the inbox like we did in this example, but you can fetch calendar events, get files from OneDrive for Business, or even browse through sites available under SharePoint Online.
I hope that this was a great introduction on how you can use the brand new Office365 API in your Xamarin.iOS and Xamarin.Android applications. You can download the full source code for this sample on my GitHub.