Programming for Google Cardboard on iOS using F#
One of the highlights of Xamarin Evolve is the Darwin Lounge, a hall filled with programmable devices ranging from robots to iBeacons and quadcopters to wearables. One thing that was particularly intriguing this year was a stack of kits from DodoCase, “inspired by Google Cardboard.” Google Cardboard is an inexpensive stereoscope that exploits the ridiculously small pixels of modern phones. Instead of synchronizing two displays, it directs your eyes separately to the two halves of a phone screen in portrait mode.
Unfortunately, all of the resources for programming Google Cardboard have been Android only. This is not the Xamarin way and could not stand! Luckily, Joel Martinez had written a 3D demo for our talk, Make Your Apps Awesome With F#, and it was just a matter of a quick hacking session to see our Xamarin.iOS code in glorious stereoscopic 3D.
Functional Refactoring
As Mike Bluestein has written previously, the easiest way to program 3D on iOS is to use Scene Kit, which is what Joel and I had done for our demo. Stereoscopic programming in Scene Kit, as it turns out, is easy!
One great aspect of F# and the functional programming style is that refactoring is often easier than object-oriented refactoring. Instead of creating new objects and data structures, you’re generally focusing on “minimizing the moving parts” and extracting common functionality into reliable functions.
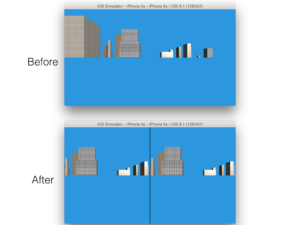
For instance, the first thing we needed to do was switch from a single UIView to two side-by-side views. We refactored this code:
//Configure view
let r = new RectangleF(new PointF(0.0f, 0.0f), new SizeF(UIScreen.MainScreen.Bounds.Size))
let s = new SCNView(r)
configView s scene |> ignore
this.View <- s
into this code:
//Configure views
let outer = new UIView(UIScreen.MainScreen.Bounds)

let ss =
    [
        new RectangleF(new PointF(0.0f, 0.0f), new SizeF(float32 UIScreen.MainScreen.Bounds.Width / 2.0f - 1.0f, UIScreen.MainScreen.Bounds.Height));
        new RectangleF(new PointF(float32 UIScreen.MainScreen.Bounds.Width / 2.0f + 1.0f, 0.0f), new SizeF(UIScreen.MainScreen.Bounds.Width / 2.0f -1.0f, UIScreen.MainScreen.Bounds.Height));
    ]
    |> List.map (fun r -> new SCNView(r))
    |> List.map (fun s -> outer.AddSubview(configView s scene); s)

this.View <- outer
Although you may be more familiar with C# than F#, you should be able to follow what’s going on in the original snippet. We had a RectangleF as big as the entire screen’s Bounds. We created a single SCNView called s. We configured s to show our scene and then, because we don’t need to do any more manipulation on the result of that calculation, we called the ignore function with the result (the |> is F#’s pipe operator, which works just like the familiar pipe operator on the UNIX command-line or PowerShell). Finally, we assigned this single SCNView to be the main View of our controller object.
To refactor, we introduce an outer view that will contain our two eye-specific views. We then use the |> operator again to:
- Create a 2-element list of
RectangleFs, each a half-screen wide - Create an
SCNViewfor each one of those - Configure each
SCNViewwith thescene - Add them to the
outercontainerUIView
Now we have two side-by-side SCNViews, but each is rendering the exact same scene, so there is no 3D effect. Scene Kit is a scene-graph toolkit, and to get a stereoscopic 3D effect, we’re going to need two camera nodes slightly separated in space. That’s easy. We replace:
//Camera!
let camNode = new SCNNode()
camNode.Position <- new SCNVector3(0.0F, 0.0F, 9.0F)
scene.RootNode.AddChildNode camNode
With:
//Cameras!
let camNode = new SCNNode()
let leftCamera = buildCamera camNode (new SCNVector3 (0.0F, 0.0F, 9.0F))
let rightCamera = buildCamera camNode (new SCNVector3 (0.2F, 0.0F, 9.0F))
Note the slight difference in the first argument to the SCNVector3 constructor – this eye-position vector is the “moving part” that we want to isolate. So now our camNode has two subnodes, each containing a node that defines one of our eye positions.
The buildCamera function is:
let buildCamera (parent : SCNNode) loc =
    let c = new SCNNode()
    c.Camera <- new SCNCamera()
    parent.AddChildNode (c)
    c.Position <- loc
    c
It’s worth emphasizing that this function is strongly-typed. Even though it doesn’t explicitly state that loc is an SCNVector or that it returns an SCNNode, F#’s type inference is powerful enough to figure that out and enforce the types at compile-time. (As for programming style: “Is it better to explicitly declare types in the function signature or let them be implicit?” is the type of discussion that happens both in the Darwin Lounge and at Xamarin Evolve parties…)
Now we have two scenes and two camera nodes. To join them together, we use:
//Set PoVs to shifted cameras
ss.Head.PointOfView <- leftCameraNode
ss.Tail.Head.PointOfView <- rightCameraNode
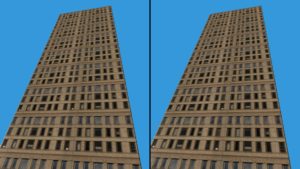
And there you have it! In the following image, you can see the converging perspective of the building climbing into the sky.
This might not be ready for the Avatar sequel, but it’s really cool when viewed through Cardboard!
Here’s something James Cameron can’t do, though: exploit the gyroscope and accelerometer on iOS devices. This block of code shifts the orientation of the camNode camera node so that it tracks the direction in which the user is looking:
    let rr = CMAttitudeReferenceFrame.XArbitraryCorrectedZVertical
    this.motion.DeviceMotionUpdateInterval <- float (1.0f / 30.0f)
    this.motion.StartDeviceMotionUpdates (rr,NSOperationQueue.CurrentQueue, (fun d e ->
        let a = this.motion.DeviceMotion.Attitude
        let q = a.Quaternion
        let dq = new SCNQuaternion(float32 q.x, float32 q.y, float32 q.z, float32 q.w)
        let dqm = SCNQuaternion.Multiply (dq, SCNQuaternion.FromAxisAngle(SCNVector3.UnitZ, piover2))
        camNode.Orientation <- dqm

       ()
    ))
Which looks like this in action:


 Light
Light Dark
Dark
0 comments