
Azure Functions are a serverless, event-driven development experience that can easily integrate into any mobile app or Azure Mobile App backend. This means you can run nanoservices in Azure that scale seamlessly and only pay for the resources your function consumes. I have fallen in love with them and have been leveraging Azure Functions in some unique ways to integrate into my mobile apps.
![]()
Previously, Pierce showed us how to easily integrate the Cognitive Services Vision SDK into your Xamarin application to perform Optical Character Recognition (OCR) on an invoice to find the total.
Today, I want to show you how to upload an invoice directly into Azure Blob Storage from any device, perform OCR in Azure Functions, store the results in your Azure Mobile App, and sync it directly into your mobile app. You’ll be able to upload invoices from several devices including mobile, web, and forwarded email.
Spin Up an Azure Mobile App Backend
You could leverage any existing Azure Mobile App backend, but I decided to create “Mobile App Quickstart” leveraging Easy Tables. I created a new table called ocritem that has a few properties, including the total, text, and URL for the image that was uploaded. That’s all we need to set up our backend; now it’s time to add our Azure Function.
Creating Your First Azure Function
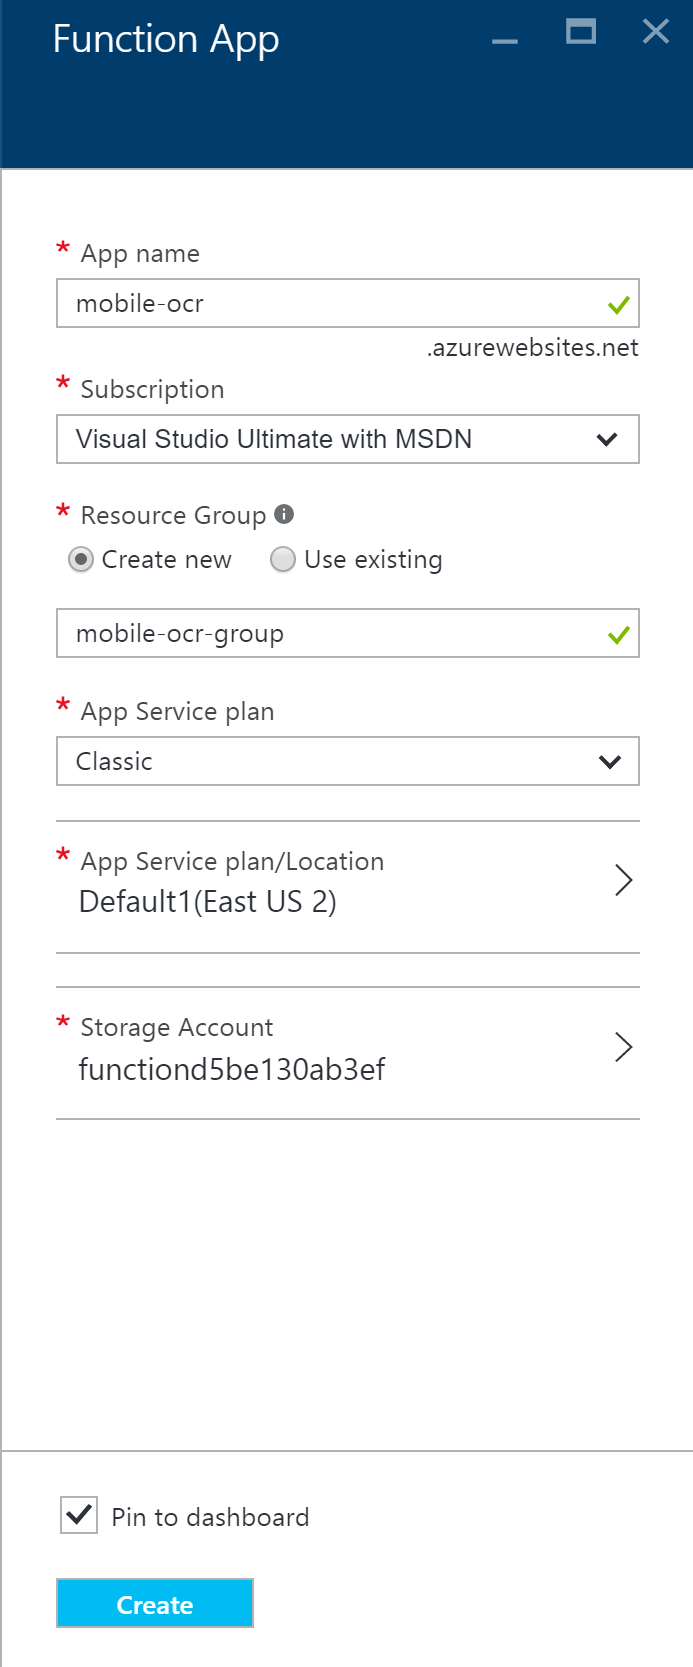
To get started with Azure Functions, you just need to create a Function App. This can be found under New -> Web + Mobile -> Function App:

There are a few items to fill in, as it runs as a unique Azure website. Additionally, it will create a new storage account where it will be possible to upload and manage images.
When the Function app is created, we’ll see a new page enabling us to create a new function. Tap on the New Function button on the top left, which will bring us to pre-built templates. Select the first option, which is BlobTrigger – C#, to trigger our function whenever a new item is added into blob storage so we can process it.
Function Overview
A Function app has its own app settings and four main sections that developers can interact with. We’re only concerned with the settings and two of the sections:
- Develop: Where all of the C# source code will live that will be executed.
- Integrate: Defines the trigger, input, and output in relation to the function.
Defining the workflow
Before we write any code, we need to set up the integration trigger and output that will store a record in our Azure Mobile App table. Selecting the Integrate tab will bring up a simple workflow diagram with the trigger already defined from the template.

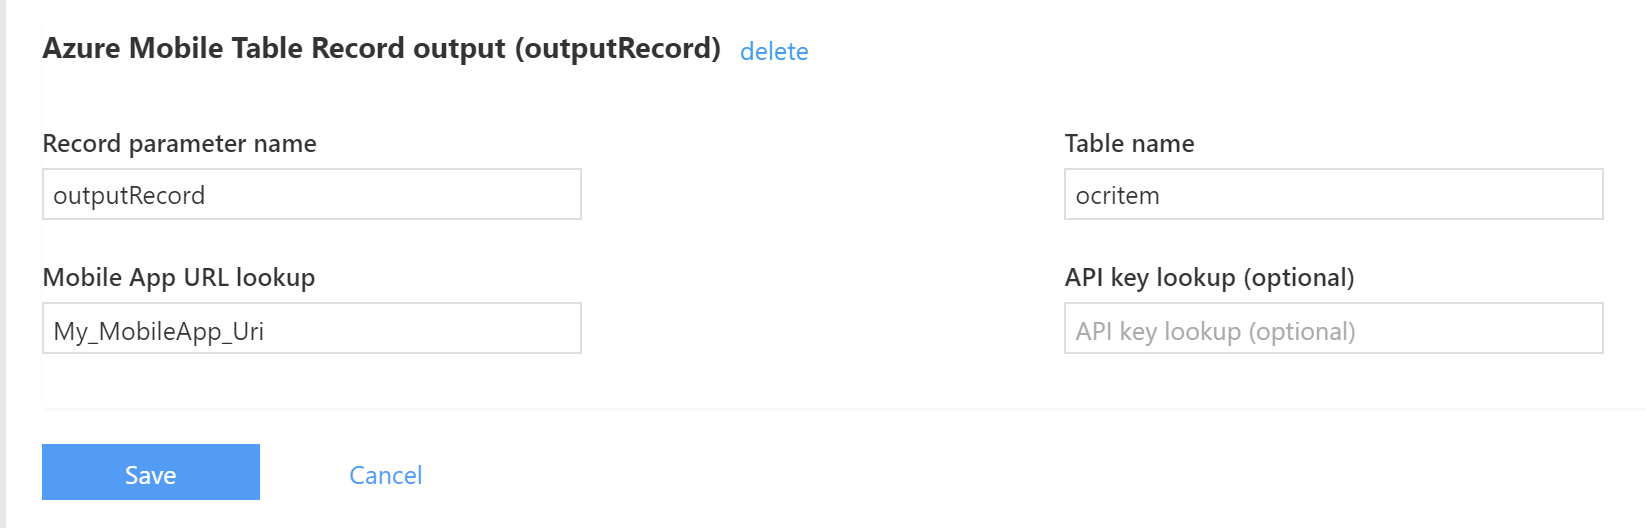
The trigger will pass us information about the blob so there is no need for additional input. We will, however, create a New Output, which will be the Azure Mobile Table Record:

After tapping select, we can configure the output record’s settings. The only thing that we’ll change is the Table name, as we have created one called ocritem in our Mobile App.
*For this example we are not using any authentication for the table, but in a full production app we’d want to set up an API Key to authenticate our Function App and enable communication with our Azure Mobile App tables.
Connecting to our Azure Mobile App
Right now, our Azure Function doesn’t know where to look for our Azure Mobile App backend. This can be configured in the Function app setting’s Advanced Settings. Simply tap the Go to App Service Settings, which will open a new blade where we can configure additional settings:

Under All Settings -> General -> Application Settings -> App Settings, we’ll want to create a new Key/Value pair with the key specified as My_MobileApp_Uri (which was the identifier from the output setting we just created) and the Value as the full URL of your Azure Mobile App. In my case: https://mobile-app-ocr.azurewebsites.net

Tap Save and head back to the main Function App, as it’s now time to write some code under the Develop tab.
Importing Cognitive Services
On the Develop tab we’ll see a large section called Code that enables us to write any C# and have it execute when an event is triggered. To utilize NuGets we’ll add a new file to the project. Tap on the View files link under the Code section and tap the plus icon and create a file called project.json.
Then simply paste the following json:
{
  "frameworks": {
    "net46":{
      "dependencies": {
        "Microsoft.ProjectOxford.Vision": "1.0.354"
      }
    }
   }
}
Save the file, and then it’s time to write some code.
Processing Images in the Azure Function
Back in the run.csx file we can finally write our logic that will process the blob image and import it into our Azure Mobile App backend.
First, let’s bring in a few namespaces. This can be done with the standard using matched with a new #r define for certain namespaces:
#r "Microsoft.WindowsAzure.Storage"
#r "System.Runtime"
#r "System.Threading.Tasks"
#r "System.IO"

using System;
using System.Linq;
using System.Runtime;
using System.Threading.Tasks;
using Microsoft.WindowsAzure.Storage.Blob;
using Microsoft.ProjectOxford.Vision;
Then, we can update the Run method’s parameter’s with our known inputs and outputs from our settings:
public static void Run(ICloudBlob myBlob, TraceWriter log, out object outputRecord)
This method will get triggered every time a new item is added and we can now call directly into the Vision APIs. You’ll have had to request a new Vision API Key from the Cognitive Services portal for this. Similar to Pierce’s app, we’ll process the image, parse for a number, and then create a new record that will be inserted into our Azure Mobile App:
var client = new VisionServiceClient("YOUR_API_KEY_HERE");

log.Info($"C# Blob trigger function processed: {myBlob.Uri.ToString()}");

var url = myBlob.Uri.ToString();
var result = client.RecognizeTextAsync(url).Result;

var words = from r in result.Regions
        from l in r.Lines
        from w in l.Words
        select w.Text;

var output = string.Join(" ", words.ToArray());

log.Info($"Complete output from OCR: {output}");

 var numbers = from word in words
                where word.Contains("$")
                select word.Replace("$", "");

double temp = 0.0;
var total = numbers.Count() == 0 ? 0 : numbers.Select(x => double.TryParse(x, out temp) ? temp : 0).Max();

log.Info($"We found the total of: {total}");


outputRecord = new
{
    Total = total,
    TimeStamp = DateTime.UtcNow,
    Url = url,
    Text = output
};
When we tap Save, our code will be compiled and ready to execute. The Logs underneath the code will confirm that the method has been successfully compiled or if any errors have been found.
Uploading Blobs
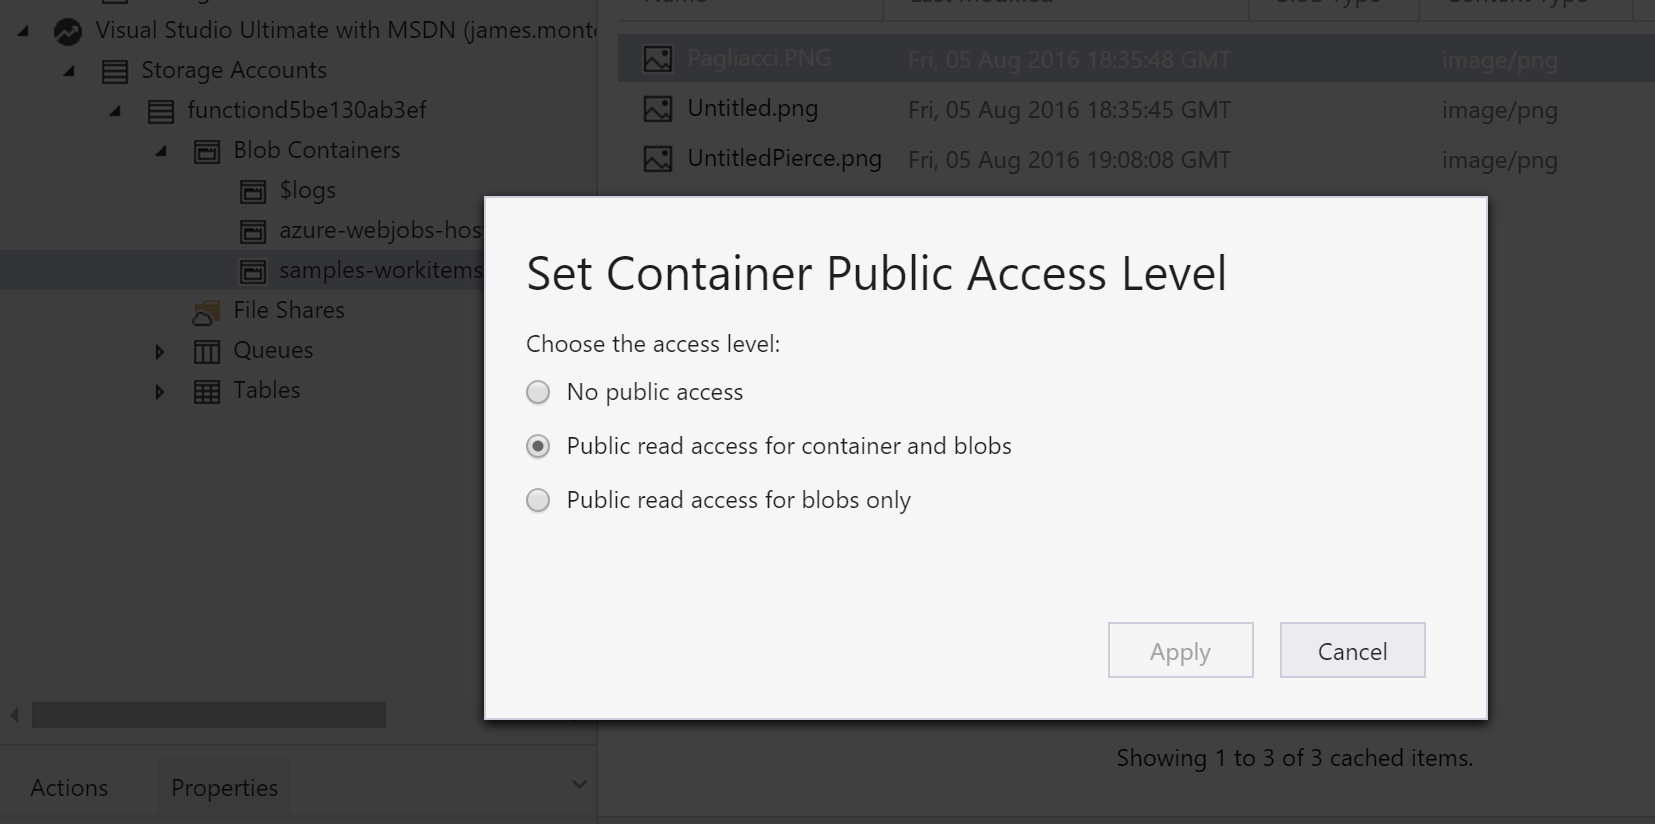
The trigger that we created will happen in our Azure blob storage no matter where the image is uploaded from. This means we could add an upload from an app or from a website with just a few lines of code. For this example, we’ll use the new Azure Storage Explorer application to allow us to drag and drop files to upload to blob storage. Download the app and sign in with your Azure account. Under Storage Accounts, find the account that was created for the Function. Right click on the Blobs Containers, select “Create Blob Container” and name it samples-workitems, which is what the trigger will be looking for:

Then, let’s make this container and blog accessible to the public by right clicking on the container and selecting Set container access level… and then setting it to Public Read:
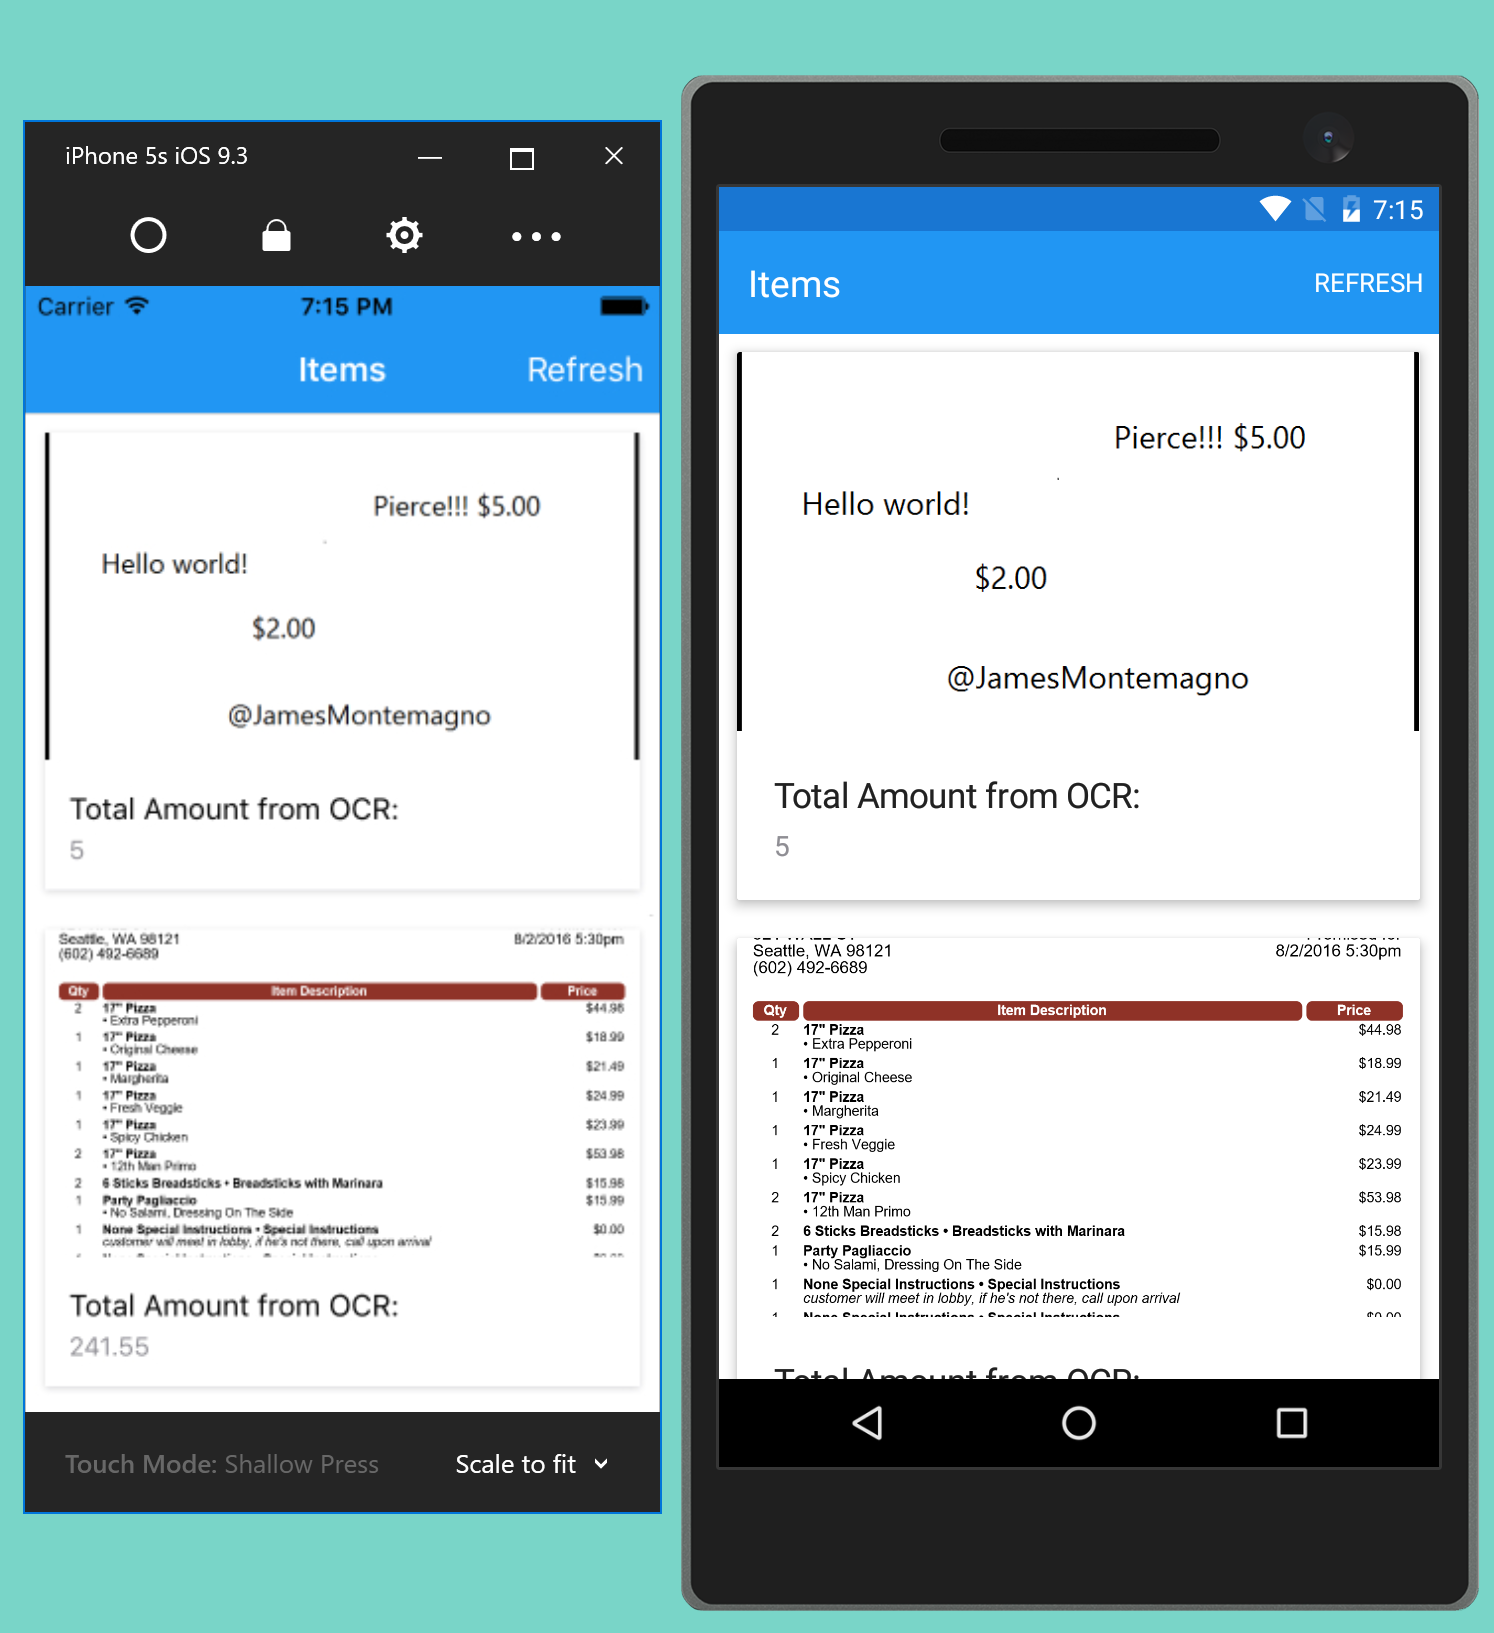
Finally, we can drag and drop an image and it will be uploaded into the container. The Function will then trigger to process it and insert it into our mobile app. For instance, here’s a sample image and the results:
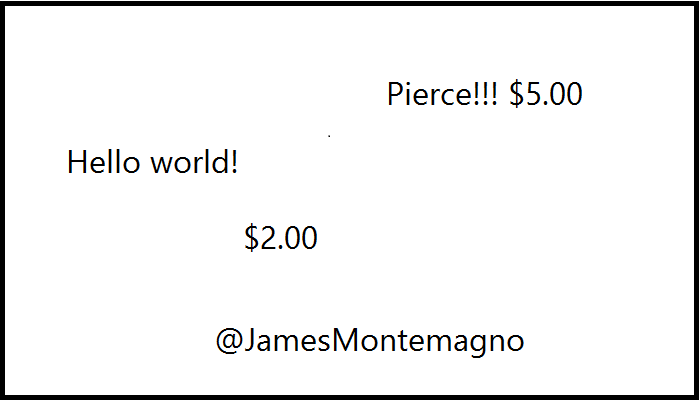
2016-08-05T21:53:06  Welcome, you are now connected to log-streaming service.
2016-08-05T21:53:37.197 Function started (Id=cbf5db4e-acc9-4bdb-9767-c7e509001568)
2016-08-05T21:53:37.272 C# Blob trigger function processed: https://functiond5be130ab3ef.blob.core.windows.net/samples-workitems/UntitledPierce.png
2016-08-05T21:53:38.403 Complete output from OCR: Pierce!!! $5.00 Hello world! $2.00 @JamesMontemagno
2016-08-05T21:53:38.403 We found the total of: 5
2016-08-05T21:53:38.403 Function completed (Success, Id=cbf5db4e-acc9-4bdb-9767-c7e509001568)
Back in our Azure Mobile App, we can look at the items in the table to verify that the function created a new entry:

Consuming Azure Mobile Apps Backends with Xamarin
Since we used an Azure Mobile App backend, we can easily consume all of this data that has been processed by the Azure Function with the Azure Mobile Apps SDK. As a quick example, I created a single page application leveraging Xamarin.Forms Data Pages to consume the Azure Mobile App data. You can get the full source code for this app on my GitHub.
Here it is in action:
Learn More
This just scratches the surface of what you can do with Azure Functions as a tool for your Xamarin mobile applications. To learn more about Azure Functions, be sure to browse the entire documentation, and specifically be sure to read through the Azure Function Mobile Apps bindings, which we used here. To see how to create a full serverless backend using Azure Functions, be sure to read the next blog in the series.