
 As organizations continue moving to the cloud, it’s increasingly important to monitor resource usage and predict expenses with the ‘Pay-As-You-Go’ model. This common payment model in cloud technology can be used to save expenses, but can often turn into a white elephant if not monitored properly. To achieve maximum cost saving, Microsoft introduced the Azure Billing API. In this blog post, we’re going to learn how to utilize these APIs to build our own Azure consumption tracking application for iOS, Android, and Windows using Xamarin.Forms.
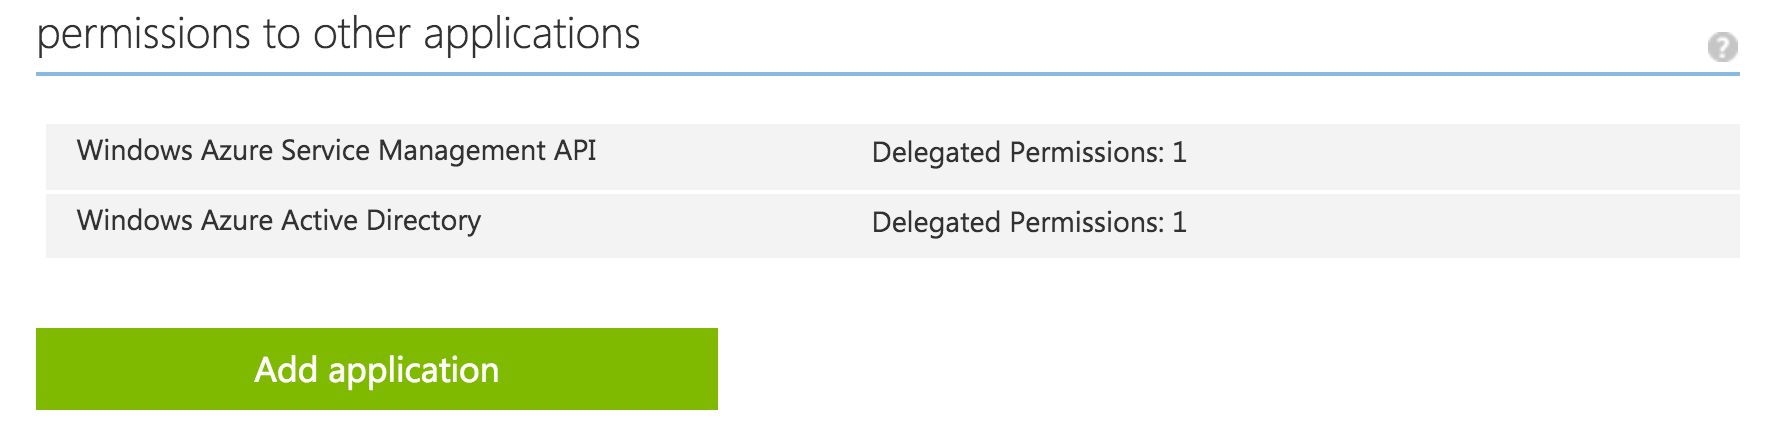
Step 1: Register and Provide API Access to Mobile Apps
Authenticating mobile apps using Azure Active Directory is super easy with Xamarin. In this particular scenario, we need to give access to the “Windows Azure Service Management API”. Click “add application” and provide access to all of the APIs you wish to use in your resource manager. To get started, click “Add application” and provide access to the APIs below in the Azure Portal. Be sure to keep “Windows Azure Active Directory” permissions as they are, without making any changes. Be sure to write down your “ClientId” and “Redirect Uri”, as it will be required in a later step.
Step 2: Define Variables and Authenticate Your App with ADAL
Now that all of the server-side configuration has been taken care of, it’s time to get started building our consumption tracking app! Create a new class to handle communication between the Azure Billing API and your app and add the following variables to your class. Be sure to enter your ClientId and Redirect Uri from Step 1.
public static string ClientId = "<your-client-id>";
public static string LoginAuthority = "https://login.microsoftonline.com/<your-tenant-id>";
public static string ReturnUri = "<your-redirect-uri>";
public static string GraphResourceUri = "https://graph.windows.net/";
public static string ManagementResourceUri = "https://management.core.windows.net/";
public static AuthenticationResult AuthenticationResult = null;
public static Subscription SelectedSubscription { get; set; }
We will use the same interface here to handle our authentication as we did for the IAuthenticator interface while using the Active Directory Authentication Library (ADAL) in Xamarin.Forms. The Authenticate method should return an AuthenticateResult object from ADAL, which contains the AccessToken and other required details for further API calls. The AuthenticateSilently method is used to re-authenticate with the API, without having to request new access tokens.
public interface IAuthenticator
{
   Task<AuthenticationResult> Authenticate(string authority, string resource, string clientId, string returnUri);
   Task<AuthenticationResult> AuthenticateSilently(string tenantId, string resource, string clientId);
}
Next, implement the IAuthenticator interface. We’ve already done the heavy lifting for you by implementing the Authenticate method, which requires a per-platform implementation. It is not required to write AuthenticateSilently on a per-platform basis:
public async Task<AuthenticationResult> AuthenticateSilently (string tenantId, string resource, string clientId)
{
   var loginAuthnority = "https://login.microsoftonline.com/" + tenantId;
   var authContext = new AuthenticationContext (loginAuthnority);
   var authResult = await authContext.AcquireTokenSilentAsync(resource, clientId,
        new UserIdentifier(App.AuthenticationResult.UserInfo.UniqueId, UserIdentifierType.UniqueId));
   return authResult;
}
Step 3: Call Azure Usage APIs
Once authenticated, we can get tenants by calling the Azure Resource Management (ARM) API. Each tenant may have Azure subscriptions, so we’ll need to call the GetSubscriptions method for each one. Once we have a list of subscriptions, we can call the Azure Usage API to get usage details for each subscription:
private async Task GetTenants()
{
   var requestUrl = "https://management.azure.com/tenants?api-version=2015-01-01";
   try {
      var tenantResponse = await client.GetStringAsync(requestUrl);
      tenantCollection = JsonConvert.DeserializeObject<TenantResponse> (tenantResponse);
   }
   catch (Exception ex) {
      await DisplayAlert("Error!", ex.Message, "Dismiss");
   }
   foreach (var tenant in tenantCollection.TenantCollection) {
         await GetSubscriptions (tenant.TenantId);
   }
}

private async Task GetSubscriptions(string tenantId)
{
   var requestUrl = "https://management.azure.com/subscriptions?api-version=2015-01-01";
   try {
      var data = await DependencyService.Get<IAuthenticator> ().AuthenticateSilently (tenantId,
                 App.ManagementResourceUri, App.ClientId);
    client.DefaultRequestHeaders.Authorization = new System.Net.Http.Headers.AuthenticationHeaderValue("Bearer", data.AccessToken);
    var subsriptionResponse = await client.GetStringAsync (requestUrl);
    var subscriptions = JsonConvert.DeserializeObject<SubscriptionResponse>(subsriptionResponse);
    foreach (var subscription in subscriptions.SubscriptionCollection) {
       SubscriptionCollection.Add(subscription); }
    IsFirstRunComplete = true; }
    catch (Exception ex) {
    await DisplayAlert("Error!", ex.Message, "Dismiss"); }
}
Once you get the list of subscriptions, you can select one and fetch usage details for that particular subscription:
var requestUrl = String.Format("https://management.azure.com/subscriptions/{0}/providers/Microsoft.Commerce/UsageAggregates?
          api-version=2015-06-01-preview&reportedStartTime={1}&reportedEndTime={2}&aggregationGranularity=Daily&showDetails=false",
          App.SelectedSubscription.SubscriptionId, startTime, endTime);
var usageData = await client.GetStringAsync (requestUrl);
var data = JsonConvert.DeserializeObject<AzureTracker.Model.UsageResponse> (usageData);
After you have the details, you can show them in a list or fetch more details about each subscription individually.
![]()
Bring Your Consumption Tracker to the Next Level
To see the Azure Billing API in action, download our sample and get started building your own Azure Consumption Tracker for iOS, Android, and Windows today! You can also add features like predicting future expenses or charts and graphs to help analyze usage thus far to make the app your own.