
Every front end needs a great backend. This is true now more than ever in today’s connected world, where it’s extremely important to have your data with you at all times, even if you are disconnected from the internet. There are tons of great solutions available for Xamarin developers including Couchbase, Parse, Amazon, Oracle, and, of course, Microsoft Azure. 
Using Azure Mobile Apps
In the past, we looked at the brand new Azure Mobile Apps, which gives you a full .NET backend providing complete control over how data is stored and retrieved for your mobile apps. What if you need a backend right now with the minimal setup? That is where Azure Mobile Apps’ brand new Easy Tables come in. How easy are Easy Tables? So easy that you can add backend data storage to your app in as little as 15 minutes! The best part is that if you’ve used any Azure Mobile Services or Azure Mobile Apps, you’ll feel right at home.
Keeping Track of Coffee Consumption
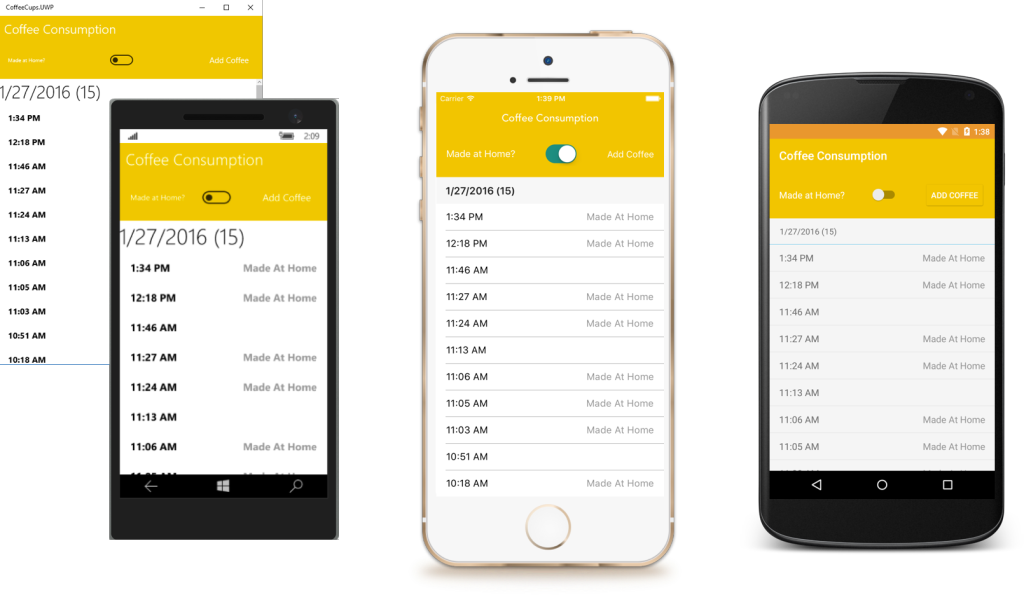
If you follow me on social media or have seen me present, then you know I love coffee; I’m drinking one as I type this! That’s why I thought that for this post I would build a cross-platform app to help me keep track of just how many coffees I’m consuming each day. I call it “Coffee Cups”, and we’ll be building it throughout this post. Here’s the final version in action:
Creating a New Azure Mobile App
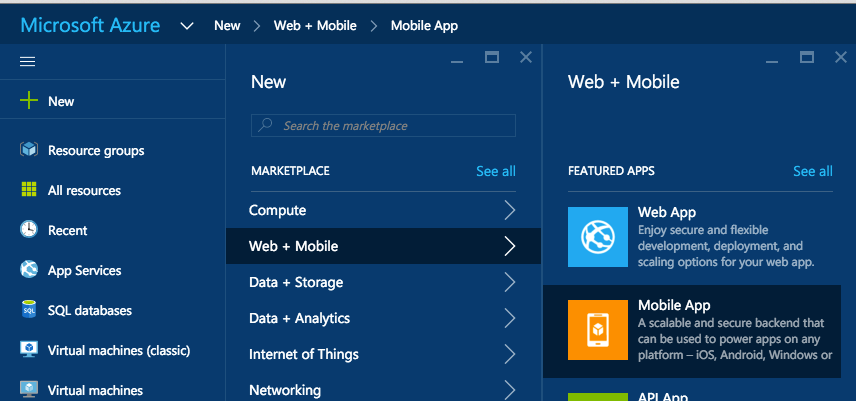
Inside of the Azure portal, simply select New -> Web + Mobile -> Mobile App, which is the starting point to configure your Azure Mobile App backend.
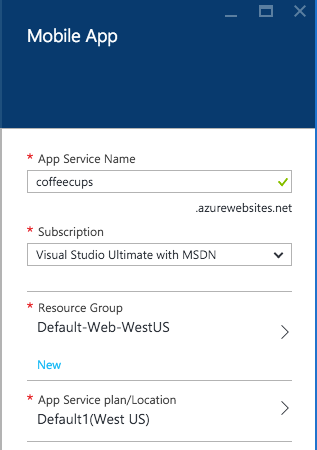
When selecting Mobile App in Azure, you will need to configure the service name (this is the URL where your backend web app/ASP.NET website will live), configure your subscription, and set your resource group and plan. I call Seattle home, so I’ve selected the default West US locations:
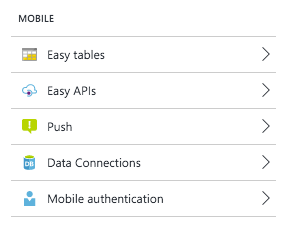
Give Azure a few minutes to deploy your mobile app, and once deployed, the Azure portal will bring you directly to the configuration screen with the settings tab open. All of the settings we’ll adjust can be found under the Mobile section:
Add Data Connection
We can’t have a backend for our mobile apps without a database. Under the Data Connections section, select Add, and then configure a new SQL database as I’ve done below:
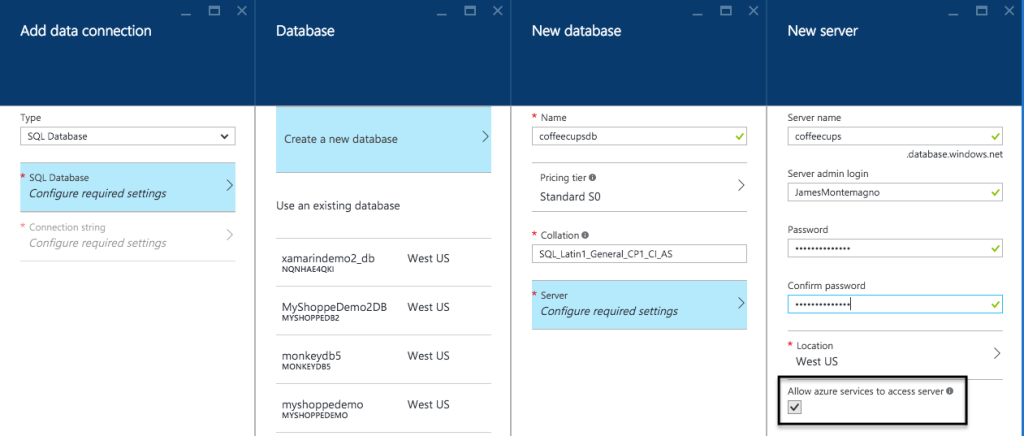
Make sure that you keep Allow azure services to access server checked for your mobile app to allow services to properly connect to the database server. Also, be sure to keep your password in a secure place as you may need it in the future.
Click OK on all open blades and Azure will begin to create the database for us on the fly. To see the progress of database creation live, click on the notifications button in the upper-righthand corner:

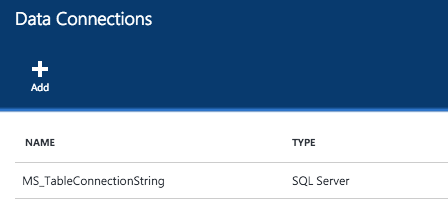
When the data connection is created, it will appear in the Mobile Apps data connections blade, which means it’s time to set up the data that will go in the new database.
Adding a New Table
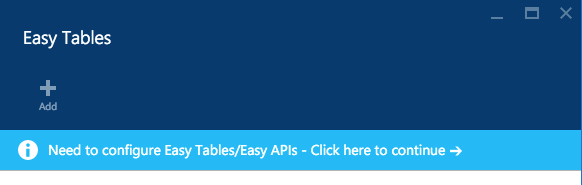
Under Mobile settings is a new section called Easy Tables, which enable us to easily set up and control the data coming to and from the iOS and Android apps. Select the Easy Tables section, and we’ll be prompted with a big blue warning asking us to configure Easy Tables/Easy APIs:
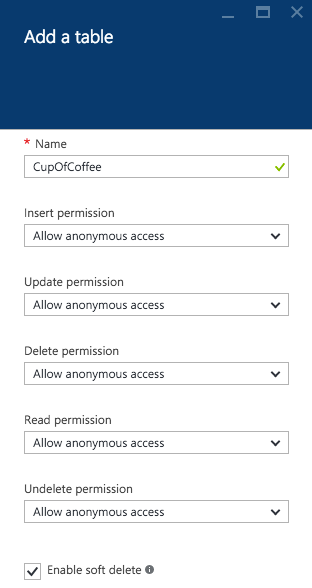
Since we already set up the database, the only thing left to do is Initialize the app.

After a few moments, the app will be fully initialized so we can add our first table of the database named CupOfCoffee. If you are adding Azure Mobile Apps to an existing application, this table name should match the class name of the data you wish to store. The beautiful part of Easy Tables is that it will automatically update and add the columns in the table dynamically based on the data we pass in. For this example, I’ll simply allow full anonymous access to the table, however, it is possible to add authentication with Facebook, Twitter, Google, Microsoft, and other OAuth login providers.
Adding Sync to Mobile Apps
With our backend fully set up on Azure, it’s now time to integrate the Azure Mobile SDK into your mobile apps. The first step is to add the Azure Mobile Apps NuGet package that’s named Azure Mobile SQLiteStore. This package sits on top and includes the Mobile Services Client SDK to connect to our backend and adds full online/offline synchronization and should be added to all application projects. For example CoffeeCups is written using Xamarin.Forms, so I added the NuGet to my PCL, iOS, Android, and Windows projects:

Initialize the Azure Mobile Client
Add the Azure Mobile Client SDK initialization code in the platform projects. For iOS, the following code must be added to the FinishedLaunching method of the AppDelegate class:
Microsoft.WindowsAzure.MobileServices.CurrentPlatform.Init();
SQLitePCL.CurrentPlatform.Init();
For Android, add the following to the OnCreate method of your MainActivity:
Microsoft.WindowsAzure.MobileServices.CurrentPlatform.Init();
The Data Model
It’s now time to create the data model that we’ll use locally to display information, but also save in our Azure Mobile App backend. It should have the same name as the table that we created earlier. There are two string properties required to ensure the Mobile Apps SDK can assign a unique identifier and version in case any modifications are made to the data. Here is what the CupOfCoffee model looks like:
public class CupOfCoffee
{
    [Newtonsoft.Json.JsonProperty("Id")]
    public string Id { get; set; }

    [Microsoft.WindowsAzure.MobileServices.Version]
    public string AzureVersion { get; set; }

    public DateTime DateUtc { get; set; }
    public bool MadeAtHome{ get; set; }

    [Newtonsoft.Json.JsonIgnore]
    public string DateDisplay {  get { return DateUtc.ToLocalTime().ToString("d"); } }

    [Newtonsoft.Json.JsonIgnore]
    public string TimeDisplay {  get { return DateUtc.ToLocalTime().ToString("t"); } }
}
Notice the model has a UTC DateTime that will be stored in the backend, but also has two helper properties for a display date and time. They are marked with a JsonIgnore property and will not be persisted in the database.
Accessing Mobile App Data
It’s now time to use the Mobile App SDK to create a MobileServiceClient that will enable us to perform create, read, update, and delete (CRUD) operations that will be stored locally and synchronized with our backend. All of this logic will be housed in a single class, which for this app is called “AzureDataService” and has a MobileServiceClient and a single IMobileServiceSyncTable. Additionally, it has four methods to Initialize the service, get all coffees, add a coffee, and synchronize the data with the backend:
public class AzureDataService
{
    public MobileServiceClient MobileService { get; set; }
    IMobileServiceSyncTable coffeeTable;

    public async Task Initialize()
    {
    }

    public async Task<IEnumerable> GetCoffees()
    {
    }

    public async Task AddCoffee(bool madeAtHome)
    {
    }

    public async Task SyncCoffee()
    {
    }
}
Creating the Service and Table
Before we can get or add any of the data we must create the MobileServiceClient and the SyncTable. This is done by passing in the URL of the Azure Mobile App and specifying the file in which to store the local database:
public async Task Intialize()
{
    //Create our client
    MobileService = new MobileServiceClient("https://coffeecups.azurewebsites.net");

    const string path = "syncstore.db";
    //setup our local sqlite store and intialize our table
    var store = new MobileServiceSQLiteStore(path);
    store.DefineTable();
     await MobileService.SyncContext.InitializeAsync(store, new MobileServiceSyncHandler());

    //Get our sync table that will call out to azure
    coffeeTable = MobileService.GetSyncTable();
}
Synchronize Data
Mobile devices often lose connectivity, so it’s vital that our app continue to function properly even in low or no connectivity environments. Azure makes this extremely easy; with just a few lines of code, Azure automatically syncs our local database and the backend when connectivity is reestablished:
public async Task SyncCoffee()
{
    //pull down all latest changes and then push current coffees up
    await coffeeTable.PullAsync("allCoffees", coffeeTable.CreateQuery());
    await MobileService.SyncContext.PushAsync();
}
Retrieving Data
The IMobileServiceSyncTable offers a very nice asynchronous and LINQ queryable API to get data from our backend. This can be done to grab all of the data or filter it down by a property, such as an Id. In this instance, we’ll simply synchronize our local data with the backend before fetching all cups of coffee, sorted by the date:
public async Task<IEnumerable> GetCoffees()
{
    await SyncCoffee();
    return await coffeeTable.OrderBy(c => c.DateUtc).ToEnumerableAsync();
}
Inserting Data
In addition to getting all of the latest data, we can insert, update, and even delete data that will be kept in sync between devices.
public async Task AddCoffee(bool madeAtHome)
{
    //create and insert coffee
    var coffee = new CupOfCoffee
    {
      DateUtc = DateTime.UtcNow,
      MadeAtHome = madeAtHome
    };

    await coffeeTable.InsertAsync(coffee);

    //Synchronize coffee
    await SyncCoffee();
}
Now from my mobile app I can simply create my AzureDataService and start querying and adding coffees through the day, all in under 70 lines of code.
Learn More
In this post we’ve covered setting up the basic Azure Mobile App’s Easy Tables to perform CRUD and sync operations from our mobiles apps. In addition to this, you have full access to the service code and can customize it right from the portal (using the edit script option in Easy Tables and even custom scripts with Easy APIs). Be sure to check out all of the additional services provided by Azure Mobile App Services such as authentication and push notifications on the Azure portal. You can try out Azure Mobile Apps by downloading this Coffee Cups sample from my GitHub or by testing pre-built samples\ apps on the Try App Services page.