
There are several ways to extend Xamarin.Forms to finely tune your apps’ user interfaces, including the use of custom renderers and, more recently, effects. Sometimes, though, you just want to take a native control and place it directly into your Xamarin.Forms application without any of the ceremony and code around these two other approaches. This is where the newly announced Native Embedding (Xamarin.Forms 2.2.0+) feature comes in, enabling you to easily add a native control to any Xamarin.Forms layout.
Set Up for Embedding Native Controls
It’s easier and recommended to use Shared Projects for native embedding since the feature is exposed as platform extension methods on a Xamarin.Forms layout control, but it can also be accomplished by exposing the layout in a portable class library. Since we’ll use a shared project, we can use conditional compilation for each platform we wish to add the native control too. For this blog, we’ll take a look at how to embed an Android and iOS control onto a Xamarin.Forms app that has a ListView on it.
Currently, the code is a simple ListView inside of an AbsoluteLayout:
var list = new ListView();
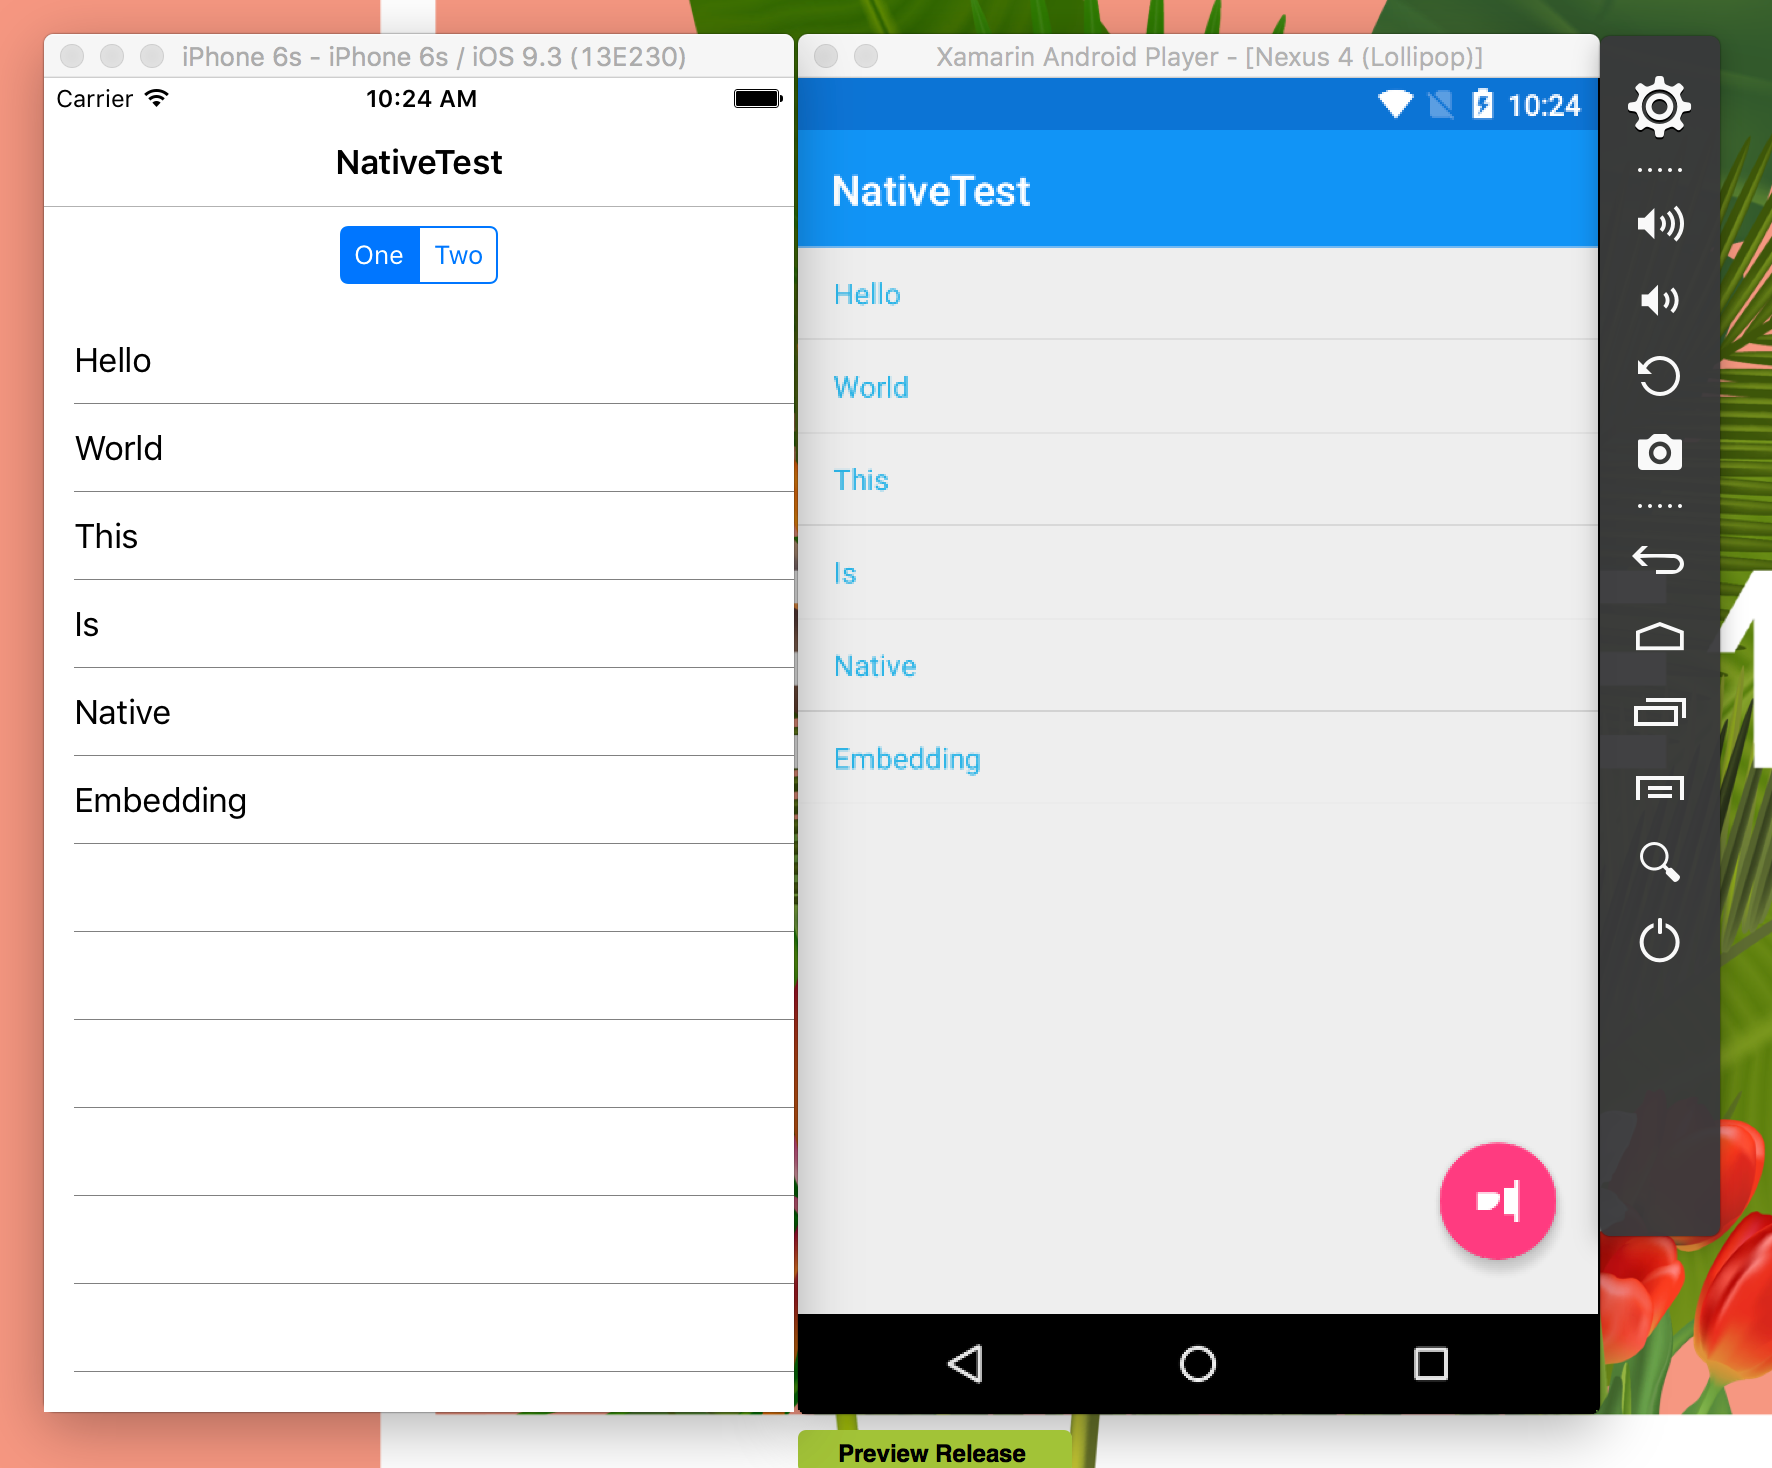
list.ItemsSource = new[] { "Hello", "World", "This", "Is", "Native", "Embedding" };
// Main page layout
var pageLayout = new StackLayout
{
Children = { list }
};
var absolute = new AbsoluteLayout()
{
VerticalOptions = LayoutOptions.FillAndExpand,
HorizontalOptions = LayoutOptions.FillAndExpand
};
// Position the pageLayout to fill the entire screen.
// Manage positioning of child elements on the page by editing the pageLayout.
AbsoluteLayout.SetLayoutFlags(pageLayout, AbsoluteLayoutFlags.All);
AbsoluteLayout.SetLayoutBounds(pageLayout, new Rectangle(0f, 0f, 1f, 1f));
absolute.Children.Add(pageLayout);
var stack = new StackLayout
{
Padding = 8,
HorizontalOptions = LayoutOptions.Center,
};
//Embed Native Controls here to add to StackLayout above
// The root page of your application
var content = new ContentPage
{
Title = "Native Embedding",
Content = absolute
};
MainPage = new NavigationPage(content);
Android Floating Action Button
At Xamarin Evolve Jérémie and I gave a talk on Material Design for Android applications where Jérémie showed off an amazing vector drawable animation in a FAB. Let’s leverage the hard work Jérémie did for his traditional Android app and bring it over to a Xamarin.Forms application. To get this working, we’ll copy over Jérémie’s CheckedFab code and resources from his Buzzeroid application.
At the top of this page, we’ll bring in a few Android specific namespaces
#if __ANDROID__
using Xamarin.Forms.Platform.Android;
using NativeTest.Droid; //Your Namespace
using Android.Views;
#endif
To add the native FAB all we need to do is create it with the Xamarin.Forms context and set a few properties and events:
#if __ANDROID__
var fab = new CheckableFab(Forms.Context)
{
  UseCompatPadding = true
};

fab.SetImageResource(Droid.Resource.Drawable.ic_fancy_fab_icon);
fab.Click += async (sender, e) =>
{
  await Task.Delay(3000);
  await MainPage.DisplayAlert("Native FAB Clicked",
                                            "Whoa!!!!!!", "OK");
};

stack.Children.Add(fab);
absolute.Children.Add(stack);

// Overlay the FAB in the bottom-right corner
AbsoluteLayout.SetLayoutFlags(stack, AbsoluteLayoutFlags.PositionProportional);
AbsoluteLayout.SetLayoutBounds(stack, new Rectangle(1f, 1f, AbsoluteLayout.AutoSize, AbsoluteLayout.AutoSize));
#endif
Now we can run the application and see our FAB working with full animations!

iOS Native Controls
So far, we’ve spiced up the Android page with a control that only exists on Android platforms, and the same can be done for iOS with a segmented control that is used to filter content in the list. This time, instead of adding Android namespaces to the top of the page, we’ll add iOS specific namespaces:
#if __IOS__
using Xamarin.Forms.Platform.iOS;
using UIKit;
using CoreGraphics;
#endif
Then simply create the iOS control and insert it into the top of the StackLayout:
#if __IOS__
var segmentControl = new UISegmentedControl();
segmentControl.Frame = new CGRect(20, 20, 280, 40);
segmentControl.InsertSegment("One", 0, false);
segmentControl.InsertSegment("Two", 1, false);
segmentControl.SelectedSegment = 1;
segmentControl.ValueChanged += async (sender, e) =>
{
  var selectedSegmentId = (sender as UISegmentedControl).SelectedSegment;
  await MainPage.DisplayAlert($"Native Segmented Control Clicked {selectedSegmentId}",
                                            "Whoa!!!!!!", "OK");
};
stack.Children.Add(segmentControl);
 pageLayout.Children.Insert(0, stack);
#endif

Start Embedding with Native Controls
There you have it! With just a few lines of code in our shared project, we’ve embedded two completely different controls in our iOS and Android projects. Building your app in XAML and portable class libraries? Check out the next evolution of native embedding with the next series in this blog post.
This is just the beginning, as native embedding opens up a world of possibilities. Be sure to read through our entire native embedding documentation for more great examples and download this sample from my GitHub page.