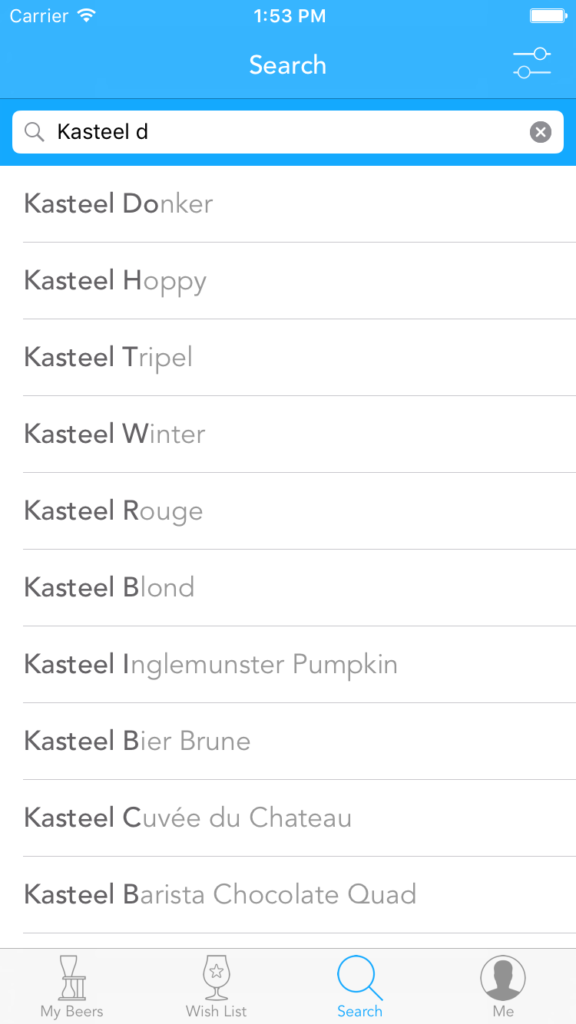
 I’ve recently been developing an iOS app that leverages Microsoft’s Azure Search to provide search query suggestions to the user as they type. Implementing this feature will reduce the number of search queries that return zero results and help keep users engaged since users often misspell search terms (and thus a search returns no results) even though the item exists in the database. Users have also become accustomed to having suggestions offered to them when using popular search engines like Google or Bing, so a product that requires the user to search but cannot offer spelling corrections or suggestions isn’t creating the best possible user experience, leading to app abandonment.
In this blog post, I’m going to detail how I implemented Azure Search into an existing iOS app and added support for hit highlighting in order to support suggestions. You’ll be surprised how easy it is to get started and just how much this simple approach can improve your users’ experience with your app.
Getting Started
Our search service must support hit highlighting, which could be anything from Elastic Search to a bespoke implementation. In this example, we’re going to use Azure Search, which provides a generous free tier supporting up to 10,000 documents within its index. First, we need to configure Azure Search for our mobile app to display search suggestions.
Once we have provisioned the backend infrastructure, add the Microsoft Azure Search NuGet package to the iOS project’s packages. As the client SDK remains in preview, we need to ensure that we’ve checked the ‘Show pre-release packages’ checkbox.
Configuring Azure Search
To connect to the configured Azure Search instance, all that’s required on the client side is to add a little boilerplate code to your search ViewController in order to utilize the Azure Search SDK. Create an instance of both the SearchServiceClient and the SearchIndexClient.
var serviceClient = new SearchServiceClient("serviceName", new SearchCredentials(Core.Helpers.Keys.AzureSearchKey));
var indexClient = serviceClient.Indexes.GetClient("indexName");
Implementing a Basic Suggestions UI
Azure Search provides a very simple API for requesting suggestions based on a search query. We’ll use this to create a list of strings which we’ll display within a UITableView.
var response = await indexClient.Documents.SuggestAsync(searchBar.Text, "nameSuggester");
var results = new List();
foreach(var r in response)
{
    results.Add(r.Text);
}
We can then pass the results from Azure to a UITableViewSource to ensure we correctly create the UITableViewCell for display purposes. Our UITableViewSource should look something like the following:
public class SearchSuggestionDataSource : UITableViewSource
{
    List results;
    public SearchSuggestionDataSource(List results)
    {
        this.results = results;
    }

    public override nint RowsInSection(UITableView tableview, nint section)
    {
        return results.Count;
    }

    public override UITableViewCell GetCell(UITableView tableView, Foundation.NSIndexPath indexPath)
    {
        var cellIdentifier = new NSString("suggestion");
        var cell = tableView.DequeueReusableCell(cellIdentifier) as NoRecentSearchesViewCell ?? new NoRecentSearchesViewCell(cellIdentifier);

        var text = results[indexPath.Row];
        cell.TextLabel.Text = text;
        return cell;
    }
}
Improving the Results
With the current implementation, we’re able to show a list of results that changes as the user edits the characters in the search field. However, the suggestions don’t take into account misspelled queries or let the user know why a particular result was returned. We can easily support this by updating our search suggestion parameters:
var suggestParameters = new SuggestParameters();
suggestParameters.UseFuzzyMatching = true;
suggestParameters.Top = 25;
suggestParameters.HighlightPreTag = "[";
suggestParameters.HighlightPostTag = "]";
suggestParameters.MinimumCoverage = 100;
This code asks Azure Search to enable fuzzy matching, return the top 25 matches, add tags to the matched section of a result, and cover the entire index before returning (with a huge index, these properties would result in more resource consumption and latency). We also need to add the suggestParameters variable to the SuggestAsync method arguments.
var response = await indexClient.Documents.SuggestAsync(searchBar.Text, "nameSuggester", suggestParameters);
If we looked at an item within our results list, we would see that the pre and post tags have been appended to reflect where a match occurred. For example, if I queried with ‘Duv’, we’d get back [Duv]el because Azure Search found Duv within Duvel. With fuzzy matching enabled, you can often see some slightly dubious matching, but at least you’ll always know why it matched.
Updating our UITableViewCells
In order to take full advantage of the hit highlighting, we need to remove the tags and change the style of that element of the string. We’ll accomplish this within our UITableViewSource implementation. Update the GetCell method by creating variables for the index position of the pre and post tag.
var hitStart = text.IndexOf("[");
var hitEnd = text.LastIndexOf("]");

//Create our colours for later.
var hitColor = "646265".ToUIColor();
var textColor = "989898".ToUIColor();
Next, let’s use UIStringAttributes to create attributes for different parts of our string. To start, we’ll create our attributes for the default situation. This will define what our text looks if we have no matches or a particular section of the string doesn’t match.
var defaultAttributes = new UIStringAttributes {
    ForegroundColor = textColor,
    Font = UIFont.FromName("Avenir", 18)
 };
Then we can go ahead and create our hit attributes. These are the attributes we change to reflect that we’ve matched to a particular part of the string. In this case, we’re going to simply set the matching text to be bold and tweak the color, while the default remains unchanged.
var hitAttributes = new UIStringAttributes {
    ForegroundColor = hitColor,
    Font = UIFont.FromName("Avenir-Medium", 18)
};
Now that the string attributes are defined, we need to put them in place. Before we do this, we need to remove the pre and post tag. If we didn’t remove the tags, then our UITableViewCell text would still contain the square brackets we defined earlier as our tags.
text = text.Remove(hitEnd, 1);
text = text.Remove(hitStart, 1);

var attributedString = new NSMutableAttributedString (text);
attributedString.SetAttributes(defaultAttributes.Dictionary, new NSRange(0, text.Length));
attributedString.SetAttributes(hitAttributes.Dictionary, new NSRange(0, hitEnd -1));

cell.TextLabel.AttributedText = attributedString;
return cell;
With this in place, we’re now able to clearly see where our search query matches the results. It also shows us suggestions for simple spelling mistakes as seen below.
To see this live in a real app, check out this video where I used Azure Search on iOS to return beer suggestions in response to a user’s input:
Wrapping Up
By using Azure Search along with some tweaks to our cells, we are able to create vastly improved search experiences within our mobile apps. Although this post focuses on the iOS implementation, the approach for implementing search suggestions in Android would be exactly the same. The key aspect of providing a great search experience is to remember that search is about discovering and not just simple string matching. Offering suggestions makes it easy to fix user errors before they become an issue and no results are returned, making our mobile apps more pleasant to use.


