Add Storage to Your Apps with Office 365
Enterprises with a Bring Your Own Device (BYOD) strategy face the challenge of securing their resources on various types of devices. For example, organizations want to share documents with their employees, allow them to collaborate on documents with coworkers, and more. Employees want to sync these documents with a variety of devices, such as tablets, laptops and mobile phones, with a seamless search experience. These challenges can be tackled by using OneDrive for Business, which is part of Office 365.
Xamarin developers can use OneDrive for Business in their iOS and Android apps to download, open, edit, and upload files in Office 365 (O365). In this post, we’ll build a simple Xamarin.Android app that can connect to OneDrive for Business to show a list of files.
Note 1: To build apps that can connect to Office 365, you’ll need an active subscription. Also, to follow the steps manually as mentioned in this blog, you’ll need to access the O365 associated Active Directory.
Note 2: The APIs, libraries, sample code and registration process are currently in preview. This blog post is intended to show the possibilities of using O365 with Xamarin.
Step 1: Register the app
As we’ve seen before, Office 365 uses Azure Active Directory (AD) as the Identity Provider. Which means that Azure Active Directory is used to authenticate and authorize users. To allow OneDrive to be accessed from mobile apps, it is mandatory to register this app in AD. You can follow our guide to registering an app with Active Directory to learn how.
Step 2: Give access to the O365 APIs
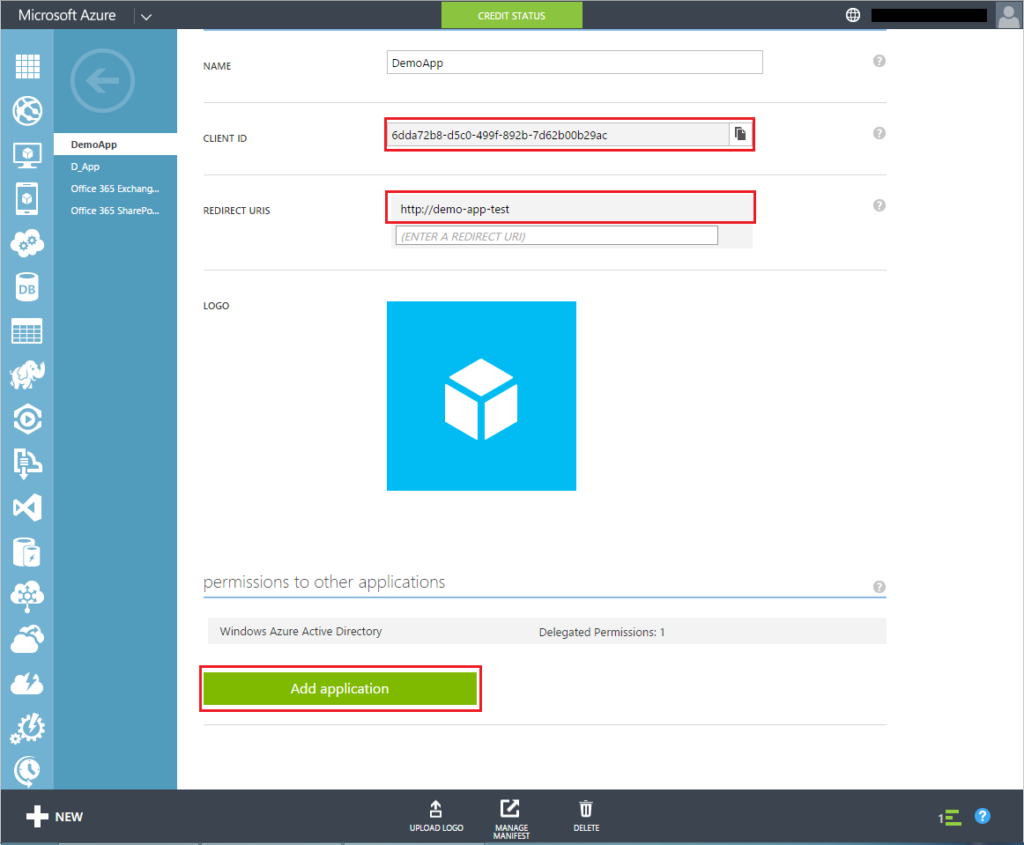
On the Configure tab, click the Add Application button at the bottom.
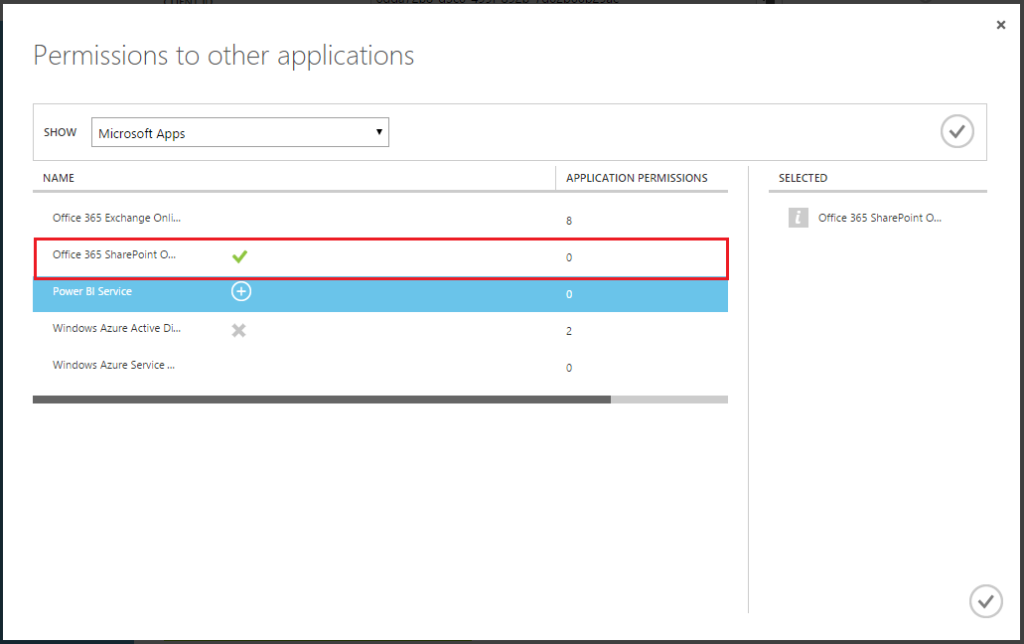
On next screen, select Office 365 SharePoint Online to access the Files and Lists.
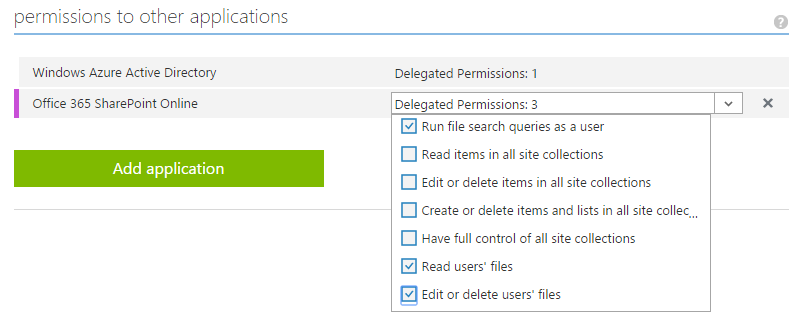
Once these services are selected, give access to the tasks that a user can perform with the app on the next screen.
Now we can Save this configuration and focus on the mobile part of our app.
Step 3: Build mobile app
Step 3a: Refer NuGet packages
In order to use O365 services in your Xamarin app, you will need to add the following NuGet packages to your project.
- Azure Active Directory Authentication Library (ADAL) – v3.0.11xx (Preview/Alpha)
- Microsoft Office 365 My Files Library for .NET – v1.0.22 (Stable)
- Microsoft Office 365 Discovery Library for .NET – v1.0.22 (Stable)
Step 3b: Declare variables
Add a new class to your project and name it AuthenticationHelper. Declare the variable at class and global level as outlined below:
public static readonly string DiscoveryServiceResourceId = "https://api.office.com/discovery/";
public const string Authority = "https://login.windows.net/common";
public static readonly Uri DiscoveryServiceEndpointUri =
new Uri("https://api.office.com/discovery/v1.0/me/");
public static Uri returnUri = new Uri("http://Xam-O365-Integration");
public static string clientId = "32088804-9284-451f-9ee6-2b70507a99cf";
public static AuthenticationContext authContext = null;
Step 3c: Write method to acquire AccessToken
Using ADAL, this app will fetch the Access Token from AD, as shown below. In this method, the second parameter will depend on the platform on which the code is executing. For example, in Android an Activity is passed, but on iOS and Windows Phone the second parameter is not required.
public static async Task<AuthenticationResult> GetAccessToken (string serviceResourceId, Activity activity)
{
   authContext = new AuthenticationContext(Authority);
   if (authContext.TokenCache.ReadItems().Count() > 0)
      authContext = new AuthenticationContext(authContext.TokenCache.ReadItems().First().Authority);
      var authResult = await authContext.AcquireTokenAsync(serviceResourceId, clientId, returnUri, new AuthorizationParameters(activity));
   return authResult;
}
Step 3d: Create DiscoveryClient
Discovery Service helps find Service Endpoints. Create a new method GetDocumentsList(), which will create DiscoveryClient for further use.
List<string> fileNames = new List<string>();

DiscoveryClient discoveryClient = new DiscoveryClient(async () => {
  var authResult = await AuthenticationHelper.GetAccessToken(AuthenticationHelper.DiscoveryServiceResourceId, this);
  return authResult.AccessToken;
  });

var appCapabilities = await discoveryClient.DiscoverCapabilitiesAsync();
var myFilesCapability = appCapabilities.Where(s => s.Key == "MyFiles")
    .Select(p =>; new {
      Key = p.Key,
      ServiceResourceId = p.Value.ServiceResourceId,
      ServiceEndPointUri = p.Value.ServiceEndpointUri
     })
    .FirstOrDefault();
Step 3e: Create SharePointClient
Files in OneDrive or Lists from SharePoint in O365 can be accessed using SharePointClient. This object again encapsulates REST services provided by O365.
if (myFilesCapability != null)
{
  SharePointClient myFilesClient = new SharePointClient(myFilesCapability.ServiceEndPointUri,
  async () => {
    var authResult = await AuthenticationHelper.GetAccessToken(myFilesCapability.ServiceResourceId, this);
    return authResult.AccessToken;
  });

  var myFilesResult = await myFilesClient.Files.ExecuteAsync();
  do
  {
    var myFiles = myFilesResult.CurrentPage;
    foreach (var myFile in myFiles)
    {
      fileNames.Add(myFile.Name);
    }
    myFilesResult = await myFilesResult.GetNextPageAsync();
  } while (myFilesResult != null);
}
Step 3f: List files
By default, MainActivity is derived from Activity. Change this behavior to derive from ListActivity to display a list in the app.
Just after the above code, create an adapter and use it to show the list of documents.
this.ListAdapter = new ArrayAdapter(this,
       Android.Resource.Layout.SimpleListItem1,
       fileNames.ToArray());
Last, call this GetDocumentsList method from the OnCreate method and run the app. It should show the following result, listing files from your OneDrive account.
Now you’ve got a fantastic foundation to build multi-tenant, intranet, integrated mobile apps using Office 365. Office 365 has a huge number of features which we’ll be highlighting in future guides and samples apps.
If you’re interested in exploring a sample project, you can download a copy of the source code from this blog post on GitHub and discuss this topic in forums.


 Light
Light Dark
Dark
0 comments