
Neural networks are very powerful to perform predictive analysis and solve analytical tasks. They are widely used for data classification to detect patterns in the input data and make predictions. The business cases are varied from customer data classification and protection, text classification, consumer behavior, and many others.
To show how to create an application to perform data analysis to solve classification tasks, the Windows ML team has created a “Data Analysis with Pytorch and Windows Machine Learning” tutorial. This tutorial shows how to train a neural network model based on a tabular dataset using the PyTorch library, and how to deploy that model within a Windows Machine Learning application that can run on any Windows device.
While this guide uses a dataset in Excel or csv formats, the process it outlines works for any tabular dataset and will teach you how to run predictions and leverage Windows M capabilities for your own unique business case.
Train a multilabel regression model with PyTorch
The tutorial showcases these data analysis capabilities by predicting the species of Iris flower based on that flower’s numerical measurements. For training, we’ve used a famous Fisher’s dataset that includes the records of Iris species.
You can use any other set of tabular data to train your model and predict the desired outcome. However, it’s important to specify the model input and output based on your dataset and your scenario. During the training process, the model will look at the relationship between the inputs and the output and will learn to predict the outcome.
In the last step in data preparation, you’ll convert model inputs and outputs to the Tensor format, as machine learning models require Tensor (multi-dimensional array) representation of values. Luckily, it’s very easy to convert model inputs to Tensors with PyTorch using the torch.Tensor PyTorch package. In this tutorial, we convert our dataset input with just a few lines of code.

Figure 1: Covert your model inputs and output to the Tensor format
To train the neural network model, the tutorial will take you through the process of loading the data, defining the model parameters, a model, and a loss function, training the model on the training set and validating the model with the validation set. At the end of the training process, you’ll learn how to test the model using the test dataset.

Figure 2: Train the multilabel regression model process with Pytorch
The Pytorch nn.Module neural network class provides an easy way to build the neural network. You only need to define the forward function, as the backward function will be automatically defined.
Review the tutorial to learn how to create a training function to loop over the data, feed the inputs to the network, and optimize. After you run several iterations over the training set, you should expect to achieve relatively high accuracy.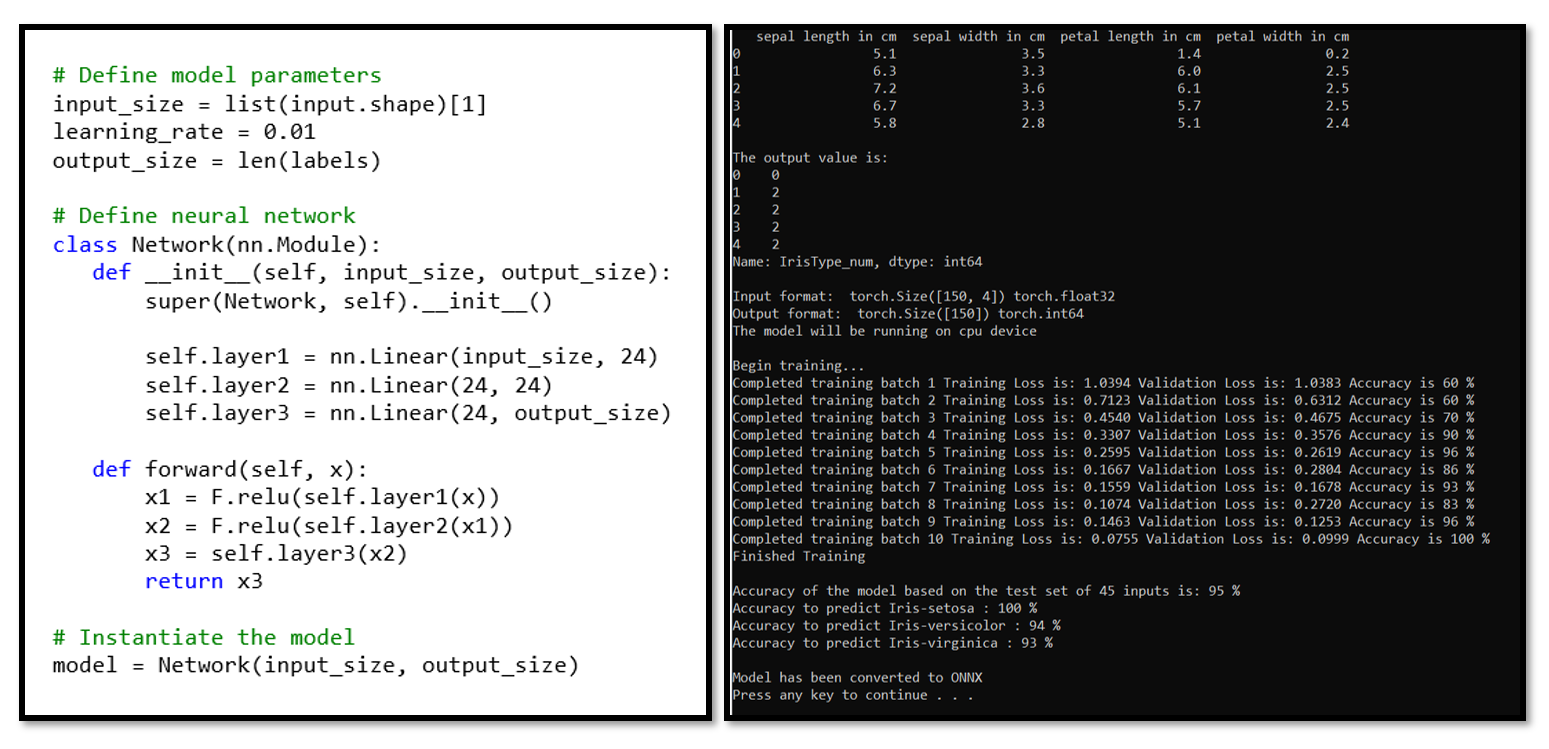
Figure 3: The training result of our neural network model
Deploy model with Windows Machine Learning APIs
After you’ve trained the model, you can go ahead and deploy it in a Windows Machine Learning application that can run on any Windows device. The tutorial shows you how to create all the classes and methods to call the Windows Machine Learning APIs, which load, bind inputs and outputs, and evaluate your machine learning model.

Figure 4: Integrate and evaluate a machine learning model with Windows ML APIs
WindowsML API accepts and supports all ONNX feature types of four descriptive classes: tensors, sequence, map, and image. This tutorial will help you to define the correct inputs based on your model requirements. To create a tensor input with Windows ML API, you can use TensorFloat class to define a 32-bit float tensor object. This class provides several methods to construct a tensor – in this tutorial, we use the CreateFromArray method to build a tensor input in the exact size your model requires.
CreateFromArray method requires two parameters – shape array and tensor data array. The tensor itself is just a list of values – our data, and the shape array tells you how to interpret the data array. If you’ve followed the tutorial, the network regression model you built in the previous part has four input values, each representing the possible sizes of four physical features of an iris flower. The batch size defined the number of samples that will be propagated through the network – in our case, the batch size is 1. So, the input tensor shape is [1×4]. This shape array tells you that the data array has 2 dimensions. The first dimension has length 1, and the second dimension has length 4.
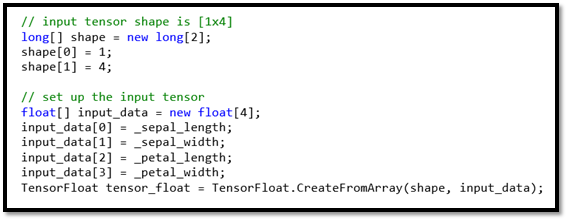
Figure 5: Define the model input tensor with Windows ML API
Getting Started
Once you complete the machine learning part of the code, you can easily integrate your model with the Windows application. And if you want a shortcut to see it all in action, you can review the complete sample code at our GitHub repository – “Data analysis sample” to get access to the pre-built Windows application. This pre-built app includes the application GUI and UI control code – everything you need to test your model!
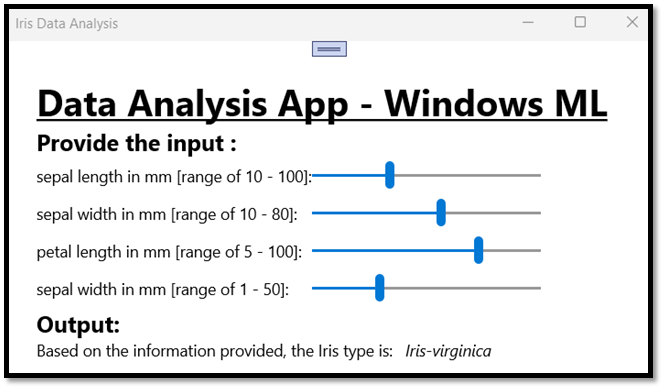
Figure 6: Windows ML application to test regression network
As you try out the tutorial, please let us know if you have any suggestions or questions by leaving feedback on the documentation or samples. And stay tuned to the Windows AI blog for more updates!
0 comments