
GitHub Copilot in Visual Studio is becoming more agentic with every release. This update brings cloud agent integration front and center, letting you start remote coding sessions without leaving the IDE. Custom agents now support user-level definitions that travel with you across projects, C++ code editing tools for agent mode are generally available, and a new Debugger Agent that validates fixes against real runtime behavior.
Download Visual Studio 2026 to try everything in this update.
Cloud agent integration
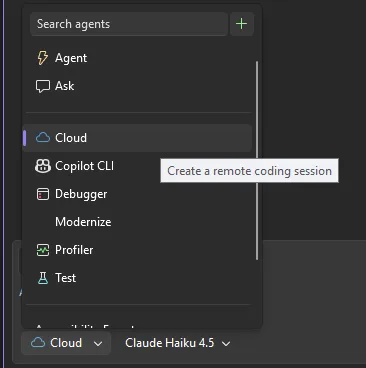
Cloud agents run on remote infrastructure for scalable, isolated execution, and you can now start new sessions directly from Visual Studio. Select Cloud from the agent picker in the Chat window, describe the work you need help with, and the cloud agent takes it from there.
The workflow starts by asking for permission to open an issue in your repository, then creates a pull request to address it. While the cloud agent prepares the PR, you can keep working on other tasks in Visual Studio or close the IDE entirely and come back later. When the PR is ready, you get a notification with options to View PR or Open in browser.
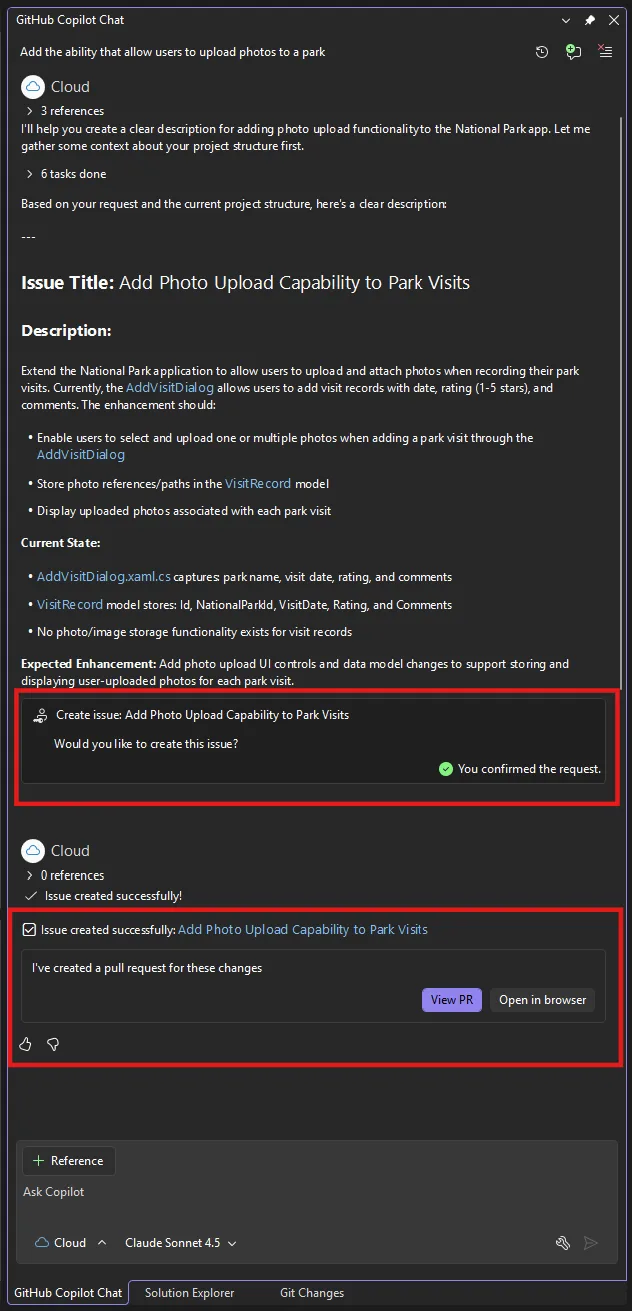
Cloud agent in Visual Studio is currently powered by Copilot coding agent. To use it, make sure you are in a GitHub repository and that Copilot has permission to create issues in that repository. This is a different way of working that frees you up to focus on the parts of your project that need your full attention.
Build your own custom agents
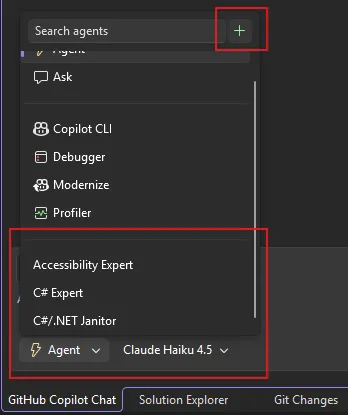
Custom agents launched last month with support for repository-based .agent.md files. This update extends the story with user-level agents that travel with you across projects.
User-level agents are stored in %USERPROFILE%/.github/agents/ by default. You can change this location in Tools > Options > GitHub > Copilot > Copilot Chat > Custom agents user directory. Creating new agents is also easier now: click the + button in the agent picker and follow the prompts.
Everything you could do with repository-based agents still works: workspace awareness, code understanding, tools, model selection, and MCP connections to external knowledge sources like internal documentation, APIs, and databases. The community has been sharing agent configurations on the awesome-copilot repository if you are looking for starting points. We’d love to see what you build.
C++ code editing tools for agent mode
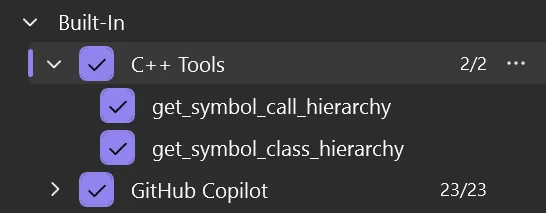
C++ Code Editing Tools for GitHub Copilot agent mode are now generally available by default. These tools give Copilot language-aware navigation of your C++ codebase, helping it map out class inheritance hierarchies and follow function call chains when refactoring or modifying code.
To get started, open a C++ project with IntelliSense configured and enable the tools using the Tools icon in Copilot Chat. The two available tools are get_symbol_call_hierarchy and get_symbol_class_hierarchy.
Once enabled, Copilot uses these tools automatically. For example, you can ask Copilot to analyze the major classes in a file and it will use get_symbol_class_hierarchy to trace inheritance and usage relationships across your codebase.

If you work with large C++ codebases, these tools make a real difference. They work best with AI models that support tool-calling, so check the model comparison page to see which ones are compatible.
Agentic Issue to Resolution
Debugging with static analysis only gets you so far. The new Debugger Agent workflow validates bugs against real runtime behavior, walking you through a complete loop from understanding the issue to verifying the fix through live execution.
Start from a GitHub or Azure DevOps issue, or describe the bug in natural language. Switch to Debugger mode using the dropdown in the lower-left corner of the chat, and the agent maps the problem to your local source code. From there, it works through a structured process: creating a minimal reproducer, generating failure hypotheses, instrumenting your app with tracepoints and conditional breakpoints, running the debug session to analyze live telemetry, and suggesting a precise fix at the exact failure point.
You can interact with the agent during the debugging process to provide additional context, discuss your theory, or refine the fix in real time. This is debugging that works with you, not just for you.
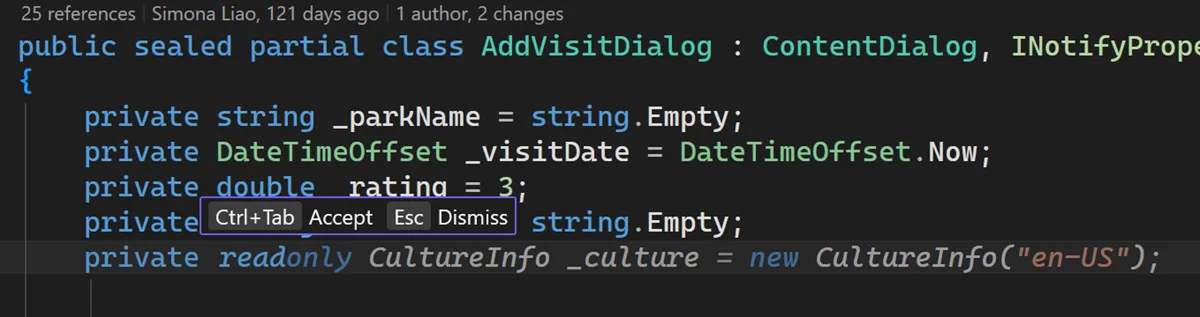
IntelliSense takes priority over Copilot
Seeing IntelliSense and Copilot completions at the same time can be distracting. We heard your feedback, and the editor now prioritizes the IntelliSense completion list, showing only one suggestion at a time.
When IntelliSense is active, Visual Studio temporarily suppresses Copilot completions so you can focus on your current selection. After you dismiss or commit the IntelliSense selection, Copilot completions resume automatically. This behavior is enabled by default, so just update and code as you normally do.
Customizable Copilot keyboard shortcuts
You can now customize the keyboard shortcuts for accepting Copilot inline suggestions. Whether you want to change the key for accepting a full suggestion, the next word, or the next line, it is all available in standard keyboard settings.
Head to Tools > Options > Environment > Keyboard and search for the commands: Edit.AcceptSuggestion, Edit.AcceptNextWordInSuggestion, or Edit.AcceptNextLineInSuggestion. Remove the existing binding and assign your preferred shortcut under the Inline Suggestions Active scope.
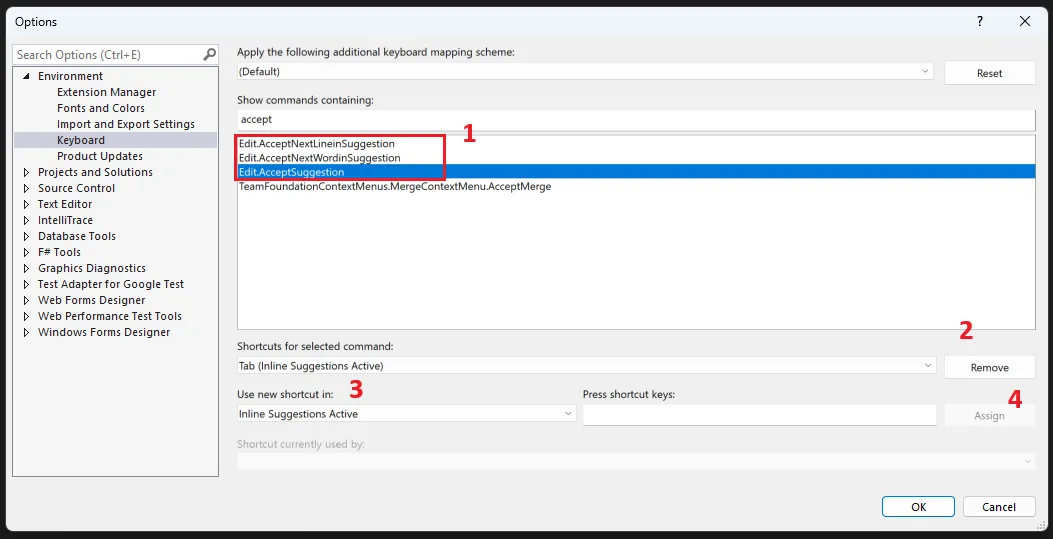
Your new shortcut appears throughout the editor hint bar, so you always know which key to press.
From our entire team, thank you for choosing Visual Studio! For the latest updates, resources, and news, check out the Visual Studio Hub and stay in touch.
Happy coding! The Visual Studio team
0 comments