This is another walkthrough, demonstrating how to use some new Visual Studio 2010 features available in the October VS2010 CTP. It provides steps to follow in the CTP build; however, you may find that you are able to give feedback on the descriptions below without actually downloading and executing the steps yourself. Please leave your feedback on this feature set at the end of this post, or at the following forum:
Thanks!
Lisa
Walkthrough: Office Programmability in Visual Basic and C#
This walkthrough demonstrates several new features in Visual Basic and C#. This walkthrough focuses on how the new features, when used in conjunction, can greatly simplify Office development, although most of these new features are useful in other contexts.
In this walkthrough, you will create a class that represents a bank account. You will then create collections of objects of that class. Next, you will create an Office Excel worksheet, populate it with data from a collection, and embed the worksheet into an Office Word document. Finally, you will modify the build process so that end users can run your program without having the Office primary interop assembly (PIA) installed on their computers.
This walkthrough demonstrates the following new language features:
New features in Visual Basic:
- Auto-implemented properties
- Statement lambdas
- Collection initializers
- Implicit line continuation
New features in Visual C#:
- Optional and named parameters
- Optional ref parameter modifier
- Dynamic dispatch on COM calls returning Object
New feature in both languages:
- No-PIA deployment
Prerequisites: You must have Excel 2007 and Word 2007 installed on your computer to complete this walkthrough.
To create a new console application
1. On the File menu, point to New and then click Project. In the New Project dialog box, in the Project types pane, expand Visual Basic or Visual C#, and then click Windows. In the upper right-hand corner, make sure that .NET Framework 4.0 is selected. Then click Console Application and click OK.
2. In Solution Explorer, right-click the project node and then click Add Reference. On the .NET tab, select Microsoft.Office.Interop.Excel, version 12.0. Hold down CTRL and click Microsoft.Office.Interop.Word, version 12.0.
3. Click OK to close the Add Reference dialog box.
To create the bank account class
In this section, you will create a simple class that represents a bank account.
1. In Solution Explorer, right-click the project node, point to Add, and then click Class to open the Add New Item dialog box. Name the file Account.vb (for Visual Basic) or Account.cs (for C#) and click Add.
2. Add the following code to the new class. Note that when you declare a property, it is no longer necessary to also create an explicit backing field because the compiler will add one automatically. This is called an auto-implemented property, and it is new to Visual Basic 10.0:
Visual Basic code
Visual C# code
Note: Be sure to delete any namespace declarations before pasting in this code. To simplify the rest of the walkthrough, the Account class should be outside of any namespace.
To import the Office namespaces:
There is nothing new in this step. You are just adding Imports statements or using directives so that you do not have to fully qualify the names of the Excel and Word objects each time you reference them.
At the top of the Module1.vb or Program.cs file, add the following code:
Visual Basic code
Visual C# code
To add data to the account class
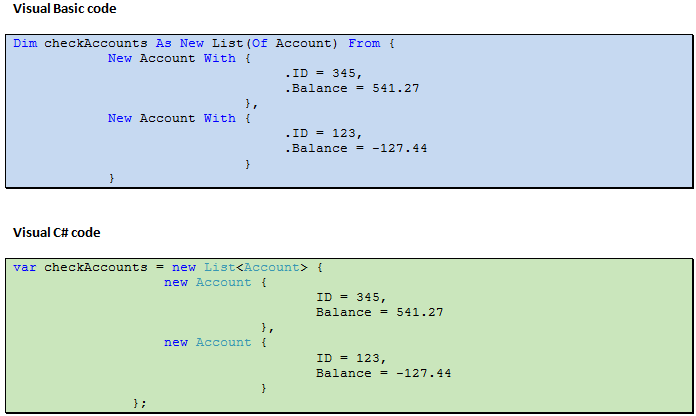
This step demonstrates collection initializers, which provide a convenient and expressive way to populate a collection like a list or array with elements when you first create the object. This feature was introduced in C# in Visual Studio 2008 and is introduced in Visual Basic in Visual Studio 2010.
In the Main method of your application, add the following code:
To display the account data in Excel
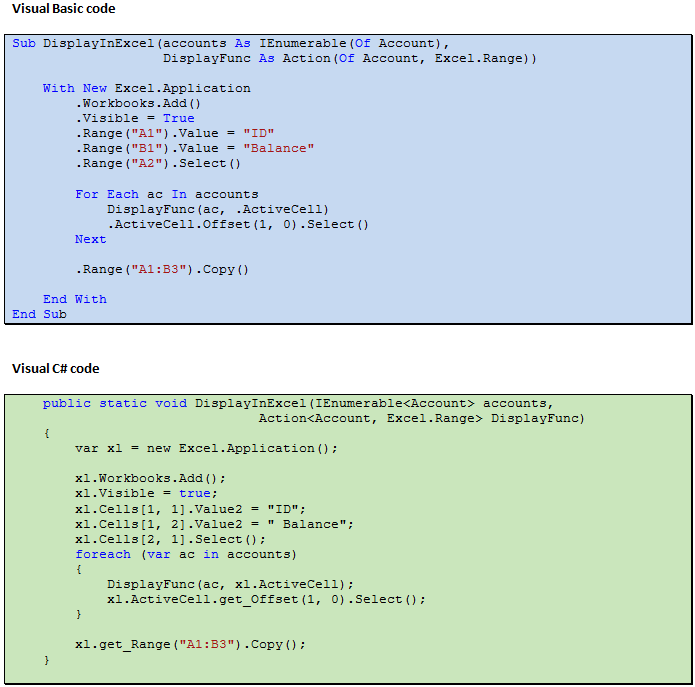
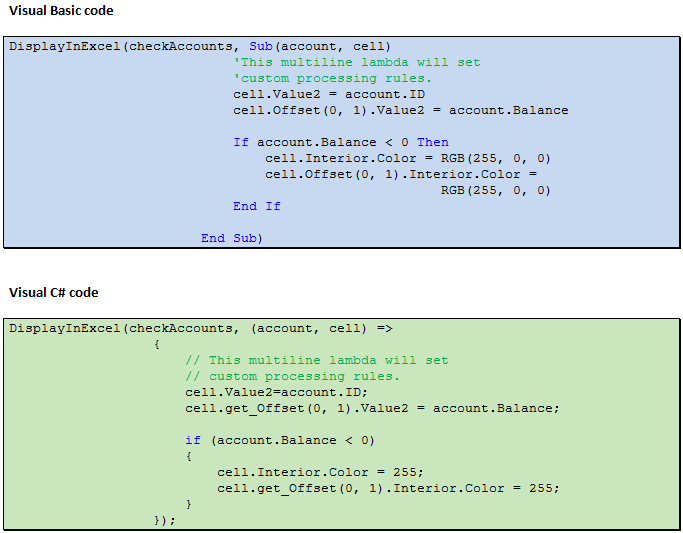
This step demonstrates how to create a new Excel workbook and populate it with data from the List<Account> or List (Of Account) that was initialized in the previous step. Action is a delegate type; several Action delegates are defined that have differing numbers of input parameters, but they all return void. In a later step, you will use a statement lambda when calling DisplayInExcel to supply the inline method that matches the Action delegate signature.
1. Declare the DisplayInExcel method, as shown in the following code:
2. At the bottom of the Main method, call the DisplayInExcel method by using the following code. Note the use of the statement lambda, which colors the Excel cell red if the balance is negative.
3. To automatically adjust the width of these columns to fit their contents, insert the following code at the end of the DisplayInExcel method:
Notice that the AutoFit method is being called on the result of the indexed call to Columns, which has a type of Object. Return values of type Object from COM hosts such as Office are automatically treated as Dynamic in C# 4.0, which allows dynamic dispatch (late binding) and avoids the casts that would be required in C# 3.0:
Visual C# code
To embed the Excel spreadsheet into a Word document
In this step, you will create an instance of Word and paste a link to the Excel worksheet into the document. There is nothing new in the Visual Basic code, because Visual Basic has supported named and optional parameters for a long time. Note, however, that C# 4.0 now supports this feature. The PasteSpecial method actually has seven parameters, but they are all optional, so in C# it is no longer necessary to supply arguments for all parameters.
Insert the following code at the end of the Main method:
Finally, in the definition for PasteSpecial, note that all of its parameters are ByRef (ref in C#). C# 4.0 allows you to make calls to COM components without having to specify ref in front of each parameter. What can now be done in one line of code used to take about 15 (for this particular function) in C# 3.0:
To run the application
- Press F5 to run the application. First, Excel will open and display a worksheet. Next, Word will open and display a document that contains an embedded link to the Excel worksheet. It should look something like this:
To remove the PIA dependency
1. Start a Visual Studio command prompt (from the Visual Studio Tools folder on the Start menu). Type ildasm and press ENTER. Open your assembly. (It will be in your project’s bin directory, by default: My DocumentsVisual Studio 10Projectsproject namebin)
2. Double-click Manifest. You should see the following entry for Excel in the list. (There will also be a similar entry for Word.)
This is an assembly reference to the Excel primary interop assembly (PIA). Because this assembly is referenced by your application, it needs to exist on the end user’s computer.
3. The No-PIA feature enables you to compile your application in such a way that references to a PIA are no longer required; the compiler will import whatever types you use from the PIA into your own assembly. This results in a much smaller assembly and easier deployment; the PIAs no longer have to be present on the user’s computer. Also, this application can now work with multiple versions of Office (because it does not require a specific version of a PIA).
4. In Solution Explorer, click the Show All References button. Expand the References folder and select Microsoft.Office.Interop.Excel. Press F4 to display the Properties window.
5. Change the Embed Interop Types property from False to True.
6. Repeat step 5 for Microsoft.Office.Interop.Word.
7. Be sure to close Ildasm. Press F5 to rebuild the project. Verify that everything still runs correctly.
8. Repeat steps 1 and 2. Notice that this time the entries for Excel and Word are gone. You no longer need to distribute these PIA DLLs to the user’s computer.


![clip_image002[9]](https://devblogs.microsoft.com/vbteam/wp-content/uploads/sites/7/2008/12/clip_image0025B95D_thumb.jpg)

![clip_image004[5]](https://devblogs.microsoft.com/vbteam/wp-content/uploads/sites/7/2008/12/clip_image0045B55D_thumb.jpg)
I want to automate “Get External Data” section of MS Excel through Visual Basic. What is thy way around?