How would you like it if you could create a Console App in Visual Basic and run it on Linux? Or running the same Xamarin.Forms-App written in Visual Basic on an iPhone, and Android and a Windows Tablet? Welcome to the world of cross-platform development, which from Visual Studio 2017 Update 3 on – thanks to .NET Standard and .NET Core – is now also available for Visual Basic! Well, currently the preview of Visual Studio 2017 lets you use this, and it is the best set of features that Update 3 (aka VS 15.3) will bring for us VBs: We are getting Visual Basic .NET Core and .NET Standard templates. Note though, that there are some limitations in this first version for Visual Basic regarding .NET Core and .NET Standard support compared to C#: There is no ASP.NET template for .NET Core yet, and Xamarin support when using .NET Standard is also limited. But we come to that later in more detail.
Before we start with a sample to show off what we VBs can do with our new cross-platform powers, let’s ask the team’s .NET Core/.NET Standard champion Immo Landwerth to explain what .NET Core and .NET Standard are with just one respective tweet:
@terrajobst For #visualbasic guys, who just got #netstandard and #dotnetcore with VS 2017 U3, can you explain both in a respective tweet?
— Klaus Löffelmann (@loeffelmann) May 14, 2017
.NET Core is our new open source and cross platform .NET implementation. It supports command line tools and https://t.co/a0lvit6464 apps.
— Immo Landwerth (@terrajobst) May 14, 2017
But, as I said, let’s be clear about one thing:
@loeffelmann That's right, we don't have templates for https://t.co/a0lvit6464 Core yet. AFAIK we plan on adding them except for Razor as that's C# tech.
— Immo Landwerth (@terrajobst) May 14, 2017
If you want to learn more about .NET Core and .NET Standard, I suggest you to read Immo’s excellent blog posts Introducing .NET Standard and Introducing .NET Core, and also watch some awesome videos about the topic on YouTube in addition!
Using Xamarin.Forms with .NET Standard in Visual Basic
With that, let’s take a look what that means for a practical sample, and we concentrate in this example on .NET Standard, not on .NET Core. (If you want to see a dedicated .NET Core VB sample, tweet me @loeffelmann or find me at ActiveDevelop). As you might know, Visual Studio supports cross-platform development on Android, iOS, Windows Universal Platform and the Mac in C# via Xamarin since Visual Studio 2015. Principally, the Xamarin tooling provides two options for creating apps for platforms other than Windows.
- You can create native apps for each platform which use the native APIs of each respective OS. You can only do this in C# though – Xamarin does not support Visual Basic in that scenario. The advantage is that you can really use every aspect of the target platform, and you do not have to make any compromises. The disadvantage: None of the front-end code is reusable on other platforms.
- You use Xamarin.Forms projects.
Here is how that works in practice: In Xamarin.Forms there are – let’s call them – Bootstrap-Projects for every platform (iOS, Android, UWP – later Xamarin will add WPF as a potential target platform as well). Those bootloader apps, which Visual Studio creates for you in C#, then initialize the Xamarin.Forms framework and utilize one shared cross-platform DLL for each platform which holds at least one so-called ContentPage with the initial UI. This ContentPage becomes the main Activity in Android, the main Page in Windows UWP and the main ViewController in iOS. So, this shared library holds the UI in a somewhat generic UI definition, and Xamarin.Forms translates these generic UI elements into the platform-native equivalents of each platform-specific app at runtime. Now, here is the important part for us VBs: Such a Xamarin.Forms library is by standard (for now, but subject to change in later versions!) a Portable Class Library project, but it can also be a .NET Standard class library project. And since Visual Basic supports .NET Standard from Visual Studio 2017 Update 3 on, we can have the lion share of a Xamarin.Forms app also in Visual Basic! Compared to C#, there is one drawback, though: While in C# a Xamarin.Forms .NET Standard DLL can define the UI for all apps via the markup language XAML, this scenario is so far not supported in Visual Basic. In VB, Xamarin.Forms libraries can define their UI only through code.
The following screenshot points out the different project types of the solution in the solution explorer.
Now, let’s see how to make this work. If you happened to read the post about Unit Testing with Visual Basic, you already learned about the Roman Numerals App we built in that context as our demo example. Our goal now: Let’s port this app to Xamarin.Forms and have it run on UWP, Android and iOS!
Before we start coding, here are some Beta prerequisites.
- Visual Studio 2017 prior to Update 3 will not work, so you need to get the Visual Studio Update 3 Preview Bits. The installer allows you to install a dedicated Beta instance, which means that your already existing Community, Professional or Enterprise instances will not be harmed, and both installations can co-exist.
- Once the installer has finished, start the Visual Studio Preview and perform an update by clicking Extension and Updates in the Tools menu. Check for updates under Updates/Product updates, and install them, if present.
Now, be warned: As said before, when we develop the app(s), there will be C# projects involved, but we will just create them. We do not need to touch their code! All things we code will be pure VB. So, here we go:
- Create a new Project. In the New Project dialog, from the installed templates click Cross-Platform in the C# branch, and from the collection of available templates, pick Cross Platform App (Xamarin.Forms or Native, Visual C#)
- Name the solution VbAndXamarinForms. Make sure that the checkbox Create directory for solution is checked.
- In the dialog, Visual Studio brings up next, click Blank App, and make sure that the option buttons Xamarin.Forms and Portable Class Library (PCL) are checked./((02_CreateNewXamarinProject02))
- Visual Studio creates a new solution now, which includes one iOS Project, an Android project, and a Universal Windows App project. For the latter, Visual Studio needs to know the minimum and the preferred Windows 10 version the app should run against. You can leave the default options in this case since we would not need any functionality of newer Windows 10 versions.
When Visual Studio sets up the Xamarin.Forms project, the actual front-end code will be hosted in a C# portable class library by default. We’re going to replace this default PCL C# library by a Visual Basic .NET Standard library.
NOTE: Portable Class Libraries are the precursor of .NET Standard Libraries. In its current preview state, Visual Studio does not yet provide the Xamarin .NET Standard library templates for hosting the Xamarin.Forms based UI code – but setting up this library type manually already works! What’s important though for this to succeed: The new library must address the Standard V1.4, so it is supported by iOS, Android and UWP apps (later versions of those platforms will support .NET Standard V2.0).
- To this end, let’s first delete the existing Portable Class Library project. Find it in the solution explorer, open the context menu of the branch of project VbAndXamarinForms, and click Remove. But that’s not enough: We also need to erase that project physically from the disk so that we can create a new (.NET Standard) project with that exact name. Hence, find that project on your disk with the file explorer, and delete it:
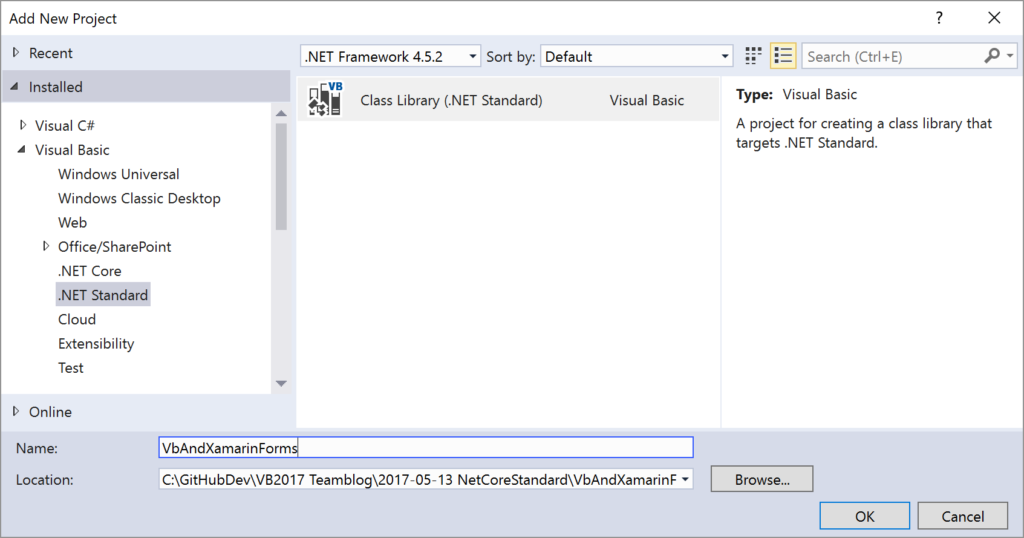
- Switch back to Visual Studio to create a new .NET Standard library now with that same name (and of course in the same directory) in Visual Basic. To that end, pick File/New/Project, and in the dialog, Visual Studio shows now, from the section Visual Basic/.NET Standard chose the template Class Library (.NET Standard).
- Enter the project’s name, pick the correct path and finally click OK, to create the project.
- In the next step, we need to make some modification to the project file of the library, which we just created. Open the context menu of the library project, and click Open VbAndXamarinForms.vbproj. This, by the way, is a new feature in Visual Studio 2017: You can edit the content of project files directly within Visual Studio, and you do not need to open that file with an external editor!
Copy the content of the following listing to the project file, save the changes and close the document. With that, you are changing the Standard version to Version 1.4 for once, and secondly, this makes the project backward compatible for NuGet packages, which were originally created for Portable Class Libraries. This, by the way, will no longer be necessary, once the final templates and NuGet packages for Xamarin.Forms for Update 3 have been released.
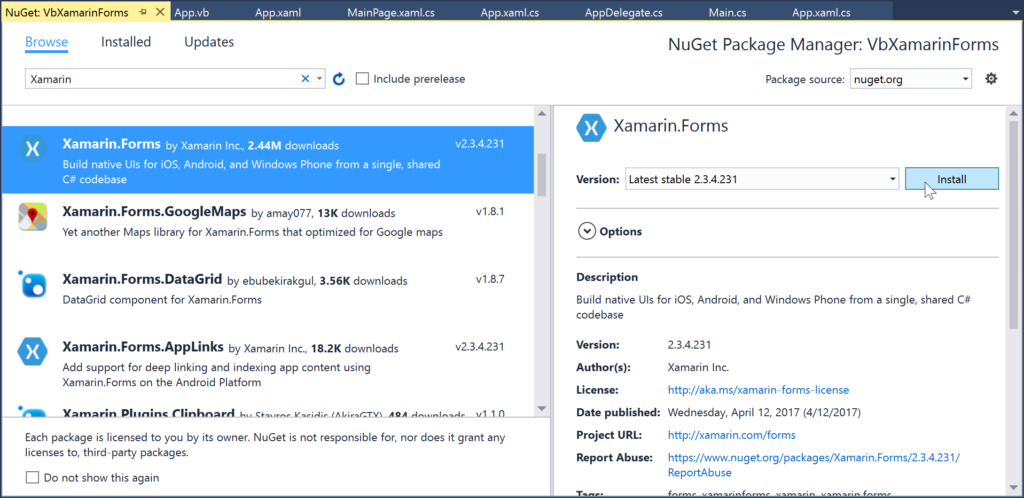
- Next, we need to add the Xamarin.Forms NuGet package to the library to leverage the Xamarin.Forms functionality. What this does is, amongst a lot of other things, to provide classes for the UI Elements (like Button, TextBox – which are called Entries in Xamarin.Forms – or Labels, which get translated to each control of their native respective UI platform: So, for UWP for example, a Xamarin.Forms Label will end up as a TextBlock, and a XamarinForms Entry will be surface as a TextBox control). To do this, open the context menu for the project, we’ve just created, and click Manage NuGet packages.
- In the search field, type in ‘Xamarin’, find the package Xamarin.Forms in the list, and click on Install. Close that tab.
- Prepared with the infrastructure, let’s implement the actual code for VbAndXamarinForms, which consists of three parts: An App class, which represents the generic frame and starting point for your actual application, a MainView class, which holds the code for the UI, and a class named RomanNumeral, which represents our Business Part.
Let’s rename the existing Class1.vb file to App.vb, and insert this code:
This code does not do that much: At some point, it will be called by the bootstrap project of each individual platform app, and instantiate the MainView (the UI).
This MainView again, needs to be placed in another code file named MainView.vb, which you need to add to the project. Here’s the code:
- And finally, we need our business logic: the algorithm which converts a decimal integer value to a Roman numeral. This one also goes into a dedicated code file names RomanNumerals.vb, and you find it here:
There is only one step left to do. Since we erased the original Xamarin.Forms project (which was in C#, and which we replaced by our Visual Basic version), the references from the three main projects for each UI got also lost. So, we need to go through each of the platform-specific bootstrap projects and add the reference back to our VB Xamarin.Forms .NET Standard project.
- For that to end, open the branches for each platform-specific project, and find the references node.
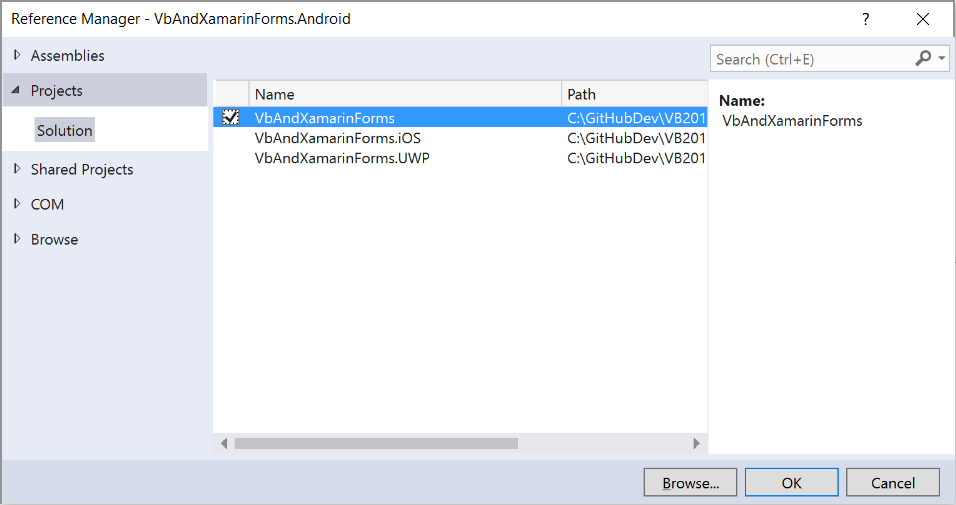
- Click Add Reference. Open the branch Projects in the dialog, Visual Studio shows now, and check the Xamarin.Forms-.NET Standard project VbAndXamarinForms.
- Click OK, to add the reference and close the dialog.
- Repeat those steps for each platform.
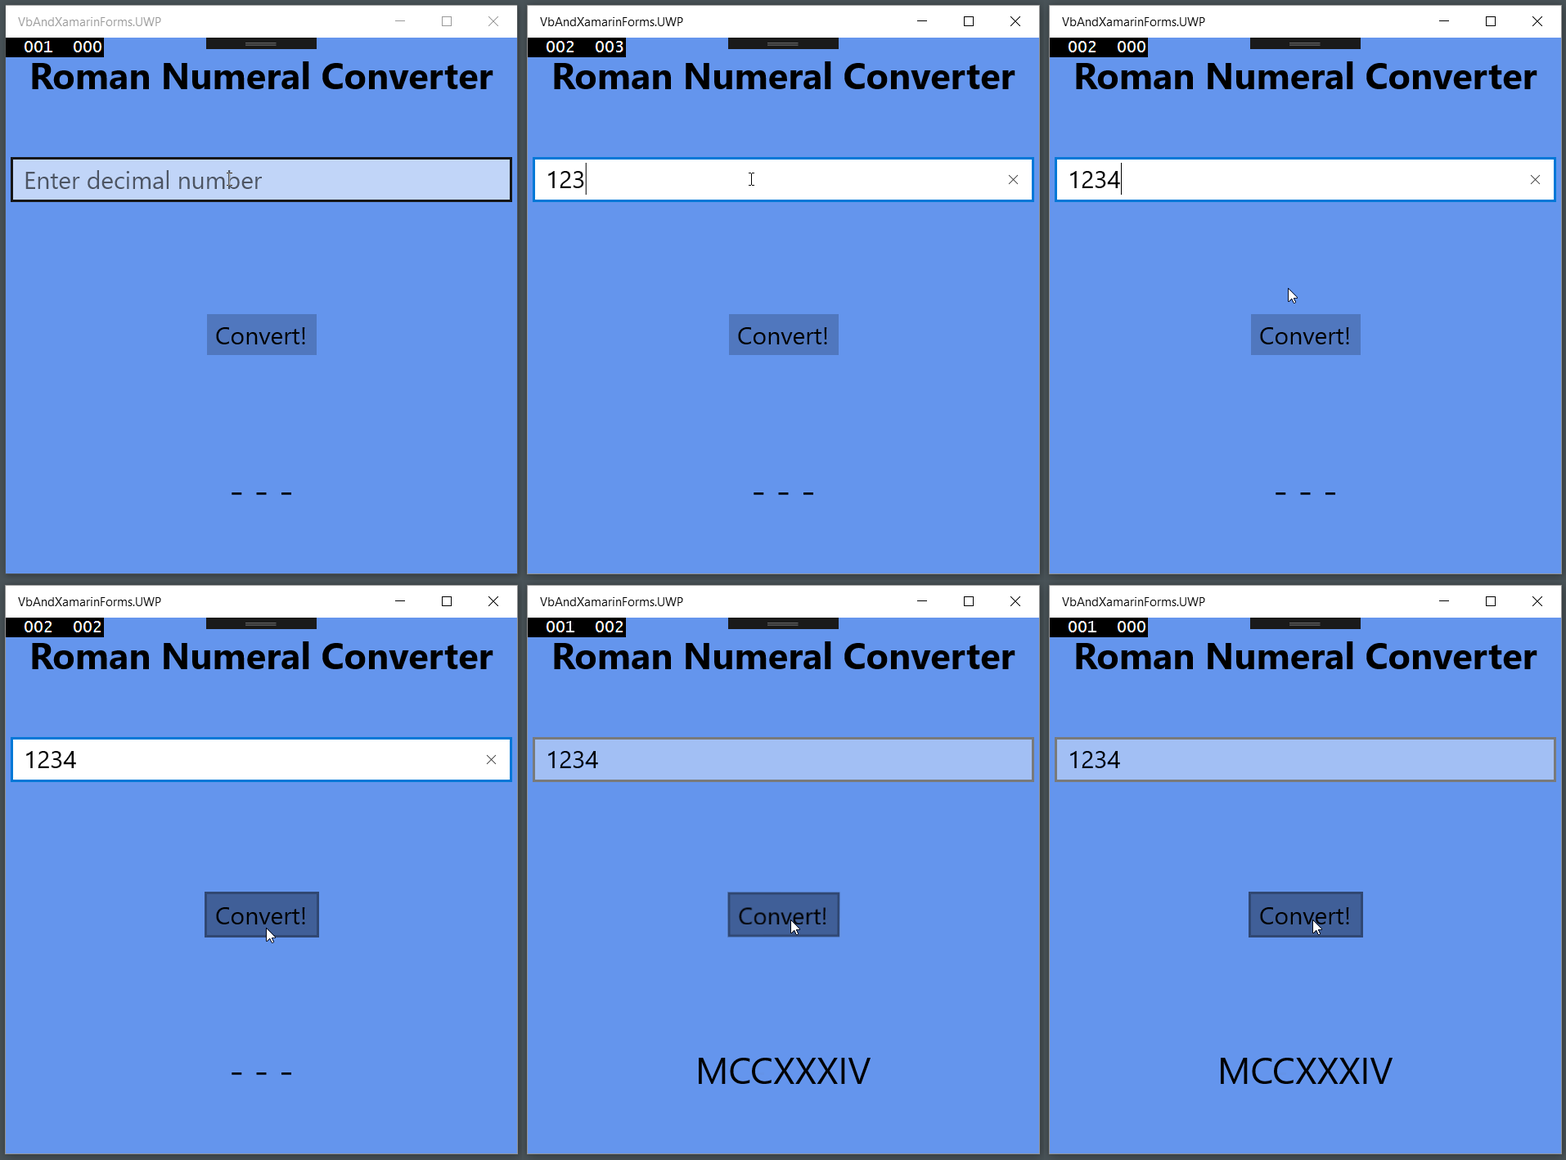
If everything went smoothly so far, you should be ready to fire up the app. Let’s start with the UWP app directly on our Windows machine, because that is the simplest way to test the app. For that, find the UWP project in the solution explorer, open the context menu on the project root, and click Set as StartUp project. Start the app.
If you have an Android phone or an Android tablet, let’s see how easy it is to deploy the app on a physical Android machine. Two things are necessary to make this happen.
- You need to activate the Developer mode on your Android device.
- You need to connect the Android device to your developer machine via USB.
NOTE: Enable the Developer mode before you connect your Android device to our developer machine.
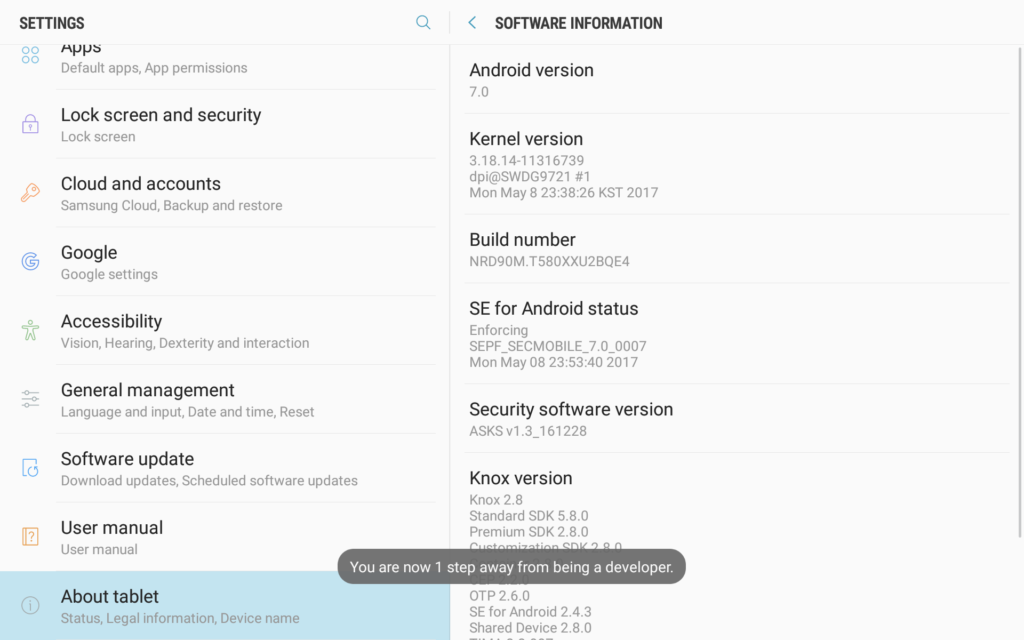
- To that end, on the Android device go to Settings and find the item About device.
- Now, tap seven times (yes, you read correctly!) on Build number. Your tablet or phone should comment that with what you see in the screenshot above.
- Connect your Android Phone or Tablet via USB to your PC.
- Make the Android project of the solution the start project.
- Open the Run (Start app) combo box in the Visual Studio toolbar, find the entry with your device’s name, and select it.
- Click the Play button to compile, deploy, and start the app on your device:
And now: Happy cross-platform development in Visual Basic!
Tip: You can get the project directly from the VB Samples Git repository, which you find here (04 .NET Standard).
And, as always: Comment and like this post! Tell others about the posts here on the VB blog! And follow me also on Twitter @loeffelmann, to receive the latest tips and news about .NET Development, Software Modernization, C# and of course Visual Basic Development!



0 comments
Be the first to start the discussion.