In our last post, I explained how to create a microphone for Windows Phone 7. In this blog, I want to share a sample that will help you to create a custom indeterminate progress bar for Windows Phone 7. You can create an indeterminate progress bar that runs on the UI thread, but that can impact the performance of your application. In this sample, I will demonstrate how to create an indeterminate progress bar that runs on the composite thread, rather than the UI thread, for better performance.
I will now demonstrate how easy it is to create a custom indeterminate progress bar application for Windows Phone 7, using Visual Basic for Windows Phone Developer Tools. The custom indeterminate progress bar application can be created in 3 simple steps:
- Create a sample application and add controls and an event handler
- Build and debug the application
- Rebuild in the release mode before publishing
Before you create a custom indeterminate progress bar application, you need to install the following applications:
- Visual Studio 2010 Professional, Premium, or Ultimate. If you do not have any of the releases, you can download any of the following trial versions as per your preference: Professional, Premium, or Ultimate.
- Windows Phone Developer Tools RTW
- Visual Basic
for Windows Phone Developer Tools – RTW
Note: You can install the newer version- Windows Phone Developer Tools 7.1 Beta instead of the above mentioned two tools as it will take comparatively less time. However, this sample was created using the previous version.
To create the custom indeterminate progress bar application, let’s follow the 3 simple steps mentioned earlier:
Step 1 – Create a sample application and add controls and an event handler
Create a sample application
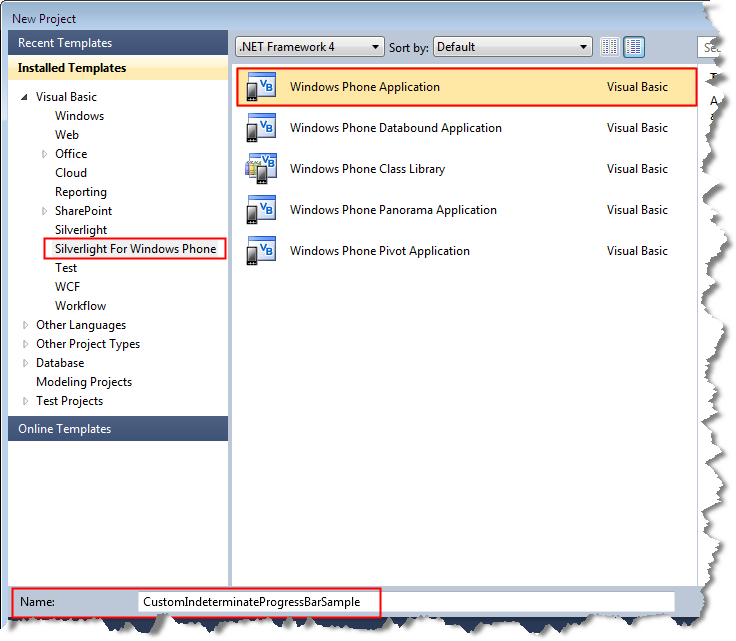
- Create a new project and browse to the “Silverlight for Windows Phone” node.
- Select the “Windows Phone Application” template.
- Enter a name for the application.

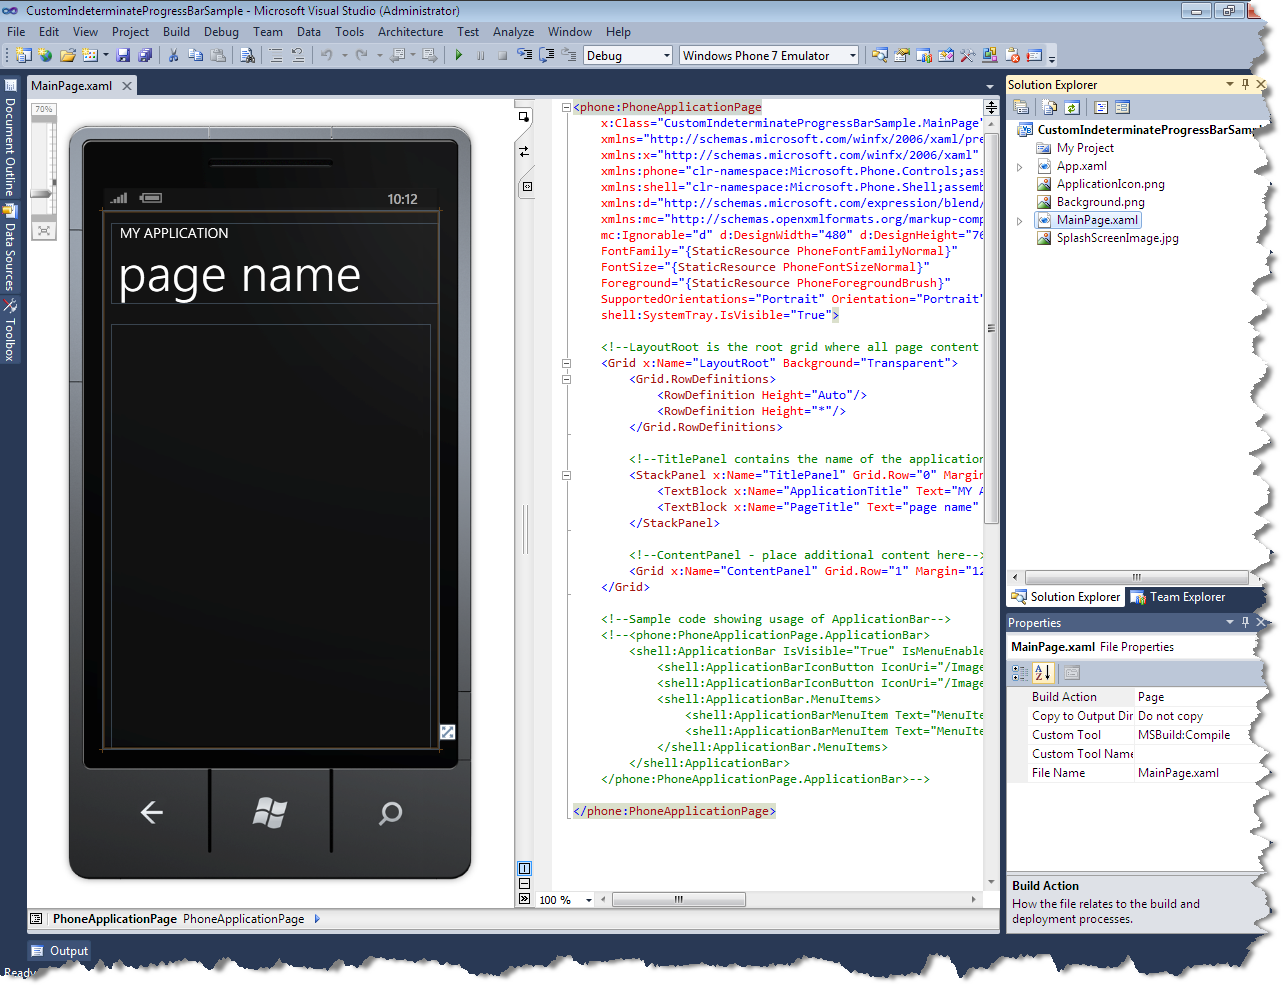
- Click OK. The MainPage.xaml page is displayed.

Add controls
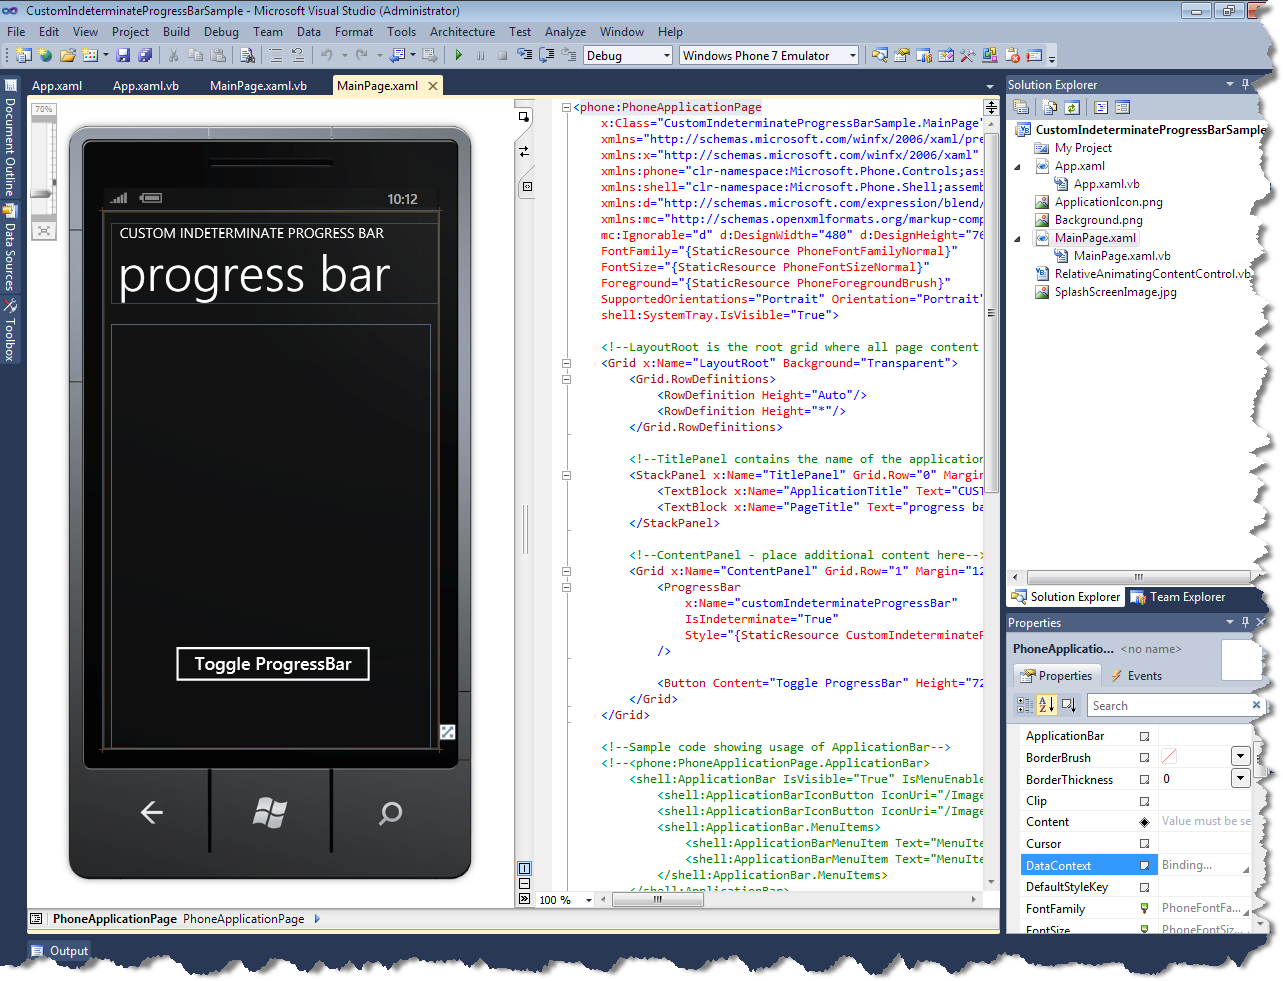
- Click the MY APPLICATION text. In the Properties window, change the text property to “CUSTOM INDETERMINATE PROGRESS BAR”.
- Click the page name text. In the Properties window, change the text property to “progress bar”.
- From the toolbox, drag and drop the Button control to the design surface.
- Click the Button control. In the Properties window, change the content property to “Toggle ProgressBar”.
- From the toolbox, drag and drop the ProgressBar control to the design surface.
- Add the following XAML code to set the Style and IsIndeterminate properties of the ProgressBar control:
<ProgressBar
x:Name="customIndeterminateProgressBar"
IsIndeterminate="True"
Style="{StaticResource CustomIndeterminateProgressBar}"
/>
- To add the CustomIndeterminateProgressBar style, open the App.xaml page. In the <Application> tag, add the following XAML code:
xmlns:unsupported="clr-namespace:Microsoft.Phone.Controls.Unsupported"
- In the <Application.Resources> tag, add the following XAML code:
<Style x:Key=”CustomIndeterminateProgressBar” TargetType=”ProgressBar”>
<Setter Property=”Foreground” Value=”{StaticResource PhoneAccentBrush}”/>
<Setter Property=”Background” Value=”{StaticResource PhoneAccentBrush}”/>
<Setter Property=”Maximum” Value=”100″/>
<Setter Property=”IsHitTestVisible” Value=”False”/>
<Setter Property=”Padding” Value=”{StaticResource PhoneHorizontalMargin}”/>
<Setter Property=”Template”>
<Setter.Value>
<ControlTemplate TargetType=”ProgressBar”>
<unsupported:RelativeAnimatingContentControl HorizontalContentAlignment=”Stretch” VerticalContentAlignment=”Stretch”>
<unsupported:RelativeAnimatingContentControl.Resources>
<ExponentialEase EasingMode=”EaseOut” Exponent=”1″ x:Key=”ProgressBarEaseOut”/>
<ExponentialEase EasingMode=”EaseOut” Exponent=”1″ x:Key=”ProgressBarEaseIn”/>
</unsupported:RelativeAnimatingContentControl.Resources>
<VisualStateManager.VisualStateGroups>
<VisualStateGroup x:Name=”CommonStates”>
<VisualState x:Name=”Determinate”/>
<VisualState x:Name=”Indeterminate”>
<Storyboard RepeatBehavior=”Forever” Duration=”00:00:04.4″>
<ObjectAnimationUsingKeyFrames Storyboard.TargetProperty=”Visibility” Storyboard.TargetName=”IndeterminateRoot”>
<DiscreteObjectKeyFrame KeyTime=”0″>
<DiscreteObjectKeyFrame.Value>
<Visibility>Visible</Visibility>
</DiscreteObjectKeyFrame.Value>
</DiscreteObjectKeyFrame>
</ObjectAnimationUsingKeyFrames>
<ObjectAnimationUsingKeyFrames Storyboard.TargetProperty=”Visibility” Storyboard.TargetName=”DeterminateRoot”>
<DiscreteObjectKeyFrame KeyTime=”0″>
<DiscreteObjectKeyFrame.Value>
<Visibility>Collapsed</Visibility>
</DiscreteObjectKeyFrame.Value>
</DiscreteObjectKeyFrame>
</ObjectAnimationUsingKeyFrames>
<DoubleAnimationUsingKeyFrames BeginTime=”00:00:00.0″ Storyboard.TargetProperty=”X” Storyboard.TargetName=”R1TT”>
<LinearDoubleKeyFrame KeyTime=”00:00:00.0″ Value=”0.1″/>
<EasingDoubleKeyFrame KeyTime=”00:00:00.5″ Value=”33.1″ EasingFunction=”{StaticResource ProgressBarEaseOut}”/>
<LinearDoubleKeyFrame KeyTime=”00:00:02.0″ Value=”66.1″/>
<EasingDoubleKeyFrame KeyTime=”00:00:02.5″ Value=”100.1″ EasingFunction=”{StaticResource ProgressBarEaseIn}”/>
</DoubleAnimationUsingKeyFrames>
<DoubleAnimationUsingKeyFrames BeginTime=”00:00:00.2″ Storyboard.TargetProperty=”X” Storyboard.TargetName=”R2TT”>
<LinearDoubleKeyFrame KeyTime=”00:00:00.0″ Value=”0.1″/>
<EasingDoubleKeyFrame KeyTime=”00:00:00.5″ Value=”33.1″ EasingFunction=”{StaticResource ProgressBarEaseOut}”/>
<LinearDoubleKeyFrame KeyTime=”00:00:02.0″ Value=”66.1″/>
<EasingDoubleKeyFrame KeyTime=”00:00:02.5″ Value=”100.1″ EasingFunction=”{StaticResource ProgressBarEaseIn}”/>
</DoubleAnimationUsingKeyFrames>
<DoubleAnimationUsingKeyFrames BeginTime=”00:00:00.4″ Storyboard.TargetProperty=”X” Storyboard.TargetName=”R3TT”>
<LinearDoubleKeyFrame KeyTime=”00:00:00.0″ Value=”0.1″/>
<EasingDoubleKeyFrame KeyTime=”00:00:00.5″ Value=”33.1″ EasingFunction=”{StaticResource ProgressBarEaseOut}”/>
<LinearDoubleKeyFrame KeyTime=”00:00:02.0″ Value=”66.1″/>
<EasingDoubleKeyFrame KeyTime=”00:00:02.5″ Value=”100.1″ EasingFunction=”{StaticResource ProgressBarEaseIn}”/>
</DoubleAnimationUsingKeyFrames>
<DoubleAnimationUsingKeyFrames BeginTime=”00:00:00.6″ Storyboard.TargetProperty=”X” Storyboard.TargetName=”R4TT”>
<LinearDoubleKeyFrame KeyTime=”00:00:00.0″ Value=”0.1″/>
<EasingDoubleKeyFrame KeyTime=”00:00:00.5″ Value=”33.1″ EasingFunction=”{StaticResource ProgressBarEaseOut}”/>
<LinearDoubleKeyFrame KeyTime=”00:00:02.0″ Value=”66.1″/>
<EasingDoubleKeyFrame KeyTime=”00:00:02.5″ Value=”100.1″ EasingFunction=”{StaticResource ProgressBarEaseIn}”/>
</DoubleAnimationUsingKeyFrames>
<DoubleAnimationUsingKeyFrames BeginTime=”00:00:00.8″ Storyboard.TargetProperty=”X” Storyboard.TargetName=”R5TT”>
<LinearDoubleKeyFrame KeyTime=”00:00:00.0″ Value=”0.1″/>
<EasingDoubleKeyFrame KeyTime=”00:00:00.5″ Value=”33.1″ EasingFunction=”{StaticResource ProgressBarEaseOut}”/>
<LinearDoubleKeyFrame KeyTime=”00:00:02.0″ Value=”66.1″/>
<EasingDoubleKeyFrame KeyTime=”00:00:02.5″ Value=”100.1″ EasingFunction=”{StaticResource ProgressBarEaseIn}”/>
</DoubleAnimationUsingKeyFrames>
<DoubleAnimationUsingKeyFrames BeginTime=”00:00:00.0″ Storyboard.TargetProperty=”Opacity” Storyboard.TargetName=”R1″>
<DiscreteDoubleKeyFrame KeyTime=”0″ Value=”1″/>
<DiscreteDoubleKeyFrame KeyTime=”00:00:02.5″ Value=”0″/>
</DoubleAnimationUsingKeyFrames>
<DoubleAnimationUsingKeyFrames BeginTime=”00:00:00.2″ Storyboard.TargetProperty=”Opacity” Storyboard.TargetName=”R2″>
<DiscreteDoubleKeyFrame KeyTime=”0″ Value=”1″/>
<DiscreteDoubleKeyFrame KeyTime=”00:00:02.5″ Value=”0″/>
</DoubleAnimationUsingKeyFrames>
<DoubleAnimationUsingKeyFrames BeginTime=”00:00:00.4″ Storyboard.TargetProperty=”Opacity” Storyboard.TargetName=”R3″>
<DiscreteDoubleKeyFrame KeyTime=”0″ Value=”1″/>
<DiscreteDoubleKeyFrame KeyTime=”00:00:02.5″ Value=”0″/>
</DoubleAnimationUsingKeyFrames>
<DoubleAnimationUsingKeyFrames BeginTime=”00:00:00.6″ Storyboard.TargetProperty=”Opacity” Storyboard.TargetName=”R4″>
<DiscreteDoubleKeyFrame KeyTime=”0″ Value=”1″/>
<DiscreteDoubleKeyFrame KeyTime=”00:00:02.5″ Value=”0″/>
</DoubleAnimationUsingKeyFrames>
<DoubleAnimationUsingKeyFrames BeginTime=”00:00:00.8″ Storyboard.TargetProperty=”Opacity” Storyboard.TargetName=”R5″>
<DiscreteDoubleKeyFrame KeyTime=”0″ Value=”1″/>
<DiscreteDoubleKeyFrame KeyTime=”00:00:02.5″ Value=”0″/>
</DoubleAnimationUsingKeyFrames>
</Storyboard>
</VisualState>
</VisualStateGroup>
</VisualStateManager.VisualStateGroups>
<Grid>
<Grid x:Name=”DeterminateRoot” Margin=”{TemplateBinding Padding}” Visibility=”Visible”>
<Rectangle x:Name=”ProgressBarTrack” Fill=”{TemplateBinding Background}” Height=”4″ Opacity=”0.1″/>
<Rectangle x:Name=”ProgressBarIndicator” Fill=”{TemplateBinding Foreground}” HorizontalAlignment=”Left” Height=”4″/>
</Grid>
<Border x:Name=”IndeterminateRoot” Margin=”{TemplateBinding Padding}” Visibility=”Collapsed”>
<Grid HorizontalAlignment=”Left”>
<Rectangle Fill=”{TemplateBinding Foreground}” Height=”4″ IsHitTestVisible=”False” Width=”4″ x:Name=”R1″ Opacity=”0″ CacheMode=”BitmapCache”>
<Rectangle.RenderTransform>
<TranslateTransform x:Name=”R1TT”/>
</Rectangle.RenderTransform>
</Rectangle>
<Rectangle Fill=”{TemplateBinding Foreground}” Height=”4″ IsHitTestVisible=”False” Width=”4″ x:Name=”R2″ Opacity=”0″ CacheMode=”BitmapCache”>
<Rectangle.RenderTransform>
<TranslateTransform x:Name=”R2TT”/>
</Rectangle.RenderTransform>
</Rectangle>
<Rectangle Fill=”{TemplateBinding Foreground}” Height=”4″ IsHitTestVisible=”False” Width=”4″ x:Name=”R3″ Opacity=”0″ CacheMode=”BitmapCache”>
<Rectangle.RenderTransform>
<TranslateTransform x:Name=”R3TT”/>
</Rectangle.RenderTransform>
</Rectangle>
<Rectangle Fill=”{TemplateBinding Foreground}” Height=”4″ IsHitTestVisible=”False” Width=”4″ x:Name=”R4″ Opacity=”0″ CacheMode=”BitmapCache”>
<Rectangle.RenderTransform>
<TranslateTransform x:Name=”R4TT”/>
</Rectangle.RenderTransform>
</Rectangle>
<Rectangle Fill=”{TemplateBinding Foreground}” Height=”4″ IsHitTestVisible=”False” Width=”4″ x:Name=”R5″ Opacity=”0″ CacheMode=”BitmapCache”>
<Rectangle.RenderTransform>
<TranslateTransform x:Name=”R5TT”/>
</Rectangle.RenderTransform>
</Rectangle>
</Grid>
</Border>
</Grid>
</unsupported:RelativeAnimatingContentControl>
</ControlTemplate>
</Setter.Value>
</Setter>
</Style>
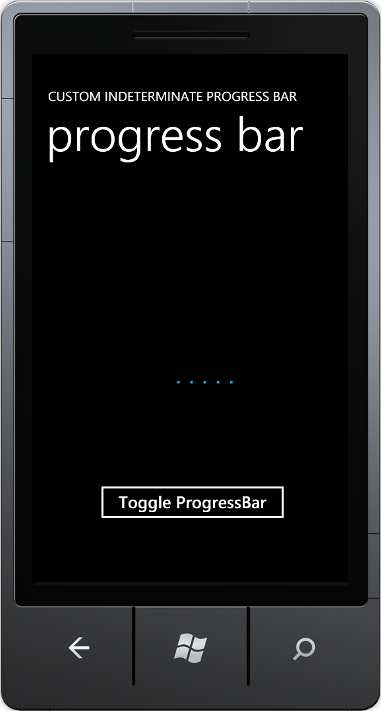
Your application now looks like this:
Add an event handler
It is essential to add an event handler to the application because it determines the visibility of the progress bar.
To add an event handler:
- Double-click the Toggle ProgressBar button. The MainPage.xaml.vb page is displayed with the following code:
Partial Public Class MainPage
Inherits PhoneApplicationPage
'Constructor
Public Sub New()
InitializeComponent()
End Sub
Private Sub Button1_Click(ByVal sender As System.Object, ByVal e As System.Windows.RoutedEventArgs) Handles Button1.Click
End Sub
End Class
- Add the following namespace at the beginning of the code:
Namespace CustomIndeterminateProgressBarSample
- Replace the Button1_Click event handler with the following code.
Private Sub toggleButton_Click(ByVal sender As Object, ByVal e As RoutedEventArgs)
customIndeterminateProgressBar.IsIndeterminate = Not (customIndeterminateProgressBar.IsIndeterminate)
If customIndeterminateProgressBar.Visibility = Visibility.Collapsed Then
customIndeterminateProgressBar.Visibility = Visibility.Visible
Else
customIndeterminateProgressBar.Visibility = Visibility.Collapsed
End If
End Sub
Voila! Now your custom indeterminate progress bar application for Windows Phone 7 is ready! You just need to build and debug the application.
Step 2 – Build and debug the application
- Select Build > Build Solution. The project should build without any errors. If there are errors, check the earlier steps, correct the errors, and then build the application again.
- To debug the application, set the deployment target of the application to “Windows Phone 7 Emulator”.

- Select Debug > Start Debugging. The emulator window is displayed.
- Click the Toggle ProgressBar button and test the visibility of the progress bar.

Note: To stop debugging the application, select Debug > Stop Debugging.
Step 3 – Rebuild in the release mode before publishing
- On the standard toolbar, change the configuration manager to Release.

- To rebuild the application, select Build > Rebuild. The XAP file of the application is generated.
Finally, to submit your application to the market place, you can refer to upload your application walkthrough.
Summary
That’s it! You have now successfully created the custom indeterminate progress bar application for Windows Phone 7, that too in just 3 simple steps!
You can find the full source code for the Visual Basic Custom Indeterminate Progress Bar application here.


0 comments
Be the first to start the discussion.