
Hello Android developers!
Over the summer, Hersh and I worked on a sample app that demonstrates a variety of dual-screen app possibilities. We used APIs like Jetpack Window Manager to create features that work across different foldable devices, including Microsoft Surface Duo. In this post, I’ve highlighted some of our favorite features that highlight cool dual-screen user experiences.
Travel Planner app
The sample is a Travel Planner app designed to help plan vacations and other travel. In this app, users can create and track trips’ dates, locations, and other information. The source code is available on GitHub.
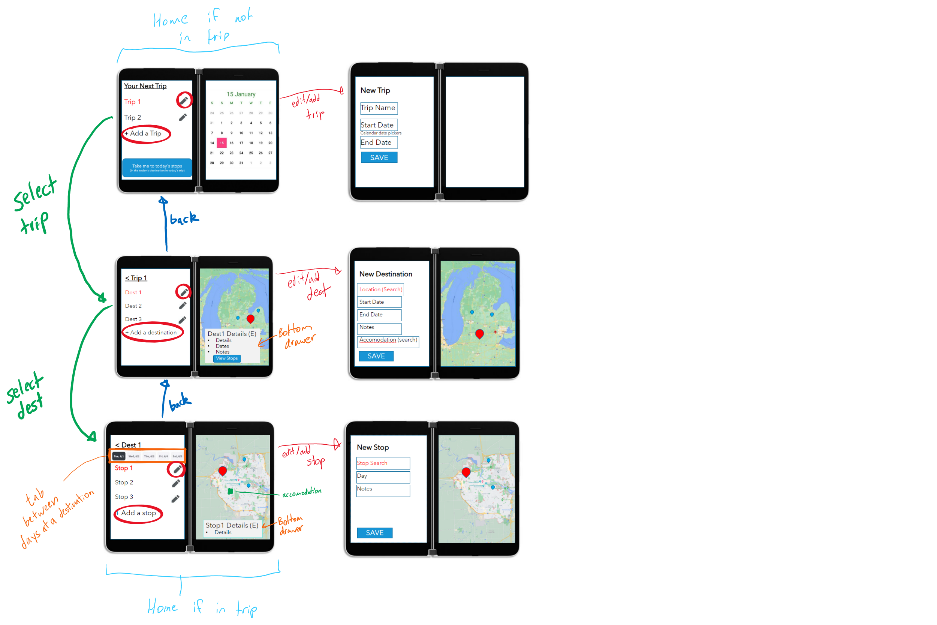
Figure 1: Travel Planner design process
Sliding Pane Layout
The Travel Planner app uses the SlidingPaneLayout control to adapt the UI for dual-screen and foldable devices. SlidingPaneLayout implements Jetpack Window Manager to detect and adjust to layout changes triggered by device attributes, such as a hinge separating the display or the user changing to a HALF_OPEN posture. With SlidingPaneLayout abstracting away the implementation details of Jetpack Window Manager, developers only need to add two child views to the element and define how they should interact. The declared width of the child views, as well as customizable properties like isOpen and isSlideable will determine how the UI responds to the current layout.
The SlidingPaneLayout declaration is shown below; a FragmentContainerView manages the list-based portion of the application, while the second child element hosts the MapFragment. This element allows us to easily follow the dual-view design pattern where the map pane and the list pane are simply two unique ways of viewing the same information:
<androidx.slidingpanelayout.widget.SlidingPaneLayout
    android:id="@+id/sliding_pane"
    style="@style/sliding_pane_invisible">
    <androidx.fragment.app.FragmentContainerView
        android:id="@+id/detail"
        style="@style/frame_horizontal_minimum"/>
    <FrameLayout
        style="@style/frame_horizontal_minimum">
        <fragment
            android:id="@+id/map"
            android:name="com.example.travelplanner.MapFragment"
            android:layout_width="match_parent"
            android:layout_height="match_parent"/>
        <com.google.android.material.card.MaterialCardView
            android:layout_width="match_parent"
            android:layout_height="wrap_content"
            android:layout_margin="8dp"
            app:cardElevation="2dp"
            android:layout_gravity="center_horizontal|bottom">
            <include layout="@layout/layout_card"
                android:id="@+id/flyout"/>
        </com.google.android.material.card.MaterialCardView>
    </FrameLayout>
</androidx.slidingpanelayout.widget.SlidingPaneLayout>
When required on a single screen, the second child element can be slid over the first. The map/list icon in the toolbar is coded to toggle this behavior:
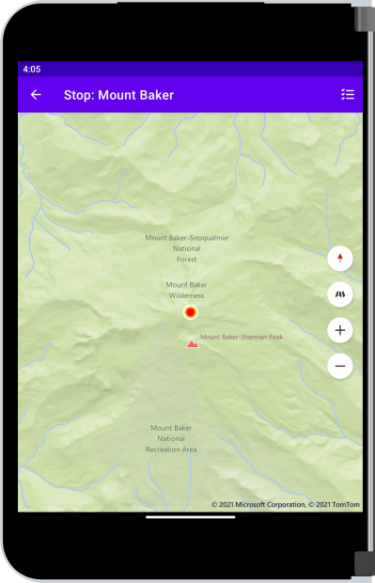
Figure 2: On a single screen, the second child element containing the map can slide over the other view
Open another app on the other screen
This app uses typical intent parameters to open photo galleries and map applications on a second screen. For example, the following code snippet constructs a URI that launches the default map application with a predetermined location.
val gmmIntentURI = Uri.parse("geo:${location.lat},${location.long}?q=${location.formattedAddress}")
val mapIntent = Intent(Intent.ACTION_VIEW, gmmIntentURI)
mapIntent.setPackage("com.google.android.apps.maps")
startActivity(mapIntent)
Refer to the Android Intent documentation for more information on customizing intents.
Drag and drop
Holiday plans are something you typically want to share, so this app supports drag and drop in multiple scenarios. Tap and hold any trip or destination card to generate a formatted text version of your itinerary, which can then be dropped into an email or word processing document.
The app creates both a plain-text and HTML version of the item so that the drop target can consume the appropriate content type:
private fun startDragAndDrop(trip: TripWithDestAndStop, view: View) {
    val clipDataItem = ClipData.Item(DragDropUtils.tripToText(trip), DragDropUtils.tripToHtml(trip))
    val mimeType = arrayOf(ClipDescription.MIMETYPE_TEXT_PLAIN, ClipDescription.MIMETYPE_TEXT_HTML)
    val clipData = ClipData("trip_drag_drop", mimeType, clipDataItem)
    val flags = View.DRAG_FLAG_GLOBAL or View.DRAG_FLAG_GLOBAL_URI_READ
    view.startDragAndDrop(clipData, View.DragShadowBuilder(view), view, flags)
}
Here’s an example of dragging and dropping in action:
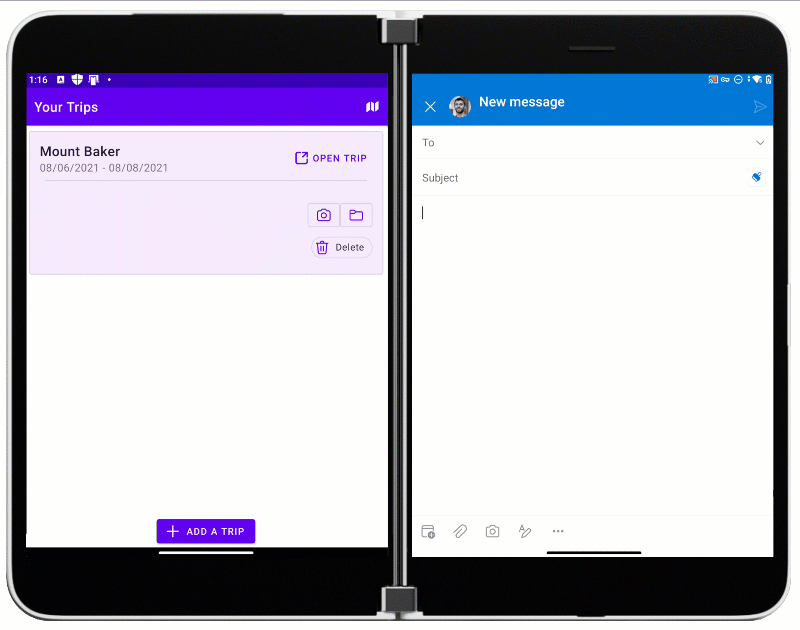
Figure 3: Animation of dragging trip details into an email
See the drag and drop documentation and samples for more details on adding drag sources or drop targets to your app.
Bing Maps
This app utilizes Bing maps to visualize trips. The map updates to match selections in the list pane but allows the user to select items by their map icons. Pinch and drag for map navigation are conveniently built into the Bing maps MapView control. Users can change locations or add new locations by tapping the map directly, triggering a BingMapsServices API routine to “reverse geocode” the tapped point. BingMapsServices also “geocodes” queries, transforming common user search strings into well-defined locations with coordinates and formatted addresses.
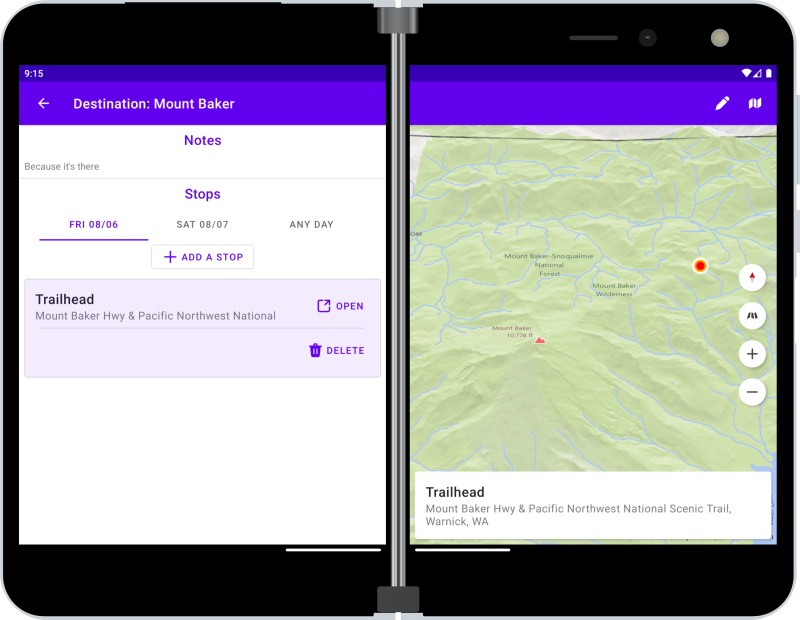
Figure 4: Bing Maps being hosted in the app for trip destinations visualization
Follow the instructions at Bing Maps for Android to get started with the map SDK. The app’s MapFragment class contains the code for displaying and interacting with the map. The onCreateView function sets up the map and configures the credentials key (you’ll need to have a basic Bing Maps API key to get full maps functionality):
val rootView = inflater.inflate(R.layout.fragment_map, container, false)
mapView = MapView(activity, MapRenderMode.VECTOR)
mapView.setCredentialsKey(BuildConfig.BUILD_KEY) // TODO: get a key from Bing Maps
(rootView as FrameLayout).addView(mapView)
mapView.onCreate(savedInstanceState)
MapFragment contains additional methods to add and remove pins, center the mapview on a location, and handle user taps of user icons or new locations. The GitHub readme explains how to configure the credentials key.
Jetpack Room
Finally, the app uses Jetpack Room to save trip data. The data model is more complex that the TwoDo sample, and includes a number of different entities and relationships:

Figure 5: Android project structure for Jetpack Room classes
The Travel Planner has four “basic” entities: Trip, Destination, Stop, and Travel. Each of these entities contains their necessary fields of data, and Room defines a table and columns for each one. Each entity is stored in its own table, but each of them is related. Specifically, each trip has multiple destinations, each destination has one travel, and each destination has multiple stops. Therefore, we have foreign keys that relate an entity to its parent. For example, each trip has a tripId, and that trip’s destinations have a parentTripId foreign key equal to the tripId.
While all the entities are related by foreign keys and are in separate tables, we frequently want access to a larger object that has the trip and all its associated destinations, stops, and travel. To accomplish this, we created two more objects: TripWithDestAndStop, and DestinationWithStops. TripWithDestAndStop contains a relation that defines the one-to-many relationship between trips and DestinationWithStops objects. Similarly, DestinationWithStops defines a one-to-many relationship with stops, and a one-to-one relationship with travel. After defining these objects with the relations, Room can query the appropriate tables automatically to give a TripWithDestAndStop or DestinationWithStops object that gives us access to the data we need. Below is a code snippet of these two objects:
data class DestinationWithStops(
    @Embedded val destination: Destination,

    @Relation(
        parentColumn = "destId",
        entityColumn = "parentDestId",
    )
    val stops: List,

    //travel time to this destination
    @Relation(
        parentColumn = "destId",
        entityColumn = "parentDestId",
    )
    val travel: Travel?

)
data class TripWithDestAndStop(
    @Embedded val trip: Trip,

    @Relation(
        entity = Destination::class,
        parentColumn = "tripId",
        entityColumn = "parentTripId"
    )
    val destinations: List
)
Feedback and resources
The source for this and other Jetpack Window Manager samples is available on GitHub.
If you have any questions, or would like to tell us about your Surface Duo apps, use the feedback forum or message us on Twitter @surfaceduodev.
Finally, please join us for our dual screen developer livestream at 11am (Pacific time) each Friday – mark it in your calendar and check out the archives on YouTube.
0 comments