
Hello Flutter developers!
Today we are going to get you started with our Surface Duo SDK for Android so that you can adapt your existing applications for dual-screens and the hinge. The sample code demonstrates how Android developers can add the Surface Duo SDK to a project and then access the screen and hinge APIs.
Our ultimate goal is to develop a single codebase that runs on iOS, Android (targeting single-screen devices), Android (targeting dual-screen devices like the Surface Duo), Windows devices, Web, and anything else Flutter supports 🙂 You can see the prototype we’ve built in this video:
Video Flutter application running on multiple devices
To get started, first follow the instructions to download and install the Surface Duo dual-screen emulator on a machine that you have also setup for Flutter development. You can follow the Flutter Getting Started Guide if you are starting from scratch.
Once you have the Surface Duo emulator running, there are three steps to get started with the dual-screen APIs in Flutter:
- Add the Android dual-screen SDK to your Flutter project.
- Add the Platform Channel and native code required to the Android MainActivity.
- Add the Platform Channel code to your Flutter application code.
Step 1. Add the Android dual-screen SDK to your Flutter project
Begin by creating a Flutter application and make sure to leave kotlin support enabled (default). The sample app that I’m building is the Contoso Movies application. You can see what the “finished” application will look like in the video above. I say “finished” because there are some features in the video that are not yet optimized for the dual-screen experience. This leaves us something to work on down the road 🙂
Once you have the typical counter application created, let’s add the SDK integration. First, we need to add a file to our Flutter app inside the Android section. Start by creating a folder below /android/app; I named mine libs.

Figure 1: Create a folder for the SDK library
Now that we have a folder created to hold the SDK library, we need to copy the SDK library into this new folder. On Windows this will typically be found at C:\Users\<username>\SurfaceDuoEmulator\sdk
In the SurfaceDuoEmulator directory you will find a JAR file; copy this file into the folder you created in your application. The last step is to add a dependency on this file to your app level build.gradle. Open the build.gradle found in the android/app folder. Scroll down to the “dependencies” section and add the following line inside it:
compileOnly files(‘libs/com.microsoft.device.display.displaymask.jar’)
Your dependencies section should now look like this if you started with a new Flutter application:
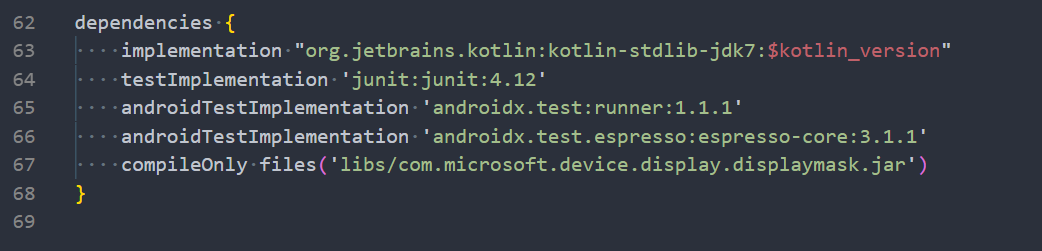
Figure 2: Modified build.gradle
Step 2. Add the Platform Channel and native code required to the Android MainActivity
Now that we have the SDK in the app, we need to add the relative native code that we can then call from Flutter to check things like, “is this a dual-screen device” and “is my app spanned across both screens” among other things. We’ll start with these two for now. Open the MainActivity.kt file found in /android/app/src/main/kotlin.
We’ll first need a couple of imports, one to be able to create a Channel for Flutter to communicate over and a second to import the library. Add these to the imports section of your app:
import io.flutter.plugin.common.MethodChannel
import com.microsoft.device.display.DisplayMask
import android.hardware.Sensor
import android.hardware.SensorManager
import android.hardware.SensorEvent
import android.hardware.SensorEventListener
Next, we need to create the channel we’ll use to communicate and ensure that the Native side and Flutter side are in sync. Add the following declaration inside the MainActivity:
private val CHANNEL = “duosdk.microsoft.dev”
We’ll also need some local variables to hold some information, so let’s add these to the MainActivity right below our CHANNEL variable:
private val HINGE_ANGLE_SENSOR_NAME = "Hinge Angle"
private var mSensorsSetup : Boolean = false
private var mSensorManager: SensorManager? = null
private var mHingeAngleSensor: Sensor? = null
private var mSensorListener: SensorEventListener? = null
private var mCurrentHingeAngle: Float = 0.0f
To make things readable, we’ll break our APIs into different functions that we can call from within the Channel’s methodCallHandler. Add the following functions to MainActivity:
fun isDualScreenDevice(): Boolean {
  val feature = "com.microsoft.device.display.displaymask"
  val pm = this.getPackageManager()  if (pm.hasSystemFeature(feature)) {
    return true
  } else {
    return false
  }
}

fun isAppSpanned(): Boolean {
  var displayMask = DisplayMask.fromResourcesRectApproximation(this)
  var boundings = displayMask.getBoundingRects()
  var first = boundings.get(0)
  var rootView = this.getWindow().getDecorView().getRootView()
  var drawingRect = android.graphics.Rect()
  rootView.getDrawingRect(drawingRect)  if (first.intersect(drawingRect)) {
    return true
  } else {
    return false
  }
}

private fun setupSensors() {
  mSensorManager = getSystemService(SENSOR_SERVICE) as SensorManager?
  val sensorList: List<Sensor> =
    mSensorManager!!.getSensorList(Sensor.TYPE_ALL)

  for (sensor in sensorList) {
    if (sensor.getName().contains(HINGE_ANGLE_SENSOR_NAME)) {
      mHingeAngleSensor = sensor
      break
    }
  }

  mSensorListener = object : SensorEventListener {
    override fun onSensorChanged(event: SensorEvent) {
      if (event.sensor === mHingeAngleSensor) {
        mCurrentHingeAngle = event.values.get(0) as Float
      }
    }

    override fun onAccuracyChanged(sensor: Sensor?, accuracy: Int) {
      //TODO – Add support later
    }
  }

  mSensorManager?.registerListener(
    mSensorListener,
    mHingeAngleSensor,
    SensorManager.SENSOR_DELAY_NORMAL)

  mSensorsSetup = true
}
The last piece we need to add to the MainActivity is the code to handle the calls to this channel. This code will return a failure if we aren’t on a dual-screen device and will handle API calls. I’ve called these isDualScreenDevice and isAppSpanned and getHingeAngle. This code should go right below the GeneratedPluginRegistrant.registerWith(flutterEngine); line:
MethodChannel(flutterEngine.dartExecutor.binaryMessenger, CHANNEL).setMethodCallHandler {
        call, result ->
            if(!isDualScreenDevice()) {
                result.success(false)
            } else {
                try {
                    if (call.method == "isDualScreenDevice") {
                        if (isDualScreenDevice()) {
                            result.success(true)
                        } else {
                            result.success(false)
                        }
                    } else if (call.method == "isAppSpanned") {
                        if (isAppSpanned()) {
                            result.success(true)
                        } else {
                            result.success(false)
                        }
                    } else if (call.method == "getHingeAngle") {
                        if (!mSensorsSetup) {
                            setupSensors()
                        }
                        result.success(mCurrentHingeAngle)
                    } else {
                        result.notImplemented()
                    }
                } catch(e: Exception){
                    result.success(false)
                }
            }
        }
Step 3. Add the Platform Channel code to your Flutter application code
Now that we have the native side setup, we can make use of that functionality within our Flutter application code. Let’s modify our main.dart file now. Add the following import so we can make the platform specific calls:
import 'package:flutter/services.dart';
Next, we need to create the platform channel like what we did on the native side in the MainActivity. First we’ll define a global constant. It’s not ideal, but for our sample this is fine.
const platform = const MethodChannel('duosdk.microsoft.dev');
Note: Make sure the string you use here matches what you used in the MainActivity code.
In the MyHomePage stateful widget, lets now add a function that will simply print out if we are on a dual-screen device, if the app is spanned and the current hinge angle.
void _updateDualScreenInfo() async {
    final bool isDual = await platform.invokeMethod('isDualScreenDevice');
    final bool isSpanned = await platform.invokeMethod('isAppSpanned');
    final double hingeAngle = await platform.invokeMethod('getHingeAngle');

    print('isDualScreenDevice : $isDual');
    print('isAppSpanned : $isSpanned');
    print('hingeAngle : $hingeAngle');
}
And finally, let’s call that new function from our build method.
@override
Widget build(BuildContext context) {
    _updateDualScreenInfo();

    ... // The rest of the build method
}
That’s it! Now we have an application that will work on both a dual-screen and single-screen device. Every time you click the ‘+’ action button we query the APIs and write the info to the debug console. If you run the application and watch the debug console in your debugger, you will see our output each time you click the button. When you span the app or if you run on a single screen device vs. a dual-screen device and then click the ‘+’ button in the application, you will see new output, including the hinge angle.
Note: The hinge angle is simulated in the emulator by changing the Pressure sensor in the settings
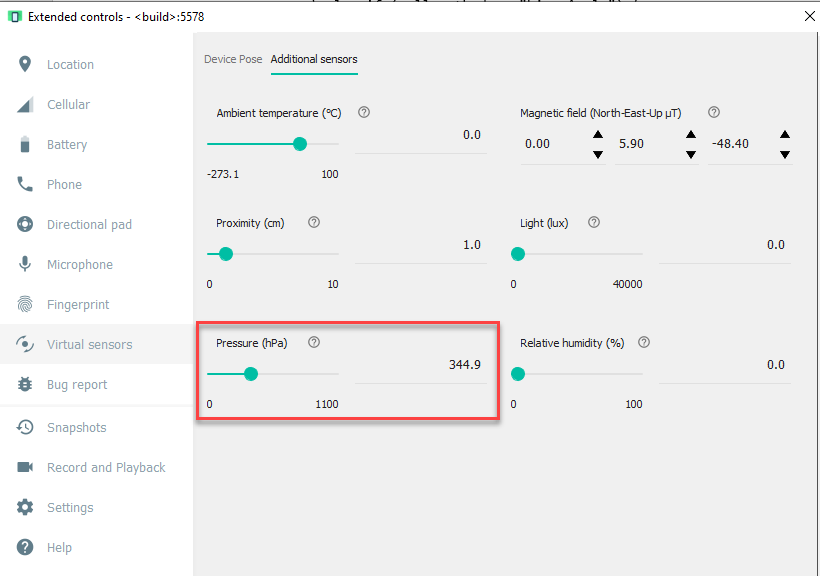
Figure 3: Extended controls UI showing Pressure sensor slider
This gif below shows the final project; notice the output showing the dual-screen and spanned state as the ‘+’ button is clicked.
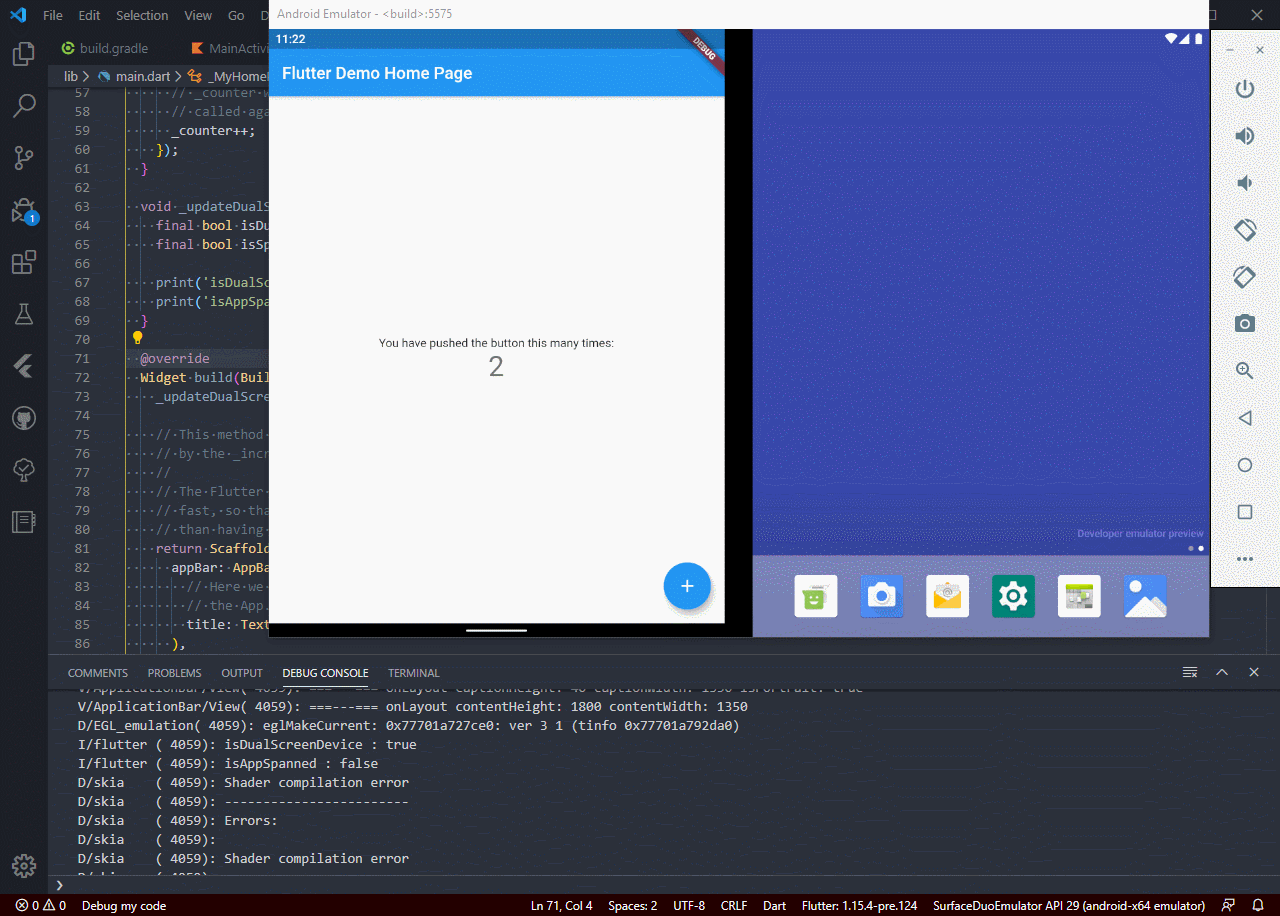
Figure 4: A gif of the final project showing the debug output
The steps above have laid the groundwork we need to move into the next stage of building apps for the Surface Duo. Next time we’ll look at how we can use this info to decide how to layout our content and take advantage of both single and dual-screen modes.
Invitation to Microsoft Build and DroidCon online
We invite you to join us at Microsoft Build on May 19-21, a free 48-hour online developer event. This unique event for developers brings together developers to help the world solve new challenges—sharing knowledge and staying connected is more important than ever. Join your community to learn, connect, and code—to expand your skillset today, and innovate for tomorrow.
Among the many topics, we will feature a dedicated dual-screen session for C# developers by Craig, SK123, where we’ll discuss our Surface Duo SDK, and a session on React Native, SK119.
You can also attend the GDG India online meetup, where Cesar from the Surface Duo team will be talking about developing dual-screen experiences. Mark your calendar for Saturday May 16th from 8:00 PM to 9:30 PM GMT+5:30.
Resources and feedback
The completed sample project can be found in our GitHub.
We would love to hear from you about your experiences using the Surface Duo SDK, emulator, and your thoughts on how you can utilize these in your Flutter applications.
Please reach out using our feedback forum or message me on Twitter or GitHub.
0 comments