Hello Android developers!
We’re excited to announce that version 30.8.3 of the Android Emulator now includes active pen support to let you test pen-specific features like pressure sensitivity, orientation, eraser tip, and input button!
Pen support requires the emulator be running on a device with a specific pen digitizer technology, which is present on modern portable devices including the Windows Surface line.
Devices from the Microsoft Surface family, like the Surface Laptop, Book, Pro, or Surface Duo work great with an active pen like the Microsoft Surface (Slim) Pen, but other devices with pen support should work too. Using a pen will enhance your productivity, enabling you to write and draw in real time, sketch out a new idea, jot down some notes, or brainstorm with colleagues as naturally and intuitively as using a real pencil.
If you are an Android app developer, chances are you are using the Android Emulator to test and debug your application. But if you wanted to bring an amazing pen and ink experience to your app, you had limited options because until now the Android Emulator did not have pen support, even if the host machine did but the pen pointer was recognized and treated just like a mouse pointer without any additional functionality.
Pen features
The following pen features are now supported in the Android emulator:
Pressure sensitivity
The emulator supports up to 1024 levels of pressure for the pen, but this is also dependent on the number of pressure levels of the hardware digitizer and pen, which is more than enough pressure for a smooth inking experience. For example, the Surface family of devices and pens support 4096 levels of pressure.
Pressure sensitivity is used to provide a natural drawing and writing experience inside an app by virtually controlling the “ink flow” or the line thickness and transparency.
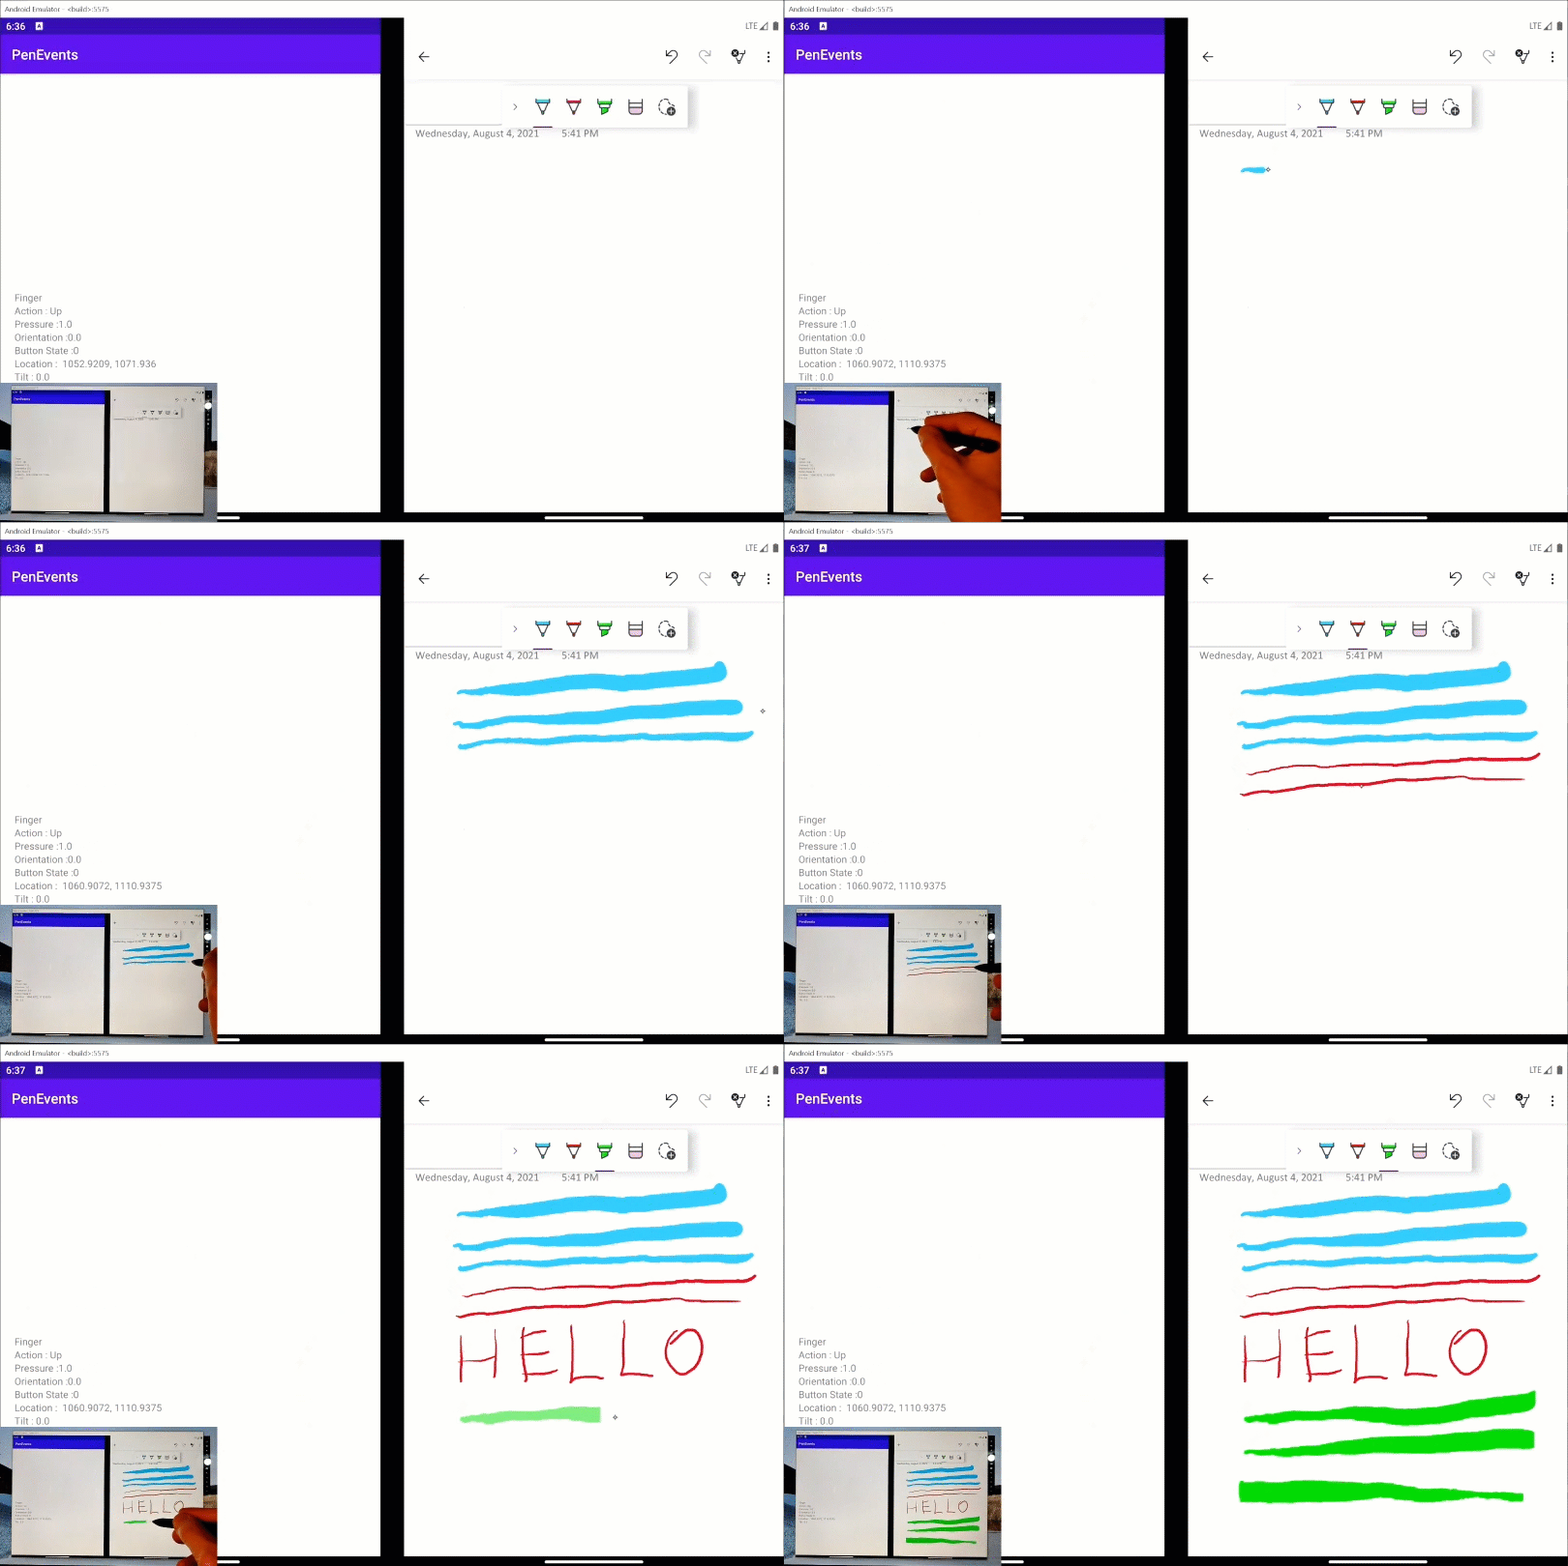
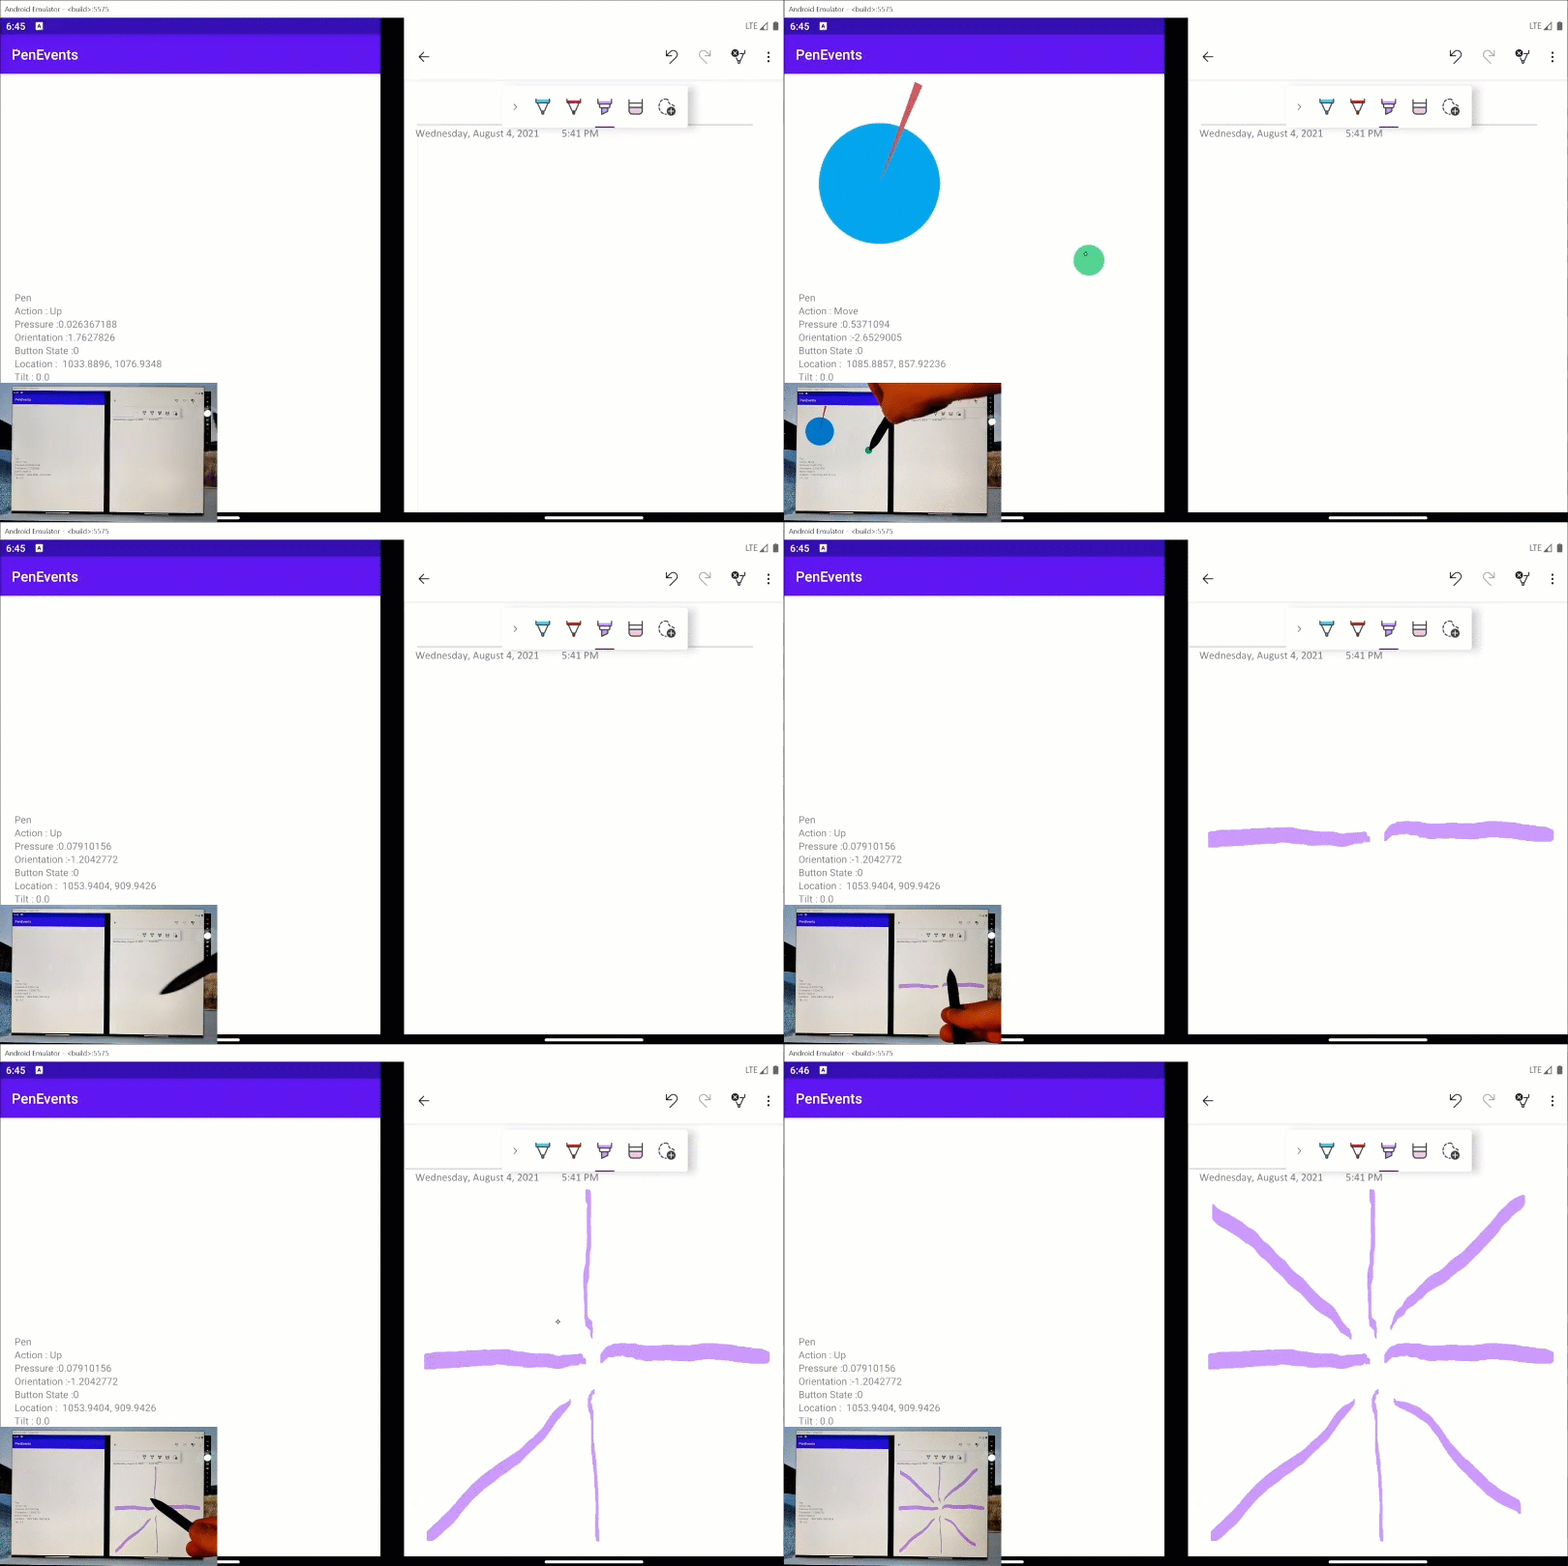
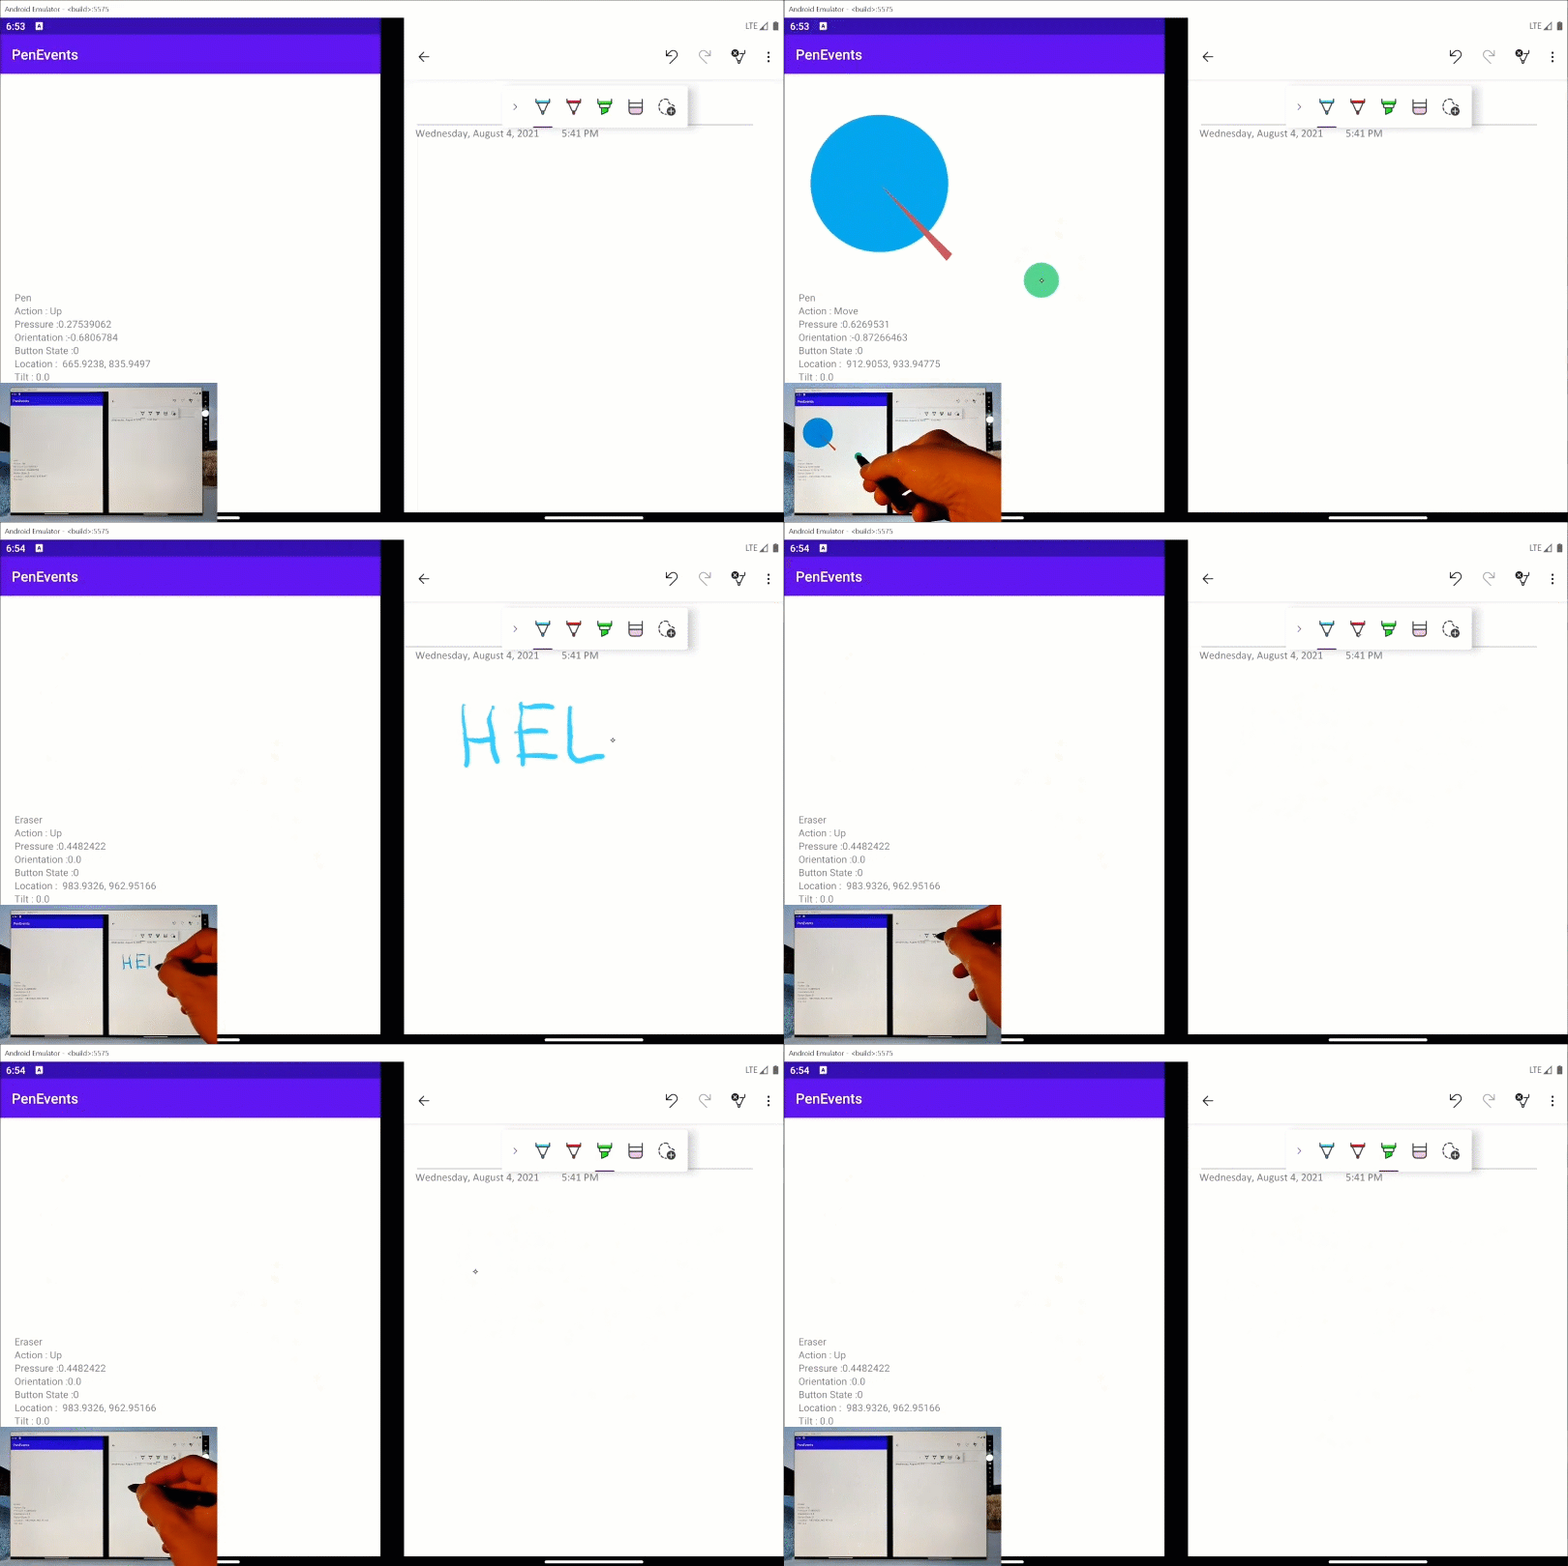
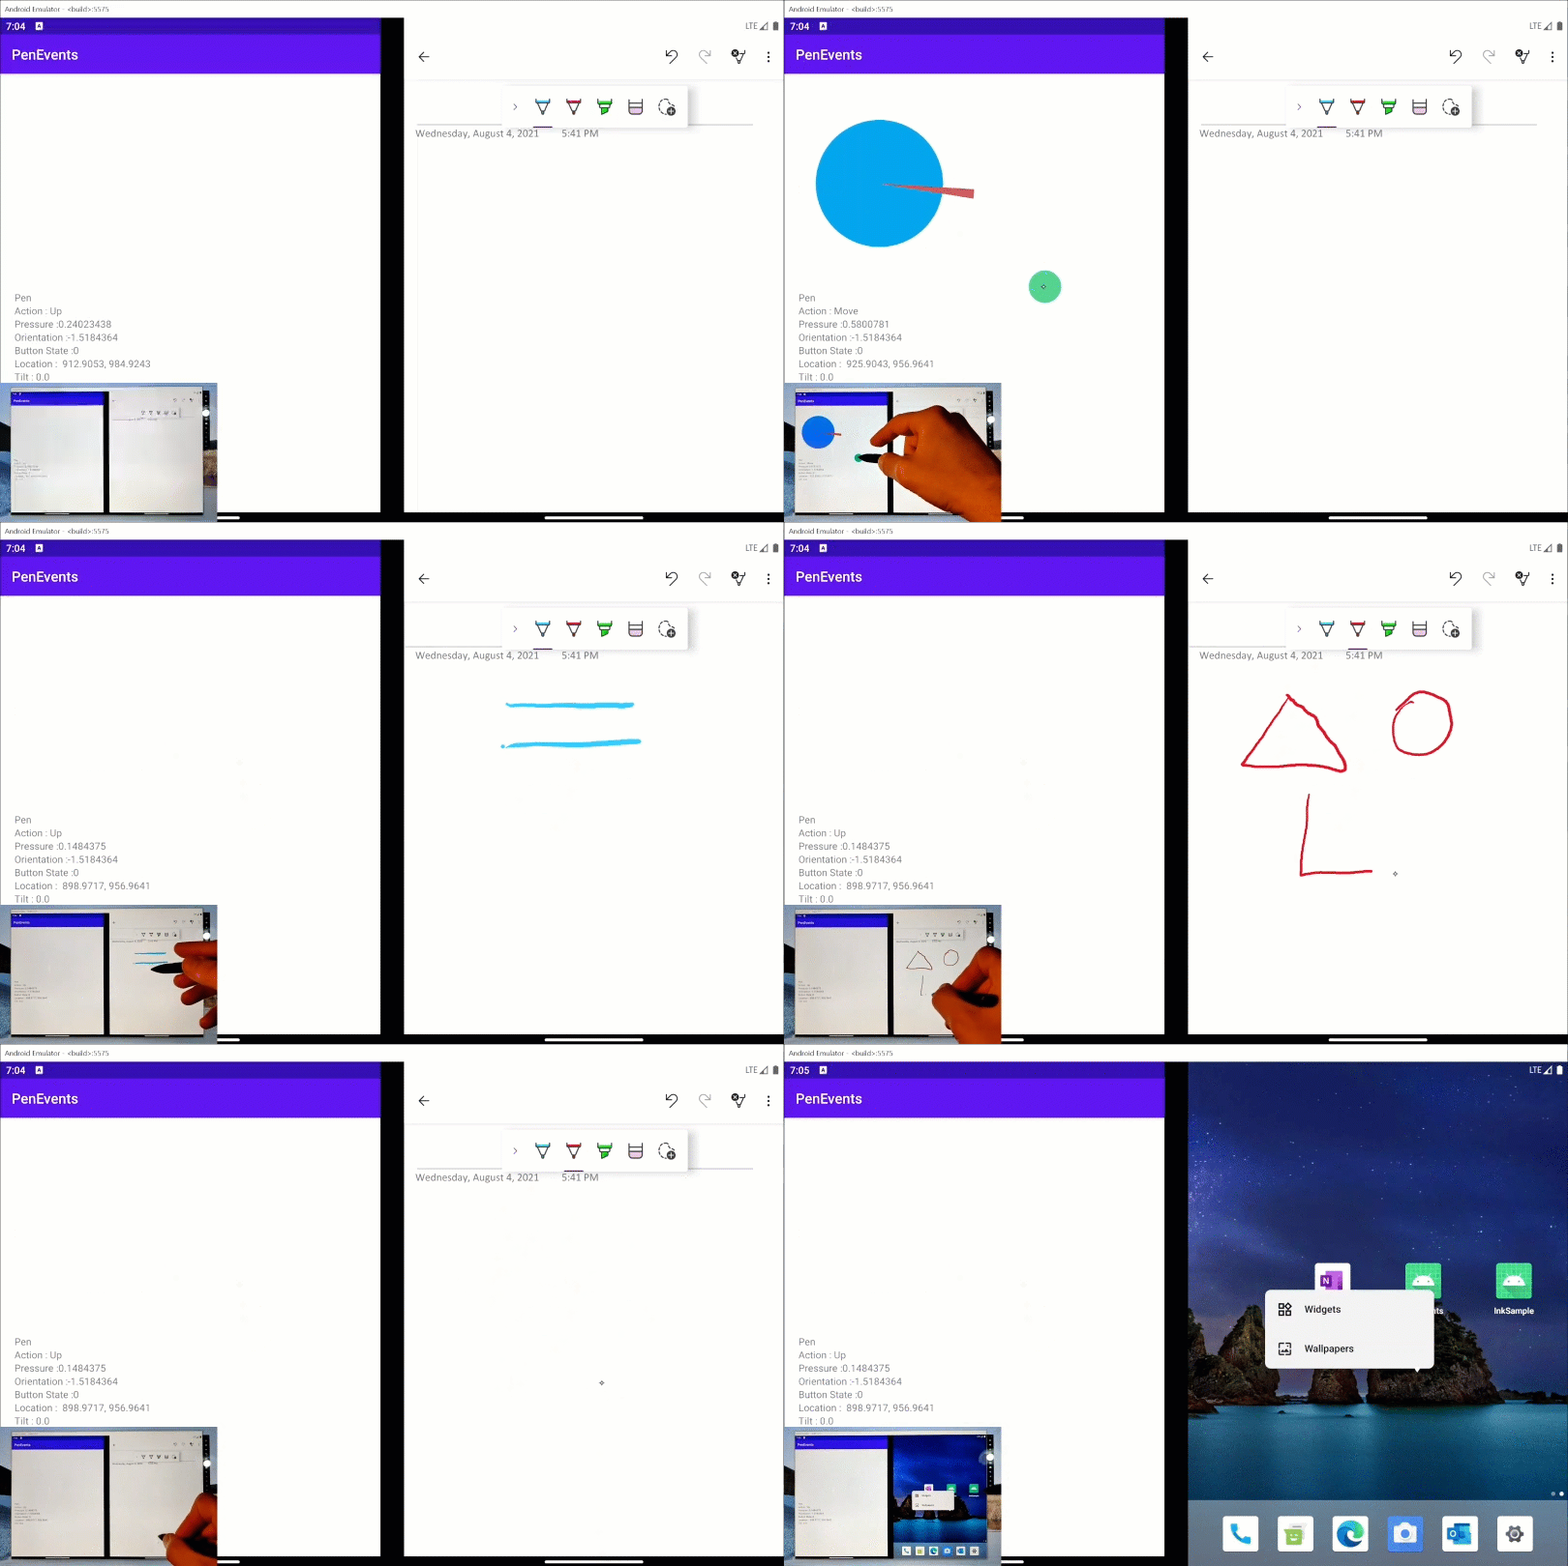
Figures 1-4 portray the Surface Duo Emulator screen running on a Surface Laptop, and in the lower left corner, the small picture-in-picture will show the real-time movement of the Surface Slim Pen on the Laptop screen. The demos were recorded using the PenEvents sample app running on the left emulator screen and the Microsoft OneNote app running on the right emulator screen.

Figure 1. Usage of pen pressure sensitivity in apps
As you can see in Figure 1, on the left side, the blue circle size depends on the pressure applied on the pen, and on the right side, the thickness of the drawn lines varies according to how hard the pen is pressed onto the screen when drawing or writing.
Pen orientation
Pen orientation is another important feature for a great inking experience, which is supported today by the Surface family of devices. It basically shows that the underlying screen can sense the orientation of the pen, then the operating system can pass this information to the applications for enhancing the drawing or writing experience.
Specifically, in the Linux Multi-touch Protocol (which is used by the emulator to communicate to the Linux kernel in Android OS), the orientation is defined as the angle in degrees between the pen’s long axis in the direction of the tip and the vertical axis of the screen in the up direction, measured clockwise. A value of 0 means the pen is vertical with the tip up, 90 means it’s horizontal with the tip to the right, -90 means it’s horizontal with the tip to the left, and for vertical with the tip down, it can be either 180 or -180.
Orientation is usually used inside applications for shading sketches just like it could be done with a real graphite pencil on paper and also for digital calligraphy, where different styles of pen tips are needed.

Figure 2. Example of pen orientation in apps
On the left side of Figure 2, the red arrow is moving in real-time sync with the pen and on the right side, we can see that lines drawn with the pen oriented in different directions will have different thicknesses.
Eraser tip
The eraser tip is located at the other end of the pen and is usually thicker that the writing tip. It can also look and feel like a button and have button-like functions.
Its functionality inside apps is erasing any writing or drawing done inside the current canvas, although it can be a little bit different depending on the app and in some apps, it erases the whole object or word it touches and in other apps, it erases just the screen area it touches.

Figure 3. Usage of pen eraser in apps
Figure 3 shows on the left side that different pen tips are recognized as such by the application and on the right side we can see how the eraser tip will delete any writing or drawing done on the canvas.
Side button
Some active pens, like the Surface ones, have a multi-purpose side or barrel button. This button is like a mouse button as it can be used to trigger a context menu similar to a right-click to hold an object for drag-and-drop or perform some other custom action.

Figure 4. Usage of pen button in apps
In Figure 4 on the left side, pressing the side button on the pen will turn the big circle purple and on the right side, we can see that in the OneNote app the functionality of the button is to erase objects just like the eraser tip. At the end, we can also check out the Android context-menu on the home screen being triggered by the side button press.
Usage
You can already try out the pen support in version 30.8.3 or newer of the Android Emulator package which can currently be found in the canary version of Android Studio by opening the SDK Manager under the SDK Tools tab.
The Android Emulator can take advantage of the maximum pen hardware specifications available on your device. For example, on the Surface devices with the Surface Pen(s) it will use all the amazing features listed above, but even on devices which only support a subset of those features, it will degrade gracefully and use whatever functionality is possible.
As an example, when used on a device with digitizer and pen support but without the pen orientation feature, everything will work with the caveat that the pen orientation will always be 0.
The pen events data can be accessed and processed from within Android apps just like my colleague Meir described in the Pen Events blog post.
In addition to all the Android in-app features of the pen that were described above, this change also includes features like:
- Navigation and control of the emulator window using the pen, such as move, drag or resize the window, and press non-device related window buttons
- Press virtual “hardware buttons” of the AVD that are present on the front of the device frame with the pen (these can only be found on older virtual devices, like the Google Nexus S)
Pen support in the emulator was designed to be as generic as possible and because the Android Emulator GUI is built on top of the cross-platform Qt framework, there is no limitation on which platform it can work, but there are some requirements to consider. The first one is about which operating system platforms the emulator is available, and the second one is about Qt framework support on a specific platform, and the third one is about hardware support, meaning a screen with a specific digitizer technology for a specific pen.
The first two requirements can be bundled together because Google supports Windows, Linux, Mac, and ChromeOS operating systems for the Android Emulator and Qt is also supported on these, any other platform does not matter at this point. Regarding the third requirement, this is where things get complicated, because there are a multitude of active pen technologies and of course the screen digitizer technology used on your device needs to match the technology of the active pen you are using, and this technology needs to be supported in the drivers and in one of the operating systems mentioned above. It’s possible even at this point that not all active pen features may be supported by every compatible device-operating system combination.
Your best bet is to use devices from a cohesive ecosystem, like the Surface family, which in this case uses the N-trig technology for digitizers and pens and supports all the listed features of active pens in Windows. This makes Windows the perfect platform for developing and testing Android applications with pen support.
Technical details
If you are interested in developing or looking at the source code of the emulator, you can find information in the development branch of the repository, which is called emu-master-dev. Additionally, if you want to check out the code changes described in this post, you can take a look at the Change Lists in the Gerrit Code Review platform.
Here are some more key pieces of information about the Google Android Emulator as it relates to pen support:
- It is built on top of QEMU
- The emulator GUI is built on top of the Qt framework
- It uses the VirtIO virtualization standard for device drivers
- It uses the Linux Multi-touch (MT) Protocol for communication with the Linux kernel of Android OS
- Qt supports the main types of related input events: mouse, pen, touch
- Previously, pen and multi-touch were not natively supported but were synthesized into mouse or single-touch events
The main changes needed to achieve native pen support were:
- Adding dedicated pen event handling in the Qt window layer (see the code)
- Adding support for new events from the Linux Multi-touch Protocol into the VirtIO drivers (code change 1, code change 2)
- Adding support for new events from the Linux Multi-touch Protocol into the Goldfish stack (code change 1, code change 2)
- Adding processing of pen events and propagation of data through to the Android OS (see the code)
One of the quirks of this implementation was the fact that the Qt framework, at least on Windows, does not provide the orientation or azimuth of the pen, but instead it provides the X-Tilt and Y-Tilt values. These are defined as:
- X-Tilt – the plane angle between the Y-Z plane and the plane containing the pen axis and the Y axis
- Y-Tilt – the plane angle between the X-Z plane and the plane containing the pen axis and the X axis
Because the Linux Multi-touch (MT) Protocol only supports pen orientation and not tilt, a conversion was necessary from tilt coordinates to azimuth using some trigonometric formulas in the X-Y-Z coordinate system. You can check out these changes in the code snippet below or in the code change:
int EmulatorQtWindow::tiltToRotation(int xTiltDeg, int yTiltDeg) {
    int rotationDeg = 0;
    // The equations used, in an X-Y-Z coordinate system:
    // tan(X Tilt) = X / Z
    // tan(Y Tilt) = Y / Z
    // tan(azimuth) = Y / X = tan(Y Tilt) / tan(X Tilt)
    // azimuth = arctan( tan(Y Tilt) / tan(X Tilt) )

    if ((xTiltDeg != 0) && (yTiltDeg != 0)) {
        // domain error may occur if both arguments x,y of atan2 are 0
        // pen is not parallel to any axis, nor perpendicular to screen
        // use the south-clockwise convention for azimuth: (-X, -Y)
        // the Y axis is already reversed on a screen (down, not up)
        double xTiltRad = -qDegreesToRadians((double)xTiltDeg);
        double yTiltRad =  qDegreesToRadians((double)yTiltDeg);

        // atan2 function computes the arc tangent of y/x using the signs
        // of arguments to determine the correct quadrant
        rotationDeg = (int)qRadiansToDegrees(std::atan2(std::tan(xTiltRad),
                                                        std::tan(yTiltRad)));
    } else if (xTiltDeg != 0) {
        // pen is parallel to the X axis, not perpendicular to screen
        rotationDeg = (xTiltDeg > 0) ? -90 : 90;
    } else {
        // pen is parallel to the Y axis, or perpendicular to screen
        rotationDeg = (yTiltDeg >= 0) ? 0 : 180;
    }
    return rotationDeg;
}
Limitations
The Android Emulator has a set of requirements among which the hardware acceleration is most important. Because we are dealing with an emulated system, the performance will depend on the capabilities of the host machine.
When discussing the performance of an active pen there are usually these main topics:
- Movement accuracy – This aspect is not influenced by the fact that we are dealing with and emulated system because the position of the pen tip is reported at the pixel level then translated as an X, Y coordinate to the Android system.
-
End-to-end latency – The end-to-end latency of the entire system, measured from the moment the pen touches the host screen and until the event data is received in an Android app is basically the sum of latencies at every level; pen latency in the host operating system + processing time in the emulator + latency in Android OS.
From the emulator’s point of view, only the middle part can be influenced, and care has been taken to optimize the processing done to minimize this time delay.
The apparent latency of the pen in the emulator is also influenced by the Android app that is running. If we look at Figures 1-4, we can see that on the left screen, the PenEvents app has a greater latency than the OneNote app on the right screen. This is happening because the PenEvents app is doing a lot of graphical intense actions. If we look at the OneNote app in Figure 3, we can see that the end-to-end pen latency in the emulator is quite good.
-
Pressure levels – The emulator itself supports up to 1024 levels of pressure for the pen, but looking at the entire system, we also need to consider the number of pressure levels supported by the host operating system, which could be greater than or less than 1024. In Android, the pressure value is converted to a floating point value in the interval [0, 1].
Moving the pen on the screen extremely fast generates a very high number of input events and their processing could result in an apparent slowdown of the emulator, but this also depends on the performance of the host machine. Because minimizing latency and maximizing movement accuracy was a priority, only pen events which contain changes of the X, Y coordinates and the button state are filtered through as can be seen in this code change.
Palm rejection, which allows you to rest your palm comfortably on the screen while using the pen, without interfering with the input, is not an issue for the emulator because it is performed at the host machine level.
Resources and feedback
These changes are part of the Android emulator (version 30.8.3 or newer) which can be updated from within Android Studio SDK Manager.
If you have any questions, or would like to tell us about your Surface Duo apps, use the feedback forum or message us on Twitter @surfaceduodev.
Finally, please join us for our dual screen developer livestream at 11am (Pacific time) each Friday – mark it in your calendar and check out the archives on YouTube.

0 comments