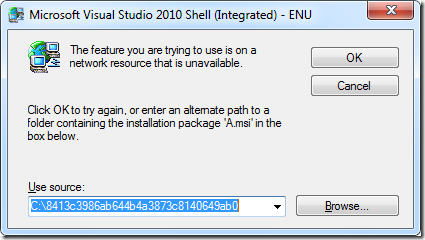
Some users are reporting that when installing Visual Studio 2010 SP1 they are prompted for MSI files as shown in the following example screenshot. These prompts for source are most common during rollback on failed install attempts and uninstall since original RTM files need to be put back on the machine and may not have been cached by Windows Installer.
This includes, but is not limited to, the following MSI files.
- vs_intshell_enu.msi
- vs_setup.msi
I will update this list of files customers are commonly seeing as I’m made aware. If you are seeing this with other MSI files when installing VS2010 SP1, please comment below.
How to work around this issue
The solution varies depending on what you are being prompted for. I will update this entry with common prompt issues for VS2010 SP1 as I’m made aware. If you’re running into this issue with other MSI files when installing VS2010 SP1, please comment below.
vs_intshell_enu.msi
This workaround also may apply to any other language for the Visual Studio 2010 Shell (Integrated), and the instructions are similar for Visual Studio 2010 Shell (Isolated) through the download location and file names will be different.
- Download VSIntShell.exe for the language required, as described by _<LANG> in the file name required (ex: vs_intShell_enu.msi is for English).
- Open a command prompt (you can elevate when opening it now, or accept the prompt later when extracting below).
- Run the comnand: vsintshell.exe /extract:”%TEMP%vsintshell”
- Change directories or browse to the %TEMP%vsintshell folder: cd “%TEMP%vsintshell”
- Rename the MSI file name as required by the prompt: rename vs_setup.msi vs_intshell_enu.msi
- Return to the prompt dialog, click the Browse button, and type the following into the File name: text box: %TEMP%vsintshell
- Select vs_intshell_enu.msi (the file name must match) and click Open to continue.
- Back in the prompt dialog, click OK to continue.
vs_setup.msi
If the title of the source prompt dialog contains “Express”, please see section 2.2.5 in the VS2010 SP1 read me; otherwise, the following instructions should help you provide the right source and continue installation.
- Locate your original installation media for the product and language listed in the source prompt dialog caption. If the name of the language is cut off, the language the dialog text is displayed in should help identify the proper source.
- Insert or attach your original installation media or network location for the product referenced in the caption.
- Return to the prompt dialog, click the Browse button, and browse to the root of the installation media above.
- Select vs_setup.msi (the file name must match) and click Open to continue.
- Back in the prompt dialog, click OK to continue.
Description of the issue
In general, prompts for source during patch install occur because a file installed by a product is missing or in an unexpected state. Windows Installer requires the original source to get these files. If it can’t find it automatically (for example, the original media isn’t in the drive or the previous network location), Windows Installer prompts the user for this source to continue.
Updated (3/16/2011): Added description for vs_setup.msi, as well as a note that these prompts are most common during rollback or uninstall.


0 comments