

Hello all, today we’re featuring a guest author on our Semantic Kernel blog, José Luis Latorre Millás, an MVP for Microsoft focused on AI.
We will turn it over to Jose to dive into Making Plans with Semantic Kernel – Setting Up & Authentication.
Extending the Reach of the Model
Plugins serve as powerful tools that enable us to extend the capabilities of AI by adding extra skills. The shift in AI prompts us to rethink how we approach its development. Often, we find ourselves confined to plugins focused solely on “information gathering,” rather than actively engaging with tasks and exploring the full potential of AI. This blog post aims to challenge this status quo, albeit incrementally.
Additionally, it provides an overview of a common question raised: How can I authenticate and authorize my application to execute actions?
Special thanks to Matthew Bolaños and the Semantic Kernel team for inspiring and suggesting the implementation of this idea using Microsoft Planner for a post/repository/video. Their guidance has been instrumental in reshaping this mental model.
The Concept: Having an AI Plan Tasks and Create them in Microsoft Planner
The concept revolves around given a goal from the user, into creating a list of ordered tasks to achieve this goal and utilize this information to create those tasks in Microsoft Planner. For this, a Microsoft Planner Bucket will be created and after it, its associated tasks. Microsoft Planner, for those unfamiliar, is an Office 365 app designed to facilitate collaborative task management, resembling a collaborative kanban board. You can learn more about it here.
This endeavor presents two primary challenges:
- Authentication: Establishing authentication and authorization from our app into a Microsoft Office tenant, along with necessary configurations.
- Microsoft Graph: Accessing the office tenant through the Graph API.
This demonstrates how to interact and manipulate elements within the Microsoft Office ecosystem using the “power of the graph” in a secure, authenticated manner. Additionally, it introduces a compelling skill: manipulating a disparate business environment, whether it be SharePoint, Tasks, Outlook, Word, or any other. Furthermore, it delves into authentication and authorization, common challenges faced by many, which will be thoroughly covered, with all the code readily available for exploration (referenced in the resources section at the end).
Getting Started!
To ensure the decoupling of the Microsoft Planner plugin from the demo app and to allow for the plugin to evolve independently, two separate projects were created:
- MicrosoftPlannerPlugin
- PlannerPluginDemo
The first project contains the Semantic Kernel planner plugin along with a simple end-to-end test script. While not recommended for production, the script offers insights into its functionality beyond what’s covered in this blog post. The second project is a Semantic Kernel app that utilizes the PlannerPlugin to generate tasks in Microsoft Planner.
Authentication & Authorization: Set Up
For the authentication aspect, I utilized two NuGet packages: Azure.Identity and Microsoft.Graph, to establish a connection to the Office 365 tenant.
It’s imperative to have a test Office 365 tenant and administrative permissions to enable necessary permissions. Exercise caution, as granting excessive permissions is a potential pitfall. Best practices dictate granting the minimum required permissions. On the server side, access to Azure AD, Entra, and creating an Application Registration are required.
Below we’ll walk through the detailed steps:
- Log into your tenant at http://www.office.com and navigate to the Admin portal (hint: you should be an admin)
![]()
2. Once here, click on “show all” at the bottom of the menu options:
![]()
3. Once done we should see the Identity menu option – so we go and click it:
![]()
4. Here we will be able to register our application, our client. This is the app that we are creating as “PlannerPluginDemo” and this App Registration on Entra will enable us to authenticate and provide permissions to it as it were a user.
5. Once in the Entra admin center, expand the Applications menu and click on “App Registrations”.
![]()
6. Click on “New Registration”, give it a name and select an account type. I went for single tenant on this case.
![]()
7. Once created, you should keep the Application (client) ID as it will be used for the OAuth 2.0 protocol for Auth (Authentication and Authorization).
A Bit About OAuth 2.0
OAuth 2.0 is a widely adopted auth framework that enables applications to secure designated access to user accounts on other servers. It works by granting tokens to third-party services without exposing user passwords. OAuth 2.0 can be used for various purposes, including allowing users to log into apps via external services (like logging into an app using your Google account) or permitting applications to access each other on the user’s behalf (for example, a travel app accessing your calendar to add flights).
Usually it works as follows:
- Auth request: the client requests authorization from a user or client.
- Grant Type: the app receives an auth grant, a credential representing the approval.
- Access Token Request: The app exchanges the auth grant for an access token, this happens in the Authentication step with the Authorization server.
- Access Token Response: The authorization server authenticates the application, validates the auth grant, and if all is valid, issues an access token.
- Resource access: The app uses the access token to request the resource from the sever, the server validates the token and if valid serves the request.
On this App registration, go into API Permissions and add the permissions you need. On my side, I give my app way too many so will not show this here but if you are using a production tenant, you should use the minimum required permissions and always check with a seasoned professional and ideally a security expert so the permissions you provide do not provide vulnerabilities.
The last step necessary for our app to log-in is in the “Certificates & Secrets” blade and involves creating a new client secret. Then, click on “Certificates & secrets” to go to this blade and click on “New client secret” to create the secret. Once done, store the secret securely as you will only see it once.
All of this is quite transparent due to the usage of the Microsoft.Graph and Azure.Identity Client libraries which help streamline this workflow.
![]()
One additional item, before we log out of Microsoft Entra, we should go to the Identity -> Overview section and securely note down our Tenant ID.
![]()
Once this is complete, we have all the necessary permissions we can proceed to code our plugin.
Authentication & Authorization: Programming the Client
For the client to be able to do Auth (Authentication & Authorization) I created a base class that can be reused for additional Microsoft Graph work, named MicrosoftGraphPluginBase, so you can reuse the base class for many Semantic Kernel Plugins.
Safety Disclosure: This is working, and using the proper OAuth 2.0 protocol, however I am not ensuring this is production ready and safe to use “as is”. This is an example, and you should consult the security professional within your organization for the best production option that minimizes opportunities for vulnerabilities.
Following up with the code, the constructor will take those three parameters and invoke CreateGraphClient which will create a TokenCredentialOptions which will use AzurePublicCloud as authority host and then we will create a ClientSecretCredential with all the provided parameters.
We will set up the usual default scope for Microsoft Graph (https://graph.microsoft.com/.default) and create a GraphServiceClient with the ClientSecretCredential and the scopes.
Below is a code example:
public abstract class MicrosoftGraphPluginBase
{
    public GraphServiceClient GraphClient { get; private set; }

    public MicrosoftGraphPluginBase(
        string tenantId,
        string clientId,
        string clientSecret)
    {
        GraphClient = CreateGraphClient(tenantId, clientId, clientSecret);
        //GraphClient = CreateGraphClientForUser(tenantId, clientId);
    }

    private GraphServiceClient CreateGraphClient(
        string tenantId,
        string clientId,
        string clientSecret)
    {
        var options = new TokenCredentialOptions
        {
            AuthorityHost = AzureAuthorityHosts.AzurePublicCloud
        };

        var clientSecretCredential = new ClientSecretCredential(
            tenantId, clientId, clientSecret, options);
        var scopes = new[] { "https://graph.microsoft.com/.default" };

        return new GraphServiceClient(clientSecretCredential, scopes);
    }

    ...
}
And with that, we are ready to use Microsoft Graph in our tenant!
For the User login we would only need the TenantId and ClientId. We would create an InteractiveBrowserCredentialOptions object and since we are executing this locally in our computer, the redirect URI would be http://localhost. I then create an InteactiveBrowserCredential with the following options object,and a GraphServiceClient with this credential and the scopes.
Note that when doing so, this triggers an authentication through Entra into our Office 365 tenant, applying any restriction that it has configured, like usage of an MFA tool, an essential recommended security practice.
Below is a code sample:
private GraphServiceClient CreateGraphClientForUser(
        string tenantId,
        string clientId)
    {
        var scopes = new[] { "https://graph.microsoft.com/.default" };

        var options = new InteractiveBrowserCredentialOptions
        {
            TenantId = tenantId,
            ClientId = clientId,
            AuthorityHost = AzureAuthorityHosts.AzurePublicCloud,
            // Adjust as necessary for sovereign clouds
            // Optionally specify a redirect URI; default is localhost
            RedirectUri = new Uri("http://localhost")
        };

        var credential = new InteractiveBrowserCredential(options);

        var graphClient = new GraphServiceClient(credential, scopes);

        return graphClient;
    }
Any permissions we have set on the application will not be valid as the user authorization will be in place.
Creating the Graph Plugin
I named the class for the Native Plugin as MicrosoftPlannerGraphPlugin, which is inherited from the previous class, MicrosoftGraphPluginBase.
public sealed class MicrosoftPlannerGraphPlugin : MicrosoftGraphPluginBase
{
    public MicrosoftPlannerGraphPlugin(
        string tenantId,
        string clientId,
        string clientSecret)
        : base(tenantId, clientId, clientSecret)
    {
    }
    ...
}
If you are delving into the code, I implemented more functions than the ones highlighted and have added additional functions in the reference.
Using the Graph Plugin Auth
To Test the plugin, just reference the plugin class as it’s a class you can invoke and test as any other normal C# Class. You can create an instance of it with the TenantId, ClientId and ClientSecret.
Below is a code example:
public class PluginCheck
{
    public MicrosoftPlannerGraphPlugin msGraphPlugin { get; private set; }

    public PluginCheck()
    {
        string msGraphTenantId = Environment.GetEnvironmentVariable("msGraphTenantId", EnvironmentVariableTarget.User);
        string msGraphClientId = Environment.GetEnvironmentVariable("msGraphClientId", EnvironmentVariableTarget.User);  // app id
        string msGraphClientSecret = Environment.GetEnvironmentVariable("msGraphClientSecret", EnvironmentVariableTarget.User);

        msGraphPlugin = new MicrosoftPlannerGraphPlugin(msGraphTenantId, msGraphClientId, msGraphClientSecret);
    }
}
If all goes well, we should painlessly get a Plugin instance that contains an authenticated GraphClient that has all the Microsoft Graph permissions we have set to our application in the Entra portal.
If we wanted to do it with a user, in our base class we swap the CreateGraphClient for the CreateGraphClientForUser and run the same code.
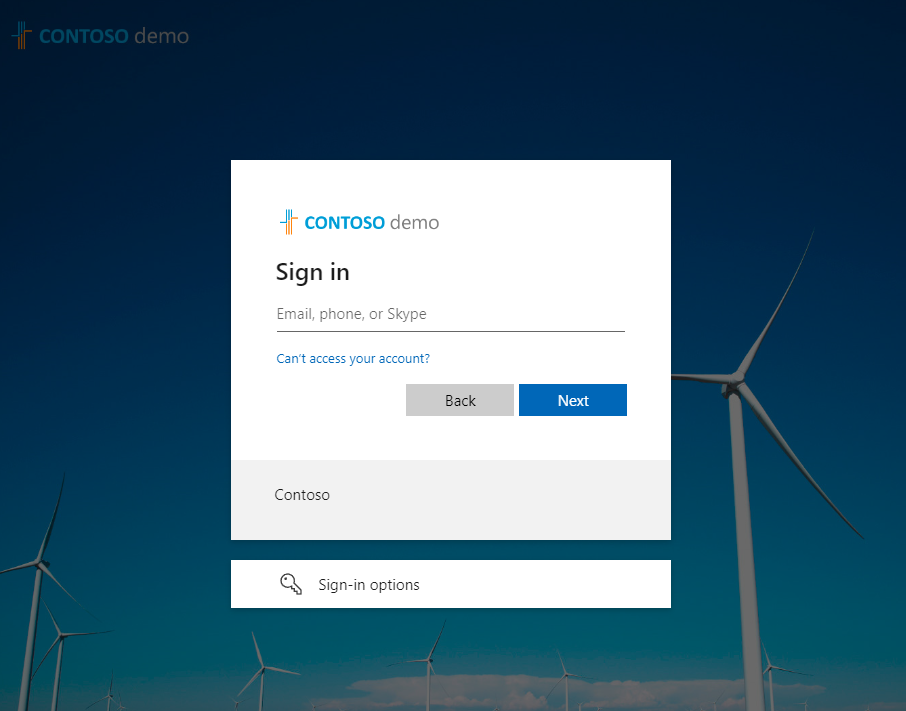
Once we create the GraphServiceClient, we will be redirected to the user login set up on our tenant, in my case to login.microsoftonline.com as shown next:
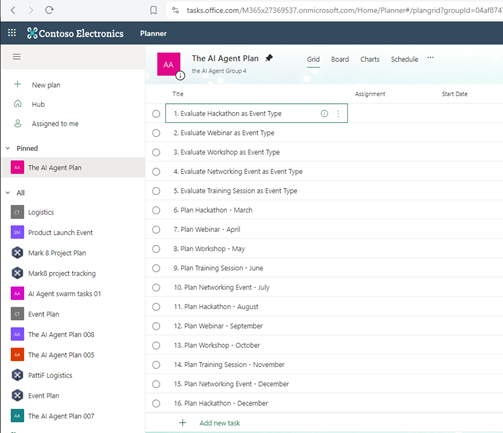
Once logged in we would have a GraphServiceClient with all the same permissions as the user has in the tenant. This means we can start creating Buckets and Tasks in the planner!
But we will leave this for the second part of the blog. See you soon!
We will be continuing this series, the first part that you’re reading now focuses on Setup and Authentication, the second part will focus on using the Planner Plugin with Semantic Kernel and the third part will feature Advanced Scenarios.
From the Semantic Kernel team, we want to thank José for his time. We’re always interested in hearing from you. If you have feedback, questions or want to discuss further, feel free to reach out to us and the community on the Semantic Kernel GitHub Discussion Channel! We would also love your support, if you’ve enjoyed using Semantic Kernel, give us a star on GitHub.
0 comments