

Build a Multi-Agent System Using Microsoft Azure AI Agent Service and Semantic Kernel in 3 Simple Steps!
Today we’re thrilled to welcome back guest author, Akshay Kokane to share his recent Medium article on Build a Multi-Agent System Using Microsoft Azure AI Agent Service and Semantic Kernel in 3 Simple Steps. We’ll turn it over to him to dive in!
In my previous blog, I introduced Microsoft’s Azure AI Agent Service, a fully managed platform that simplifies the process of building, deploying, and scaling AI agents. Unlike OpenAI Assistant, Azure AI Agent Service offers greater flexibility, supporting multiple LLMs (OpenAI, Mistral, DeepSeek, etc.) while ensuring enterprise-grade security and seamless integration with the Azure ecosystem.
By combining no-code agent creation with custom .NET integration, this approach enables developers to build scalable and intelligent AI-driven assistants with minimal effort, leveraging structured data and robust security.
In this blog, I will take the discussion further by demonstrating how to build a multi-agent system using Microsoft’s AI Framework — Semantic Kernel.
Previously, we created StockExpertAgent, an AI agent grounded with companies’ 10-K reports. Now, we will introduce InvestorAgent, which will based in the portfolio and data from stock agent provide me with personalized advice. Using Semantic Kernel, we will orchestrate these agents to enable intelligent interactions and decision-making in a multi-agent framework.

Let’s start!
Step 1: Create InvestorAgent in Azure AI Agent Service
For a detailed guide on creating agents in the Azure AI Agent Service, refer to my previous blog. The process is straightforward once you set up an AI Foundry Project and Hub. Simply navigate to Azure AI Studio and select the Agents tab to get started.
I am going to ground it up with with sample investment portfolio.

Step 2: Retrieve Agents defined in Azure AI Service in step 1
Now in .NET app, install following nugets
#r "nuget: Azure.AI.Projects, 1.0.0-beta.4"
#r "nuget: Azure.Identity"
#r "nuget: Microsoft.SemanticKernel.Agents.Core, 1.40.0-preview"
#r "nuget: Microsoft.SemanticKernel.Agents.AzureAI, 1.40.0-preview"
// Create Kernel
var builder = Kernel.CreateBuilder();
builder.AddAzureOpenAIChatCompletion("GPT4ov1", "https://testmediumazureopenai.openai.azure.com", "<api-key>");
Kernel kernel = builder.Build();
// Define the connection string to connect with Azure AI Agents
string connectionString = "eastus2.api.azureml.ms;<project>;aifoundary-hub;aiproject";
// Initialize the Azure Agents Client
AgentsClient client = new AgentsClient(connectionString, credential);
// Initialize the Stock Expert Agent
string stockExpertAgentId = "asst_8Ev5OpD3bMUll20xJFu36Pah";
Response<Agent> agentResponse = await client.GetAgentAsync(stockExpertAgentId);
Agent stockExpertAgentDefinition = agentResponse.Value;
AzureAIAgent stockExpertAgent = new(stockExpertAgentDefinition, client)
{
Kernel = kernel // Assigning kernel for execution
};Now we will define Investor Advisor agent which has been grounded with sample portfolio
// Initialize Inventor Advisor Proxy Agent
            string investorAdvisorAgentId = "asst_txX6WR6caXzpVhEksCupcySS";
            Response<Agent> investorAdvAgentResponse = await client.GetAgentAsync(investorAdvisorAgentId);
            Agent investorAdvAgentDefinition = investorAdvAgentResponse.Value;
            AzureAIAgent investorAdvAgent = new(investorAdvAgentDefinition, client)
            {
                Kernel = kernel,
            };
Step 3: Define Agent Group Chat and see it in action
Using Semantic Kernel’s Group Chat, create multi-agent system.
        // Create Semantic Kernel Agent group chat with both agents
        AgentGroupChat agentGroupChat = new AgentGroupChat(stockExpertAgent, investorProxyAgent)
        {
            ExecutionSettings = new()
            {
                SelectionStrategy = selectionStrategy,
                TerminationStrategy = terminationStrategy,
            }
        };

        // Start the interaction
        agentGroupChat.AddChatMessage(new ChatMessageContent(AuthorRole.User, "<Starting prompt here>"));

        // Process and display conversation messages asynchronously
        await foreach (var content in agentGroupChat.InvokeAsync())
        {
            string interaction = $"<b>#{content.Role}</b> - <i>{content.AuthorName ?? "*"}</i>: \"{content.Content}\"";
            Console.WriteLine(interaction);
        }
Stock Expert Agent provided company insights for investment

About how to define Termination and Selection Stratergy checkout my previous blog here. You can find complete code here.
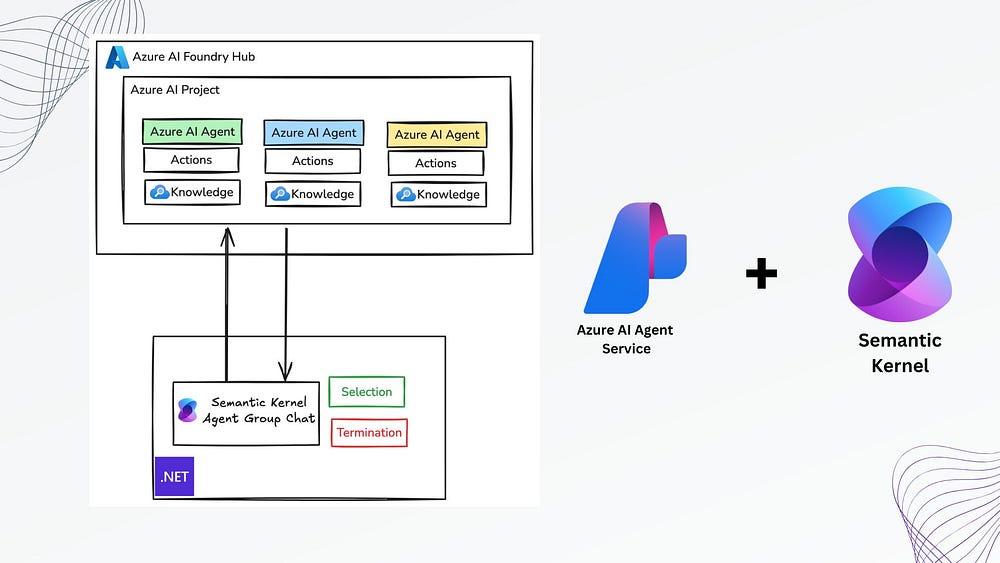
Conclusion
In the steps above, we demonstrated how AI Agents created in Azure AI Agent Service can be orchestrated using Semantic Kernel. The process leveraged a knowledge source built in Azure AI Foundry and performed Retrieval-Augmented Generation (RAG) as needed.
However, after running the application, you may notice that the correct agent is not always selected. To address this, we need to define a termination and selection strategy for the agent group chat.
Overall, I prefer using managed services, but I’ve observed that the ChatCompletionAgent in Semantic Kernel has lower latency compared to Azure Agent. This is expected since we are leveraging a managed service, which likely introduces some additional overhead.
From the Semantic Kernel team, we’d like to thank Akshay for his time and all of his great work. Please reach out if you have any questions or feedback through our Semantic Kernel GitHub Discussion Channel. We look forward to hearing from you!
0 comments