
We are excited to announce the React Native WinRT project, a new extension that makes it easier for React Native for Windows developers to call Windows Runtime APIs directly from JavaScript! With React Native WinRT, developers can light up experiences that take advantage of unique platform features on Windows.
In this blog post, we will dive a little deeper into the technology, walk through some sample code, and show how React Native WinRT is already in use today.
The React Native WinRT repo is now public, and a preview is available for developers to get started!
Introducing React Native WinRT (Preview)
Since React Native for Windows apps are truly native, they have access to the underlying native Windows Runtime (WinRT) platform. In the past, developers needed to write a native module in C++ or C# to access these WinRT APIs. With React Native WinRT, it is now possible to access the full set of Windows Runtime APIs directly from JavaScript – no native code required!
React Native WinRT is a tool that takes a Windows Metadata (WinMD) file and produces a React Native turbo module from it, so WinRT APIs can be accessed from JavaScript or TypeScript. The tool itself is distributed as a NuGet package, Microsoft.ReactNative.WinRT, and is available for any currently supported versions of React Native for Windows. As of this post, this includes support for versions 0.64 up to 0.67. React Native WinRT enables easier consumption of both public Windows platform APIs as well as existing 3rd party WinRT components.
The React Native WinRT project was motivated by our goal to make Windows development easier and more natural across various programming languages through language projections — other existing projects under the same umbrella include C#/WinRT, C++/WinRT, and Rust for Windows.
The React Native WinRT repo includes developer usage documentation and a sample app that showcases calling various WinRT APIs provided by the Windows SDK. The sample demonstrates how to incorporate Windows platform features such as push notifications, file storage, diagnostic logging, and jump list APIs into your React Native for Windows app.
Example: Adding Toast Notifications with React Native WinRT
One of the features the sample demonstrates is the Windows toast notification APIs. In a previous blog post, we showed how to Add toast notifications to your React Native for Windows application. This involved writing a native module in C++ to call the native toast notification APIs and using the JSValue APIs to inspect values sent between the JavaScript side to the native module. Now with React Native WinRT, we can call the Toast notification APIs directly and naturally from JavaScript. Let’s walk through the steps to add toast notifications to your existing app. These steps are also in the developer usage documentation.
First, download the WinRTTurboModule.zip file from the react-native-winrt GitHub releases page for the version of React Native for Windows version your app is using. When you unzip the file, you will see a directory containing the WinRTTurboModule project files and a file named WinRTTurboModule.js.
Copy the WinRTTurboModule directory to your React Native for Windows application under the windows folder. Then, add the WinRTTurboModule project to your solution. We recommend using Visual Studio for these steps. Next, specify the WinRT namespaces you want to project using the RnWinRTParameters property in ExperimentalFeatures.props:
<PropertyGroup Label="React Native WinRT properties">
  <RnWinRTParameters>
    -include Windows.UI.Notifications
    -include Windows.Data.Xml.Dom
  </RnWinRTParameters>
</PropertyGroup>
Now you can build the WinRTTurboModule project to generate the React Native module containing these types.
To consume these types from your React Native Windows application, you will need to make the following modifications to reference the WinRTTurboModule project and load up the module:
- Add a project reference from your React Native for Windows app to the WinRTTurboModule project.
- Include the WinRTTurboModule header in your React Native for Windows app’s pch.h file:
#include <winrt/WinRTTurboModule.h> - Register the module in your React Native for Windows app in App.cpp, inside the App constructor:
PackageProviders().Append(winrt::WinRTTurboModule::ReactPackageProvider()); - Load and initialize the module in your JavaScript code. Copy the WinRTTurboModule.js file from the downloaded zip file and place it under the main directory for your application (next to index.js):
import * as TurboModuleRegistry from "react-native/Libraries/TurboModule/TurboModuleRegistry";
const module = TurboModuleRegistry.get("WinRTTurboModule");
if (module) {
module.initialize();
}
export default module;
Then, add the following import statement in your index.js file before the App import statement:
import './WinRTTurboModule';
…
import App from './App';
After rebuilding and running your React Native for Windows app, you will now be able to call the Notifications and XML APIs directly from your JavaScript (or TypeScript) code. Below is an example of how to do so in your App.js file.
First, implement the showNotification and fillXmlElements functions, which pops the toast notification and iterates through the key/value pairs for customizing the toast notification.
If you compare the code below to the previous blog post which implements toast notifications using native C++ code, you will notice that the implementation using React Native WinRT is now entirely in JavaScript and no longer requires any manual conversions of WinRT types.
const Notifications = Windows.UI.Notifications;
const ToastTemplateType = Notifications.ToastTemplateType;
const ToastNotificationManager = Notifications.ToastNotificationManager;
const ToastNotification = Notifications.ToastNotification;

function showNotification(notification) {
  var type = ToastTemplateType.toastText01;

  var obj = {};
  if (typeof notification == "string") {
    obj["text"] = notification;
  } else {
    obj = notification;
  }

  if (obj.template != undefined) {
    type = obj.template;
  }

  var xml = ToastNotificationManager.getTemplateContent(type);
  for (var tagName in obj) {
    var xmlElements = xml.getElementsByTagName(tagName);
    var value = obj[tagName];
    if (typeof value == "string") {
      fillXmlElements(xml, xmlElements, [value]);
    } else if (Array.isArray(value)) {
      fillXmlElements(xml, xmlElements, value);
    } else if (typeof value == "object") {
      fillXmlElements(xml, xmlElements, [value]);
    }
  }

  var toast = new ToastNotification(xml);
  ToastNotificationManager.createToastNotifier().show(toast);
}

function fillXmlElements(xml, xmlElements, arr) {
  var i = 0;
  for (var arrValue of arr) {
    var node = xmlElements[i++];
    if (typeof arrValue == "string") {
      node.appendChild(xml.createTextNode(arrValue));
    } else if (typeof arrValue == "object") {
      for (var attrName in arrValue) {
        var attr = node.attributes.getNamedItem(attrName);
        if (!attr) {
          attr = xml.createAttribute(attrName);
          node.attributes.setNamedItem(attr);
        }

        attr.nodeValue = arrValue[attrName];
      }
    }
  }
}
Now that the functions have been implemented to parse and display a toast notification, you can add a UI component that calls the showNotification function. When specifying the template attribute, you can also now directly access the ToastTemplateType object in JavaScript.
import { Pressable } from "react-native";
// …
<Pressable
onPress={() => {
showNotification({
template: Windows.UI.Notifications.ToastTemplateType.toastImageAndText01,
text: "hello world",
image: {
src: "https://microsoft.github.io/react-native-windows/img/header_logo.svg",
alt: "React logo",
},
});
}}
>
<Text style={styles.sectionDescriptionButtonText}>
Click to send a toast!
</Text>
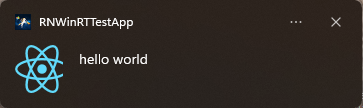
</Pressable>;You can now build and run your React Native for Windows app to pop a toast notification!
For more details on the steps above, look at our usage documentation.
React Native WinRT in action
React Native WinRT is already being used today — we have worked with the Settings and React Native for Windows teams to leverage this technology in building the new “Your Microsoft Account” page in the Windows 11 Settings app. Instead of needing to hand-author native modules in C++, the “Your Microsoft Account” page takes advantage of React Native WinRT to optimize their implementation and access the full set of Windows Runtime APIs directly from JavaScript!
To read more about this new experience in Windows, check out the blog post on React Native for Windows is helping Settings improve more quickly..
Wrap-up
Get started today by adding native Windows functionality to your React Native for Windows apps. Check out the React Native WinRT Github repo – we encourage you to try it out and give us your feedback.
If you’re interested in getting started with React Native for Windows, check out our website at aka.ms/reactnative.
You can also follow us on Twitter @ReactNativeMSFT to keep up to date on news, feature roadmaps, and more.
0 comments