
App Service is Microsoft Azure‘s platform-as-a-service offering for web apps, whether they are sites accessed through a browser, REST APIs used by your own clients, or event-triggered processing. Many of you are already using Python to implement your apps on App Service (and rightly so!).
When we first enabled Python on App Service we wanted to make it as easy as possible. So we went and installed the latest available versions on every host, so that you could just assume it was going to be present. Unfortunately, this did not turn out to be a great long-term solution.
Happily though, we found a better approach! While it isn’t quite polished yet, we know that people want the solution now. Rather than waiting until we’ve finished all the scripts, documentation, videos etc. that will come in the future, we decided to give out early details in this blog post.
This post will start by outlining some of the problems, why we couldn’t do the “obvious” fix, and how to use the new approach. Feedback is welcome as we continue to improve the user experience around it, but hopefully the information here will be sufficient to get everyone moving again.
What went wrong?
Having Python installed on every App Service machine sounds like a great idea, right? And so we went ahead and installed the most up-to-date Python 2.7.8 and Python 3.4.1… oh yeah, they’re not the latest versions of Python any more.
The obvious solution here is to simply upgrade Python so that everyone has the latest improvements, bug and security fixes. But unfortunately, there were changes made between 2.7.8 and 2.7.9 and between 3.4 and 3.5 that meant upgrading would break existing users. Stability of the platform had to outweigh these improvements, so we were stuck. (The SSL improvements in 2.7.9 had workarounds that customers could implement themselves, so weren’t sufficient to justify breaking other customers.)
We had also chosen to install the 32-bit versions of Python. This adds an extra restriction on users who may have been deploying pre-built binaries targeting 64-bit versions, or other micro versions of Python.
Since users want to be able to choose their version of Python, the fix is to let everyone choose. We also wanted to improve package installation and make it easier to avoid IIS details.
Choosing your version of Python
Azure App Service has support for site extensions, which allow you to add features to your site. These can be deployed as part of an ARM template, using a REST API, or manually through the portal. The main part of our improved Python support is a set of site extensions containing the Python runtime, broken down by the exact version so that you can choose which one to install. (Obviously we recommend using the latest Python 3 version, but when you need an older version, you really need it so you can choose it.)
If your site is already deployed and running, it is easiest to install through the portal. Navigate to your App Service blade, select Tools, Extensions and then Add.
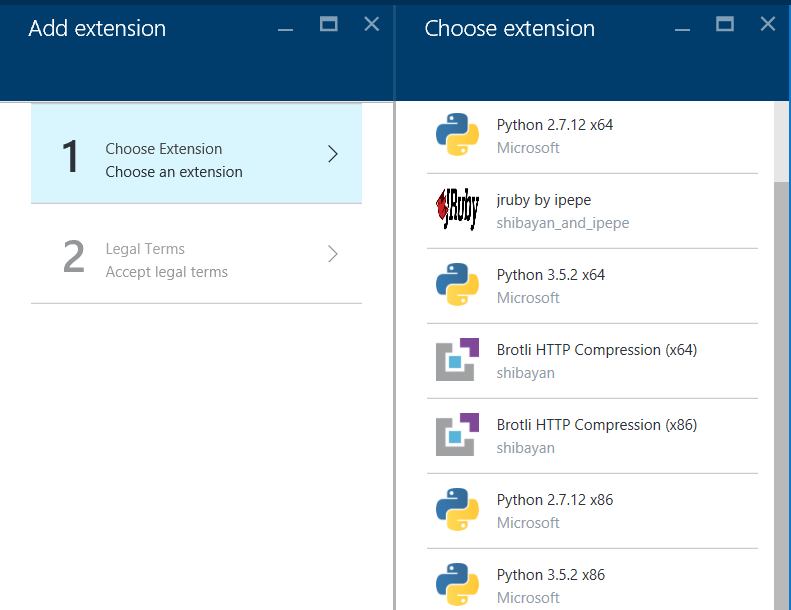
From the list of extensions, scroll down until you spot the Python logos, then choose the version you need. (Improvements to this UI are coming in the future; right now you just need to search manually.)
However, if you are deploying your site with an Azure Resource Manager (ARM) template, it is much simpler to add the site extension as a resource. It will appear as a nested resource of your site, with a type siteextensions and the name can be found from siteextensions.net.
For example, after adding a reference to python352x64, your template may look like this:
  "resources": [
    {
      "apiVersion": "2015-08-01",
      "name": "[parameters('siteName')]",
      "type": "Microsoft.Web/sites",
      ...
      "resources": [
        {
          "apiVersion": "2015-08-01",
          "name": "python352x64",
          "type": "siteextensions",
          "properties": { },
          "dependsOn": [
            "[resourceId('Microsoft.Web/sites', parameters('siteName'))]"
          ]
        },
      ...
Regardless of how you choose to install the site extension, after installing you will have a version of Python installed at a path like C:homePython35python.exe (see the description of the extension for the exact path).
Configuring your site
Once Python is installed on your site, you will need to reference it. Previously our tooling has been able to do this automatically, since we knew where Python was, but now the control is in your hands. Luckily, configuring your site is mostly a matter of knowing where to find python.exe.
Since App Service apps all run behind IIS, the configuration file is known as web.config (if you’re used to httpd servers, web.config is the equivalent of .htaccess), and there are two request handlers available: FastCGI, and Http Platform.
Using the FastCGI handler
FastCGI is an interface that works at the request level. IIS will receive incoming connections and forward the request details to a WSGI app running in one or more persistent Python processes. The wfastcgi package is pre-installed and configured, so you can easily enable it.
Your web.config configuration should include the following:
<?xml version="1.0" encoding="utf-8"?>
<configuration>
  <appSettings>
    <add key="PYTHONPATH" value="D:homesitewwwroot"/>
    <add key="WSGI_HANDLER" value="app.wsgi_app"/>
    <add key="WSGI_LOG" value="D:homeLogFileswfastcgi.log"/>
  </appSettings>
  <system.webServer>
    <handlers>
      <add name="PythonHandler" path="*" verb="*" modules="FastCgiModule" scriptProcessor="D:homePython35python.exe|D:homePython35wfastcgi.py" resourceType="Unspecified" requireAccess="Script"/>
    </handlers>
  </system.webServer>
</configuration>
The value for PYTHONPATH may be freely extended, but must include the root of your website. WSGI_HANDLER should be updated to point to a WSGI app importable from your website. WSGI_LOG is optional but recommended while debugging your site. All app settings are made available to the app as environment variables.
The path to python.exe and wfastcgi.py will need to be customized if you are using a different version of Python. See the description of the site extension to find out where it will be installed and update these paths accordingly.
Using the Http Platform handler
The HttpPlatform module passes the socket connections directly to a standalone Python process. This allows you to run any webserver you like, but you will require a startup script that runs a local web server.
<?xml version="1.0" encoding="utf-8"?>
<configuration>
  <system.webServer>
    <handlers>
      <add name="PythonHandler" path="*" verb="*" modules="httpPlatformHandler" resourceType="Unspecified"/>
    </handlers>
    <httpPlatform processPath="D:homePython35python.exe"
                  arguments="D:homesitewwwrootrunserver.py --port %HTTP_PLATFORM_PORT%"
                  stdoutLogEnabled="true"
                  stdoutLogFile="D:homeLogFilespython.log"
                  startupTimeLimit="60"
                  processesPerApplication="16">
      <environmentVariables>
        <environmentVariable name="SERVER_PORT" value="%HTTP_PLATFORM_PORT%" />
      </environmentVariables>
    </httpPlatform>
  </system.webServer>
</configuration>
As for the previous configuration, the path to python.exe may need to be customized depending on the version of Python you are using. See the description of the site extension to find out where it will be installed and update these paths accordingly.
Arguments may be freely customized for your app. The HTTP_PLATFORM_PORT environment variable contains the port your local server should listen on for connections from localhost. In this example, I created another environment variable SERVER_PORT that isn’t really required. You can add or remove environment variables as necessary for your app.
Installing packages
Once you’ve installed Python onto your server, the next thing you’ll need is any packages your app depends on. This is the area we’re currently focusing on, so expect new announcements in the coming weeks as we simplify this process, but here are a few ways you can do it right now.
Kudu Console
Even after you have installed your packages, you will likely find this is an invaluable debugging tool. Once your website is created, for example at http://trywebsites.azurewebsites.net/, you can get into the Kudu console by adding .scm after your site name: https://trywebsites.scm.azurewebsites.net/. You will need to log in with your Azure account (so that example URL probably isn’t going to work) but can then directly access files and run commands on your site. The Kudu documentation contains the most up-to-date information about the console.
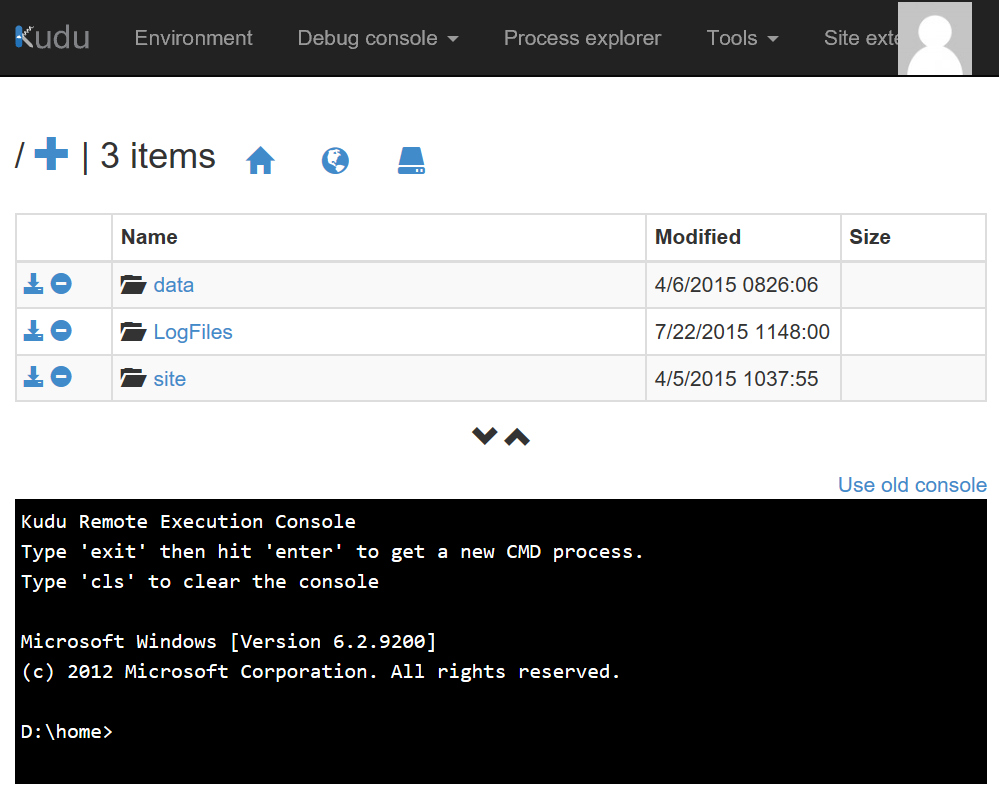
Once you are in the console and have added the site extension, you can freely install any packages you like (well, almost – more on this later). The one trick is that you’ll have to specify the full path to Python. We also suggest including a requirements file as part of your site so that it is easy to reproduce the set of packages both locally and on the server. For example:
D:home>D:homePython35python.exe -m pip install --upgrade -r D:homesitewwwrootrequirements.txt
There’s no C compiler on your web server, so if any packages have native extension modules you’ll need to install the wheel. Many popular packages provide their own wheels, so installing them will work just fine, but for those that don’t you will need to use pip wheel [package] on a development machine and then upload the wheel with your site. (The end of our page on managing requirements shows an example.)
Kudu REST API
If you don’t want to manually log into the Kudu portal to install packages, you can also trigger these commands remotely via the REST API. The command command behaves identically to typing into the console, except you can POST the command to https://yoursite.scm.azurewebsites.net/api/command.
See the documentation for other commands and information about authentication. There is a helper class in this sample project that obtains the credentials using the Azure SDK for Python and will let you submit the same command as above via the exec() method.
(Remember how I mentioned that we’re working on better ways to do all of these? Yep, there’s a lot of manual work required right now, but soon we’ll have install-on-deploy automation available.)
Vendor everything
A final option for deploying your packages is to “vendor” them. This essentially means copying the entire library into your own source code and copying it as part of your site. Depending on how many dependencies you have and how frequently you update them, this may be the easiest way to get a working deployment going.
The one catch is that you need to ensure that you copy libraries from a version of Python that precisely matches the version you are installing on the server. If you take extensions from Python 3.5 32-bit and try and use them with 64-bit Python, you will see obscure import errors after deployment. However, as the versions of Python we make available on Azure are exactly the same as those released on python.org, you can easily obtain a compatible version for local development.
Aside: what about virtual environments?
While we recommend working in a virtual environment locally, to ensure you fully understand the dependencies needed by your site, once you have published there should not be multiple projects using the same Python install at all. (If there are, you really want to avoid having conflicting dependencies!) As a result, it’s easier and more efficient to just install into the main Python directory.
Summary
We hope you appreciate this information at this time. While there is still a lot of ongoing work to improve Python on Azure App Service, we have reached a point where there is enough for people to benefit from being able to use parts of it. In particular, we know that many of you will be unblocked by the new ability to install newer versions of Python onto your app service servers.
If you have any feedback, suggestions, or want to deploy or manage your web site in a way you think we may not have considered, feel free to leave a comment on this post or email python@microsoft.com directly. While we can’t respond to every piece of feedback or need for assistance (we suggest creating support requests for those), we’re happy to hear what you need.
0 comments