Running .NET Core 2.0 applications in a Linux Service Fabric Cluster on Azure
In this post, Senior App. Dev. Managers Guru Satish Piduru and Mahendar Madhavaram explain how to deploy .NET Core 2.0 applications to a Linux Service Fabric Cluster.
The support for running .NET Core 2.0 applications in Service Fabric Cluster (SFC) environment on Linux is in preview mode today and general availability in the coming months. Today, stateless Service Fabric applications are supported in .NET Core 2.0 without any issues. If you are using Microsoft Visual Studio 2017 to develop Service Fabric applications, you can publish the applications directly to Azure SFC running on Windows but if you want to publish the applications to Azure SFC running on Linux, you may run into some issues depending on the project type and template that you choose to create an application.
In this post, we will demonstrate how to deploy .NET Core 2.0 applications to a Linux SFC using scripts until Visual Studio IDE provides this capability.
Setup Local Service Fabric Cluster
To build and run Azure Service Fabric applications on your Windows development machine, install the Service Fabric runtime, SDK, and tools. You also need to enable execution of the Windows PowerShell scripts included in the SDK. Here are instructions to setup your Windows development environment.
Setup Azure Service Fabric Cluster
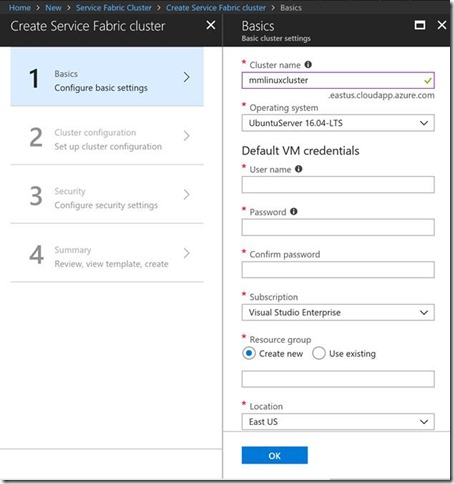
If you haven’t already, setup the Azure SFC on Linux using the Azure Portal. For the OS version, select ‘UbuntuServer 16.04-LTS’ as shown in the picture below. Please check the following documentation for more information on all other settings.
Walkthrough: .NET Core Stateless Service Fabric Application
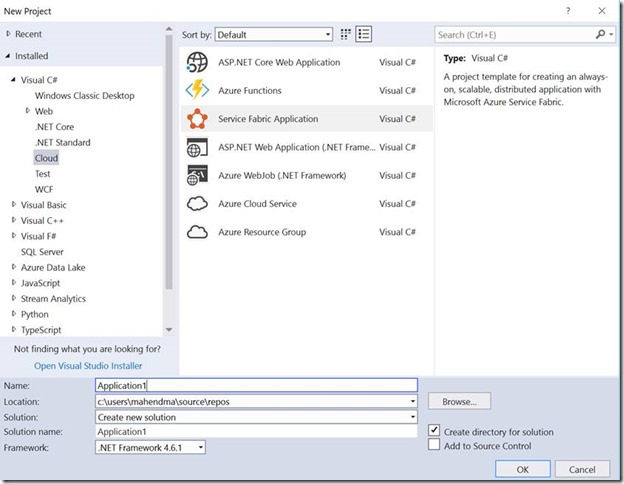
Step 1: In Visual Studio 2017, create a new Service Fabric Application
New project > Visual C# > Cloud > Service Fabric Application
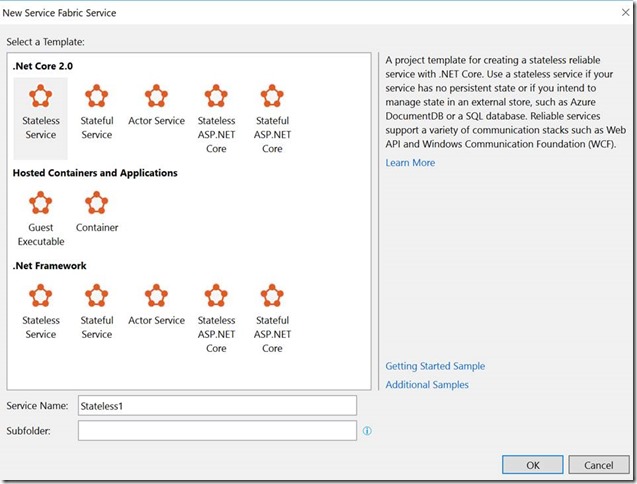
Click OK to select a Template ‘.NET Core 2.0 Stateless Service’
Step 2: Update the Runtime Identifier to linux-x64
Open all the service .csproj files and update the RuntimeIdentifier as shown below
<PropertyGroup>
<OutputType>Exe</OutputType>
<TargetFramework>netcoreapp2.0</TargetFramework>
<IsServiceFabricServiceProject>True</IsServiceFabricServiceProject>
<RuntimeIdentifier>linux-x64</RuntimeIdentifier>
</PropertyGroup>
Step 3: Update the ServiceManifest.xml to remove .exe extension from Stateless1.exe to Stateless1 as shown below
<CodePackage Name=”Code” Version=”1.0.0″>
<EntryPoint>
<ExeHost>
<Program>Stateless1</Program>
</ExeHost>
</EntryPoint>
</CodePackage>
Note: If you are building for Windows, the entry point is Stateless1.exe but since you’re building for Linux, it’s not going to produce a Windows EXE file. Therefore, we have to change that in the ServiceManifest.xml to the binary output file that’s being built for Linux (usually it’s the same file name but without the .exe extension).
Step 4: Right click on the Project and click Publish. In the Publish Service Fabric Application wizard, select the Endpoint for SFC cluster and then click Publish.
You can login to the Azure Portal, select Service Fabric Cluster, and verify if the application is deployed successfully.
Walkthrough: ASP.NET Core Stateless Service Fabric Application
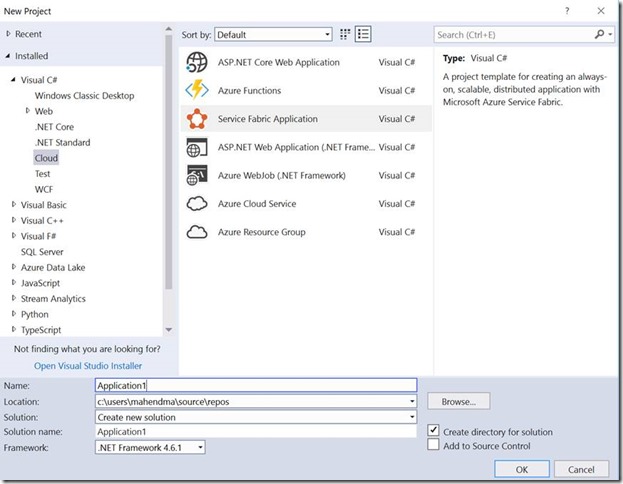
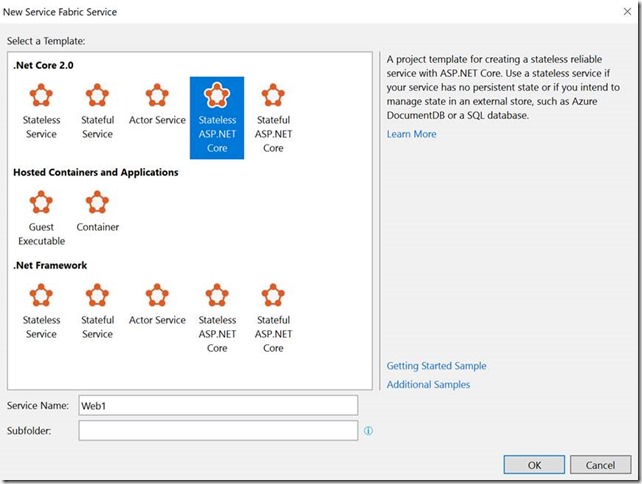
Step 1: In Visual Studio 2017, create a new “out of the box” Service Fabric Application
New project > Visual C# > Cloud > Service Fabric Application
Click OK to select a Template ‘Stateless ASP.NET Core’
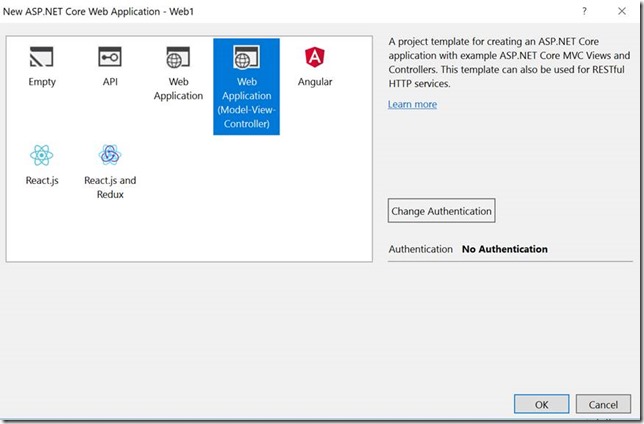
Click on ‘Web Application (Model-View-Controller)’
Step 2: Update the Runtime Identifier to linux-x64
Open all the service .csproj files and update the RuntimeIdentifier as shown below
<PropertyGroup>
<OutputType>Exe</OutputType>
<TargetFramework>netcoreapp2.0</TargetFramework>
<IsServiceFabricServiceProject>True</IsServiceFabricServiceProject>
<RuntimeIdentifier>linux-x64</RuntimeIdentifier>
</PropertyGroup>
Step 3: Update the ServiceManifest.xml to remove .exe extension from Stateless1.exe to Stateless1 as shown below
<CodePackage Name=”Code” Version=”1.0.0″>
<EntryPoint>
<ExeHost>
<Program>Web1</Program>
</ExeHost>
</EntryPoint>
</CodePackage>
Step 4: Click on Publish won’t work like it did in example ‘.NET Core Stateless Service’ above. This has to do with an issue in VS packaging for Linux for ASP.NET Core projects. As noted above, this will be fixed in an upcoming release.
Here are the steps which should work using dotnet commands to publish.
- Only use VS to create application package structure, right click on Applciation3 in solution explorer and select Package. This will create application package structure at c:\user\source\Application3\Application3\pkg\Debug
- Open Command Prompt, cd to the directory containing the AspNetCore .csproj (c:\user\source \Application3\Web1) and run following commands:
dotnet build
dotnet publish –self-contained -r ubuntu.16.04-x64 -o c:\user\source \Application3\Application3\pkg\Debug\Web1Pkg\Code
Step 5: Now use Service Fabric PowerShell to create the application.
- Connect-ServiceFabricCluster mmlinuxsfc.eastus.cloudapp.azure.com:19000 (Provide security credentials if its secured cluster)
- Copy-ServiceFabricApplicationPackage -ApplicationPackagePath c:\user\source \Application3\Application3\pkg\Debug -ApplicationPackagePathInImageStore pkg_app3_cmd
- Register-ServiceFabricApplicationType -ApplicationPathInImageStore pkg_app3_cmd
- New-ServiceFabricApplication -ApplicationName fabric:/Application3Type -ApplicationTypeName Application3Type -ApplicationTypeVersion 1.0.0
Note: Register-ServiceFabricApplicationType occasionally times out. Use compression flag for faster uploads.
If Step 5 runs successfully, Application3 should be installed in SFC.
If the Application3 failed to upload or times out, you can use Azure Service Fabric CLI command, sfctl to upload the application. You can install the Azure Service Fabric CLI from https://docs.microsoft.com/en-us/azure/service-fabric/service-fabric-cli
After using the “sfctl application upload” and “sfctl application provision”. The ASP.NET 2.0 MVC service, is deployed to Linux SFC and healthy.
C:\users\pathwherphythoninstalled>sfctl
application upload –path c:\user\source \Application3\Application3\pkg\Debug –show-progress
C:\users\pathwherphythoninstalled>sfctl
application provision –no-wait –application-type-build-path Debug
Note: if Application has references to other project which has reference to NuGet packages, use the following workaround:
Compile the above project using the below command and save these binaries:
1. dotnet publish -c Release -r linux-x64
2. In Visual Studio, compile the Service Fabric project to generate the binaries
3. Replace the generated binaries with the ones generated in #1
4. Use SF CLI to upload the binaries and create the application
The application that has NuGet package reference has successfully started in the SF cluster
References
- Overview of Azure Service Fabric: https://docs.microsoft.com/en-us/azure/service-fabric/service-fabric-overview
- Azure Service Fabric Core SDK: https://www.microsoft.com/web/handlers/webpi.ashx?command=getinstallerredirect&appid=MicrosoftAzure-ServiceFabric-CoreSDK
- Is it being deployed on ubuntu? If yes are you using Runtime identifier for ubuntu as per https://docs.microsoft.com/en-us/dotnet/core/rid-catalog#linux-rids
- Could you add the entry point as https://github.com/amanbha/samples/blob/netcore10/ContainerDemo/WebFront/PackageRoot/ServiceManifest_Linux.xml#L17
- Add entrypoint.sh as https://github.com/amanbha/samples/blob/netcore10/ContainerDemo/WebFront/entryPoint.sh in your code package.
- Deploy an Azure Service Fabric Linux container application on Azure https://docs.microsoft.com/en-us/azure/service-fabric/service-fabric-quickstart-containers-linux
- Deploy an Azure Service Fabric Windows container application on Azure https://docs.microsoft.com/en-us/azure/service-fabric/service-fabric-quickstart-containers
- Azure SF PowerShell samples: https://docs.microsoft.com/en-us/azure/service-fabric/service-fabric-powershell-samples
- Azure SF CLI samples: https://docs.microsoft.com/en-us/azure/service-fabric/samples-cli
Premier Support for Developers provides strategic technology guidance, critical support coverage, and a range of essential services to help teams optimize development lifecycles and improve software quality. Contact your Application Development Manager (ADM) or email us to learn more about what we can do for you.

![clip_image002[1] clip_image002[1]](https://devblogs.microsoft.com/wp-content/uploads/sites/31/2019/04/clip_image0021_thumb1.jpg)


 Light
Light Dark
Dark
0 comments