In this document, we will walk through the process of creating a local service using OData 8.0, which is optimized to support ASP.NET Core 5. To learn more about the changes, check out ASP.NET Core OData 8.0 Preview for .NET 5 (which also references ASP.NET Core OData now Available), written by my colleague, Sam. You’ll notice that this post has a lot of similarities; here, I’m aiming to consolidate our documentation and share my experience from the perspective of an intern new to OData.
Topics Covered
Software Used
As always, please don’t hesitate to file any issues at ASP.NET Core OData Github Repo. Let’s get started!
Creating an OData Service
Create the Application
Let’s start by opening Visual Studio 2019 and creating a new project. Select the “ASP.NET Core Web App” project template in the following dialog to create a skeleton of the ASP.NET Core OData service.
On the next page’s “Configure your new project” dialog, fill out your project’s name (I’ve chosen “BookStore“) and location.
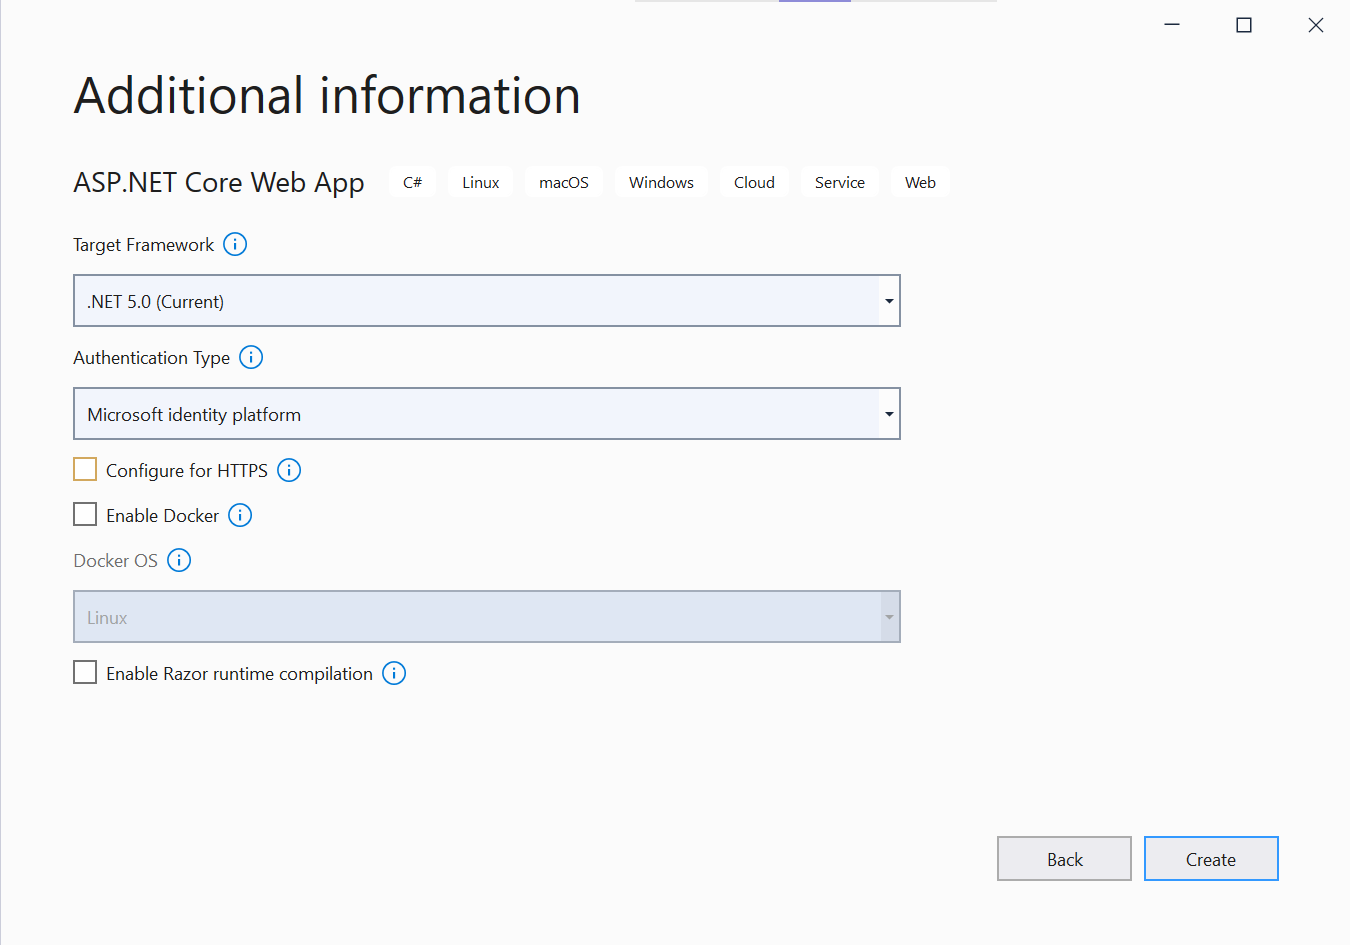
Next, under “Additional information,” make sure that ASP.NET Core 5.0 is selected as the target platform, choose your preferred authentication type, and un-check “Configure for HTTPS” (for simplicity) to create the application.
Install NuGet Packages
Once the empty application has been created, our next step is to install a couple NuGet packages from NuGet.org: ASP.NET Core OData and EntityFrameworkCore.InMemory.
First, let’s install the ASP.NET Core OData NuGet package. In the solution explorer, right click on Dependencies in the BookStore project and select “Manage NuGet Packages” to open the NuGet Package Manager dialog. In this dialog, select the latest stable “Microsoft.AspNetCore.OData” package and install it (in this case, 8.0.1).
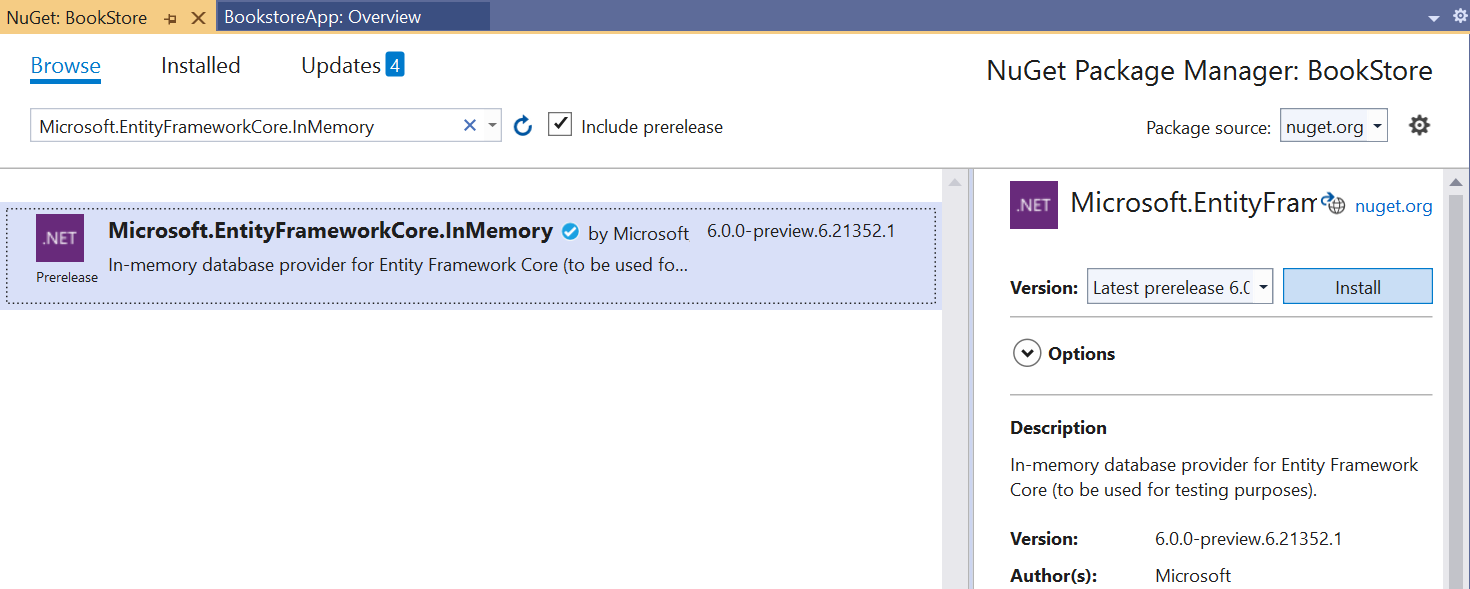
We’ll go through the same process for EF Core by installing “Microsoft.EntityFrameworkCore.InMemory” and its dependencies (for simplicity, we’re using the version with the In-Memory data source).
Now, we have the following project configuration:
<Project Sdk="Microsoft.NET.Sdk.Web">

    <PropertyGroup>
        <TargetFramework>netcoreapp2.1</TargetFramework>
    </PropertyGroup>

    <ItemGroup>
        <Folder Include="wwwroot\" />
    </ItemGroup>

    <ItemGroup>
         <PackageReference Include="Microsoft.AspNetCore.App" />
         <PackageReference Include="Microsoft.AspNetCore.OData" Version="7.0.0" />
         <PackageReference Include="Microsoft.EntityFrameworkCore.InMemory" Version="2.1.0" />
    </ItemGroup>

</Project>
Build the Entity Data Model
We will now add the model classes for our bookstore project and use them to build the Entity Data Model (EDM).
Add the Model Classes
A model is an object representing the data in the application. In this tutorial, we use the POCOs (Plain Old CLR Object) classes to represent our book store models.
To organize our models, we will first create a folder to store them. Right click the BookStore project in the solution explorer, then select Add > New Folder and name the folder “Models“. Now, let’s add some bookstore-related classes in a new file, “DataSource.cs“, in our Models folder:
// Book
public class Book
{
    public int Id { get; set; }
    public string ISBN { get; set; }
    public string Title { get; set; }
    public string Author { get; set; }
    public decimal Price { get; set; }
    public Address Location { get; set; }
    public Press Press { get; set; }
}

// Category
public enum Category
{
    Book,
    Magazine,
    EBook
}

// Address
public class Address
{
    public string City { get; set; }
    public string Street { get; set; }
}
In this file, we have defined the following classes as these CLR types:
- Book, Press – Entity Type
- Address – Complex Type
- Category – Enum Type
Build the Entity Data Model
OData uses the Entity Data Model (EDM) to describe the structure of data. In ASP.NET Core OData, it’s easy to build the EDM based on the above CLR types (Entity, Complex, Enum).
With that in mind, let’s add the following private static method at the end of Startup.cs, which actually builds a model from the classes we’ve just defined.
public class Startup {

    // ...

    private static IEdmModel GetEdmModel()
    {
        ODataConventionModelBuilder builder = new ODataConventionModelBuilder();
        builder.EntitySet<Book>("Books");
        builder.EntitySet<Press>("Presses");
        return builder.GetEdmModel();
    }
}
Now, we have defined two entity sets named “Books” and “Presses”.
Register Services
Register the OData Services
Let’s register the OData services using OData 8.0. We will add the following ConfigureServices() method to Startup.cs, which adds services such as authentication, the models, and querying capabilities:
public class Startup
{

    // ...

    public void ConfigureServices(IServiceCollection services)
    {
        services.AddControllers();
        services.AddOData(opt => opt.AddRouteComponents("odata", GetEdmModel()));
    }
}
Register the OData Endpoint
We also need to add OData route to register the OData endpoint so we can query our data using URLs. To do so, let’s add our models and call “GetEdmModel()” to bind the EDM to the endpoint — the part of our application that’s accessible to us. At this point, the Configure() method in Startup.cs should look like this:
public void Configure(IApplicationBuilder app, IWebHostEnvironment env)
{
    app.UseRouting();
    app.UseEndpoints(endpoints =>
    {
        endpoints.MapODataRoute("odata", "odata", GetEdmModel());
    });
}
Test: Query Metadata
The OData service is now ready to run so we can access its basic functionalities, such as querying the metadata (XML representation of the EDM).
Remember to use the proper dependencies in your files, then build (Build > Build BookStore) and run (Debug > Start Without Debugging) in Visual Studio. This should open up a new window that tells you it’s listening on a localhost URL. Verify that side of things is working by opening that URL (with the OData extension, as in http://localhost:5000/odata) in your browser — it should display an overview of your service.
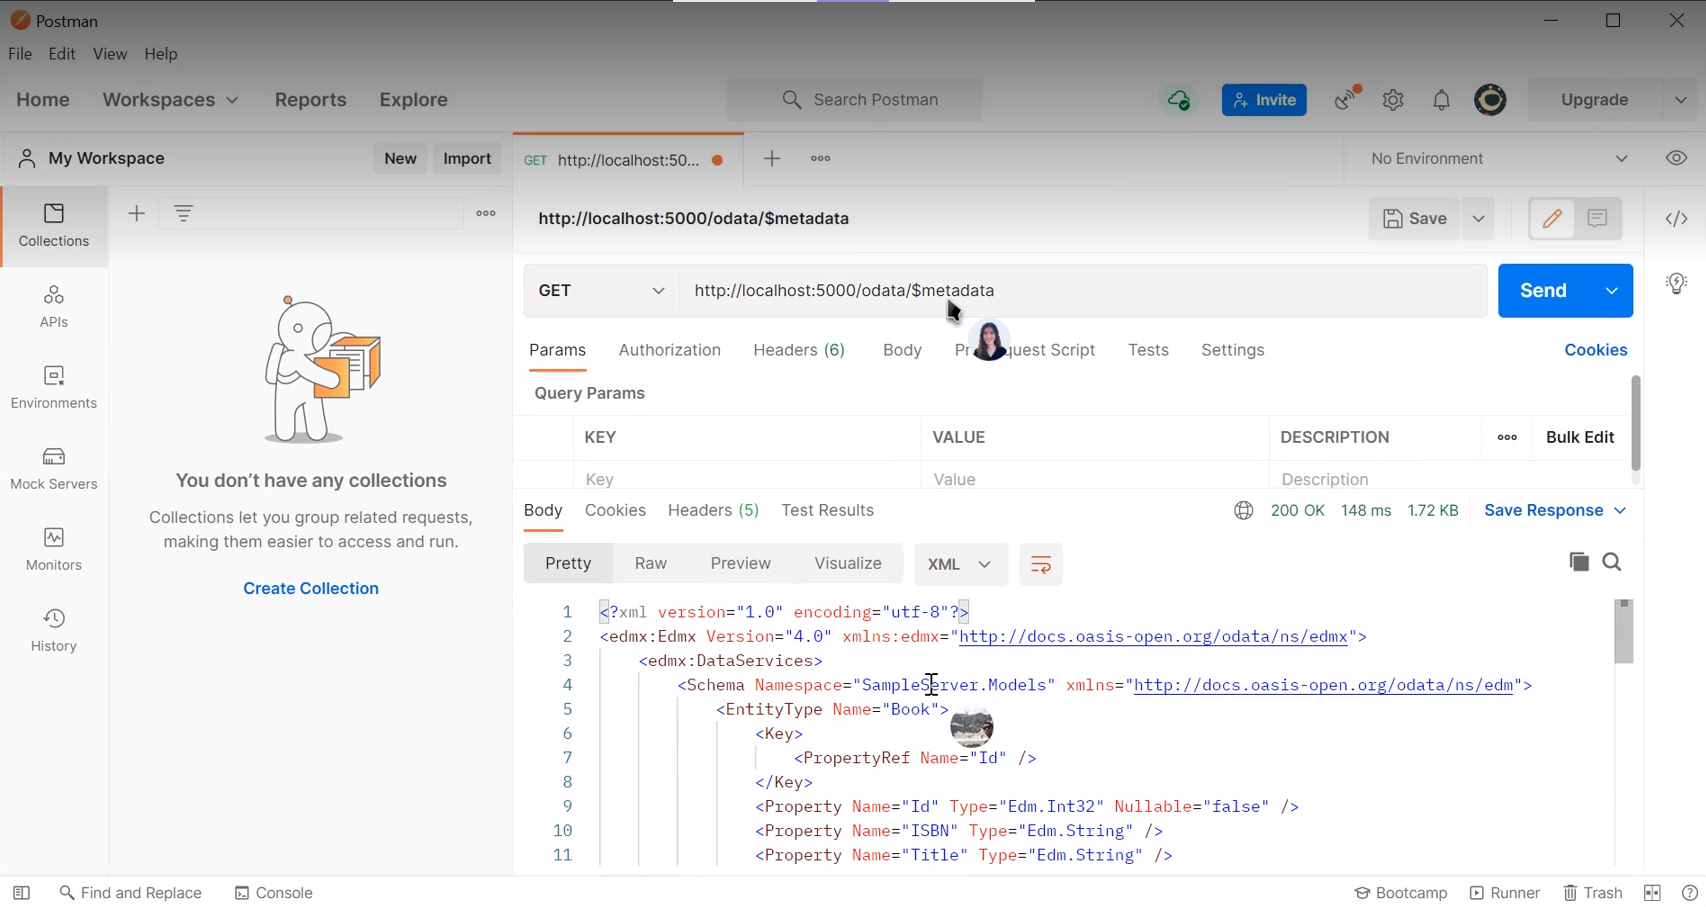
Once it’s running, we can use any client tools (I’m using Postman) to issue requests. So, let’s create a new HTTP GET Request in Postman and enter the localhost URL. If you add “/odata/$metadata” to the end of the URL, you should be able to see the metadata of your newly created service!
Your full HTTP request should look something like this:
GET http://localhost:5000/odata/$metadata
Create the Data Source
Create Data Context
In order to query the actual data we care about — in this case, books — we need a database that stores it!
Inside the Models folder, let’s create a new class named “BookStoreContext.cs” that extends DbContext.
public class BookStoreContext : DbContext
{
    public BookStoreContext(DbContextOptions<BookStoreContext> options)
        : base(options)
    {
    }

    public DbSet<Book> Books { get; set; }
    public DbSet<Press> Presses { get; set; }

    protected override void OnModelCreating(ModelBuilder modelBuilder)
    {
        modelBuilder.Entity<Book>().OwnsOne(c => c.Location);
    }
}
Then, to add this new context to our service, let’s revise our Startup.cs file so that the ConfigureServices() method looks like this:
public class Startup
{

    // ...

    public void ConfigureServices(IServiceCollection services)
    {
        services.AddDbContext<BookStoreContext>(opt => opt.UseInMemoryDatabase("BookLists")); // new
        services.AddControllers();
        services.AddOData(opt => opt.AddRouteComponents("odata", GetEdmModel()));
    }
}
Add Data
We also need the data itself! Let’s add some inline model data on just a couple books for demonstration purposes in a new file in our Models folder.
public static class DataSource
{
    private static IList<Book> _books { get; set; }

    public static IList<Book> GetBooks()
    {
        if (_books != null)
        {
            return _books;
        }

        _books = new List<Book>();

        // book #1
        Book book = new Book
        {
            Id = 1,
            ISBN = "978-0-321-87758-1",
            Title = "Essential C#5.0",
            Author = "Mark Michaelis",
            Price = 59.99m,
            Location = new Address { City = "Redmond", Street = "156TH AVE NE" },
            Press = new Press
            {
                Id = 1,
                Name = "Addison-Wesley",
                Category = Category.Book
            }
        };
        _books.Add(book);

        // book #2
        book = new Book
        {
            Id = 2,
            ISBN = "063-6-920-02371-5",
            Title = "Enterprise Games",
            Author = "Michael Hugos",
            Price = 49.99m,
            Location = new Address { City = "Bellevue", Street = "Main ST" },
            Press = new Press
            {
                Id = 2,
                Name = "O'Reilly",
                Category = Category.EBook,
            }
        };
        _books.Add(book);

        return _books;
    }
}
Add Controllers
Let’s add a way to not just have the data, but be able to access and manipulate it — a Controller. We can create a new folder for “Controllers,” and within it, create a “BooksController.cs” class. To start, it’ll be able to simply keep track of the data:
public class BooksController : ODataController
{
    private BookStoreContext _db;

    public BooksController(BookStoreContext context)
    {
        _db = context;
        if (context.Books.Count() == 0)
        {
            foreach (var b in DataSource.GetBooks())
            {
                context.Books.Add(b);
                context.Presses.Add(b.Press);
            }
            context.SaveChanges();
        }
    }
}
Now, let’s make it so we can access our book data through some GET methods:
public class BooksController : ODataController
{
    // ...

    // Return all books
    [EnableQuery]
    public IActionResult Get()
    {
        return Ok(_db.Books);
    }

    // Returns a specific book given its key
    [EnableQuery]
    public IActionResult Get(int key)
    {
        return Ok(_db.Books.FirstOrDefault(c => c.Id == key));
    }
}
We might also want to add some POST methods to not only read the data, but change it:
public class BooksController : ODataController
{
    // ...

    // Create a new book
    [EnableQuery]
    public IActionResult Post([FromBody]Book book)
    {
        _db.Books.Add(book);
        _db.SaveChanges();
        return Created(book);
    }
}
We can continue this process of adding different types of GET, POST, and DELETE methods for different situations of dealing with books. Additionally, we can go through a similar process to create Controllers for our other classes whose data we want to access and manipulate — for example, a PressesController.
Test: Query Data
Finally, the OData service is ready to test for greater capabilities.
For example, we can query a single book as by sending the following HTTP request:
GET http://localhost:5000/odata/Books(1)
This will call our first GET method we defined on our BooksController, and the response should have the following payload:
{
    "@odata.context": "http://localhost:5000/odata/$metadata#Books/$entity",
    "Id": 1,
    "ISBN": "978-0-321-87758-1",
    "Title": "Essential C#5.0",
    "Author": "Mark Michaelis",
    "Price": 59.99,
    "Location": {
        "City": "Redmond",
        "Street": "156TH AVE NE"
    }
}
This will call our first GET method we defined on our BooksController, and the response should have the following payload:
Similarly, we can also test our POST method that creates a new book by making the following request:
POST http://localhost:5000/odata/Books
Content-Type: application/json
Content:
{
    "Id":3,"ISBN":"82-917-7192-5","Title":"Hary Potter","Author":"J. K. Rowling",
    "Price":199.99,
    "Location":{
        "City":"Shanghai",
        "Street":"Zhongshan RD"
    }
}
Our result should be:
{
    "Id":3,"ISBN":"82-917-7192-5","Title":"Hary Potter","Author":"J. K. Rowling",
    "Price":199.99,
    "Location":{
        "City":"Shanghai",
        "Street":"Zhongshan RD"
    }
}
Recap
At this point, our solution space looks something like this:
Solution 'BookStore'
| BookStore
| | Connected Services
| | Dependencies
| | Properties
| | wwwroot
| | Controllers
| | | BooksController.cs
| | Models
| | | BookStoreContext.cs
| | | bookstoremodelclass.cs
| | | DataSource.cs
| | Pages
| | appsettings.json
| | Program.cs
| | Startup.cs
We started by downloading some necessary packages for our dependencies. Then, we created an Entity Data Model by adding some new classes that defined our Entity, Complex, and Enum types with all of their properties. Our next step was making sure we added all the services that make this whole thing work with querying and so forth, which allowed us to query the metadata of our service. After that, we added some sample data to a database context, plus added some methods to access and modify the data.
Additional Features
Now that we’ve gotten through the basics of setting up a simple service, let’s talk about some additional features to fully take advantage of OData 8.0.
Query Options
Query options (such as $filter, $count, etc.) allow you to view your data in more interesting ways. By default, they’re disabled for security reasons. However, it’s easy to enable them after configuring your model by calling their respective methods on the model:
services.AddOData(opt => opt.AddModel("odata", GetEdmModel()).Filter().Select().Expand());
The above code enables $filter, $select, and $expand. Now that we’ve done this, we can send more complicated request such as the following:
GET http://localhost:5000/odata/Books?$filter=Price le 50&$expand=Press($select=Name)&$select=Location($select=City)
These can give us more specific responses, such as this for the above example request:
{
  "@odata.context": "http://localhost:5000/odata/$metadata#Books(Location/City,Press(Name))",
  "value": [
  {
    "Location": {
      "City": "Bellevue"
      },
    "Press": {
      "Name": "O'Reilly"
      }
    }
  ]
}
If you’d like to enable them all at once, you can call “EnableQueryFeatures()“:
services.AddOData(opt => opt.AddModel("odata", GetEdmModel()).EnableQueryFeatures());
$batch
Sometimes, we like to make multiple requests at once. We can do this by using $batch, which gives us an array of responses. For performance, though, $batch is disabled by default. In order to enable $batch, you should include following configurations:
1. Configure the model so it takes in a batch handler by using the following AddModel() method:
public ODataOptions AddModel(string prefix, IEdmModel model, ODataBatchHandler batchHandler)
2. Enable batching before enabling routing:
public void Configure(IApplicationBuilder app, IWebHostEnvironment env)
{
    app.UseODataBatching(); // call before "UseRouting()"
    app.UseRouting();
    // ...
}
Now, the OData service can handle $batch requests!
Multiple Models
So far, we’ve been working with a single model. We currently add the one model like this:
services.AddOData(opt => opt.AddModel(model));
And we make requests like this:
GET http://localhost:5000/Books(1)
We can also easily configure multiple models within a single OData service. For example, here’s some sample code that configures two models using different “prefixes:”
IEdmModel model1 = GetEdmModel1();
IEdmModel model2 = GetEdmModel2();
services.AddOData(opt => opt.AddModel("v1", model1).AddModel("v2", model2));
Note that here, we can call AddModel() multiple times. The function also accepts another parameter — not just the name of the model we’re adding, but a prefix we can use to refer to it. The prefixes we see here are “v1” and “v2“, which are used before the OData path in a URI request to identify the specific model we’re trying to access. (Accordingly, these prefixes should be unique within a specific OData service.)
In this configuration, we can now call the service using request URIs such as the following:
- GET http://localhost:5000/v1/Books(1) – Get the first book from v1 (model1)
- GET http://localhost:5000/v2/Books(1) – Get the first book from v2 (model2)
Prefix Templates
We can also call an OData service using different versions by using the prefix parameter in the AddModel() method. In order to do so, we format the prefix as a template:
services.AddOData(opt => opt.AddModel("v{version}", model));
This allows us to call an OData service using different versions. or example:
- GET http://localhost:5000/v1/Books(1) – Get the first book from version “1”
- GET http://localhost:5000/vbeta/Books(1) – Get the first book from version “beta”
You can add a “version” parameter in the action of the controller to retrieve the “version” string:
public IActionResult Get(int key, string version)
{
    // do something
}
This Get() method will then process version as “1” for the first request above, and “beta” for the second request.
Dependency Injection for OData Services
If you would like to enable dependency injection of OData services, you can use the following variation of the “AddModel()” method:
ODataOptions AddModel(string prefix, IEdmModel model, Action<IContainerBuilder> configureAction);
For example, if you’d like to use your own deserializer provider, you can inject it like this:
services.AddOData((opt) =>
{
    opt.AddModel("odata", model, (builder) =>
    {
        builder.AddService<ODataDeserializerProvider>(Microsoft.OData.ServiceLifetime.Singleton, (sp) =>
        {
            new MyDeserializerProvider(sp))
        }
    }
});
Routing
OData routing is responsible for matching incoming HTTP requests and dispatching those requests to the app’s executable endpoints, namely the action in the OData controller. For information on more routing features such as bot built-in convention routing, attribute routing, and the path/segment template, check out Routing in ASP.NET Core OData 8.0 Preview.
Conclusion
Thanks for following along! This post is a simple introduction to using the ASP.NET Core OData 8.0 to build a service. If you have any questions or concerns, feel free email Sam at saxu@microsoft.com.
We look forward to seeing you build amazing OData services running on ASP.NET Core 5!
Additional Resources
- Open Data Protocol (OData) Specification
- ASP.NET Core & EF Core
- OData .NET Open Source (ODL & Web API)
- OData Tutorials & Samples


this article is full of mistakes. please fix it
services.AddOData(opt => opt.AddRouteComponents(“odata”, GetEdmModel()));
where does AddOData come from? the method is not found
You are absolutely correct! I followed the guide as well and can’t find the AddOData. The AddOData method is an extension on IMvcBuilder. So, you must do services.AddControllers().AddOData(..)
bookstore.csproj is wrong, this article is for net5, not 2.1