In Part 1 we created a Data Service that exposes V2 of the OData Protocol, in this post we will create a WPF application to consume our Data Service.
Walkthrough:
Step 1 – Update Code Generation Settings:
The Data Services Update is basically a patch to .NET 3.5 SP1, so it can’t break existing projects, this means we need a way to opt-in to the new Code-Gen features.
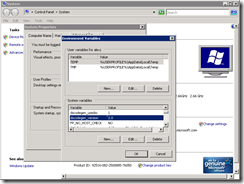
To do this after you installed the update you need to create two environment variables:
Set dscodegen_version to 2.0. This tells CodeGeneration to generate classes that can leverage V2 protocol features.
Set dscodegen_usedsc to 1. This tells CodeGeneration to use DataServiceCollection<> classes wherever possible to track changes and notify both UI code and the DataServiceContext of those changes.
NOTE: VS 2010 has these code generation options too, but in the the RTM version of VS 2010 you will be able to specify options via the Service Reference itself.
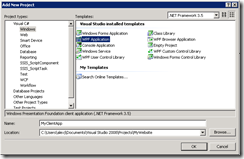
Step 2 – Create a WPF client application:
Next add a WPF Application to the solution you created in Part 1:
Step 3 – Add a Service Reference:
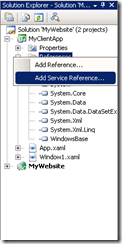
Right click on your WPF project reference and click “Add Service Reference”:
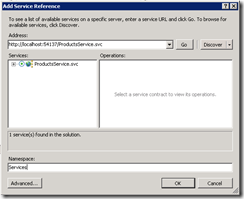
One the next screen if the your Data Service is in the same solution click ‘Discover’, which should populate the address field for you, if not simply enter the Address of your target Data Service by hand:
Finally enter a namespace for the generated code and click OK.
Step 4 – Verify V2 Code-Gen:
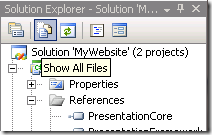
To make sure Step 1 worked correctly click the “Show All Files” button with your WPF Application selected.
Now under the service reference you added you should be see the Reference.cs file:
This is where Code-Gen emits your client classes and strongly typed DataServiceContext to allow you to program against your Data Service.
The easiest way to check that everything is using the latest and greatest features is to look for the Products property of the Category class. If everything is working you should see something like this:
Notice the return type of this property is DataServiceCollection<Product>which is what we want.
This is because the dscodegen_usedsc environment variable tells Data Services codegen to use DataServiceCollection instead of standard Collections classes.
Step 5 – Add a ViewModel:
Next add a View Model class for simplifying the interaction between our form and the DataService.
Our Application is going to allow people to view a list of Products, select one and edit it.
So our ViewModel should encapsulate a DataServiceContext to interact with the DataService, an updatable list of Products, and a list of Category reference data, so we can change the Category associated with a Product.
So this is what our ViewModel class looks like:
public class ViewModel
{
private GettingStartedWithUpdateEntities _ctx;
private Category[] _categories;
private DataServiceCollection<Product> _products;
public ViewModel()
{
_ctx = new GettingStartedWithUpdateEntities(
new Uri(“http://localhost:54137/ProductsService.svc”));
Load();
}
public DataServiceCollection<Product> Products {
get{
return _products;
}
}
public Category[] Categories
{
get {
return _categories;
}
}
public void SaveChanges()
{
_ctx.SaveChanges();
Load();
}
public void Load()
{
_categories = _ctx.CategorySet.ToArray();
_products = new DataServiceCollection<Product>(_ctx);
_products.Load(from p in _ctx.ProductSet.Expand(“Category”)
select p);
}
}
As you can see we have a member variable for holding our strongly typed DataServiceContext (called GettingStartedWithUpdateEntities), and our two lists.
TIP: If you are debugging and you want to know what port you need in your URI, hover over the Visual Studio Web Server icon in your system tray:
The most interesting piece of this code is the DataServiceCollection<Product>, which is new to the Update, and listens for changes and notifies the DataContext of any changes on your behalf:
_products = new DataServiceCollection<Product>(_ctx);
_products.Load(from p in _ctx.ProductSet.Expand(“Category”)
select p);
Here that we create a DataServiceCollection bound to the DataService, and then we load it with a query that retrieves all Products. Note that when we query the Products we also pull back the related Category so we can display the products category in the UI.
The SaveChanges() method is simply there as a way of flushing our changes back to the database.
Step 6 – Add some WPF Code:
Now open up the Window.xaml and paste in this code:
<Window x:Class=”MyClientApp.Window1″
xmlns=”http://schemas.microsoft.com/winfx/2006/xaml/presentation”
xmlns:x=”http://schemas.microsoft.com/winfx/2006/xaml”
Title=”Products Catalog” Height=”400″ Width=”425″>
<Grid>
<StackPanel Orientation=”Horizontal”>
<Grid Margin=”0,0,0,0″ Name=”grid1″ Width=”140″ >
<ListBox ItemsSource=”{Binding Path=Products}”
Name=”Products”
IsSynchronizedWithCurrentItem=”True”>
<ListBox.ItemTemplate>
<DataTemplate>
<StackPanel Orientation=”Horizontal”>
<TextBlock Text=”{Binding Path=Name}” FontWeight=”Bold”/>
</StackPanel>
</DataTemplate>
</ListBox.ItemTemplate>
</ListBox>
</Grid>
<StackPanel Orientation=”Vertical” Width=”260″>
<StackPanel Orientation=”Horizontal”>
<Label Name=”lblName” Width=”100″>
<TextBlock Width=”150″>Name:</TextBlock>
</Label>
<TextBox Name=”txtName”
Text=”{Binding ElementName=Products, Path=SelectedItem.Name, Mode=TwoWay}”
Width=”150″/>
</StackPanel>
<StackPanel Orientation=”Horizontal”>
<Label Name=”lblCost” Width=”100″>
<TextBlock Width=”150″ >Cost:</TextBlock>
</Label>
<TextBox Name=”txtCost”
Text=”{Binding ElementName=Products, Path=SelectedItem.Cost, Mode=TwoWay}”
Width=”150″/>
</StackPanel>
<StackPanel Orientation=”Horizontal”>
<Label Name=”lblCategory” Width=”100″>
<TextBlock>Category:</TextBlock>
</Label>
<ComboBox Name=”cmbCategory”
ItemsSource=”{Binding Path=Categories}”
DisplayMemberPath=”Name”
SelectedValuePath=”.”
SelectedValue=”{Binding ElementName=Products, Path=SelectedItem.Category, Mode=TwoWay}”
Width=”140″ />
</StackPanel>
<Button Height=”23″
HorizontalAlignment=”Right”
Name=”btnSaveChanges”
VerticalAlignment=”Bottom”
Width=”136″
Click=”btnSaveChanges_Click”>Save Changes</Button>
</StackPanel>
</StackPanel>
</Grid>
</Window>
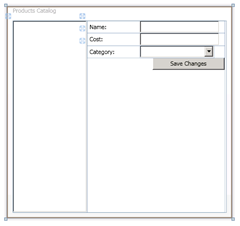
If you open this up in the designer it should look something like this:
Step 7 – Write the Code-Behind:
Next open up Window1.xaml.cs, the code behind file, and type in this code:
public partial class Window1 : Window
{
ViewModel viewmodel = new ViewModel();
public Window1()
{
InitializeComponent();
this.cmbCategory.DataContext = viewmodel;
this.grid1.DataContext = viewmodel;
}
private void btnSaveChanges_Click(object sender, RoutedEventArgs e)
{
viewmodel.SaveChanges();
this.grid1.DataContext = viewmodel;
}
}
Step 8 – Verify it is all working:
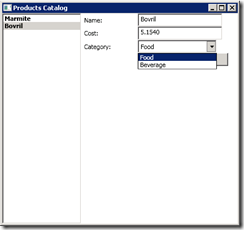
Now we are finished and you should be able to run the code, and see something like this:
And you should be able select a Product and modify it, and once you are done making all your edits you should be able to submit them to the database by clicking ‘Save Changes’.
Summary:
As you can see from Part 1 & this post it is very easy to install the ADO.NET Data Services Update for .NET 3.5 SP1, use it to create a OData V2 compliant Data Service and write a client application capable of leveraging that service.
There will be more posts covering specific features of the Update over the next few weeks.
Alex James
Program Manager, Data Frameworks Team, Microsoft



0 comments