
Introduction
The Microsoft OData Team is proud to announce general availability (GA) of OData (Open OData Protocol) on ASP.NET Core 2.0. It is now available through Nuget package at https://www.nuget.org/packages/Microsoft.AspNetCore.OData, current its version is 7.0.0.
Along this release, it will allow customers to create OData v4.0 endpoints and leverage the OData query syntax easily on multiple platforms, not only on Windows.
This blog is intended to give you a tutorial about how to build/consume OData service through ASP.NET Core OData package. Let’s getting started.
ASP.NET Core Web Application
For simplicity, we will start by creating a simple ASP.NET Core Web Application called BookStore.
Create Visual Studio Project
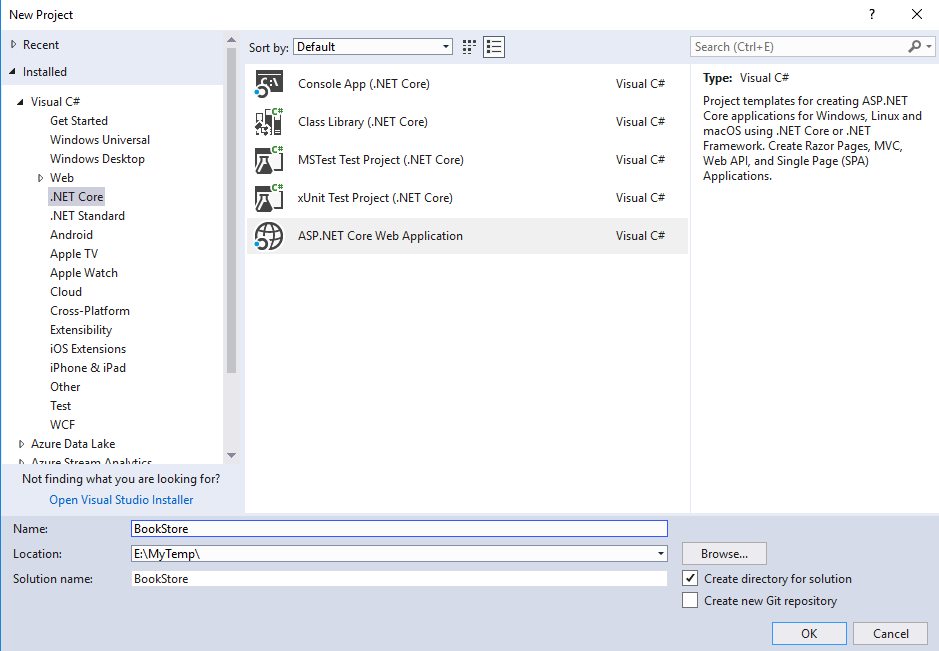
In Visual studio 2017, from the “File” menu, select “New > Project …”.
In the “New Project” dialog, select “.NET Core” and pick “ASP.NET Core Web Application” template, give a name as “BookStore” and set up the location, see the following picture:
Click “OK” button, then in the “New ASP.NET Core Web Application – BookStore” dialog, select “API” and un-check the “Configure for HTTPs” for simplicity as below:

Click “Ok” button, we will get an empty ASP.NET Core Web Application project.
Install the Nuget Package
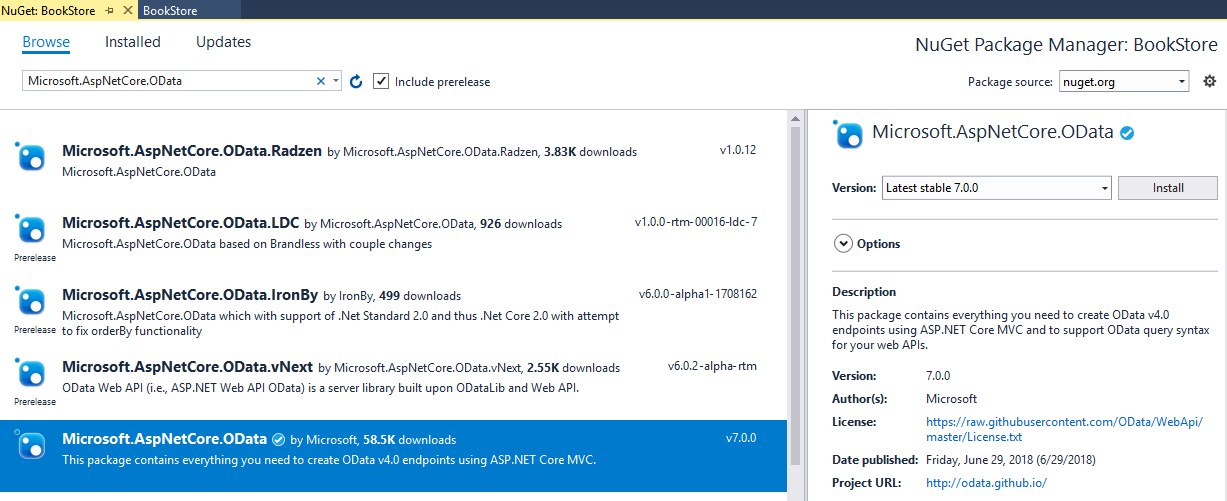
Once the empty application has been created, the first thing is to install the ASP.NET Core OData Nuget package from Nuget.org. In the solution explorer, right click on “Dependencies” in the BookStore project and select “Manage Nuget Packages” into the Nuget packages Management dialog. In this dialog, Search and select “Microsoft.AspNetCore.OData” package and click the install button to install the package into the Web application.See the below picture:
EF Core is also used in this tutorial, so do the same process to install “Microsoft.EntityFrameworkCore.InMemory” and its dependencies (for simplicity, we use In Memory data source).
Now, we have the following project configuration:
Add the Model classes
A model is an object representing the data in the application. In this tutorial, we use the POCOs (Plain Old CLR Object) classes to represent our book store models.
Right click BookStore project in the solution explorer, from the popup menu, select Add > New Folder. Name the folder as Models. Add the following classes into the Models folder:
Where:
- Book, Press will be served as Entity types
- Address will be served as a Complex type.
- Category will be served as an Enum type.
Build the Edm Model
OData uses the Entity Data Model (EDM) to describe the structure of data. In ASP.NET Core OData, it’s easily to build the EDM Model based on the above CLR types. So, add the following private static method at the end of class “Startup”.
Where, we define two entity set named “Books” and “Presses”.
Register Services through Dependency Injection
Register the OData Services
ASP.NET Core OData requires some services registered ahead to provide its functionality. The library provides an extension method called “AddOData()” to register the required OData services through the built-in dependency injection. So, add the following codes into “ConfigureServices” method in the “Startup” class:
Register the OData Endpoint
We also need to add OData route to register the OData endpoint. We are going to add an OData route named “odata” with “odata” prefix to the MVC routes, and call the “GetEdmModel()” to bind the Edm model to the endpoint. So, change the “Configure()” method in “Startup” class as:
Query the metadata
The OData service is ready to run and can provide basic functionalities, for example to query the metadata (XML representation of the EDM). So, let’s build and run the Web Application. Once it’s running, we can use any client tools (for example, Postman) to issue the following request (remember to change the port in the URI):
GET http://localhost:5000/odata/$metadata
Then, you can get the metadata as following xml:
Create the Database Context
Now, it’s ready to add more real functionalities. First, let’s introduce the database context into the Web Application. The database context is the main class that maps Entity Framework Core database to a given data model (CLR classes).
In the “Models” folder, add a new class named “BookStoreContext” with the following contents:
The code in “OnModelCreating” maps the “Address” as complex type.
Register the Database Context
Second, we should register the database context through built-in dependency injection at service configuration. So, change the “ConfigureServices” method in “Startup” class as:
Inline Model Data
For simplicity, we build a class to contain the inline model data. In the following codes, I add two books in this container.
Manipulate Resources
Build the Controller
In the “Controllers” folder, rename “ValuesController.cs” to “BooksController.cs” and replace its content with: In this class, we add a private instance of BookStoreContext to play the DB role and inherit it from “ODataController” class.
Retrieve the Resources
Add the following methods to the “BooksController”: Where,
- Get() returns the entire books
- Get(int key) returns a certain book by its key.
Now, we can query the whole books as “GET http://localhost:5000/odata/Books”, the result should be: You can try issue a request as “GET http://localhost:5000/odata/Books(2)” to get the book with Id equal to 2.
Create the Resources
Adding the following lines of code into “BooksController” will allow to create book to the service: Where, [FromBody] is necessary in ASP.NET Core.
As an example, we can issue a post request as follows to create a new Book:
POST http://localhost:5000/odata/Books
Content-Type: application/json
Content:
Query the Resources
Adding the following line of code in Startup.cs enables all OData query options, for example $filter, $orderby, $expand, etc. Here’s a basic $filter example:
GET http://localhost:5000/odata/Books?$filter=Price le 50
The response content is:
It also supports complex query option, for example:
GET http://localhost:5000/odata/Books?$filter=Price le 50&$expand=Press($select=Name)&$select=ISBN
The response content is:
Summary
Thanks to the OData Community for their feedbacks, questions, issues, and contributions on GitHub. Without their help, we can’t deliver this version.
We encourage you to download the latest package from Nuget.org and start building amazing OData service running on ASP.NET Core. Enjoy it!
You can refer to the below links for other detail information:
- Open Data Protocol (OData) Specification
- ASP.NET Core & EF Core
- OData .NET Open Source (ODL & Web API)
- OData Tutorials & Samples
- This blog’s sample project
Same issue like “Dean Wilson” and used nuget packages from “Abhishek Bansal”‘s provided medium article but unfortunately that nuget package also does not work with above code. Thanks though for the article but as dot net core is still evolving its really hard to try out some sample code like above and blazor also has similar issues in my experience.
That is some freaking great news.
Hope OData comes back.
Ideally, I’m hoping OData to become the new beloved RIA Services that was taken from us with the death of Silverlight.As a LoB dev, there should be an official “Breeze#” or “TrackableEntities” backed by Microsoft, see this feature suggestion.
AddOData() method is NOT in .net Core. It is NOT found in Microsoft.AspNetCore.OData, but instead found in Microsoft.AspNet.OData…..Thanks,
Great Article. A similar implementation can be found at below link:
https://medium.com/@abhi.bansal08/why-odata-and-how-to-enable-odata-in-c-net-core-application-1f13ad6ca3d1
Many code samples, which should have appeared inline with this article, are not visible here. You can find the code using the “This blog’s sample project” link.
can we use OData for exsiting api with sql database (ADO.net — Stored procedures) and what about the filtering of data, is there anyway to dont get all records to memory and do the filter.
Best Regards