
This blog post is an introduction to the data binding capabilities we have added in Data Services v1.5 CTP1. Since this is a CTP release of this feature we eagerly look forward to hearing your feedback.
Introduction to Data Binding
In ADO.NET Data Services, it is now possible to generate client side types that implement the INotifyPropertyChanged and INotifyCollectionChanged interfaces.
A new method has been added to the DataServiceQuery and QueryOperationResponse classes called ToObservableEntityCollection that will create an ObservableEntityCollection (extends ObservableCollection) that contains the results of an ADO.NET Data Services query. The ObservableEntityCollection supports two way binding. This means that any changes made to contents of the collection will be reflected on the state of the ADO.NET Data Services client context; any subsequent calls to SaveChanges() on that context will then execute those changes against the service.
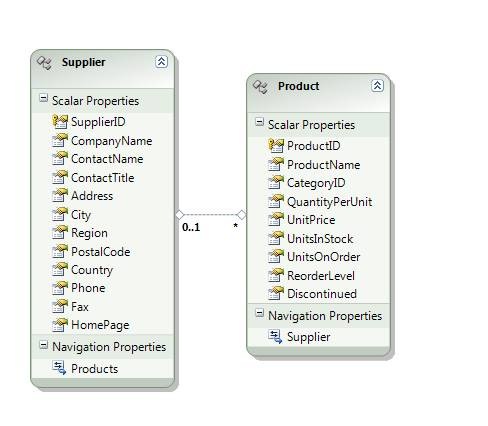
Here are some examples of different ways to create an ObservableEntityCollection using the ADO.NET Data Services client library. In all of these examples, the queries are being executed against a service named “nwsvc” that exposes two types: products and suppliers that have a one-to-many relationship.
Example 1: Creating an ObservableEntityCollection of all products.
![]()
Example 2: Creating an ObservableEntityCollection of all products and their associated suppliers.
![]()
Example 3: Creating an ObservableEntityCollection of all products and the associated suppliers from a LINQ Query.
![]()
Example 4: Creating a new ObservableEntityCollection of products. This creates a new empty collection of products without issuing a query against the service. New product objects can be created and added to this collection.
![]()
Example 5: Creating a ObservableEntityCollection of products from an asynchronous query.
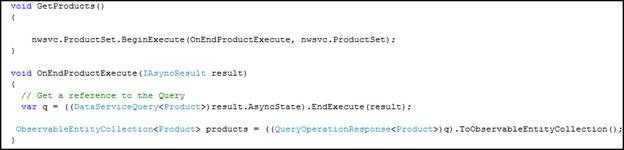
Walkthrough
The following is a walkthrough of using data binding in a WPF application.
To get started, you’ll want to download all of the required software I use in the walkthrough:
Step 1: Create an ADO.NET Data Service v1.5
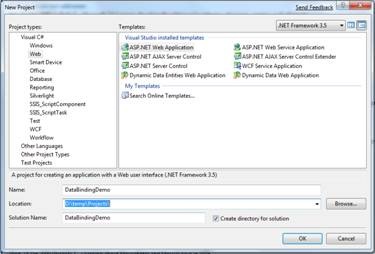
Create a new Web Application (named DatabindingDemo):
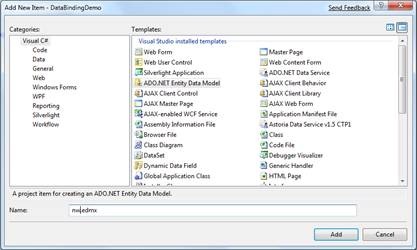
Our first data access related task is to generate the Entity Framework-based data access layer to the Northwind database. Right click the ASP.NET project and select ‘Add New Item’, then select ‘ADO.NET Entity Data Model’. Name the new item nw.edmx:
After clicking ‘Add’ on the screen above, a wizard will open to walk you through creating the Entity Data Model for the Northwind database. Use the default settings until you get to the point where you choose the database objects to include in the model. For this demo, choose only the Products and Suppliers tables.
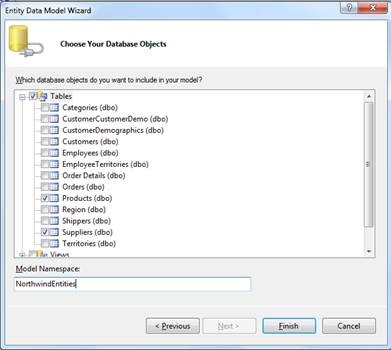
Once you reach the ‘Choose Your Database Objects’ screen, select the two tables and click ‘Finish’. This will open the Entity Data Model designer view. This view allows you to customize the generated conceptual data model. To learn more about the mapping capabilities of the Entity Framework, see here. For this demo rename the Suppliers entity to “Supplier” and the Products entity to “Product”.
Create a v1.5 CTP1-based ADO.NET Data Service over this model. To create the data service, right click the ASP.NET project and select ‘Add New Item’. Add an ‘ADO.NET Data Service v1.5 CTP1’ item called nw.svc
This will generate a file (nw.svc.cs) which represents the skeleton of a v1.5 data service. All we need to do now is point the data service at the data model to be exposed as a REST-service and we’ll be set. The snippet below shows the 2 or so lines of code you need to write to do this. One thing to note is that a data service is locked down by default, so we need to take explicit steps to open access to it. For this simple application we’ll enable read and write access to the entire model quickly using the call to ‘SetEntitySetAccessRule’ shown below.
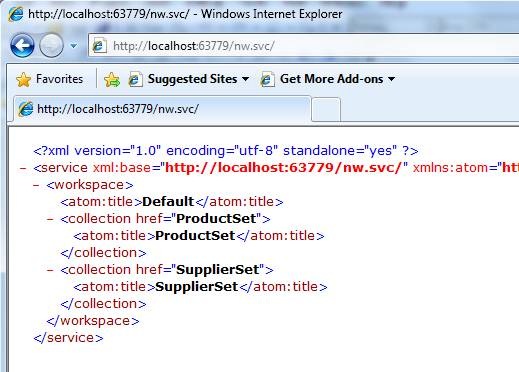
The data service is now created. To test this, run the project and navigate to the nw.svc file. You should see a listing as shown below that outlines all the entry points to the data service. If you don’t, tweak your IE settings and reload.
Step 2: Enable data binding on the client.
By default, the client side types generated by ADO.NET Data Services v1.5 CTP1 do not implement binding interfaces. To get client side types that do implement the binding interfaces, you have to tell the code generation library that you want client code that has binding enabled. To do this, set an environment variable before starting Visual Studio and then use Add Service Reference (ASR) to generate client proxy code. The environment variable to set is:
set dscodegen_databinding=1
Note: The use of this environment variable is further explained by the video embedded in this blog post.
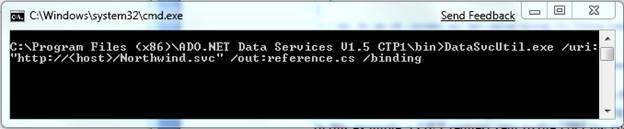
Note: It is also possible to generate proxy code that have binding enabled using DataSvcUtil.exe with the /binding flag.
Step 3: Create client proxy code with binding enabled.
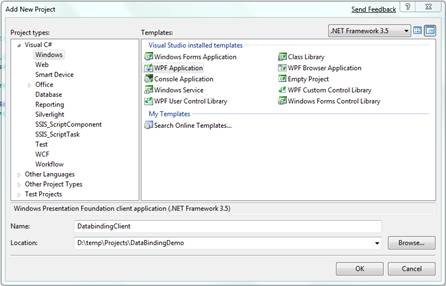
After setting the environment variable in step 2, open the solution you created in step 1 and create a new WPF project.
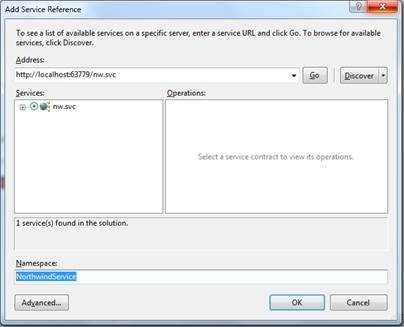
Once you have created a WPF client project, the next step is to generate client side types. To do this, find the DatabindingClient project in the solution explorer, right-click the project and select Add Service Reference.. .In the Add Service Reference dialog, click the Discover button. The nw.svc service will show up in the Service window. Enter NorthwindService as the Namespace value and select OK. This wizard will generate a set of client side types that can be used to interact with the service created in step 1.
If this step is done correctly, you will see a new NorthwindService node under the Service References Node in the solution explorer. As well, you will see a reference to Microsoft.Data.Services.Client in the references node; if you do not see the reference to Microsoft.Data.Services.Client or you see a reference to System.Data.Services.Client go to the ADO.NET Data Services blog and read this post about enabling ADO.NET Data Services v1.5 features in Visual Studio and then repeat the Add Service Reference Step.

The next step is to create a new instance of the ADO.NET Data Services client context and connect to the service created in step 1. To do this, add the following code to the Window1.xaml.cs file to create a connection to the service; making sure to replace the host and port number with the values for your service.

The next step is to create an interface that you can bind the result of a query to. The service you created in step 1 exposes a set of Suppliers and a set of Products from the Northwind database with a one-to-many relationship between them. The XAML code below will create two listviews, one to display the suppliers and another to display the products associated with the current supplier selected in the first view. This type of binding is called master-detail binding.
The code below uses standard WPF binding semantics. The ItemsSource of the supplierView is set to “{Binding}”, this will cause the listview to bind to the collection of items that are supplied as the data context of the supplierViewGrid; in this case the collection of items will be a collection of supplier objects. The columns of the supplierView are each bound to a property of the supplier object through the DisplayMemberBinding=”{Binding Path=SupplierID}”/> tag.
The second listview, productsView, is bound to the Products property of the supplier objects by the ItemsSource=”{Binding Products}” tag.
By supplying the IsSynchronizedWithCurrentItem=”True” tag on the listview, you are taking advantage of the feature WPF has to automatically display the items in the second list view (products) that are associated with the currently selected item in the first list view (suppliers).
Paste the following code snippet into the window1.xaml file:
<Grid Name=”supplierViewGrid”>
<ListView ItemsSource=”{Binding}” Margin=”25,11,33,145″ Name=”supplierView”
IsSynchronizedWithCurrentItem=”True”>
<ListView.View>
<GridView>
<GridViewColumn Header=”ID” DisplayMemberBinding=”{Binding
Path=SupplierID}”/>
<GridViewColumn Header=”Name” DisplayMemberBinding=”{Binding
Path=CompanyName}”/>
<GridViewColumn Header=”Address” DisplayMemberBinding=”{Binding
Path=Address}”/>
<GridViewColumn Header=”City” DisplayMemberBinding=”{Binding Path=City}”/>
<GridViewColumn Header=”Region” DisplayMemberBinding=”{Binding
Path=Region}”/>
</GridView>
</ListView.View>
</ListView>
<ListView Margin=”25,213,33,0″ Name=”productsView” ItemsSource=”{Binding Products}”
IsSynchronizedWithCurrentItem=”True” Height=”97″ VerticalAlignment=”Top”>
<ListView.View>
<GridView>
<GridViewColumn Header=”ID” DisplayMemberBinding=”{Binding ProductID}”/>
<GridViewColumn Header=”Name” DisplayMemberBinding=”{Binding ProductName}”/>
<GridViewColumn Header=”QuantityPerUnit” DisplayMemberBinding=”{Binding
QuantityPerUnit}”/>
<GridViewColumn Header=”Price” DisplayMemberBinding=”{Binding UnitPrice}”/>
<GridViewColumn Header=”InStock” DisplayMemberBinding=”{Binding
UnitsInStock}”/>
</GridView>
</ListView.View>
</ListView>
</Grid>
Edit the following attributes of your window: Height=”382″ Width=”584″ to properly display the controls.
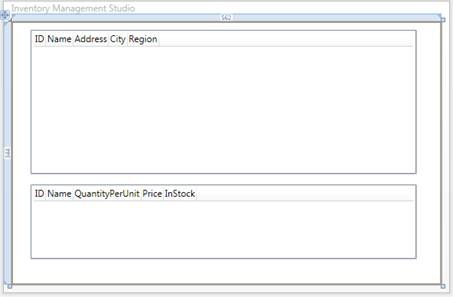
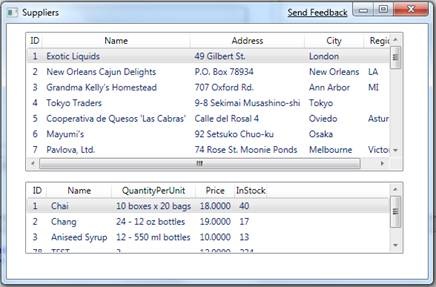
This will create a WPF interface that looks like this:
The final step to enable binding to these WPF controls is to set the DataContext of the grid in the window you just created to the result of a query for suppliers from the service created in step 1. This is done by executing a standard ADO.NET Data Services query on the context for the set of suppliers and then adding a call to ToObservableEntityCollection() to the result of the query. The ToObservableEntityCollection() method will execute the query against the service and return the result as an ObservableEntityCollection of entities. The entities in this collection will implement INotifyPropertyChanged and INotifyCollectionChanged. To do this, add the following code to the constructor for the window:

Once this is complete, compile the project and run it. The result should be:
Step 4: Two-way Binding
Up to this point in the walkthrough, you have set up a service, created a WPF client and bound the result of a query to the service to a pair of listview controls in the client. This type of binding you have done so far has all been one-way binding. The ObservableEntityCollection you used at the end of step 3 also supports two-way binding. This means that any changes made to the collection or items in the collection will propagate to the service when a call to SaveChanges() is made on the context.
This final step will walk you through adding buttons that will add and remove items to the collection of products and take advantage of two-way binding to have those changes propagate to the service and the backing northwind database.
To start, add the following XAML code to the window1.xaml file to create three buttons to that will add and remove a product from the list of products and save the changes to the service.
<Button Height=”24″ HorizontalAlignment=”Left” Margin=”411,0,0,4″
Name=”addButton” VerticalAlignment=”Bottom” Width=”28″ Click=”addButton_Click”>+</Button>
<Button Height=”24″ HorizontalAlignment=”Right” Margin=”0,0,89,4″
Name=”deleteButton” VerticalAlignment=”Bottom” Width=”28″ Click=”deleteButton_Click”>-</Button>
<Button Height=”24″ HorizontalAlignment=”Right” Margin=”0,0,33,4″
Name=”saveButton” VerticalAlignment=”Bottom” Width=”50″ Click=”saveButton_Click”>Save</Button>
After adding this code the client application will be:

The next step is to handle the click events on the new buttons and add or remove the currently select product in the list. The first thing we will need is a new product window to input the property values of a new product when one is created. To do this, create a new WPF window in your client project called ProductWindow.

After creating the window, we need to set up the product window to bind to a single instance of the product class. To configure binding in the product window, you will use the same WPF binding method you used for the supplier window, except this window will bind to a single object and not a collection of objects. Add the following XAML code into the ProductWindow.xaml:
Title=”Product” Height=”206″ Width=”296″>
<Grid x:Name=”productGrid”>
<Grid.ColumnDefinitions>
<ColumnDefinition Width=”171*” />
<ColumnDefinition Width=”159*” />
</Grid.ColumnDefinitions>
<Label Height=”26″ Margin=”12,17,68,0″ Name=”nameLabel”
VerticalAlignment=”Top”>Name:</Label>
<Label Margin=”12,49,6,0″ Name=”quantityLabel” Height=”26″
VerticalAlignment=”Top”>Quantity Per Unit:</Label>
<Label Margin=”12,78,68,64″ Name=”priceLabel”>Price:</Label>
<Label Height=”26″ Margin=”12,0,68,35″ Name=”inStockLabel”
VerticalAlignment=”Bottom”>InStock:</Label>
<TextBox Height=”23″ Margin=”0,23,28.018,0″ Name=”textBox1″
VerticalAlignment=”Top” Text=”{Binding ProductName}” Grid.Column=”1″ />
<TextBox Margin=”0,52,28.018,0″ Name=”textBox2″ Text=”{Binding
QuantityPerUnit}” Height=”23″ VerticalAlignment=”Top” Grid.Column=”1″ />
<TextBox Margin=”0,81,28.018,64″ Name=”textBox3″ Text=”{Binding
UnitPrice}” Grid.Column=”1″ />
<TextBox Height=”23″ Margin=”0,0,28.018,35″ Name=”textBox4″
VerticalAlignment=”Bottom” Text=”{Binding UnitsInStock}”
Grid.Column=”1″ />
<Button Height=”23″ Margin=”19.018,0,61,6″ Name=”okButton”
VerticalAlignment=”Bottom” Grid.Column=”1″
Click=”okButton_Click”>OK</Button>
</Grid>
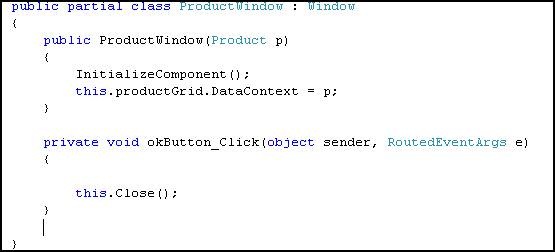
Next add the following code to the ProductWindow.xaml.cs file to set the data context to a single product and handle the ok button click event:
The final step is to handle the add, remove, and save button click events in the supplier window. Add the following code to the Window1.xaml.cs file.
Add the following code to the addButton_Click event to create a new product when the add button is selected. The following code creates a new Product object, adds it to the list of products for the currently selected supplier, and creates a new product window for the user to input the property values for the new product.

Add the following code to handle the click event on the delete button. This method finds the supplier that represents the currently selected supplier in the list view. It then removes the currently selected product from that supplier’s collection of products. This operation gets translated into a delete operation on the product object in the service. After the save button is clicked, the product entry that has been removed will be deleted from the backing northwind database.

Add the following code to handle the save button click. This button calls SaveChanges on the context which will cause any operations that have been performed on the context to be sent to the service.

Your project is now complete. You can run the form and use the buttons to add and remove items from the collection of products. When you make a change you then click the save button to persist the changes to the service.
Providing Feedback
We have created a new forum dedicated to providing feedback on “pre-release” versions of data services such as this CTP. Please direct all your questions and comments about this feature this new forum which is available at: (http://social.msdn.microsoft.com/Forums/en-US/dataservices/threads).
Note: The forum intended for questions on currently shipping versions of ADO.NET Data Services is still available at: (http://social.msdn.microsoft.com/Forums/en-US/adodotnetdataservices/threads/ )
We look forward to hearing your feedback.
Shayne Burgess
ADO.NET Data Services, Program Manager
0 comments