

As we continue to embrace cloud native patterns in our development environments, new terms surface. “Decentralized” is a newer term (at least to me) as there’s growing traction for fast development cycles using a decentralized approach with cloud. Microsoft now has a product in public preview called Azure Active Directory Verifiable Credentials that uses decentralized identity.
In preparation for our community-based efforts to bring awareness to the service in January, I decided to set up some of the sample applications, in hopes of learning more. I also thought you may appreciate learning about the current state while the service is in public preview.
Let’s start out by quickly setting the stage. Identity data has too often been exposed in security breaches, affecting our lives across several mediums (both personal and professional). Right now, we use digital identities at work and personal lives. The digital identity boundary sometimes even spreads between apps, across different devices, and is often used interchangeably both at work and in personal settings. Users grant consent to several apps using an identity provider to authorize access. Everything from purchasing concert tickets, to creating an account, signing up for a new service, to even booking a hotel room. Within enterprises, users may want to work with someone at a different company and use the other company as a source of authorization between both companies for collaboration work.
Each of these scenarios empowers individuals to take ownership of their identity, however when a breach occurs, users must change passwords and re-grant consent once more. Additionally, these identities could be removed at any time by external parties. At Microsoft, we believe everyone has a right to an identity they own and control. Each identity securely stores elements of a digital identity and promises to preserve privacy. Within decentralized identity systems, control of the life span and use of credentials is shared between the issuer, the holder, and the relying party consuming the credential.
Decentralized Identifiers (DIDs) are different. These DIDs are part of the Azure Active Directory Verifiable Credentials service. The DIDs are user-generated, self-owned, and globally unique identifiers. Users can secure access to resources, sign and verify credentials, and help the data exchange between users and applications.
A quick look at the architecture for Verifiable Credentials may be an interesting data point. The admin section is relatively minimal in nature and there are a few steps required to set this up in Azure. I will cover these steps in the next paragraphs. The development work deals mainly with the Verifiable Credential API by creating both a VC issuer and a verifier. The high-level overview is as follows:

Pre-Requisites
There are a few considerations that you’ll want to make sure you have situated before setting up the service. Please reference the following table for a quick understanding of what you need prior to building the service within your environment.
| What? | Why? |
| Azure Active Directory Tenant | Setup requires global administrator permissions. |
| Azure subscription tied to AAD Tenant | Additional resources are created for the service: standard LRS storage account and Key Vault. |
| At least one AAD P2 license* | This will let the global administrator set up the service. |
| Ability to create the following Azure resources: | Service Principal, standard LRS storage account, Key Vault. |
| Ability to assign permissions | Setup requires ability to set access policy on Key Vault for different accounts and set permissions on the storage account container. |
* Required during public preview
Once the pre-requisites are met, feel free to take one of the sample applications referenced above and follow these tutorials:
- Set up the Verifiable Credentials service
- Issue a verifiable credential
- Verify a Verifiable Credential
The set-up is straightforward, however when I set things up, I ran into errors about not being able to access the Key Vault. After troubleshooting and verifying the setup, I went ahead and over permissioned the storage account and over permissioned the Key Vault to give myself full access to everything. After that configuration change, I still couldn’t get the environment to work. So, I combed through the set-up with a colleague and re-permissioned the Key Vault and storage account correctly. Since that gave both me and my colleague a little bit of trouble, I wanted to outline those settings here:
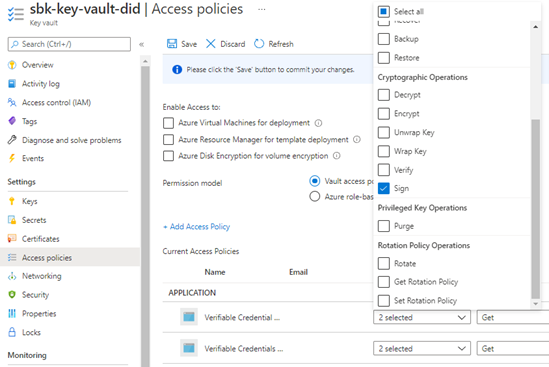
Key Vault Access Policy
- Ensure the Verifiable Credential Request Service and Verifiable Credentials Issuer Service have been permissioned with the Get key permissions in Access Policies > Key Management Operations:

- Ensure the Verifiable Credential Request Service and Verifiable Credentials Issuer Service have been permissioned with the Sign Cryptographic Operations.

- Ensure the account you’re using to set this up has the following permissions assigned: Create and Delete Key Management Operations, along with Sign for the Cryptographic Operations.

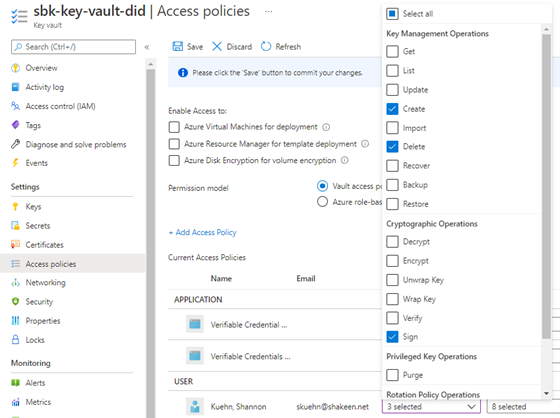
4. Lastly, ensure that both the Verifiable Credential Request Service and Verifiable Credentials Issuer have Get secret permissions, as well as the user account you’re using to set this service up.
Storage Account Permissions
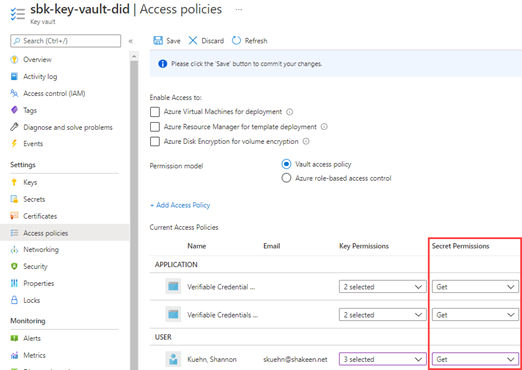
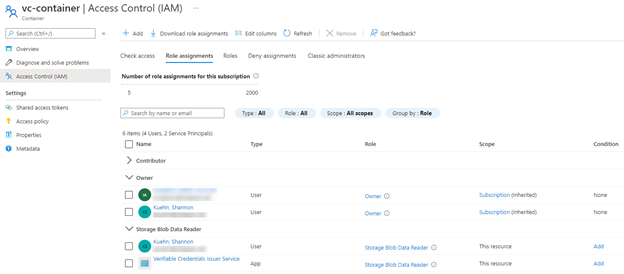
For the storage account container, ensure both the account you’re using to set the service up and the Verifiable Credentials Issuer Service app account have the Storage Blob Data Reader assigned at the container level. Note in my screen shot, my user account was also an Owner of the resource, however that resource permission did not work. The permissions are very explicit, so if you run into any errors, make sure you examine the permissions.
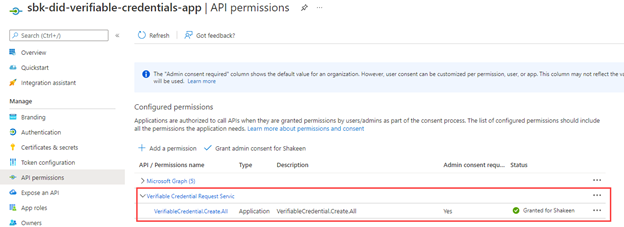
The last permission to call out is to during a request or issue operation. The end state configuration will look like this (make sure you grant admin consent for the service principal):
After you follow the tutorial, you should have the following resources provisioned within your environment.
- Azure Active Directory Verifiable Credentials Service to handle issuing and verifying VCs.
- Service Principal to access the request API.
- Key Vault to get and sign verifiable credentials.
- Storage Account to store the rules and display file(s) for your VCs.
Earlier in this blog post, I called out the larger GitHub repo with all sample applications. If you’re interested in the individual apps, use the links below:
For a deeper technical understanding, check out our official documentation:
- Azure Active Directory Verifiable Credentials documentation
- Frequently asked questions
- Verifiable Credential Request API
- ION CLI
- ARM template setup
Summary
In closing, hopefully we’ve helped draw your attention to the areas that you might gloss over with your set-up. Permissions are key to making the service work to issue and verify VCs for the applications you build. Check out all the activities we have planned for the month of January so you can learn even more about the service.
Happy coding!
0 comments