


Teams Toolkit for Visual Studio enables you to create, debug and deploy Microsoft Teams apps to a Microsoft 365 tenant fast using a no configuration approach. In this tutorial, I guide you through the steps to create a Stock Update Notification bot for Teams Toolkit and C#.
Check out the sample code in the TeamsFX GitHub repository to see the finished version.
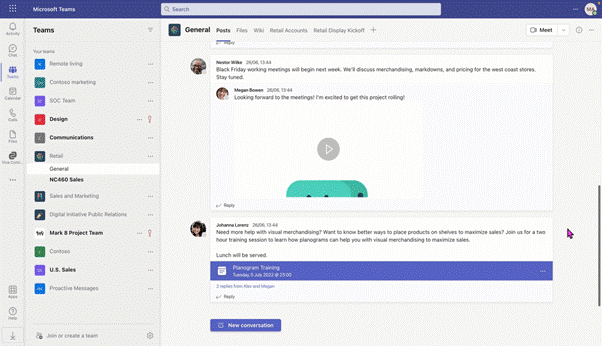
Table of Contents
- Prerequisites
- Install Teams Toolkit for Visual Studio
- Scaffold the project
- Update the adaptive card
- Update the bot logic
- Start ngrok
- Prepare dependencies
- Test your bot
- What next?
- Learn more!
🏁 Prerequisites
To follow this guide successfully you need the following.
- Microsoft 365 tenant enabled for developing custom applications. If you do not have a tenant, I highly recommend you use a free Microsoft 365 developer tenant, which you can obtain by joining the Microsoft 365 Developer Program. It’s pre-configured for Microsoft Teams app development right out of the box.
- Visual Studio 2022 17.3+. You can use either of the Community, Professional or Enterprise editions. If you do not have Visual Studio installed, try out the Community edition for free!
- ngrok is a globally distributed reverse proxy you can use to promote web services running on your local machine to an internet available address. In short, it puts localhost on the internet. This is required for Microsoft Teams to talk to the code running locally on your machine. If you do not have ngrok, you can download for free.
With the pre-requisites done, let’s begin!
🛠 Install Teams Toolkit for Visual Studio
Our first step is to install Teams Toolkit into Visual Studio.
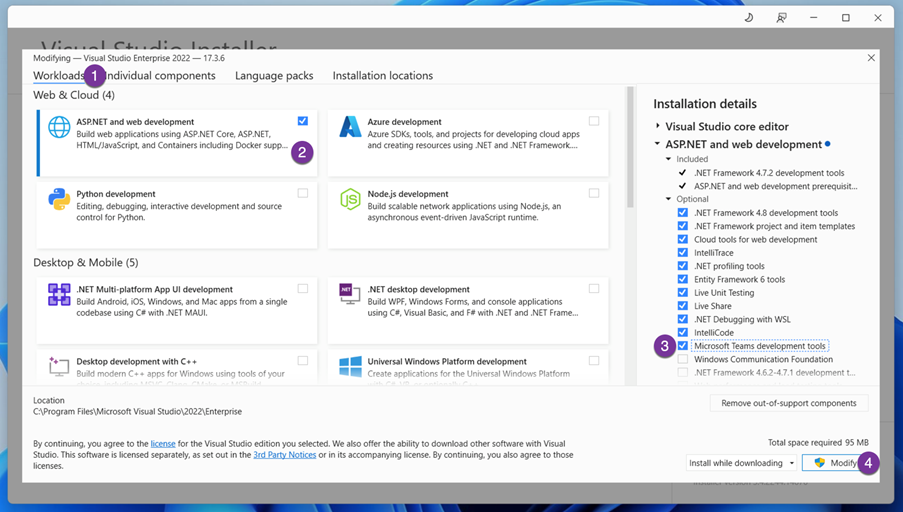
- Open the Visual Studio Installer.
- Click the Modify button to configure your installation.
- On the Workloads tab, select the NET and web development workload.
- In the Installation details pane on the right, scroll down the list and check the option called Microsoft Teams development tools.
- Click the Modify button to install Teams Toolkit.
Once the installation is complete, you can close the Visual Studio installer.
👷 Scaffold the project
After installing Teams Toolkit into Visual Studio, it is time to create our project.
- Open Visual Studio 2022
- From the start-up screen, select Create a new project.
- On the Create a new project screen, expand the All-platforms dropdown, and select Microsoft Teams, this will display a single template called Microsoft Teams App, click Next to confirm the template choice.
- On the Configure your new project screen, enter StocksUpdateNotificationBot in the Project name field, then click Create to confirm.
- In the Create a new Teams application dialog, expand the Trigger type dropdown, and select Timer Trigger (Azure Function), then click Create to confirm.
Teams Toolkit will now generate a new project for you and open it.

ℹ️ Update the Adaptive Card
We will use an Adaptive Card to represent our stock price update, so let’s update the default Adaptive Card design to fit our needs.
Open the NotificationDefault.json file in the Resources directory and replace the contents with the following JSON.
{
  "$schema": "http://adaptivecards.io/schemas/adaptive-card.json",
  "type": "AdaptiveCard",
  "version": "1.4",
  "body": [
    {
      "type": "Container",
      "items": [
        {
          "type": "TextBlock",
          "text": "${name}",
          "size": "Medium",
          "wrap": true
        },
        {
          "type": "TextBlock",
          "text": "${symbol}",
          "isSubtle": true,
          "spacing": "None",
          "wrap": true
        },
        {
          "type": "TextBlock",
          "text": "{{DATE(${timestamp},SHORT)}} {{TIME(${timestamp})}}",
          "wrap": true
        }
      ]
    },
    {
      "type": "Container",
      "spacing": "None",
      "items": [
        {
          "type": "ColumnSet",
          "columns": [
            {
              "type": "Column",
              "width": "stretch",
              "items": [
                {
                  "type": "TextBlock",
                  "text": "${formatNumber(price,2)}",
                  "size": "ExtraLarge",
                  "wrap": true
                },
                {
                  "type": "TextBlock",
                  "text": "${if(change >= 0, '▲', '▼')} ${formatNumber(change,2)} USD (${formatNumber(changePercent, 2)}%)",
                  "spacing": "None",
                  "wrap": true
                }
              ]
            },
            {
              "type": "Column",
              "width": "auto",
              "items": [
                {
                  "type": "FactSet",
                  "facts": [
                    {
                      "title": "Open",
                      "value": "${formatNumber(open,2)}"
                    },
                    {
                      "title": "High",
                      "value": "${formatNumber(high,2)}"
                    },
                    {
                      "title": "Low",
                      "value": "${formatNumber(low,2)}"
                    }
                  ]
                }
              ]
            }
          ]
        }
      ]
    }
  ]
}
We use Adaptive Cards Template Language here to provide separation between our data and layout. Using binding expressions i.e., ${name}, we can add placeholders to our layout in locations where we want our data to be rendered.
Let’s create a class to represent the data object to use with the template. Open the NotificationDefaultModel.ts file in the Models directory and replace the contents with the following.
namespace StocksUpdateNotificationBot.Models{
    public class GlobalQuote
    {
        public string Symbol { get; set; }
        public double Open { get; set; }
        public double High { get; set; }
        public double Low { get; set; }
        public double Price { get; set; }
        public double Volume { get; set; }
        public string LatestTradingDay { get; set; }
        public double PreviousClose { get; set; }
        public double Change { get; set; }
        public double ChangePercent { get; set; }
        public string Name { get; set; }
        public string Timestamp { get; set; }
    }
}
When we combine our template and data using the Adaptive Cards SDK, the notification will look something like this.
🤖 Update the bot logic
Open the NotifyTimerTrigger.cs file, this file contains the core logic of our bot that will be executed on a schedule.
For now, let’s remove the contents of Run method and remove unused using statements. You can remove the statements by using the keyboard shortcut, Ctrl + R followed by Ctrl + G.
As our bot will call out to an external API, we need an HTTP client to execute the requests. So, let’s also create a new read-only property in the NotifyTimerTrigger class and create a new HTTP client.
private readonly HttpClient _client = new();
Your file should look like the below block of code.
using Microsoft.Azure.WebJobs;
using Microsoft.Extensions.Logging;
using Microsoft.TeamsFx.Conversation;

using ExecutionContext = Microsoft.Azure.WebJobs.ExecutionContext;

namespace StocksUpdateNotificationBot
{
    public sealed class NotifyTimerTrigger
    {
        private readonly ConversationBot _conversation;
        private readonly ILogger<NotifyTimerTrigger> _log;
        private readonly HttpClient _client = new();

        public NotifyTimerTrigger(ConversationBot conversation, ILogger<NotifyTimerTrigger> log)
        {
            _conversation = conversation;
            _log = log;
        }

        [FunctionName("NotifyTimerTrigger")]
        public async Task Run([TimerTrigger("*/30 * * * * *")]TimerInfo myTimer, ExecutionContext context, CancellationToken cancellationToken)
        {

        }
    }
}
Let’s add in the logic for our bot.
First, let’s add a try/catch block to the Run method.
try {
    // bot logic goes here
} catch (HttpRequestException e) {
    _log.LogError(e.Message);
}
When the bot is executed, our bot needs to obtain the latest stock price. To do this, we will send a HTTP request to the Alpha Vantage API.
Replace the // bot logic goes here comment inside the try block, with the following code:
// Get quote data from Alpha Vantage API
var response = await _client.GetStringAsync($"https://www.alphavantage.co/query?function=GLOBAL_QUOTE&symbol=MSFT&apikey=demo", cancellationToken);
Next, we need to deserialize and transform the response into the correct shape to use with our Adaptive Card model.
Add the following using statements to the top of the file.
using Newtonsoft.Json;
using Newtonsoft.Json.Linq;
using StocksUpdateNotificationBot.Models;
Add the following code into the try block.
// Deserialize JSON response
JObject jObj = (JObject)JsonConvert.DeserializeObject(response);

// Transform Global Quote object
var globalQuote = new GlobalQuote
{
    Symbol = jObj["Global Quote"]["01. symbol"].ToString(),
    Open = double.Parse(jObj["Global Quote"]["02. open"].ToString()),
    High = double.Parse(jObj["Global Quote"]["03. high"].ToString()),
    Low = double.Parse(jObj["Global Quote"]["04. low"].ToString()),
    Price = double.Parse(jObj["Global Quote"]["05. price"].ToString()),
    Volume = double.Parse(jObj["Global Quote"]["06. volume"].ToString()),
    LatestTradingDay = jObj["Global Quote"]["07. latest trading day"].ToString(),
    PreviousClose = double.Parse(jObj["Global Quote"]["08. previous close"].ToString()),
    Change = double.Parse(jObj["Global Quote"]["09. change"].ToString()),
    ChangePercent = double.Parse(jObj["Global Quote"]["10. change percent"].ToString().Replace("%", string.Empty)),
    Name = "Microsoft Corporation",
    Timestamp = $"{DateTime.Now.ToUniversalTime().ToString("o").Split(".")[0]}Z"
};
Now that we have all the data and it has been transformed into the correct shape, we need to obtain our Adaptive Card template.
Add the following code into the try block.
// Read adaptive card template
var adaptiveCardFilePath = Path.Combine(context.FunctionAppDirectory, "Resources", "NotificationDefault.json");
var cardTemplate = await File.ReadAllTextAsync(adaptiveCardFilePath, cancellationToken);
Finally, we want to iterate over all the locations where the bot has been installed in Microsoft Teams, render our Adaptive Card by combining the data and template, and send the card output into those locations.
Add the following code into the try block.
// Get bot installation
var installations = await _conversation.Notification.GetInstallationsAsync(cancellationToken);

foreach (var installation in installations)
{
    // Build and send adaptive card
    var cardContent = new AdaptiveCardTemplate(cardTemplate).Expand(globalQuote);
    await installation.SendAdaptiveCard(JsonConvert.DeserializeObject(cardContent), cancellationToken);
}
That’s the code complete, so let’s move onto getting our project ready to run our bot locally.
📡 Start ngrok
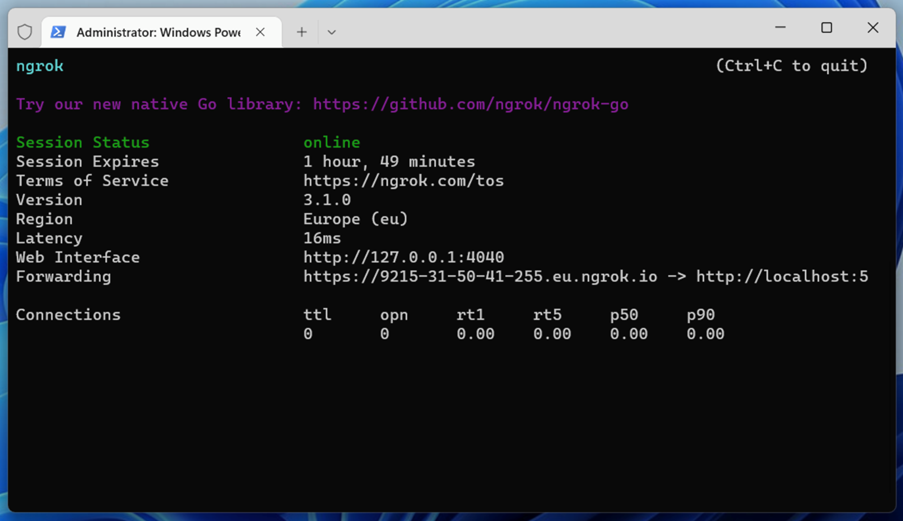
We need to ensure that ngrok is running so Microsoft Teams can communicate with the code running on our local machines.
Open a terminal prompt at the location where you installed the ngrok executable and start the ngrok service forwarding port 5130 using the following command:
> .\ngrok http 5130
When ngrok is running, a dashboard will be displayed in your terminal prompt with the internet accessible ngrok address that is forwarding network traffic to your localhost hostname. This will be in the format of <randomid>.<region>.ngrok.io.
🧑🍳 Prepare dependencies
In Visual Studio, right click the StocksUpdateNotificationBot project in the Solution Explorer pane, expand the Teams Toolkit menu and select the first option in the menu, Prepare Teams Apps Dependencies.
A Visual Studio account dialog box will be shown. Add your Microsoft 365 tenant account and follow the authentication steps. Once your account has been authenticated, click Continue to start the process.
The Prepare Teams Apps Dependencies process ensures that the required resources have been provisioned in your target Microsoft 365 tenant, and that the services needed are running on your machine, such as ngrok, and updating the app manifest file.
🧪 Test your bot!
Now, it is time to see our bot in action! To do this, simply press F5 on your keyboard.
The first time you run your bot, you will need to allow the Azure Functions executable to send network requests through the Windows Defender firewall. To enable this, click Allow access in the prompt.
Teams Toolkit will open a browser window for you and start to open Microsoft Teams. You may be asked to sign into you Microsoft 365 tenant at this point. If you are, complete the process. When you are authenticated, you will be presented with Microsoft Teams dialog which enables you to side load our app into your Microsoft 365 tenant.
Click the Add button to install the bot as a personal app and you will be taken to the chat tab of your personal app.
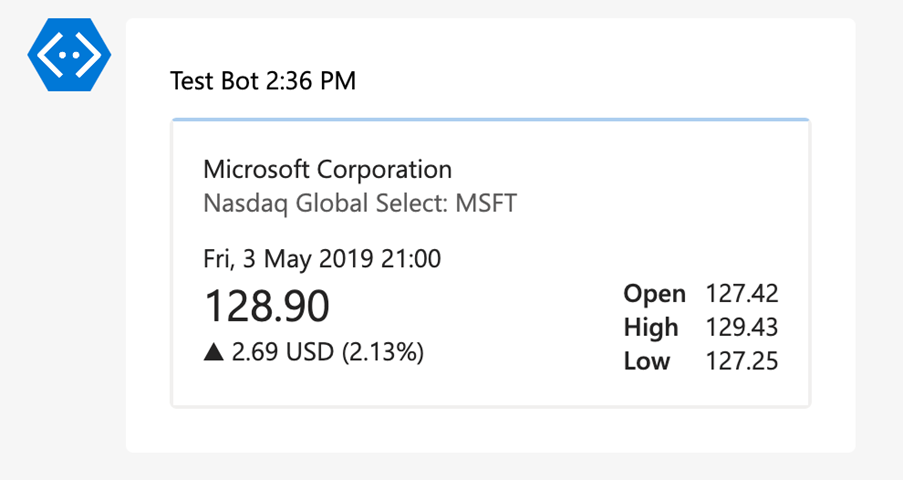
Wait a few seconds for your bot to be executed. You will see a message arrive from our bot with the latest stock price rendered as an Adaptive Card.
Congratulations, you have just created your first notification bot using Teams Toolkit for Visual Studio! 🎉
⏭ What’s next?
Want to make some updates? Here are a few things you can try.
- Use a different symbol, currently the stock price for MSFT is returned, pass a different symbol into the API call, and update the company name in the GlobalQuote object.
- Change the timer frequency, currently the timer trigger is executed every 30 seconds, change this by updating the CRON expression passed into the Run method in NotificationTimerTrigger.cs file.
- Update the app manifest, currently the app manifest contains mostly default values, use the Open Manifest File menu item in the Teams Toolkit menu to open the app manifest template and makes changes to it.
- Update the app icons, currently the app uses stock icons, update the icons in the Templates/appPackage/resources directory with new more relevant icons.
- Disable the bot chat compose box, by default the bot chat compose box is enabled to disable this edit the app manifest and update the isNotificationOnly property to true.
- Restrict supported Teams scopes, by default the bot can be installed into a personal, chat or channel context, to restrict where the bot can be used, update the scopes array in the app manifest.
📚 Learn more!
- Microsoft Teams Developer Center
- Teams Toolkit Documentation
- Teams Toolkit Overview
- Build your first app using C#
Happy coding!
Thanks for the tutorial. What Azure resources are being created as part of creating a notification bot? Instead of creating new Azure resources, how can we overwrite settings to use existing ones?
Teams Toolkit is very helpful, but as a Developer, I like to control the resources my app will use?
Thanks for these tutorials. Could you make one about the deployment of e.g. Teams notification bot to live environment and elaborate on that with some different options?
Thank you for the feedback. We will add this to our content to provide. Keep checking back for the posted updates.