
List of all posts in the #30DaysMSGraph series
-Today’s post written by Srinivas Varukala
In Day 12 we reviewed authentication flows for Microsoft Graph requests. Today we’ll look at using the Postman tool to make Microsoft Graph queries. For more details, read our documentation at Use Postman with the Microsoft Graph API.

Postman
Postman is a popular tool used to quickly test API calls including REST/JSON based endpoints. Postman can also be used to support every stage of the API lifecycle and it has extensive features that aid in quick prototyping. In this post, we will show you how to make Microsoft Graph API calls using Postman while using the OAuth 2.0 client-credentials (app-only) flow.
For this article we are going to use Azure AD V2.0 endpoint. From a high level it involves the following steps:
- Registering the Azure AD App
- Get admin consent for the app
- Get access token using the app
- Make Microsoft Graph API call using the access token as bearer token
Registering the Azure AD App
Please refer to Day 9 for the detailed instructions on creating an Azure AD V2 app. Once that is complete, you can continue with the next steps.
Get Admin Consent for your Application
In the Azure AD App that we created we selected “User.Read.All” permission scope which requires Admin consent. Azure AD admins can use the Azure AD Portal to grant the consent for the application, however, a better option is to provide a sign-up experience for administrators by using the Azure AD v2.0 “/adminconsent” endpoint.
We need to build a Admin consent URL that’s formatted as shown below:
https://login.microsoftonline.com/{tenant-id}/adminconsent?client_id={client-id}&state={random-string}&redirect_uri={redirect-url}
Here is a sample admin consent URL for the app that was created earlier:
Navigate to the above URL in the browser of your choice. Azure AD enforces that only a tenant administrator can sign in to complete the request. The administrator will be asked to approve all the application permissions that you have requested for your app in the app registration portal.
The following is an example of the consent dialog that Azure AD presents to the administrator:

Once it is “Accepted” the page will redirect to the redirect_uri along with certain parameters that implies that the consent was successful. Here is an example:
Get Access Token using Postman
Getting access token and further calls to Microsoft Graph will require values like the Tenant ID, Client ID, Secret and Token strings. Postman can be configured to store these values in variables and reuse them across multiple requests. This is a great feature that will save you time.
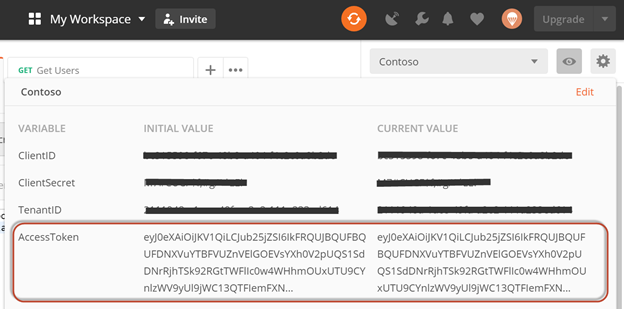
To create variables in Postman, click on the eye icon (also known as the “Environment quick look”) located top right corner of the application. This opens a popup window with an option to add new environments and variables.

Create a new environment using the Add link button with below details.
Environment name:
- Contoso (pick any name)
Variables:
- ClientID = [Client ID value that we saved from Azure AD App]
- ClientSecret = [Client Secret value that we saved from Azure AD App]
- TenantID = [Tenant ID value that we saved from Azure AD App]
- AccessToken = [Leave this blank]
Use the syntax {{variable-name}} to refer to a variable value in the requests. Example: {{ClientID}}

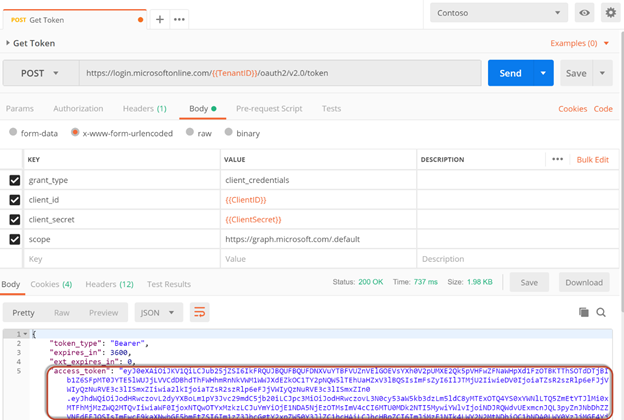
Select the above created environment in the environment dropdown. Then create a New request in Postman with below details.
- Request Type: POST
- Request URL: https://login.microsoftonline.com/{{TenantID}}/oauth2/v2.0/token
- Body Type: x-www-form-urlencoded
- Body Key/Value Pairs:
- grant_type = client_credentials
- client_id = {{ClientID}}
- client_secret = {{ClientSecret}}
- scope = https://graph.microsoft.com/.default
Note: The scope “https://graph.microsoft.com/.default” tells the Microsoft Graph to return a token with the application permissions already configured for the Azure AD app.
Click Send button to make a request to get an Access Token. In the below screen you can see the request that was built, along with the response showing the access token (truncated for brevity).
If you are seeing errors, chances are you did not complete the Admin Consent step.
Here is another quick tip to copy the access_token value to the variable AccessToken that was created earlier. This avoids the manual step to copy the access_token value to make Microsoft Graph request. Postman supports writing JavaScript Test cases that can execute soon after the request is complete. You can find the Tests tab in the same line of tabs along with Body and Headers. Here is a quick snippet that takes care of copying the value to AccessToken variable:
var json = JSON.parse(responseBody);
pm.environment.set(“AccessToken”, json.access_token);

Execute the above request again by clicking Send button. Once the request is complete, you can verify the variable values by clicking the eye icon.
Make Microsoft Graph API call using the access token
We will now use the Access Token to make Microsoft Graph API call to get a list of users in the organization.
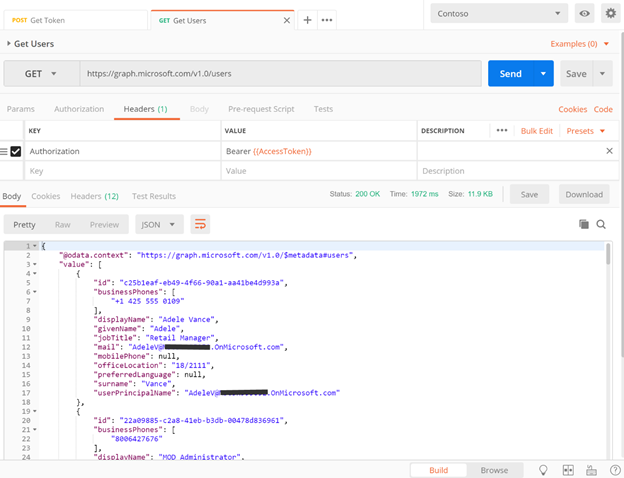
Build a New request with below details.
- Request Type: GET
- Request URL: https://graph.microsoft.com/v1.0/users
- Headers:
- Key: Authorization, Value: Bearer {{AccessToken}}
Note the {{AccessToken}} is reused in this request as a Bearer token in the Headers for Authorization.
Send this request to get back a list of users in the organization.
Try It Out
Using Postman try below Microsoft Graph API calls:
- Use Paging and NextLink discussed on Day 7 to get all users.
- Use filter query parameters to filter the users by JobTitle.
Join us tomorrow as we show you how to batch requests to Microsoft Graph in Day 14.
0 comments