
Our team was recently working on a project where we wanted to host a Docusaurus site for maintaining product documentation and eventually be able to just point to a project’s docs folder for reuse. The team decided to use Azure Container Apps (ACA) as the hosting solution. The main reason the team went with this solution was to reduce the infrastructure maintenance, focus on creating documentation, reuse the existing docker container and take advantage of features like https ingress and monitoring out of the box.
The challenge arose when the team began to look into bootstrapping the infrastructure and configuring continuous deployment of the application. It was difficult to separate the infrastructure setup from the application deployment. This is because there is no way to deploy a container app without a revision (a new container). Therefore, it seems like you need to have your container built and ready for use, which creates a chicken-and-egg situation.
Detailed Flow
The initial thought for addressing this challenge was the following:
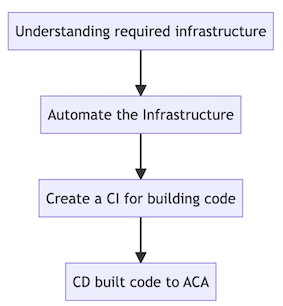
Understanding required infrastructure to deploy ACA
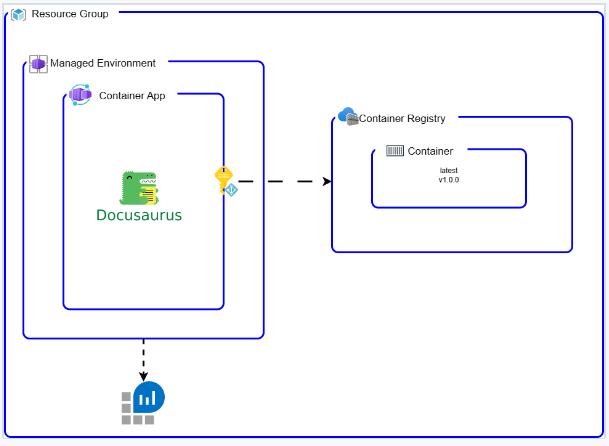
A basic deployment of an ACA requires the following resources:
- Managed environment
- Container app
- Container
- Log analytics
And specific for our solution:
- Azure Container Registry (to privately host the container image)
- Managed Identity (to avoid managing credentials to access the ACR)
Architecture:
Automate the infrastructure
Here is where things got really interesting. We decided to use Bicep, as our Infrastructure as Code language (IaC). As we began setting up the basic infrastructure, we noticed that the container's app had the containers property marked as required (“Must specify at least one container to create a container app.”).
We expected that the managed environment would have the credentials for accessing a private registry, but it didn’t. This means that we had to configure the credentials for each container app separately. To do this, we created and gave permissions to a managed identity planning to add it to the container app.
And then, there was one more snag: the container’s image property couldn’t be left blank. This means we had to either set up an image or point to an existing one when we were creating our resources. The question then that we had to ask ourselves was: Should we create the container first and then the infrastructure? Or should we set up the infrastructure first and then switch it up with a new container? This got us thinking about the best way to go about things.
To answer the question we came with two possible solutions:
-
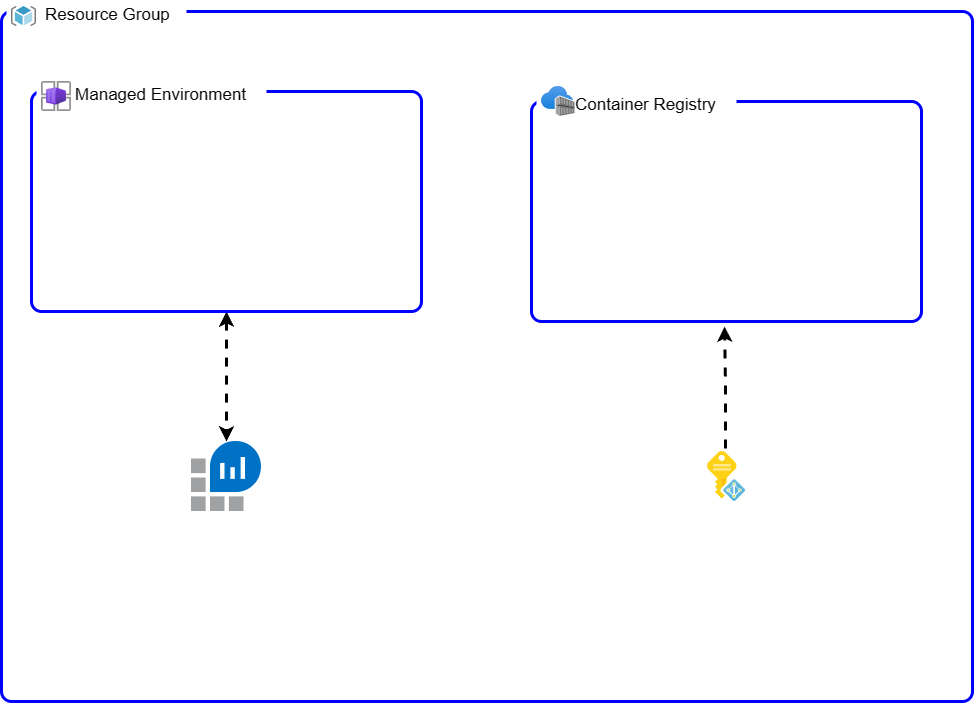
First, we set up the basic infrastructure, but we skip creating the container app for now. Next, we set up a CI (Continuous Integration) for the code. Once that’s done, we use the
az clitool (which is great because of the idempotency) to create the container by using ayaml definition, and we point it to the container we’ve built.Here’s a visual of the infra bootstrap:
-
The second approach that was considered was, we create all the basic infrastructure right from the start, including the container app, pointing to the demo container (that uses a different port). Next, we set up a CI for the code just like in the first approach. Lastly, we update the image version using the
az clitool using thecontainerapp updatecommand. It is a similar approach as the one detailed in here.Here’s a visual of the infra bootstrap:

Create a CI for building code
Once the infrastructure was bootstrapped, we had the container registry and permissions to push images. Therefore the CI was a standard container build; for this project we took advantage of semantic release and Azure Devops Pipelines to lint, test, build and push the container when a new release was triggered.
Deploying the new container to Azure Container App
In the context of the two bootstrap flows we experimented with, we evaluated two distinct deployment strategies, each with their respective advantages and disadvantages. Please find the examples of the repositories and corresponding code used for this purpose outlined below.
Both methodologies deploy identical source code located in the src directory. The deployment of the infrastructure is managed via bicep, and the pertinent templates can be found within the infra directory.
Using deployment template
One cool thing about this setup is that it lets the dev team have more control over how the app is deployed and set up. But, there’s a bit of a snag. Figuring out the yaml schema can be like trying to solve a jigsaw puzzle without the picture on the box. It’s hard to understand the purpose of the properties. In our journey, we looked at the properties from the ARM template schema (for containerapp) for guidance. It’s worth mentioning, the az cli create command could use ARM templates instead of bicep as seen here. A small caveat the team faced during the research – the ARM template and the YAML schema for deployment aren’t always in sync.
With this workflow, because the container app is created after a new version of the container is released, it always ends up in the ‘Provisioned’ and ‘Running’ state. That’s a big win since it allows for continuous monitoring.
Basically in our CD, we render a deployment manifest based on this template:
location: $LOCATION
name: $APPNAME
resourceGroup: $RG
type: Microsoft.App/containerApps
identity:
  type: userAssigned
  userAssignedIdentities: {
      '$MANAGED_IDENTITY_ID' # the identity that has pullrole from the ACR
    }
properties:
  managedEnvironmentId: $MANAGED_ENVIRONMENT_ID # environment from the bootstrap
  configuration:
    activeRevisionsMode: Single # we didn't need multiple, but in this workflow is achievable
    identity:
      userAssignedIdentities: $MANAGED_IDENTITY_ID # the identity that has pullrole from the ACR and to use in the registry property
    ingress:
      external: true
      allowInsecure: false
      targetPort: 3000
      transport: Auto
    registries:
      - identity: $MANAGED_IDENTITY_ID # the identity that has pullrole from the ACR
        server: $REGISTRYNAME.azurecr.io
  template:
    containers:
      - name: docusaurus
        image: $REGISTRYNAME.azurecr.io/docusaurus:$DOCS_VERSION
and finally deploying using the create option:
export RG=$(az deployment sub show -n docusaurus-aca-yaml --query 'properties.outputs.resourceGroupName.value' -o tsv)
az containerapp create -n "docusaurus" -g $RG --yaml ci/deployment.yaml| Pros | Cons |
|---|---|
| Control: The dev team gets to call the shots on how the app is deployed and set up. That’s a lot of power in their hands. | Know-it-all: The dev team needs to know a lot about the infrastructure they’re working on, which could be a bit of a learning curve. |
| Always Running: Because the container app is created after a new version is released, it always ends up Provisioned and Running. This keeps things going smoothly and allows for constant monitoring. | Puzzle Solver: The yaml schema is like a puzzle with missing pieces. It’s tough to understand the properties, which can slow things down. |
| Using Resources: The team uses properties from the ARM template schema to complete the yaml template. | Asking for Help: Depending on how much the dev team knows about the infrastructure, they might need to keep asking the operations team for deployment values. This could slow down the process. |
Sample code for this flow -> docusaurus-aca-yaml.
Using Update command
With this way of working, the ops team has clear tasks, which means the dev team doesn’t have to deal with tough setups when launching a new version of their app. See a tough setup as configuring a storage account for a shared folder for the container; or running the whole application in a private VNET; or a nice feature – running Dapr bindings. For these kinds of setups, the customer would like the ops team to create all the base infrastructure and bind the containerapp, allowing dev team to focus on the consumption not in the configuration. Plus, the ops team makes sure everything is safe from the get-go, so the dev team can focus on improving their app without worrying about the complicated stuff.
But, it’s not always easy. One issue we’ve found with this way of working is that it needs the container app to be in single mode when making changes. Which means, once the new container is deployed and in running state it will deactivate old revisions. More details can be found here or here. It’s worth mentioning the main reason why we needed to use single mode is because the initial revision from the bootstrap ends as Degraded, therefore the state of the containerapp will always have an issue (false positive). We would also need to manage traffic splitting across the revisions. Meaning, if you want one revision with 50% and a previous revision also with 50%, the developer will need to manage the revisions as part of the deployment. Remember the initial configuration is done at bootstrap, so the update command will update/create a new revision but won’t modify the traffic.
Also, as mentioned before, the container app might be in a ‘Degraded’ state. This usually happens because the port that’s configured in the containerapp ingress and the port used by the app that’s being built and launched doesn’t match. In our example, the built container runs in port 3000 while the sample app exposes port 80.
Basically the container app won’t be in a running state till we deploy the container. The reason behind is that the sample container exposes port 80 while the app exposes port 3000. Since the update command doesn’t allow updating the port, we had to live with it till the first deployment was done. A workaround is to create your own public image for bootstrapping that listens on the same port as your eventual private application image.
The CD step was quite simple:
export RG=$(az deployment sub show -n docusaurus-aca-azcli --query 'properties.outputs.resourceGroupName.value' -o tsv)
export ACR=$(az deployment sub show -n docusaurus-aca-azcli --query 'properties.outputs.containerRegistryServer.value' -o tsv)
az containerapp update -n 'docusaurus' -g $RG --image $ACR/docusaurus:$DOCS_VERSION| Pros | Cons |
|---|---|
| Simplified Deployment: The development team is spared from having to understand and handle complex infrastructure configurations. This allows them to focus on their main task, which is developing the application. | Single Mode Constraint: The requirement for the container application to be in single mode for the revisions may limit the flexibility and functionality of the workflow. |
| Clear Division of Responsibilities: The operations team and the development team have distinct roles, ensuring that each team can focus on their core competencies. | Port Discrepancy: The exposed port might differ from the port used by the application being built and deployed, potentially leading to communication issues or other conflicts within the application environment. |
| Enhanced Security: With the operations team managing the infrastructure from the outset, there is likely to be better control and implementation of security measures. | Bootstrap will be in a Degraded state because of the port misconfiguration. Containerapp update command doesn’t allow the user to modify the port. Therefore the bootstrapped infrastructure can be pointing to the wrong port of the sample container image. Even though the up command allows the user to modify the target port, it requires all the configuration and doesn’t seem to have the option to set the managed identity as the credentials to pull images from a private registry. |
Sample code for this flow -> docusaurus-aca-azcli.
Summary
We decided to go with the second approach (update command), the main reasons were:
- Clear distinction on the scope between development and infrastructure.
- Continuous Deployment was simple, just need the new image.
- Any new request for infrastructure could be done in the bootstrap place without having to modify the deployment.
- The team focused on the documentation creation instead of any update on the CD.
- The dev team didn’t have to get access to the managed identity
(Bonus) Using Azure Developer CLI (AZD)
During our engagement, we didn’t have the chance to work with Azure Developer CLI (AZD) as it was not yet generally available. However, during the sharing phase, we did manage to experiment with it to some extent. You can find a template for a similar scenario in this repository: docusaurus-aca-azd. If you take a look at the azure.yaml file, you’ll notice we included a prepackage hook to capture the version from the semantic release.
Despite the fact that this tool is designed with developers in mind, we identified a potential disadvantage related to the container creation process. We wanted to retain some degree of control over the container’s Continuous Deployment (CD), which we could only achieve by using hooks, leading to a somewhat unconventional setup. Even with this option on the table, we believe the team would have opted for the update command solution.