Background
We recently partnered with Ascoderu, a small non-profit using technology to help bridge the digital divide in rural communities in the Congo DRC. Ascoderu is building “Lokole”, a hardware access point and suite of open source Linux cloud services that enable people to have rich communications via email for as little as US$0.01 per person per day. Access to efficient communication technology is recognized as a key factor for sustainable development by the United Nations Sustainable Development Goal 9. Efficient communication has numerous valuable applications in unconnected rural sub-Saharan African communities, including improved access to education and medical resources, enabling the knowledge about bottom-up innovation to spread between communities, and creating opportunities for the creation of new small businesses.
The Problem
Being a small non-profit, one of Ascoderu’s main challenges is the continuity of software development staff. Volunteer developers, computer science student groups, tech-for-good hackathons, and open source events make great but short-lived contributions. Context and background are lost when these engineers move on to other priorities. As a result, it is essential for tasks such as deploying to production and infrastructure management to be as simple and automated as possible, to minimize the time it takes new developers to familiarize themselves with the development environment.
This article describes how we leveraged Azure Service Fabric to deploy and scale Ascoderu’s open source Python Linux cloud services with zero downtime, introducing no new technologies and only using the popular standard tool that the Ascoderu project already uses: Docker Compose.
Getting Started with Azure Service Fabric
Azure Service Fabric is a cluster management and service orchestration technology, similar to Kubernetes. As such, Service Fabric provides features such as:
- Distributing application containers across a cluster of multiple virtual machines.
- Scaling the cluster.
- Moving containers between hosts depending on resource utilization.
- Handling fail-over in case of issues with virtual machines.
- Managing rolling deployments to ensure up-time during application upgrades.
- Providing dashboards for cluster monitoring.
- Handling service discovery.
Service Fabric also provides advanced features such as distributed reliable collections and distributed reliable actors, but these are beyond the scope of the solution we built with Ascoderu.
Using Service Fabric adds no additional cost or fees; you only pay for the compute resources utilized in the cluster. To get started with Service Fabric, first create an Azure subscription and then install the system-level dependencies. For example, using Bash on the Windows Subsystem for Linux:
# install the azure command line tool (az)
# more details about the setup are available at https://aka.ms/install-az
curl -L https://aka.ms/InstallAzureCli | bash

# install the service fabric command line tool (sfctl)
# more details about the setup are available at https://aka.ms/install-sfctl
sudo pip install sfctl
Note that after signing up for your Azure subscription, if you’re a non-profit like Ascoderu, you may want to consider investigating the Azure non-profit program. The program grants $5,000 per year in free Azure credits to eligible organizations.
Now we’re ready to set up our first Service Fabric cluster. The code snippet below sets up a cluster with five virtual machines since that is the minimum recommended number of nodes for a production cluster to ensure reliability in the face of node failure and potential deployments happening at the same time. For a development cluster, a three-node setup is also supported.
# define variables to configure the service fabric cluster
cluster_name="myServiceFabric"
user_name="serviceFabricAdmin"
password="my_PassW0rD.123"
location="eastus"
certificate_folder="."

# for production, use at least five nodes to ensure reliability
# for development, three node clusters are also supported
cluster_size=5

# define the type and count of virtual machines used in the cluster
# the list of all SKUs is at https://aka.ms/linux-vm-skus
vm_sku="Standard_B2S"

# create a resource group that will hold everything related to the cluster
az group create --name "$cluster_name" --location "$location"

# create a new service fabric cluster
# access to the cluster will be secured via a self-signed certificate that
# also gets created by this command
az sf cluster create
  --resource-group "$cluster_name"
  --location "$location"
  --certificate-output-folder "$certificate_folder"
  --certificate-password "$password"
  --certificate-subject-name "$cluster_name.$location.cloudapp.azure.com"
  --cluster-name "$cluster_name"
  --cluster-size "$cluster_size"
  --os "UbuntuServer1604"
  --vault-name "$cluster_name"
  --vault-resource-group "$cluster_name"
  --vm-password "$password"
  --vm-user-name "$user_name"
  --vm-sku "$vm_sku"

# check the status of the deployment
# note that deploying a new cluster for the first time make 30+ minutes
# when the cluster is fully set up, the "clusterState" field of json
# output by the command below will no longer show as "Deploying"
az sf cluster show --name "$cluster_name"

# find the certificate file that is required to connect to the cluster
# note that the $certificate_folder also contains a PFX version of the
# certificate that can be used to install the certificate on Windows by
# double clicking the file
certificate_file="$(find $certificate_folder -name '*.pem' -print -quit)"

# from now on, we will use the service fabric command line tool (sfctl) as
# opposed to the more general azure command line tool (az) which we used above
# for setting up the cluster
# the sfctl tool is based on python and the requests library, so we need to
# enable python to find the certificate required to connect to the cluster
# which we do by setting the following environment variable
export REQUESTS_CA_BUNDLE="$certificate_file"

# connect to the cluster
# note that the no-verify flag needs to be passed since the command
# used above to create the cluster generated a self-signed certificate
sfctl cluster select
  --endpoint "https://$cluster_name.$location.cloudapp.azure.com:19080"
  --pem "$certificate_file"
  --no-verify

# verify that we were able to connect to the cluster
# this command should print json to the terminal
sfctl cluster health
After running the commands above, we can verify that the cluster was created successfully by logging into one of the cluster’s virtual machines. The machines in the cluster are all accessible via SSH on various ports exposed by the cluster gateway. For example, for a five-node cluster, the virtual machines can be accessed by connecting to the cluster gateway on ports:
- 3389
- 3390
- 3391
- 3392
- 3393
In general, all virtual machines in a Service Fabric cluster can be accessed by connecting to the cluster gateway starting at port 3389 with each following node offset by one port increment as shown in the five-node example above. So, for example, using SSH on Bash, we can connect to the first virtual machine in the cluster as follows:
# when prompted for a password, use the password configured via the $password
# variable earlier
node_port=3389
ssh "$user_name@$cluster_name.$location.cloudapp.azure.com" -p "$node_port"
After verifying that our Service Fabric cluster is operational, we’re ready to deploy our application to the cluster. We’ll describe this process in the next two sections.
Preparing Python Web Services for Azure Service Fabric

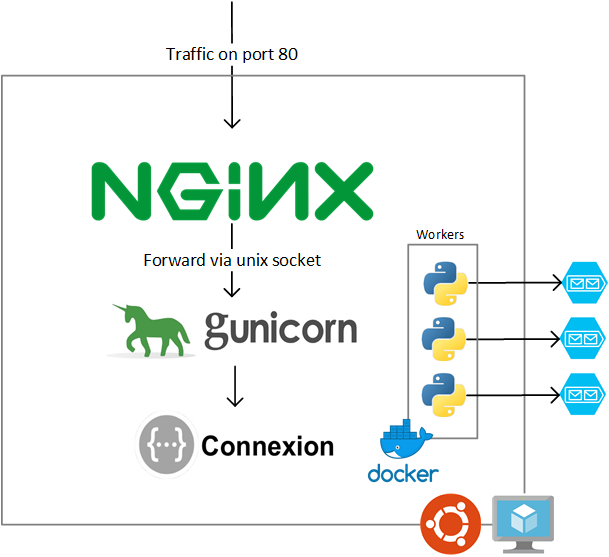
The diagram above shows the architecture of the Ascoderu cloud services before moving to Service Fabric. The architecture follows a standard Python web service model: a monolithic web application (in Ascoderu’s case written in the Flask-based Connexion framework) is run via a Gunicorn WSGI server behind a Nginx web server acting as a reverse proxy. There are also some Python background worker tasks, running in a Docker container, which consume messages from Azure Storage Queues. The web application adds messages to these queues.
Many Python applications follow the architectural pattern just described: a Python application, a WSGI server and a reverse proxy. This means that the steps for moving to Service Fabric and benefits of the switch outlined in this article will apply for many other use-cases and applications.
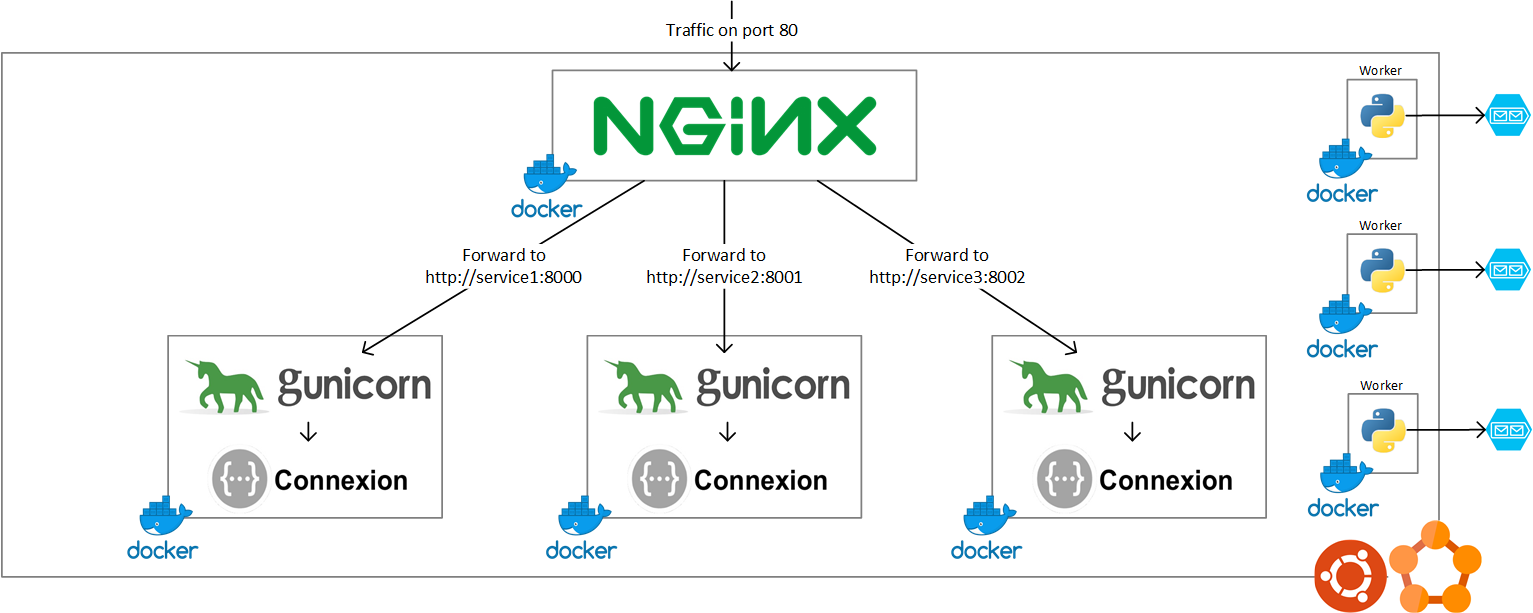
In order to fully leverage the benefits of a container management tool like Service Fabric, we made a few modifications to the architecture shown previously, namely:
- We split the background workers into multiple Docker containers.
- We made the Python web application run inside of Docker containers.
- We decomposed the web application into multiple smaller web services, i.e. we moved to a micro-services architecture.
The architecture resulting from these changes is shown in the diagram below. We’ll explain each change in more detail in the remainder of this section.

Splitting the background workers into multiple Docker containers was easy: we moved each worker into a separate Docker image, so that we have one image per queue in the system. In this way, we can increase the rate at which messages are being processed from the queue by starting more container instances of the Docker image responsible for handling that queue.
Similarly, splitting the web application into multiple smaller services was easy since Ascoderu’s application domain splits cleanly along three main axes, as identified by three top-level routes in their OpenAPI specification file. Each of these top-level routes was spun out into its own OpenAPI specification file (1, 2, 3) and then we used Connexion to automatically create a web service for each of these files. This approach enables us to scale the APIs independently based on the traffic patterns specific to that API.
After splitting the Python web application into independent components, we were ready to containerize the application. We built one Docker image for the Nginx reverse proxy and one for each of the Connexion web services defined in the paragraph above. The main change from the standard Python web service architecture described earlier was in the setup of the Nginx reverse proxy. Previously, Nginx and the single Gunicorn process were set up on the same virtual machine and were therefore able to communicate via a Unix socket. This communication method is very efficient in a single-host scenario. However, after the split into multiple independent containers, this method is no longer viable since the containers for the web service and the reverse proxy may be deployed to different hosts by our cluster manager. We thus changed the communication model between the Nginx frontend and the backend Gunicorn services to be via HTTP. Docker Compose can then be used to set up a network between the containers so that the reverse proxy can resolve the hosts for the backend services when forwarding requests. We’ll return to this topic in more detail later in this article.
Deploying to Azure Service Fabric via Docker Compose
After having set up our cluster and prepared our application to leverage the benefits of a container management tool, we are now ready to deploy the application to the cluster. At this point in a project, complexity often increases since many container management tools have their own domain-specific languages and abstractions that need to be learned. For simple applications like the one described in this article, this is often a large overhead.
Service Fabric addresses this complexity via a feature that enables deployment of applications via a Docker Compose file. As such, developers can leverage their existing Docker knowledge to drive Service Fabric without having to deeply learn a new technology for cluster management. The code snippet below shows how to deploy to a Service Fabric cluster via Docker Compose:
# define variables to configure the application deployment to our cluster
deployment_name="myApplication"

# copy values from cluster set up steps described earlier
cluster_name="myServiceFabric"
certificate_file="/path/to/certificate.pem"

# build and publish our application's containers
# so that the virtual machines managed by our service fabric
# cluster are able to pull down to the containers we'd like to run
docker-compose build
docker-compose push

# docker compose has support for pulling values from the environment
# see https://aka.ms/docker-compose-vars for more information
# however, the sfctl tool doesn't currently support this feature and it expects
# a full-formed docker compose file for deployments so we must create a new
# version of the compose file that has any environment variables replaced with
# their current values
deployment_compose_file="$(mktemp)"
docker-compose config > "$deployment_compose_file"

# connect to the cluster as previously described in the deployment section above
export REQUESTS_CA_BUNDLE="$certificate_file"
sfctl cluster select
  --endpoint "https://$cluster_name.$location.cloudapp.azure.com:19080"
  --pem "$certificate_file"
  --no-verify

# deploy the application containers defined by docker compose to the cluster
# for the first deployment, use the `sfctl compose create` command shown below
# subsequent deployments instead use `sfctl compose upgrade` with everything
# else staying the same
sfctl compose create
  --deployment-name "$deployment_name"
  --file-path "$deployment_compose_file"

# clean up files that are no longer necessary and wait for the application
# deployment to complete
# depending on the size of your cluster, the deployment may take a while
# you can monitor details about the deployment in the service fabric management
# portal by pointing your browser to
# https://$cluster_name.$location.cloudapp.azure.com:19080/Explorer/index.html
# note that this will prompt you to authenticate via the cluster certificate
# so make sure to install the certificate first, e.g. by double clicking on the
# certificate PFX file if you're on a Windows device
rm "$deployment_compose_file"
Note that Docker Compose is a technology that works with one host. Service Fabric, however, deploy services to multiple hosts (like Kubernetes or Docker Swarm). As such, some of the features in Docker Compose files may not be supported by Service Fabric and we have to implement workarounds for them. We had to make a few compromises and minor changes to our Docker Compose file and Nginx configuration to make them compatible with Service Fabric. We’ll describe these changes in detail in the remainder of this section.
A full list of all the features supported by the Docker Compose mode for Service Fabric can be found in the Service Fabric documentation.
Working around the “depends_on” directive
Service Fabric does not currently support the “depends_on” directive. In a standard web system architecture like the one described in this article, the “depends_on” directive is commonly used to ensure that the Nginx reverse proxy and downstream services are brought live together.
Given that the “depends_on” directive is not implemented in Service Fabric, it’s important to note that after a deployment, for a short period of time while the downstream containers are spinning up, you may experience HTTP 502 Bad Gateway errors when connecting to the Nginx reverse proxy.
It is possible to configure Service Fabric with custom health checks to ensure that the reverse proxy is started after the downstream services. However, for the application described in this article with relative infrequent deployments (on the order of weekly, not hourly or daily), we didn’t want to introduce this additional layer of complexity. We implemented a simpler pragmatic cloud-native workaround for this issue by adding retry logic in any clients that connect to the Service Fabric cluster to handle the deployment-related HTTP 502 errors.
Working around the “links” directive
Service Fabric does not currently support the “links” directive. In a standard web architecture like the one described in this article, the “links” directive in Docker Compose is commonly used to ensure that the Nginx reverse proxy is able to locate the downstream web service containers and forward requests to them.
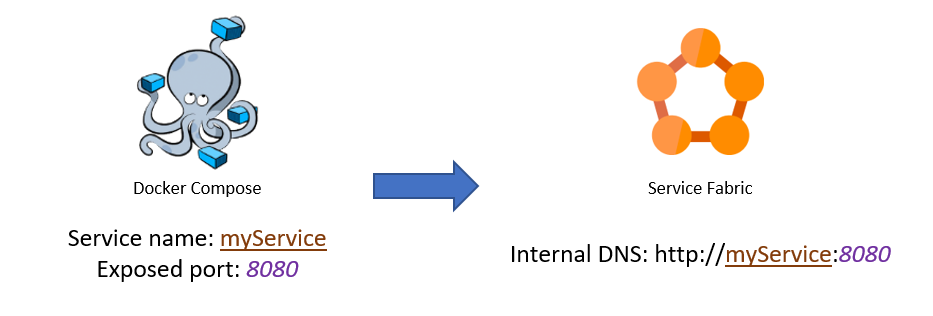
In order to replace the functionality of the “links” directive in Service Fabric, we use Service Fabric’s cluster-internal DNS service which automatically assigns a name to each container that is deployed via Docker Compose.
To activate the Service Fabric DNS service for a container, simply expose a port on the container in the Docker Compose file via the ports directive. Note that the exposed port must be globally unique. Service Fabric will then make the container accessible inside of the cluster by DNS name-matching the service name declared in the Docker Compose file. An example of the mapping between Docker Compose and Service Fabric DNS can be found in the diagram below.

An example Docker Compose file including the just-described changes to enable the Service Fabric DNS service can be found below:
# the snippet below is an excerpt from the file docker-compose.yml

version: '3'

services:

  nginx:
    # expose a port that will be accessed by clients via the cluster gateway
    ports:
      - 80:80

    # also keep the links directive although Service Fabric doesn't support it so
    # that when running locally via `docker-compose up` everything still works
    links:
      - downstream_service_1:downstream_service_1
      - downstream_service_2:downstream_service_2

    image: my_nginx_reverse_proxy_image

  # this service exposes a port so it will be made accessible via the Service
  # Fabric DNS service so that all containers can access this service by
  # talking to http://downstream_service_1:8000
  downstream_service_1:
    # ensure that the exposed port is globally unique
    ports:
      - 8000:80

    image: my_first_service_image

  # this service exposes a port so it will be made accessible via the Service
  # Fabric DNS service so that all containers can access this service by
  # talking to http://downstream_service_2:8001
  downstream_service_2:
    # ensure that the exposed port is globally unique
    ports:
      - 8001:80

    image: my_seceond_service_image

  # this service does not expose a port so it will not be accessible via the
  # Service Fabric DNS inside of the cluster, however Service Fabric will still
  # deploy, manage and run the container
  unrelated_container:
    image: my_third_service_image
After changing the Docker Compose file, we must update the Nginx reverse proxy configuration to include the new DNS name and port as shown in the configuration snippet below:
# the snippet below is an excerpt from the file nginx.conf

server {
  listen 80;

  location / {
    proxy_pass_header Server;
    proxy_set_header Host $http_host;
    proxy_redirect off;
    proxy_set_header X-Real-IP $remote_addr;
    proxy_set_header X-Scheme $scheme;

    location /path/to/api/root/for/first/service {
      proxy_pass http://downstream_service_1:8000;
    }

    location /path/to/api/root/for/second/service {
      proxy_pass http://downstream_service_2:8001;
    }
  }
}
A fully working example of this setup can be found in Ascoderu’s cloud services repository on Github in their Docker Compose file and Nginx configuration.
After applying the changes described above, we now have a Docker Compose setup that can run locally via docker-compose up while also being deployable to Service Fabric.
Note that Service Fabric also implements its own reverse proxy service. However, the reverse proxy service is currently only supported for Windows clusters. Once the feature is also enabled for Linux clusters, we could leverage the Service Fabric reverse proxy to simplify our architecture and replace our custom Nginx reverse proxy configuration with the one provided out of the box by Service Fabric.
Alternative hosting and deployment options
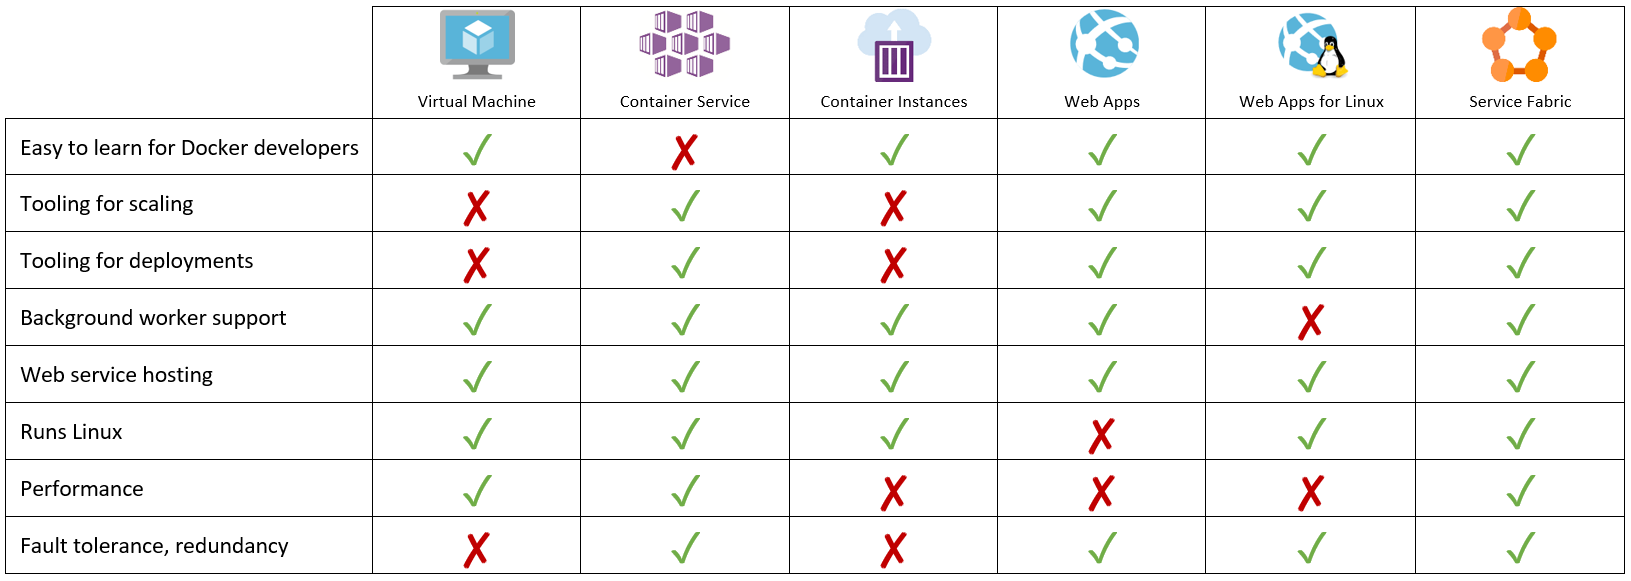
We investigated several alternatives to the hosting and deployment mechanism outlined in this article before settling on Service Fabric as the best choice for Ascoderu’s use cases. An overview of our investigation is shown in the table below and more in-depth discussion is provided in the following sections.

Azure Virtual Machine
Our engagement with Ascoderu started with a single virtual machine hosting all the components in their architecture, combined with some Bash scripts to set up a new virtual machine. This approach enabled Ascoderu to get up and running quickly; however, it didn’t offer any protection from failure via redundancy or self-healing, and deploying software updates was manual and complicated.
Azure Container Service (AKS)
Managed Kubernetes via Azure Container Service is a cluster manager that offers a very similar set of capabilities to Service Fabric. As such, it is a great choice for many projects since Kubernetes is a mature technology with a large ecosystem.
However, Kubernetes is a complex tool so there is a non-trivial barrier to entry for learning Kubernetes and all of its underlying concepts. This requirement presented an unacceptable cost for the Ascoderu project with its ever-changing volunteer developer base that includes individuals who may not be experts in DevOps.
Unlike Kubernetes’ steep learning curve, the Service Fabric deployment approach outlined in this article only requires a developer to be familiar with Docker. Docker is an easy-to-learn technology that developers from many backgrounds are already familiar with, so most people on-boarding onto the Ascoderu project will quickly be able to understand Ascoderu’s deployment pipeline.
Azure Container Instances
Azure Container Instances offers a simple one-click experience to getting a container spun up. The simplicity of the service is very attractive since all that is required to get a new container live is a single command in the az command line tool.
However, there is currently no built-in support for deploying code updates to Azure Container Instances beyond manually deploying a new container, updating any associated DNS records, and finally deleting the old container. As such, utilizing Azure Container Instances for the Ascoderu project would have meant building and maintaining a lot of continuous delivery and cluster management tooling that Service Fabric already offers. This was an unacceptable development overhead for Ascoderu who would rather focus their limited resources on their core product instead of building tooling.
Additionally, Azure Container Instances is primarily designed for one-time short-running containers. As such, running an always-on web service via Azure Container Instance is not economical since its pricing model makes this more costly than running a dedicated virtual machine. Furthermore, we also saw a non-trivial latency increase (on the order of 1 to 2 seconds) when connecting to the web services hosted via Azure Container Instances.
Azure Web Apps
Azure Web Apps is a simple way to get started with deploying web applications that also provides great tooling for continuous delivery, background jobs, and so forth.
However, Azure Web Apps runs on Windows hosts which is an environment that is not well supported by many Python libraries that Ascoderu relies on such as Gunicorn. There are workarounds for these limitations, such as by replacing the Gunicorn WSGI server with Waitress and using a custom deploy.cmd and web.config to configure Azure Web Apps for a production Python setup with virtual environments and so forth. However, this non-standard setup adds a non-trivial amount of complexity to the project. Additionally, Azure Web Apps doesn’t provide fine-grained control over the virtual machines that host the applications which negatively impacts performance (we saw latency increases of 3 to 4 seconds).
Azure Web Apps for Linux
Azure Web Apps for Linux works around some of the limitations we faced with Azure Web Apps by enabling developers to deploy their applications to Linux hosts while still benefiting from some of the same great tooling as Azure Web Apps.
However, at the time of writing, unlike Azure Web Apps, Azure Web Apps for Linux doesn’t have support for background tasks. This means that implementing the entire Ascoderu architecture described in this article would have required utilizing Azure Web Apps for Linux to host the web services plus additional technologies for running for the background workers. Adding multiple technologies to the mix increases complexity. With Service Fabric, we can use one tool to manage everything which simplifies on-boarding of new developers.
Summary
This article covered how to leverage the benefits of running a web service application on a cluster management tool (self-healing, load balancing, rolling deployments, fail-over management, etc.) without introducing complicated new technologies. We achieved this by deploying our application to a Service Fabric cluster via Docker Compose.
We found that Service Fabric is a great tool to manage a standard Python web application running in Linux containers on Linux hosts. Using this setup, the Ascoderu non-profit was able to reduce the complexity of their infrastructure management and simplify onboarding of new developers where previously deployments were a major time-sink and source of errors. In a follow-up article, we’ll cover how we extended this work to build a full continuous delivery pipeline for Service Fabric using Travis CI to further simplify the operations of the Ascoderu project.
The web application discussed in this article is based on standard technologies like Python, Nginx, Gunicorn and Docker. As such, the Service Fabric deployment techniques outlined in this article is generalizable to many applications. Give it a try and tell us about your results in the comments below!
Resources
- Service Fabric enabled Docker Compose file for Ascoderu project
- More information about Service Fabric
- More information about Docker Compose
- List of Docker Compose directives supported by Service Fabric
- Article on Continuous Delivery for Service Fabric and Docker Compose via Github and Travis CI
