
With 0.4.5 release of Azure IoT Edge Tools (Preview) for Visual Studio 2017, the tool has provided a rich set of functionalities to support development of IoT Edge solutions in Visual Studio 2017: 
- New Azure IoT Edge project targeting different platforms (Linux amd64, Linux arm32v7, Windows amd64)
- Add a new IoT Edge module (C#/C) to solution
- Edit, build and debug IoT Edge modules locally on your Visual Studio machine
- Build and push docker images of IoT Edge modules
- Run IoT Edge modules in a local or remote simulator
- Deploy IoT solutions to IoT Edge devices (with Cloud Explorer)
In the latest release, we’ve added the support for new platform arm32v7. Next, we’ll walk you through how to use Visual Studio 2017 to create, build, debug and deploy IoT Edge solutions for your Raspberry Pi as an IoT Edge device. Please refer the following tutorial links if you want to run IoT Edge on Linux amd64 or Windows amd64:
Use Visual Studio 2017 to develop and debug modules for Azure IoT Edge (Preview)
Easily Develop and Debug Azure IoT Edge C Modules with Azure IoT Edge Tools
Prerequisites
Setup your Raspberry Pi
- Install Raspbian on your Raspberry Pi by following this tutorial.
- Setup your Raspberry Pi as an IoT Edge device – Follow the instructions to install Azure IoT Edge runtime on Linux(arm32v7/armhf).
- Enable remote API for dockerdon Raspberry Pi:
- sudonano /lib/systemd/system/service to append -H tcp://0.0.0.0:2375 at the line starting with “ExecStart”: ExecStart=/usr/bin/dockerd -H fd:// -H tcp://0.0.0.0:2375
- sudosystemctl daemon-reload
- sudosystemctl restart docker
- Manage Docker as a non-root user on your Raspberry Pi, so that you don’t need to preface the docker command with sudo.
Setup your development machine
- OS: Windows 10
- Visual Studio 2017 with update 7 or later, including workloads “.NET desktop development” and “Azure development workload”; you should include “Windows desktop development with C++” as well if you plan to develop C modules.
- Download and install Azure IoT Edge extension (Preview) for Visual Studio.
- To use Docker Desktop for Windows, download and install Docker Desktop for Windows.
- Set up your local development environment to debug, run, and test your IoT Edge solution by installing the Azure IoT EdgeHub Dev Tool. Install Python (2.7/3.6) and Pip and then install the iotedgehubdev package by running the following command in your terminal. Make sure your Azure IoT EdgeHub Dev Tool version is at least 0.8.0.
- Upgrade Cloud Explorer to latest version by downloading and installing Cloud Explorer for Visual Studio 2017.
Configure the extension settings
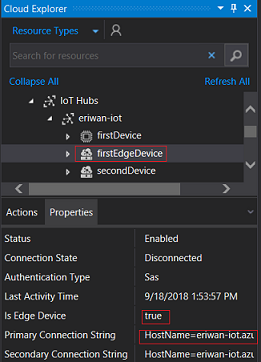
- Copy the connection string of any IoT Edge device from Primary Connection String in the Visual Studio Cloud Explorer. Be sure not to copy the connection string of a non-Edge device, as the icon of an IoT Edge device is different from the icon of a non-Edge device.

- Open Visual Studio 2017 and click menu Tools -> Azure IoT Edge Tools -> Setup IoT Edge Simulator, input the connection string you just copied from step 1.
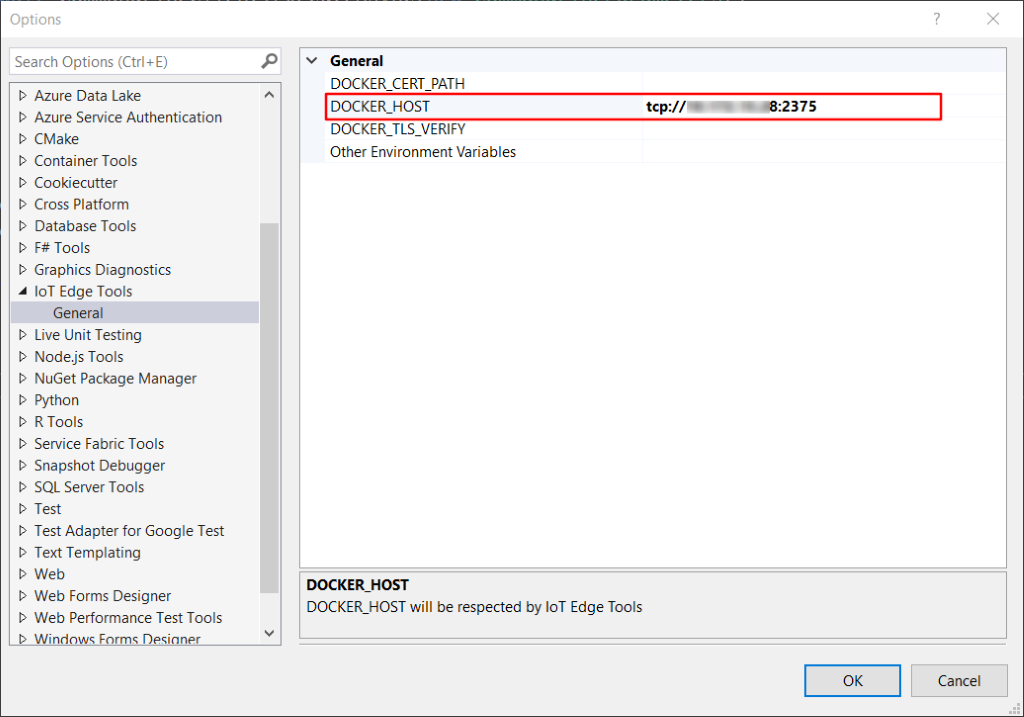
- Open Visual Studio 2017, click menu Tools->Azure IoT Edge Tools -> IoT Edge Tools Settings, set DOCKER_HOST as IP and port of your Raspberry Pi as below, for example it is tcp://10.172.14.127:2375 for my Raspberry Pi:

Create IoT Edge project
- Open Visual Studio 2017, click menu File -> New -> Project.
- In the New Project dialog, select Installed -> Azure IoT, select Azure IoT Edge (Linux arm32v7), enter a name for your project and specify the location, and then select OK. The default project name is AzureIotEdgeAppN where N is number.

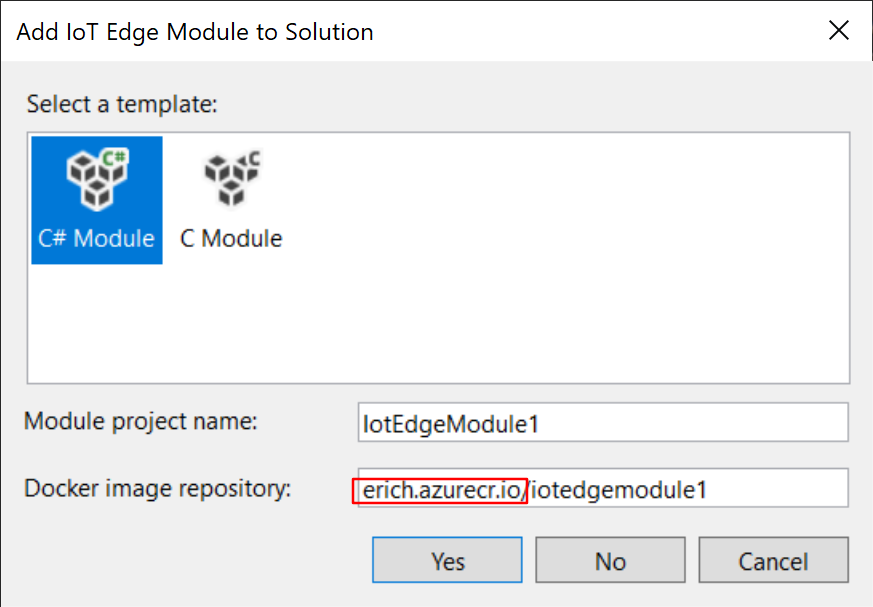
- In the project wizard, select C# Module, replace localhost:5000 with your own registry info, then click Yes:

- Now there’re two projects in the solution, one is Edge module project, which is just simple .Net Core project, the other is called Edge project.
- There’re two ways to add a new IoT Edge module to an existing IoT Edge project. The first way is to right click on IoT Edge project to open context menu, then select Add -> New IoT Edge Module; the second way is to right click on Modules node of IoT Edge project, then select Add -> New IoT Edge Module.


Build and debug C# module locally
To build and debug C# module locally, first set the Edge project as default project, then click F5, in the background we’ll start IoT Edge simulator on your local dev machine, the module project will be started as local process to communicate with IoT Edge simulator. You may set one breakpoint in Program.cs of IotEdgeModule1 project, the breakpoint should be hit as below:

Build and push C# images
- Right click on the Edge project to open context menu, then click men Properties, select Configuration Properties in the pop-up window, make sure you select Release for Target Configuration, click OK to close the window, then click menu “File -> Save All” to make sure the configuration change is written into project file.
- If you’re using private registry like Azure Container Registry, use the following Docker command to sign in to it. docker login -u <ACR username> -p <ACR password> <ACR login server>
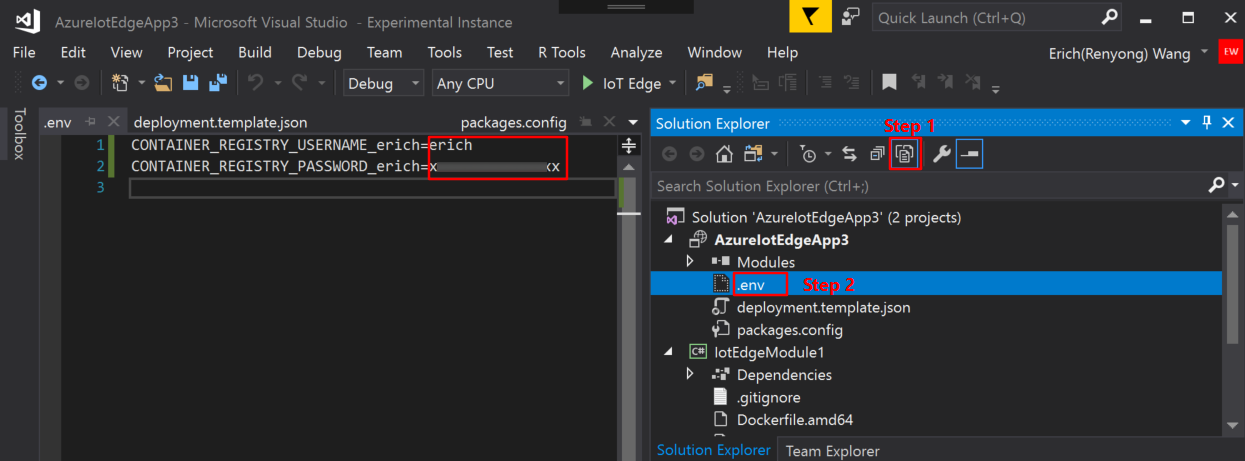
- Click Show All Files icon as below, a .env file should be displayed under Edge project, open the .env file to input credential for your registry, this credential will be used by IoT Edge run time to pull module images after deployment.

- Right click on the Edge project and select Build and Push Edge Modules to build and push the Docker image for the C# module. After running this command, the deployment manifest will be generated as well in config folder under the Edge project.
Deploy the solution
You can deploy modules using Could Explorer for Visual Studio. After finishing the above steps, you should have deployment.arm32v7.json.
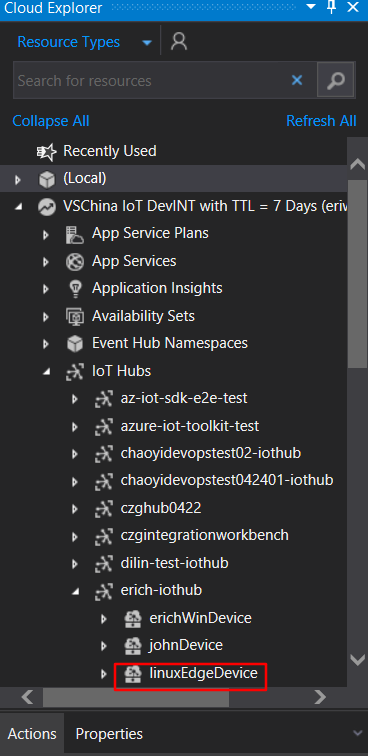
- Open Cloud Explorer by clicking View -> Cloud Explorer. Make sure you’ve logged in toVisual Studio 2017.
- In Cloud Explorer, expand your subscription, find your Azure IoT Hub and the Azure IoT Edge device you want to deploy.

- Right-click on the IoT Edge device to create a deployment forit, you need to select the deployment manifest file under the $AzureIoTEdgeAppSolutionDir\$AzureIotEdgeAppX\config\deployment.arm32v7.json.
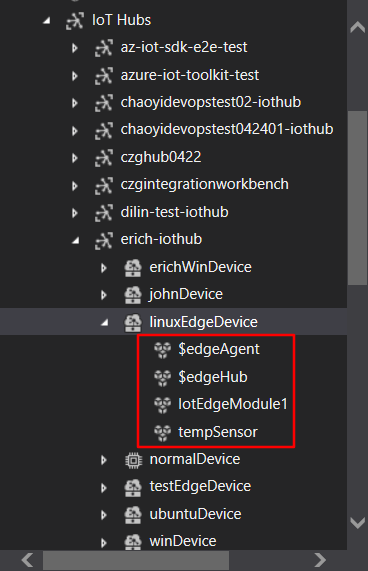
- Click the refresh button to see the new modules running along with the TempSensor module and $edgeAgent and $edgeHub.

View generated data
- To monitor the D2C message for a specific device in Cloud Explorer, select the device in the list and then click Start Monitoring D2C Messages in the Action window.
- To stop monitoring data, select the device in the list and then select Stop Monitoring D2C Messages in the Action window.
Please don’t hesitate to get it a try. Your feedback and suggestions are very important for us to keep improving and making it even easier to develop your IoT applications. Please share your thoughts with us by suggesting a feature or reporting an issue in our Visual Studio Azure IoT Edge Tools repo.
0 comments