

Astrophotography with Windows, Tiny PCs, and WPF
We’re off for the holidays, so I thought I’d take the time to talk about something fun: Astrophotography.
When I was around ten or eleven years old, I got an inexpensive Newtonian refractor for Christmas. It was good for visual use, and was super unstable on a pressed metal tripod, and was difficult to focus. But that didn’t stop me from standing out in the parking lot of our apartment complex, in the cold, to look at the moon and stars. The telescope was not very high power, so I couldn’t see much detail on the moon, but that didn’t stop me from being amazed at what I could see. This added to all the other space flight and astronomy stuff I had in my room, like the huge poster of all the rockets to-date, the models of the fairly-new Space Shuttle, my science fiction books, and more.
Disclosure: this post contains a number of third-party products. I paid full price myself for each of them. None were gifted or subsidized by Microsoft or any third-party. I did get a small discount on the first-party Surface Pro 8 as an employee of Microsoft.
I’ve always like astronomy, and wished it was the science I could have taken in college (rather than Physics) for my Computer Science degree. I just find it both beautiful and inspiring. I’m not interested in just seeing things, though. I want to share them with others, and then save them for future reference.
So, this summer, I started a journey into astrophotography. I’m still quite new to this, but have learned a lot, and also run across some very cool technology I wanted to share with you.
This post has several sections. First I cover some of the basics in astrophotography so you know which problems we’re solving, second I cover some hardware and my own setup, and then third, I get into the software used, including software built in .NET.
Key challenges in deep-sky astrophotography
First, a little background in the types of processes involved in astrophotography. Keep in mind that, like most things, these were handled manually in the past, or used analog processes.
It’s important to remember that the earth rotates, and at an angle. This is approximately centered around Polaris in the northern hemisphere. If you want to avoid streaked stars, and keep the same framing of the object you’re imaging, you want to use some variation on a German Equatorial Mount. (You can also use an automatic field rotator and an altitude/azimuth mount like many large observatories, but we’ll stick with the GEM approach here).
To use this kind of mount, you need to point the mount to (in the northern hemisphere) Polaris as closely as possibly. Once the mount itself is pointed to Polaris, it will be able to track deep sky objects correctly, keeping them in frame. This is super important for long exposures, which are often used for galaxy and nebula photos. In my own setup, each frame is typically 3-5 minutes long. Polar alignment is a manual process, involving tweaking adjustment screws on the mount until Polaris is within some error margin of center. You can do this completely manually with a polar scope, or you can use software which helps you out by telling you how well you’re doing. If you want to learn more about Polar Alignment, there’s a great article here.
Polar alignment is just one aspect of proper tracking of an object. Most mounts are able to use time-based algorithms to track an object in the sky. I use this for tracking the moon, but it also works well for planets. But because alignment and tracking always have a margin of error (including the fact that Polaris isn’t at 100% center of rotation), and due to things like wind, vibration, any instability in the mount due to mechanical or balance issues, etc. you typically use an autoguider to help with keeping the object in the exact center of the screen. There are multiple ways to do this, but a common approach is to use a smaller guide telescope attached to the main scope, a black & white camera, and software such as PHD2 to latch on to a star and send commands to the mount to make micro adjustments.
Another important process is Plate Solving. Plate Solving is when you take an image, and then identify through the positions of the stars, the location and orientation of what the scope is imaging. As you can imagine, this is an ideal situation for software to step in and handle the plate solve for you. And, that’s exactly the case. There are many plate solvers out there, including online ones. Each one has different strengths and weaknesses. Some use more compute power, some are more accurate in different situations, etc.
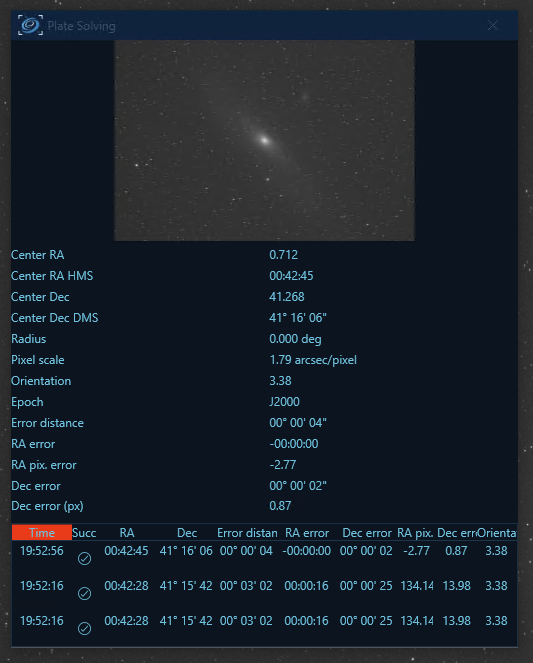
Plate solving is also important for coming back to teh same target over multiple days, months, or years, which is quite common for faint deep-sky objects. With good plate solving, you can ensure the framing is identical, maximizing the usable frame content from session to session.
Ok. So how is this handled today?
Modern deep-sky astrophotography
First, it helps to describe a bit how astrophotography works these days. There are many more types of telescopes, mounts, and imaging devices compared to what was available when I was a kid. Sometimes it can be a bit overwhelming, but the way everything works together is akin to the revolution in CNC machining and 3D Printing vs manual approaches. Technology previously available only at the observatory level is now available to consumers and hobbyists everywhere.
The mount
I had mentioned the mount and how it needs to be able to track the object. It also needs to have manageable backlash (similar problem to CNC where software or hardware compensate for backlash) and some basic brains. Additionally, you need to be able to polar align it if it’s an equatorial mount.
There are two schools of thought here. The first is to use the brains in the mount to do everything. The second is to ignore those brains and have it all handled by a separate PC. I chose the latter option for most of my imaging, except for when I record video of the moon.
Imaging
It’s no surprise that digital imaging is where it’s at for astrophotography. What surprised me when I first got into this was that using my crop-sensor DSLR wasn’t the best approach for deep-sky astrophotography. First, unless the camera is modified, there are wavelengths of light it simply doesn’t capture. Second, because it’s not designed for hours of long exposures, sensor heat starts to cause noise and patterns in the resulting image.
You can buy modified DSLRs (or make your own) but there are also dedicated astrophotography cameras. Deep sky cameras are cooled, and planetary cameras are generally less expensive and not cooled, but they are faster and (usually) lower resolution. Originally, the cameras were CCD. These days, most are CMOS technology.
Don’t get me wrong: many people use DSLRs for astrophotography and do quite well. Many are modified and able to pick up different wavelengths.
There’s one additional reason why dedicated cameras have been popular: resolution. But wait! Aren’t DSLRs high resolution? Yes, many of them are. But those are color cameras and so you don’t have the same long-exposure electron-capturing capacity that monochrome astrophotography cameras have. The reason for this is due to how color cameras have thousands of tiny filters over the sensor, each a single color. Typically, this is Red, Green, Green, Blue (yes, two green pixels). So if you want to capture, say, Red electrons, you are only use effectively one quarter of the sensor elements.
The filter over the elements is called a Bayer filter.
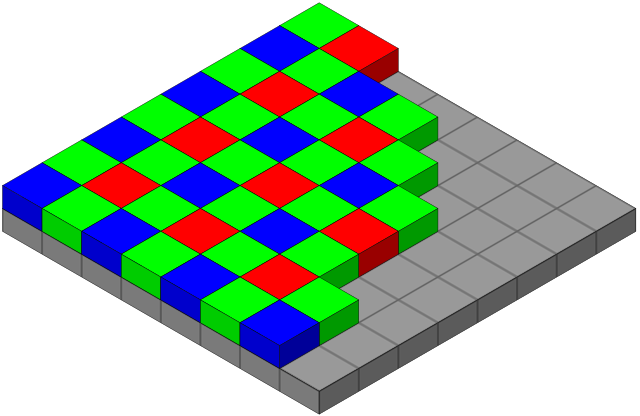 Image By Cburnett – Own work, CC BY-SA 3.0, https://commons.wikimedia.org/w/index.php?curid=1496858
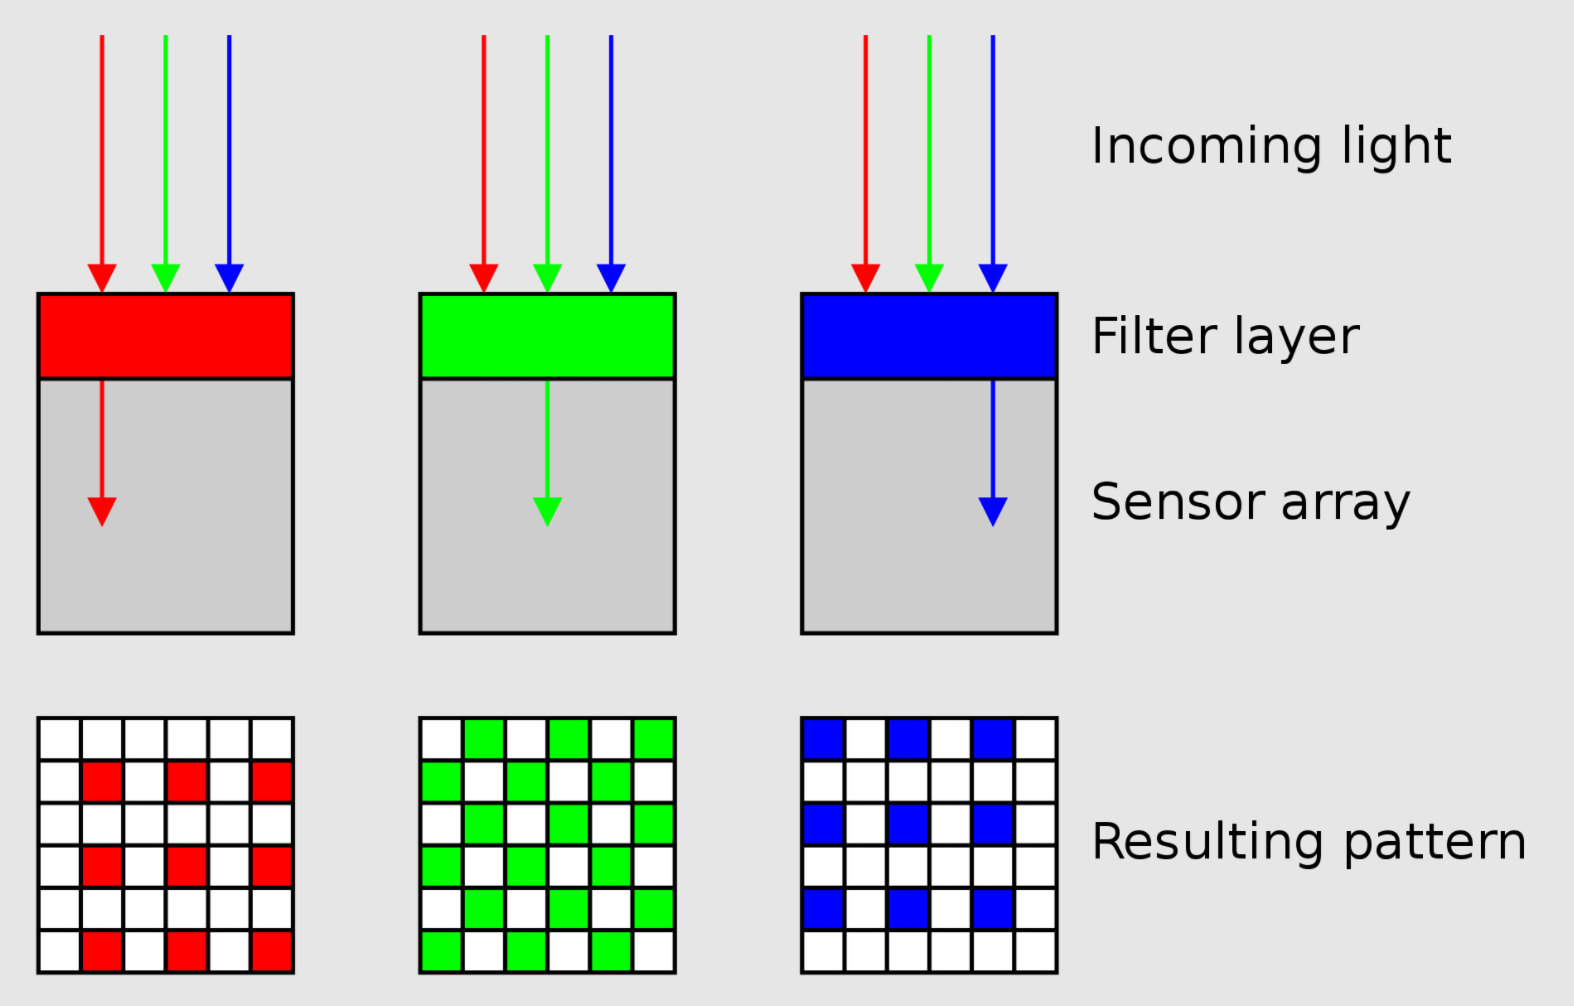 Image By Cburnett – Own work, CC BY-SA 3.0, https://commons.wikimedia.org/w/index.php?curid=1496872
The fewer electrons you capture in any given time, the longer you have to expose.
The alternative is to use monochrome cameras with filters. This means you need to take multiple exposures (at least one per color plus luminance), but you get to use the full capacity of the camera. Additionally, you can use narrowband filters and properly capture wavelengths like Hydrogen Alpha, Oxygen III, and Sulfur II at full resolution.
I just did a horrible job explaining that, but there are other explanations on the web which do a better job. Here’s the astrobackyard explanation.
The brain behind it all
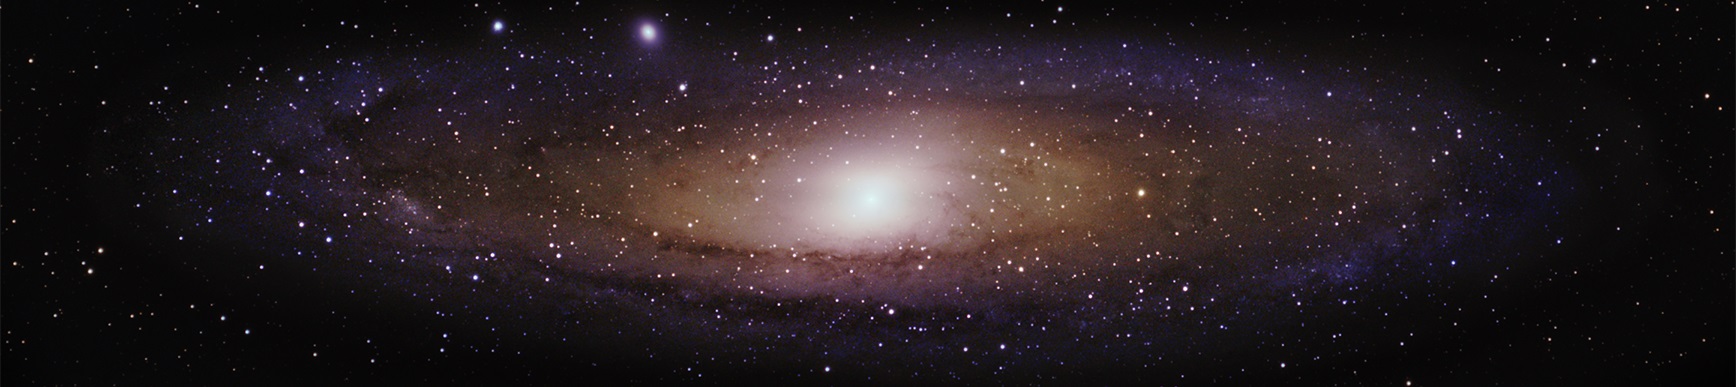
All of the processes require computing power. Plate solving, constant tracking of a star and adjusting the mount position, switching the powered filter wheel, handling auto-focus, and controlling the camera and saving photos. Additionally, there are processes like the meridian flip which need to be handled correctly. This is the process which repositions the telescope when the object being photographed or observed passes over the halfway point in the sky. Here’s a flashlight-lit video of my setup automatically handling this while photographing the Andromeda Galaxy (M31)
In this video, I was imaging in RGB, so I didn’t want any lights on outside, ergo the flashlight-cam. I’m thinking of putting an IR camera out there, so I can watch the scope at night, as my filters all block IR light.
There are lots of options here
- USB-connected laptop
- Raspberry Pi and dedicated astro software, with an external phone or tablet for the UI
- Embedded PC with an external laptop, desktop, or tablet for ease of control
The USB-connected laptop works, but it requires you to sit at the telescope. In the summer, that’s probably not a problem, but in the winter, when skies are clearest, that can be a chilling experience. You also have to be concerned with the USB tether, and always aware of pulling on it (which is enough to cause the scope to move when looking at deep sky images at long focal lengths), or getting it tangled during a slew or flip. Nevertheless, it’s a workable low-cost approach which makes use of equipment you already have. If you go that route, I recommend you put a small USB-3 hub on the scope, and then have a single USB cable going to the PC.
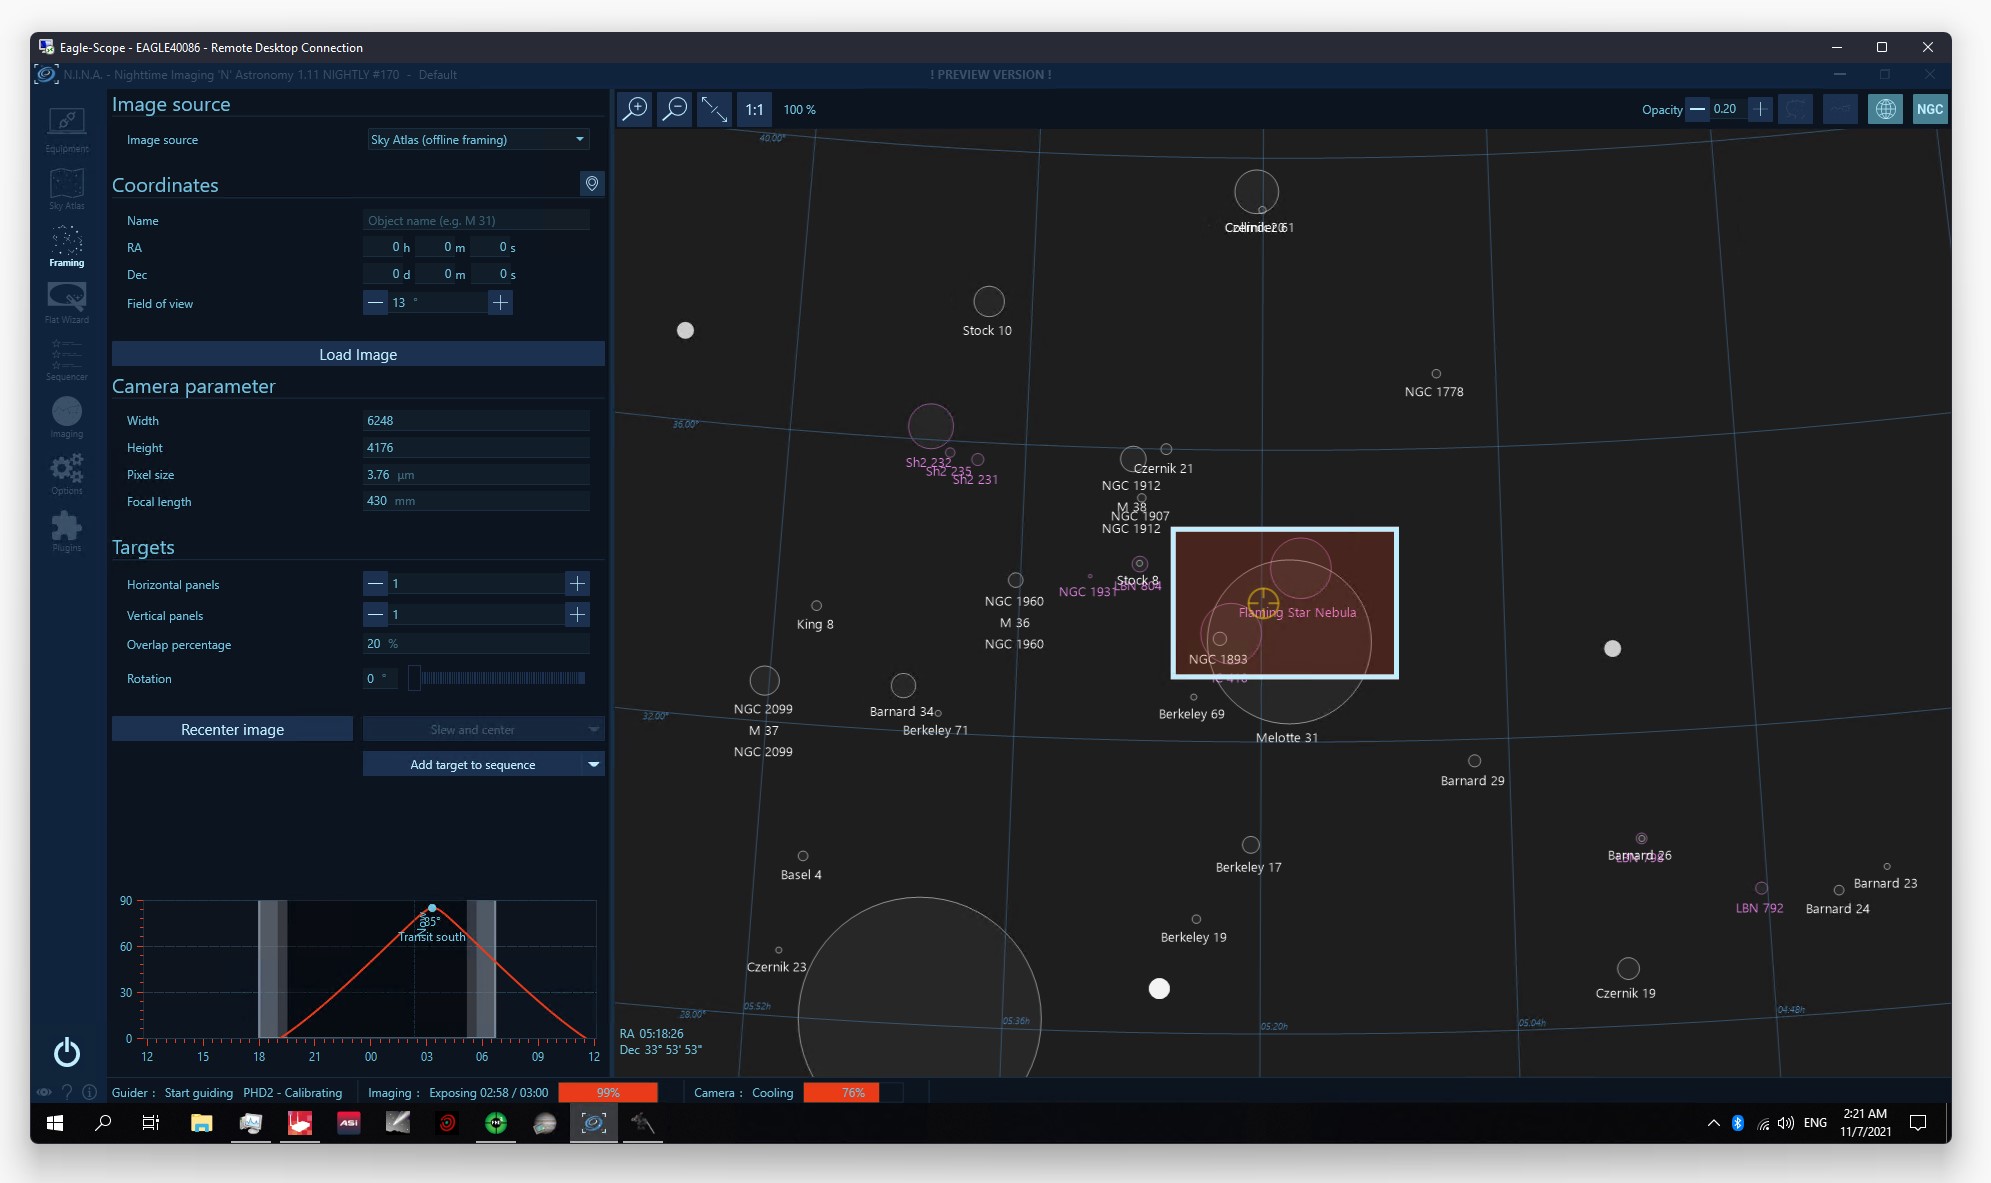
The Raspberry Pi approach also works well. But you have fewer choices in software you can run. This is how I originally started. I quickly found that I wanted to run different software, and have more options available to me. The equipment I used was the Raspberry Pi-based ASI Air Pro, and an iPad for the UI. The ASI Air is great, but locks you into the ZWO ecosystem for focusers, cameras, filter wheels, etc. There are also open source alternatives which support more hardware on the Pi.
The third option is very popular and gives you the best of all worlds. In this case, you have a mini/embedded PC on the mount itself, and you connect to it wirelessly from another PC, Mac, or iPad using Remote Desktop or similar. This has the benefit of keeping the wiring on the telescope compact and less likely to tangle on a slew or flip, and also gives you options on where to locate yourself while imaging.
My setup
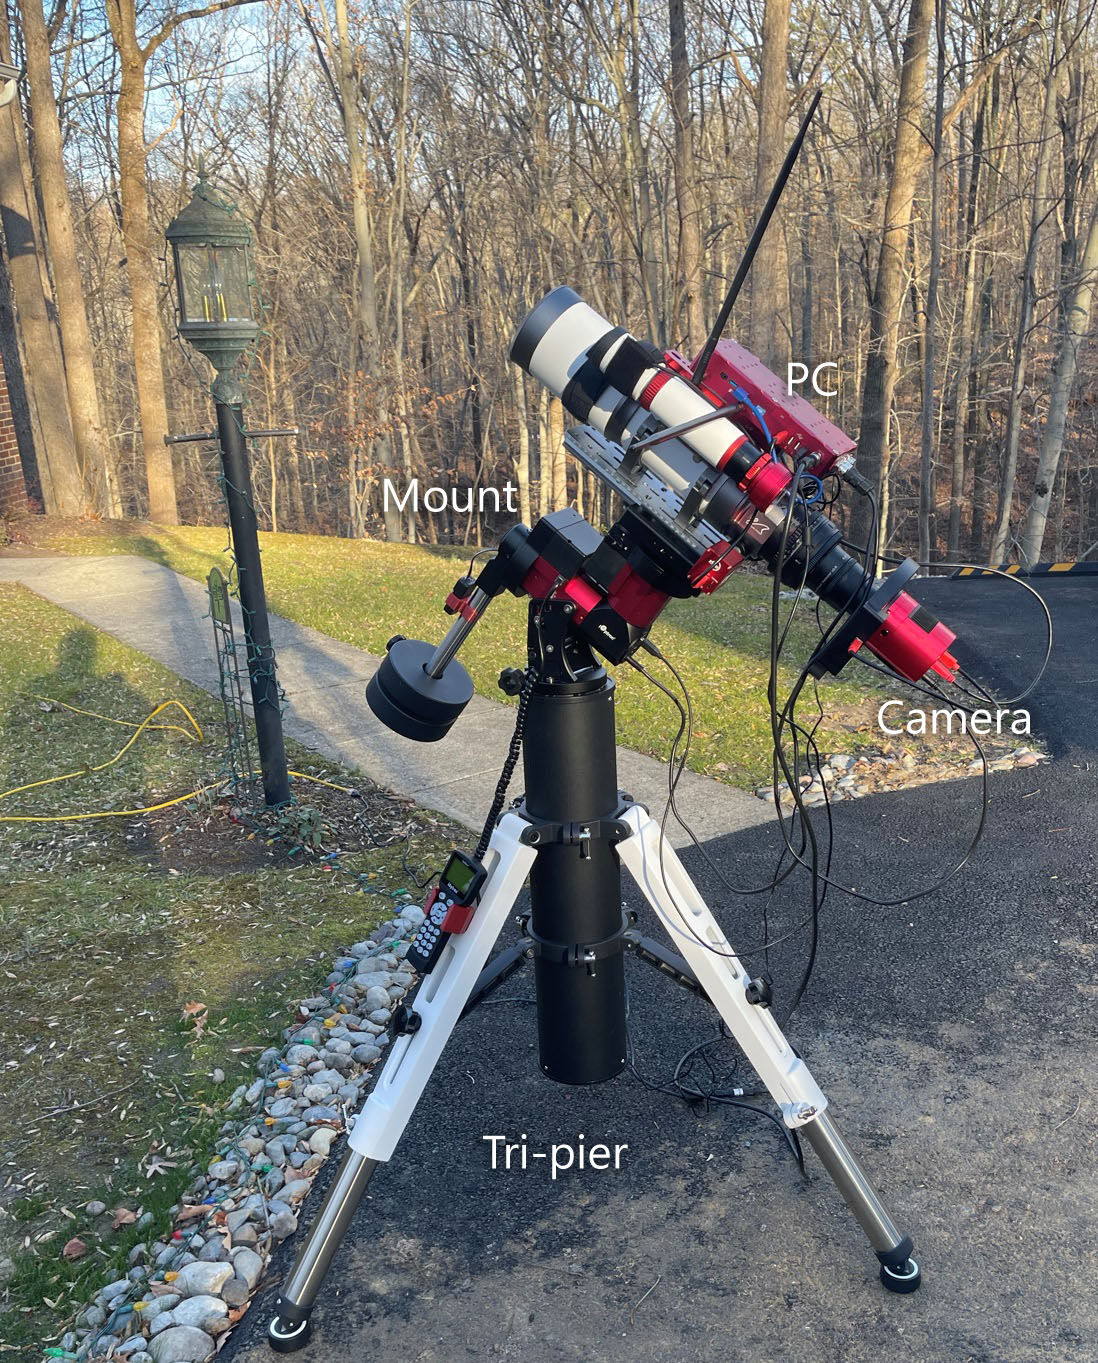
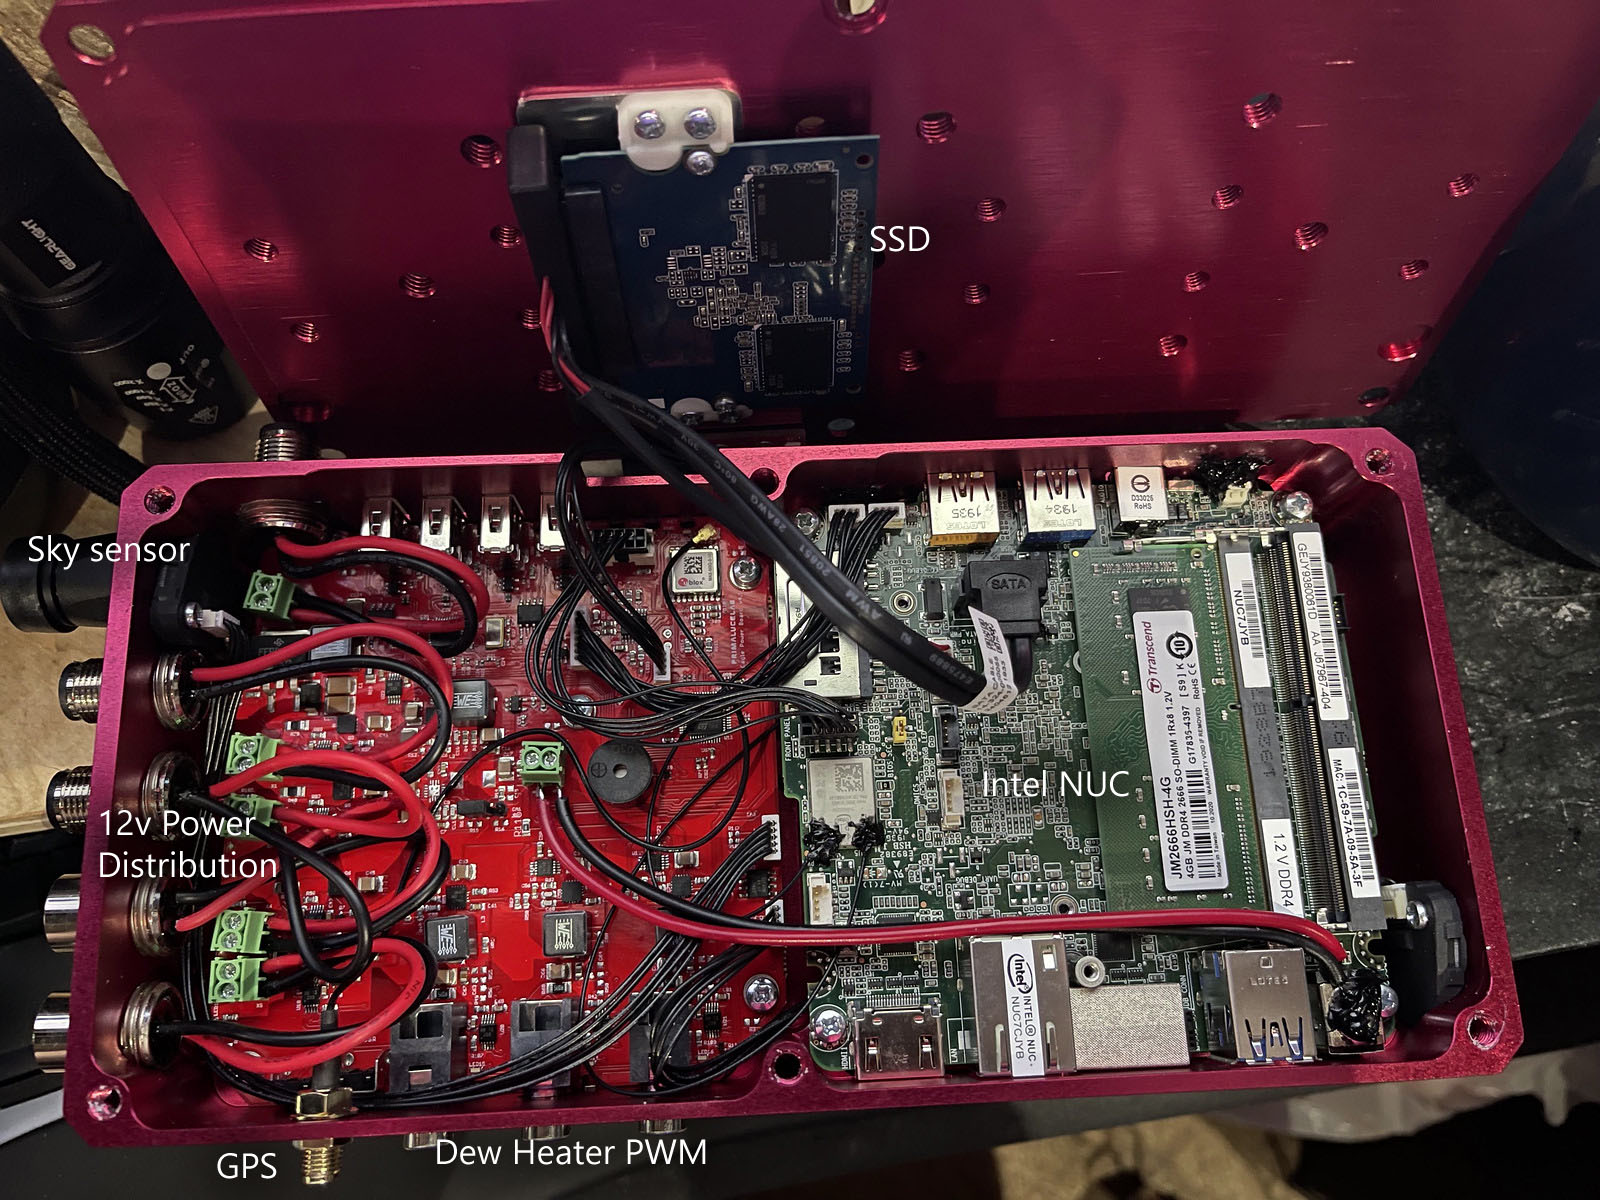
In my setup, I have an embedded PC on the mount, running Windows 10 Enterprise LTSC. It’s a PrimaLuceLab Eagle 4 dedicated astro computer. Inside, it has the motherboard of a Celeron-based NUC, and also a second board which handles GPS, power distribution, control of the dew heaters, and more. The aluminum case it’s in is designed to be an integral part of the setup, easily mounted above or below the telescope optical tube.
Here’s what it all looks like, set up at the edge of my driveway at home:
When I’m at home, the embedded PC is on my home WiFi network, and I control it from my main PC while in the house, and my Surface Pro 8 while outside with it (for polar alignment, for example). When I pack it up and travel to another site, I use my Surface Pro 8 exclusively to control it, connected via an ad-hoc wireless network. I originally tried connecting to it with my iPad Pro over RDP (same iPad I previously used to connect to the ASI Air), but found that experience to be pretty poor (glitchy RDP, no mouse/trackpad, slow). Once I moved to a regular PC, the experience was much better for me.
Here’s the full list of everything I use hardware-wise:
| Component | What I use |
|---|---|
| Optics | William Optics Fluorostar 91 w/reducer |
| Filter Wheel | ZWO 7-position automated filter wheel (50mm/2″) |
| Filters | Astronomik Deep Sky Red, Green, Blue, plus MaxFR Ha, and L1 luminance (Astronomik Oxygen III and Sulfur II filters are on order) |
| Main Camera | ZWO ASI2600MM Pro |
| Focuser | ZWO EAF (I have a moonlight focuser/rotator on order) |
| Guide Scope | William Optics 50mm guide scope |
| Guide Scope Camera | ZWO ASI178MM |
| Control PC | PrimaLuceLab Eagle 4 (Celeron version) |
| Mount | iOptron CEM40 Goto mount |
| Mount Support | iOptron tri-pier |
| Battery for travel | Bluetti EB70 |
| Other | Misc hardware, two dew heaters, some 3d-printed brackets, etc. |
The telescope is not a long focal length / high magnification one. That’s on purpose. As it turns out, most deep sky objects are actually quite large. If our eyes could take in light for more than a fraction of a second, like you can with a camera and telescope, the sky would be filled with galaxies and nebulae. Now, if you want to image planets, or tiny galaxies, then yes, a longer focal length / higher magnification would be helpful.
If you are getting into astrophotography, don’t get a high focal length telescope as your first scope. The reason is those are much more sensitive to proper polar alignment, and the quality of your mount/tripod setup. Instead, aim for something in the 200mm to 550mm range for focal length. Additionally, you’ll want something fast, but not too fast, to start. In this case, something in the f/4 to f/7 range (note that focal ratios here don’t mean the same thing they do in regular photography). There’s a lot more to say about all this, but in summary, higher focal lengths (more magnification) are harder to start with, and not great for most deep sky imaging. My William Optics FLT91 (without reducer) comes out to 540mm at f/5.9. However, I always use it with the 0.8x reducer which comes to 432mm f/4.75.
Here’s the setup as a diagram.
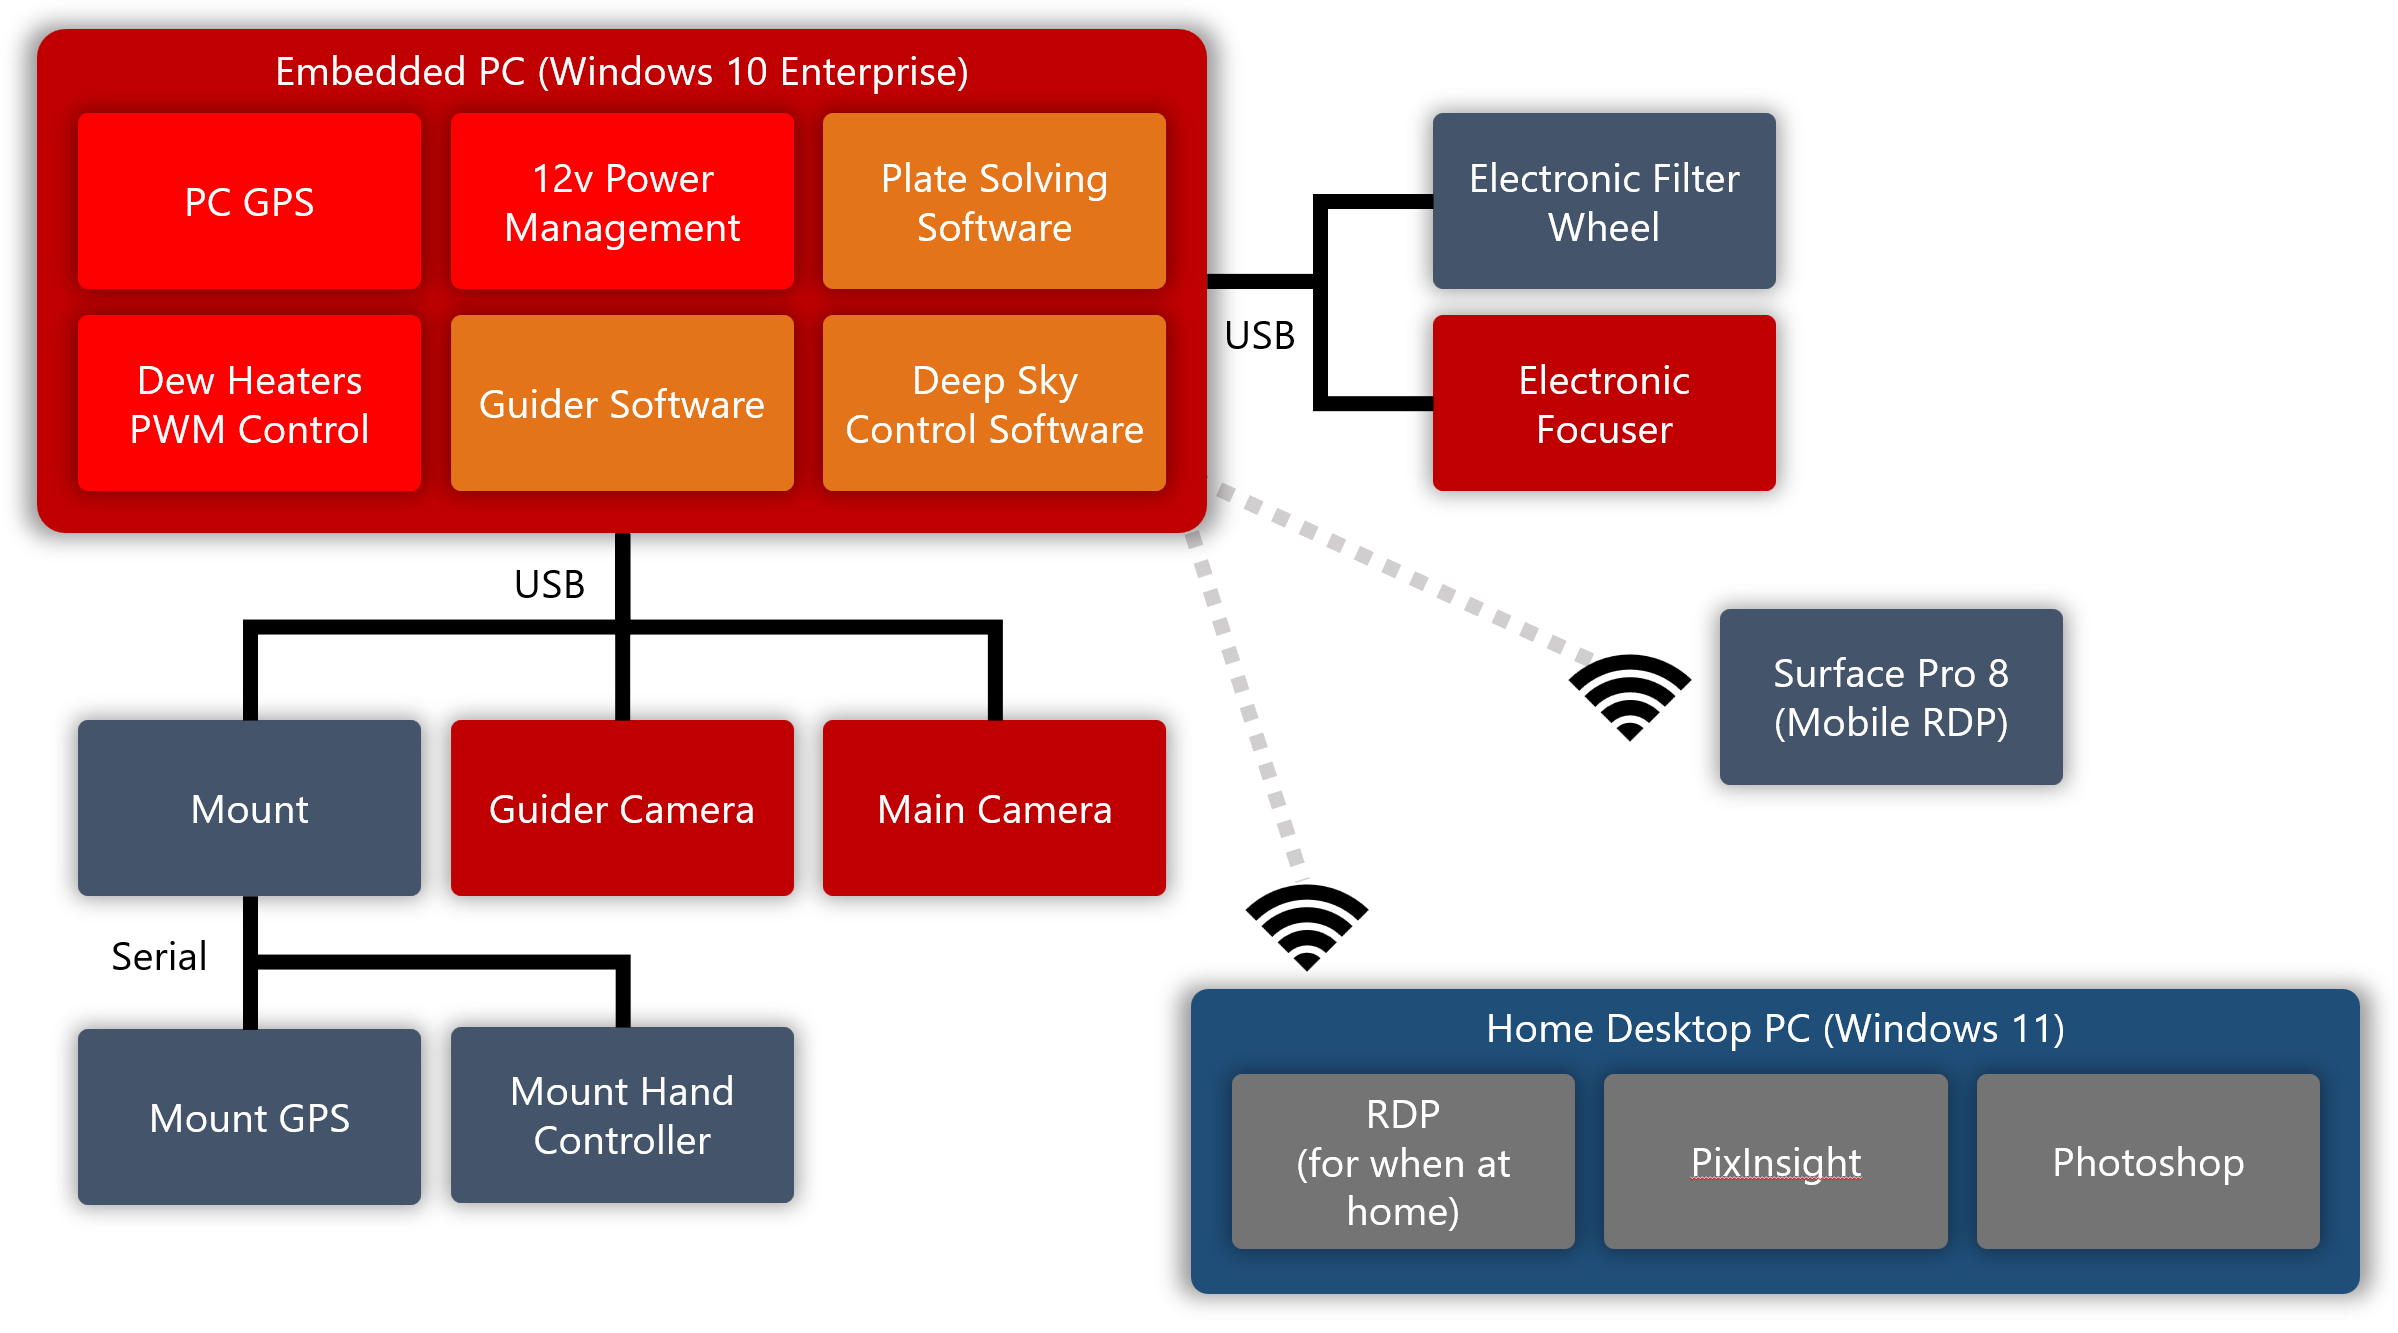
The key thing to note is that the PC on the telescope is responsible for everything on the scope. This includes guiding, capturing, etc. To interact with the applications on it, I remote into that PC using either my desktop (if at home), or my Surface Pro 8 (if remote, or outside doing polar alignment). I don’t need to stay connected to the scope while it’s imaging, but I tend to do so anyway to monitor progress, and also to stop imaging if clouds roll in, or the field of view gets blocked by a tree or something.
Here’s a quick photo of when I was remoting in from my truck, using my Surface Pro 8. One reason I like to use my Surface for this, is that I can charge it using USB-C in my truck or the field battery when I’m out imaging.
In praise of tiny and embedded PCs
As an aside, I’d like to point out just how many choices there are for tiny PCs these days. I’m not even talking about the ones that are a dongle you plug into the HDMI port in the back of the TV, but fully-functional PCs with network ports and/or WiFi, USB3 ports, and more.
It was the Intel NUC which really popularized this form factor. Others in the embedded world have since taken it on and created tiny PCs suitable for astrophotography, robotics, home theaters, and more. In some cases, these are air-cooled Intel processor PCs, without any moving parts. In others, there’s a small fan. In most, you can add on a SATA SSD, or an M2 drive for storage, upgrade memory, and more.
Here’s what the Eagle 4 looks like inside, before I upgraded memory and SSD.
I have three PCs like this in use right now.
- The PrimaLuceLab Eagle Windows 10 PC on my telescope
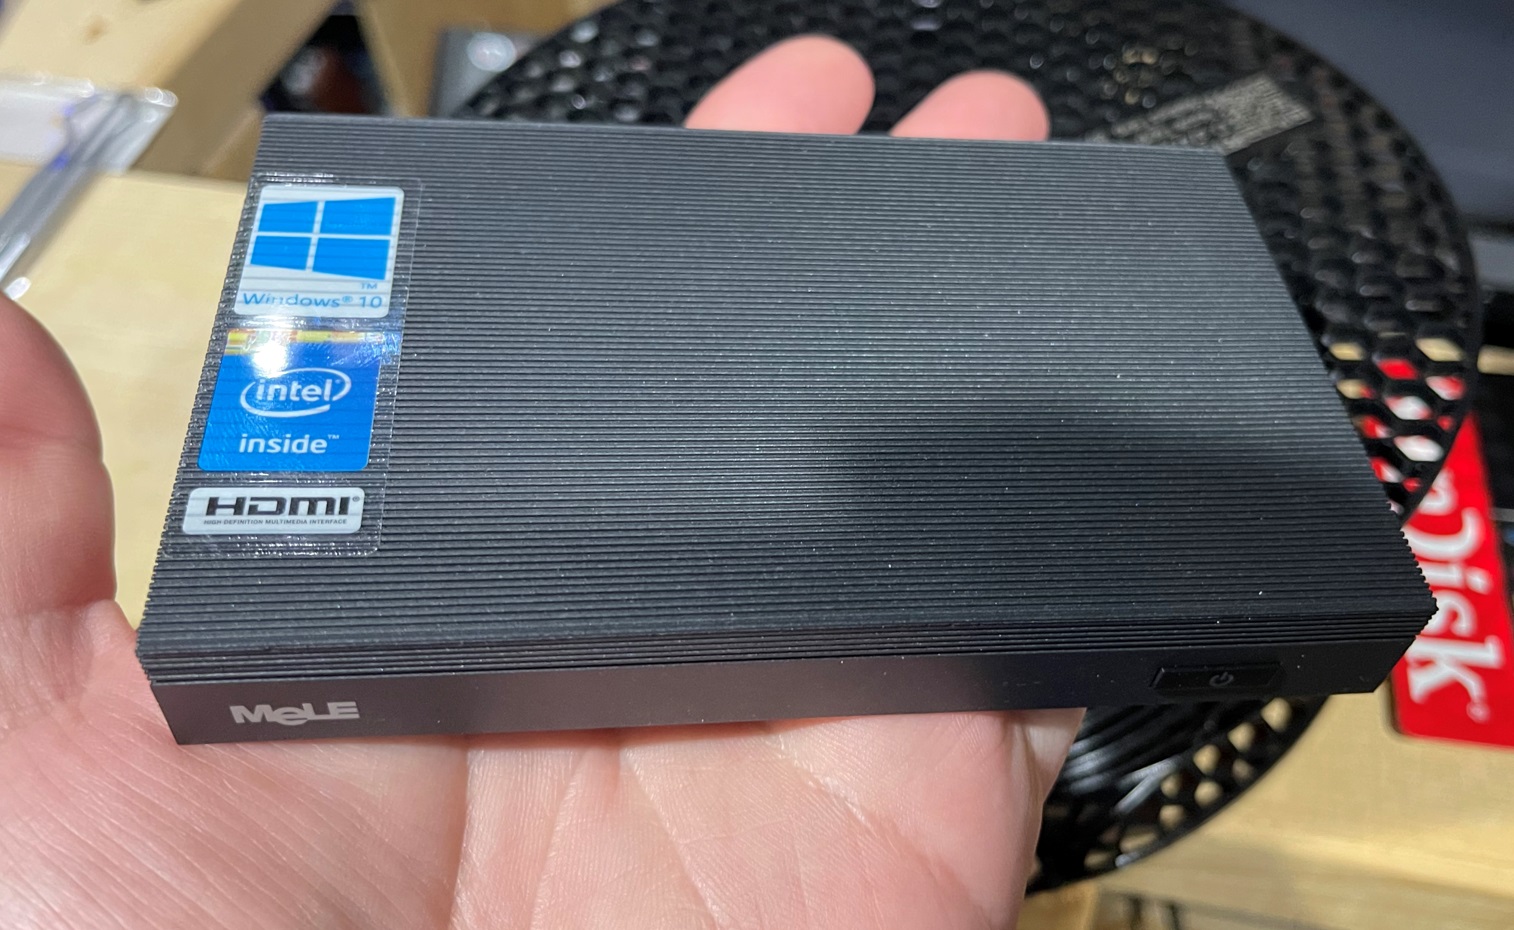
- A second MeLe Windows 10 PC I’m evaluating for telescope control for another telescope (you can’t have too many telescopes)
- A small fanless i5 running Ubuntu in my network rack, running the Pi-hole software which used to be on a (died in service) Raspberry Pi.
The Eagle is nice, but expensive for the processing power (you’re paying for the form factor, software, and additional control board). If you don’t need the additional hardware and case in something like the Eagle, you can get one of these tiny PCs for usually less than $300. If they run on 12v and have enough USB3 ports for the equipment, that makes them suitable for use on a telescope. You can have other voltages, but that makes battery use in the field more trouble. For power management and dew heater control, you can always pick up something like the Pegasus power boxes.
The software
Software plays an enormous role in all this. Not only do you need software to control the devices during imaging, but also for post-processing after the images are captured. Here’s what I use:
Software on the telescope:
| Role | What I use |
|---|---|
| Main control | N.I.N.A. with three-point polar alignment plugin |
| Plate-solver | ASCAP Solver |
| Guider | PHD2 |
| Planetary/Lunar Imaging | SharpCap |
| Drivers | ASCOM drivers and platform |
Software I bring with me when setting up and imaging in the field:
| Role | What I use |
|---|---|
| Sky Atlas | Sky Safari Pro on iPhone |
| Remote | Remote desktop on Surface Pro 8 |
| Other | Stellarium+ and SkyView on phone |
Processing software on my beefy desktop PC at home:
| Role | What I use |
|---|---|
| Stacking | PixInsight |
| Processing | PixInsight, Photoshop |
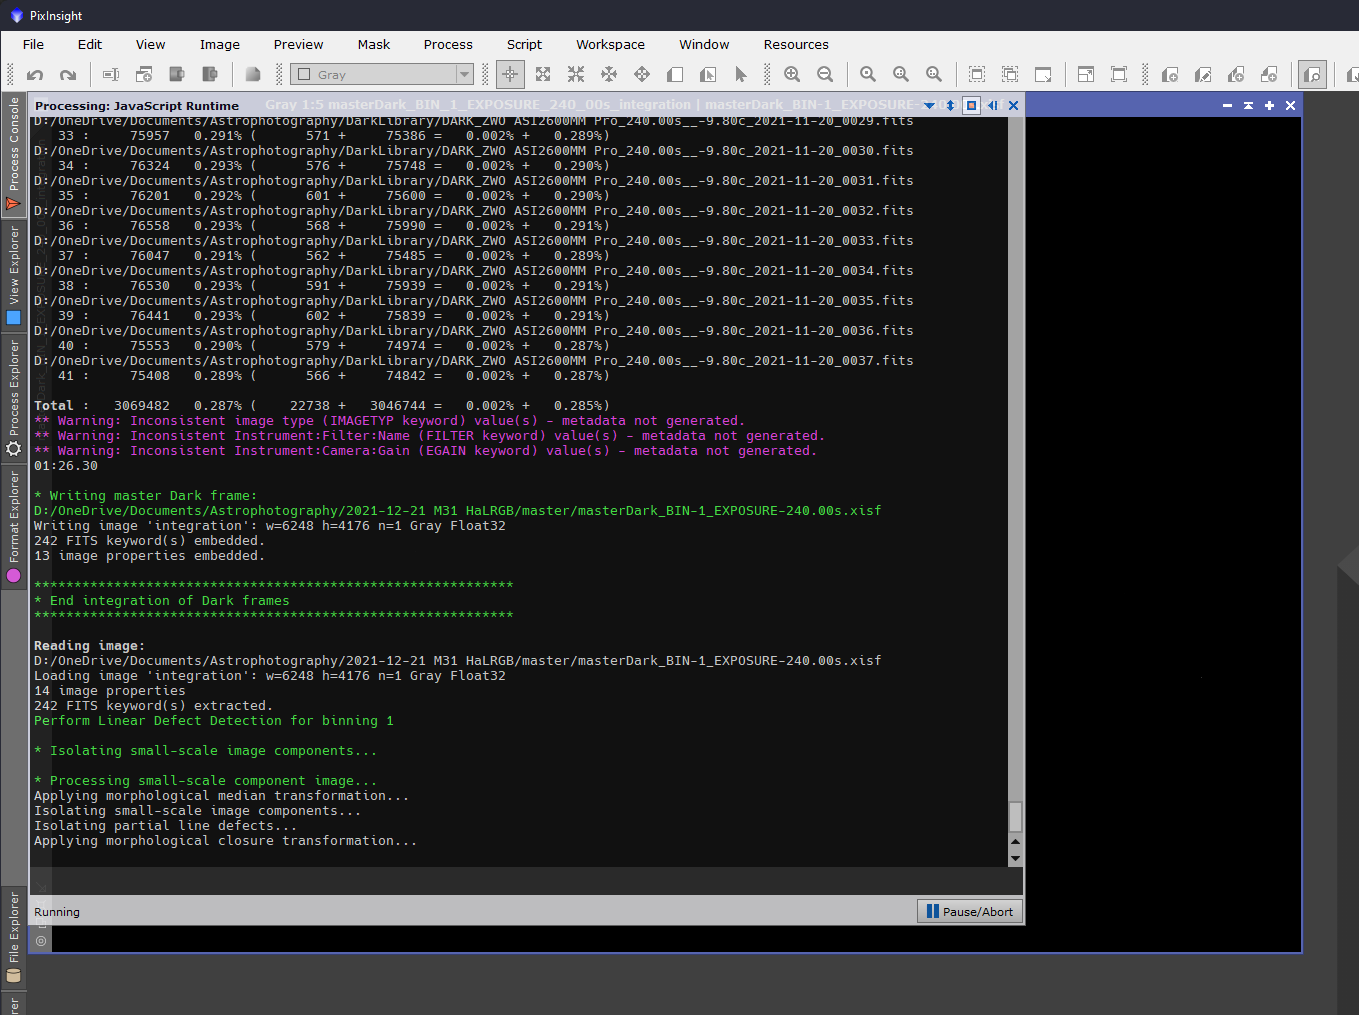
PixInsight, in particular, benefits from a fairly beefy computer. Some of its processes can take hours, even on a fast PC. When I was building out my dark library, with 100 frames at each likely exposure duration, it took a fully day to integrate them. (It took more than a day to do all the exposures from 30 seconds up to 10 minutes in the increments I most use).
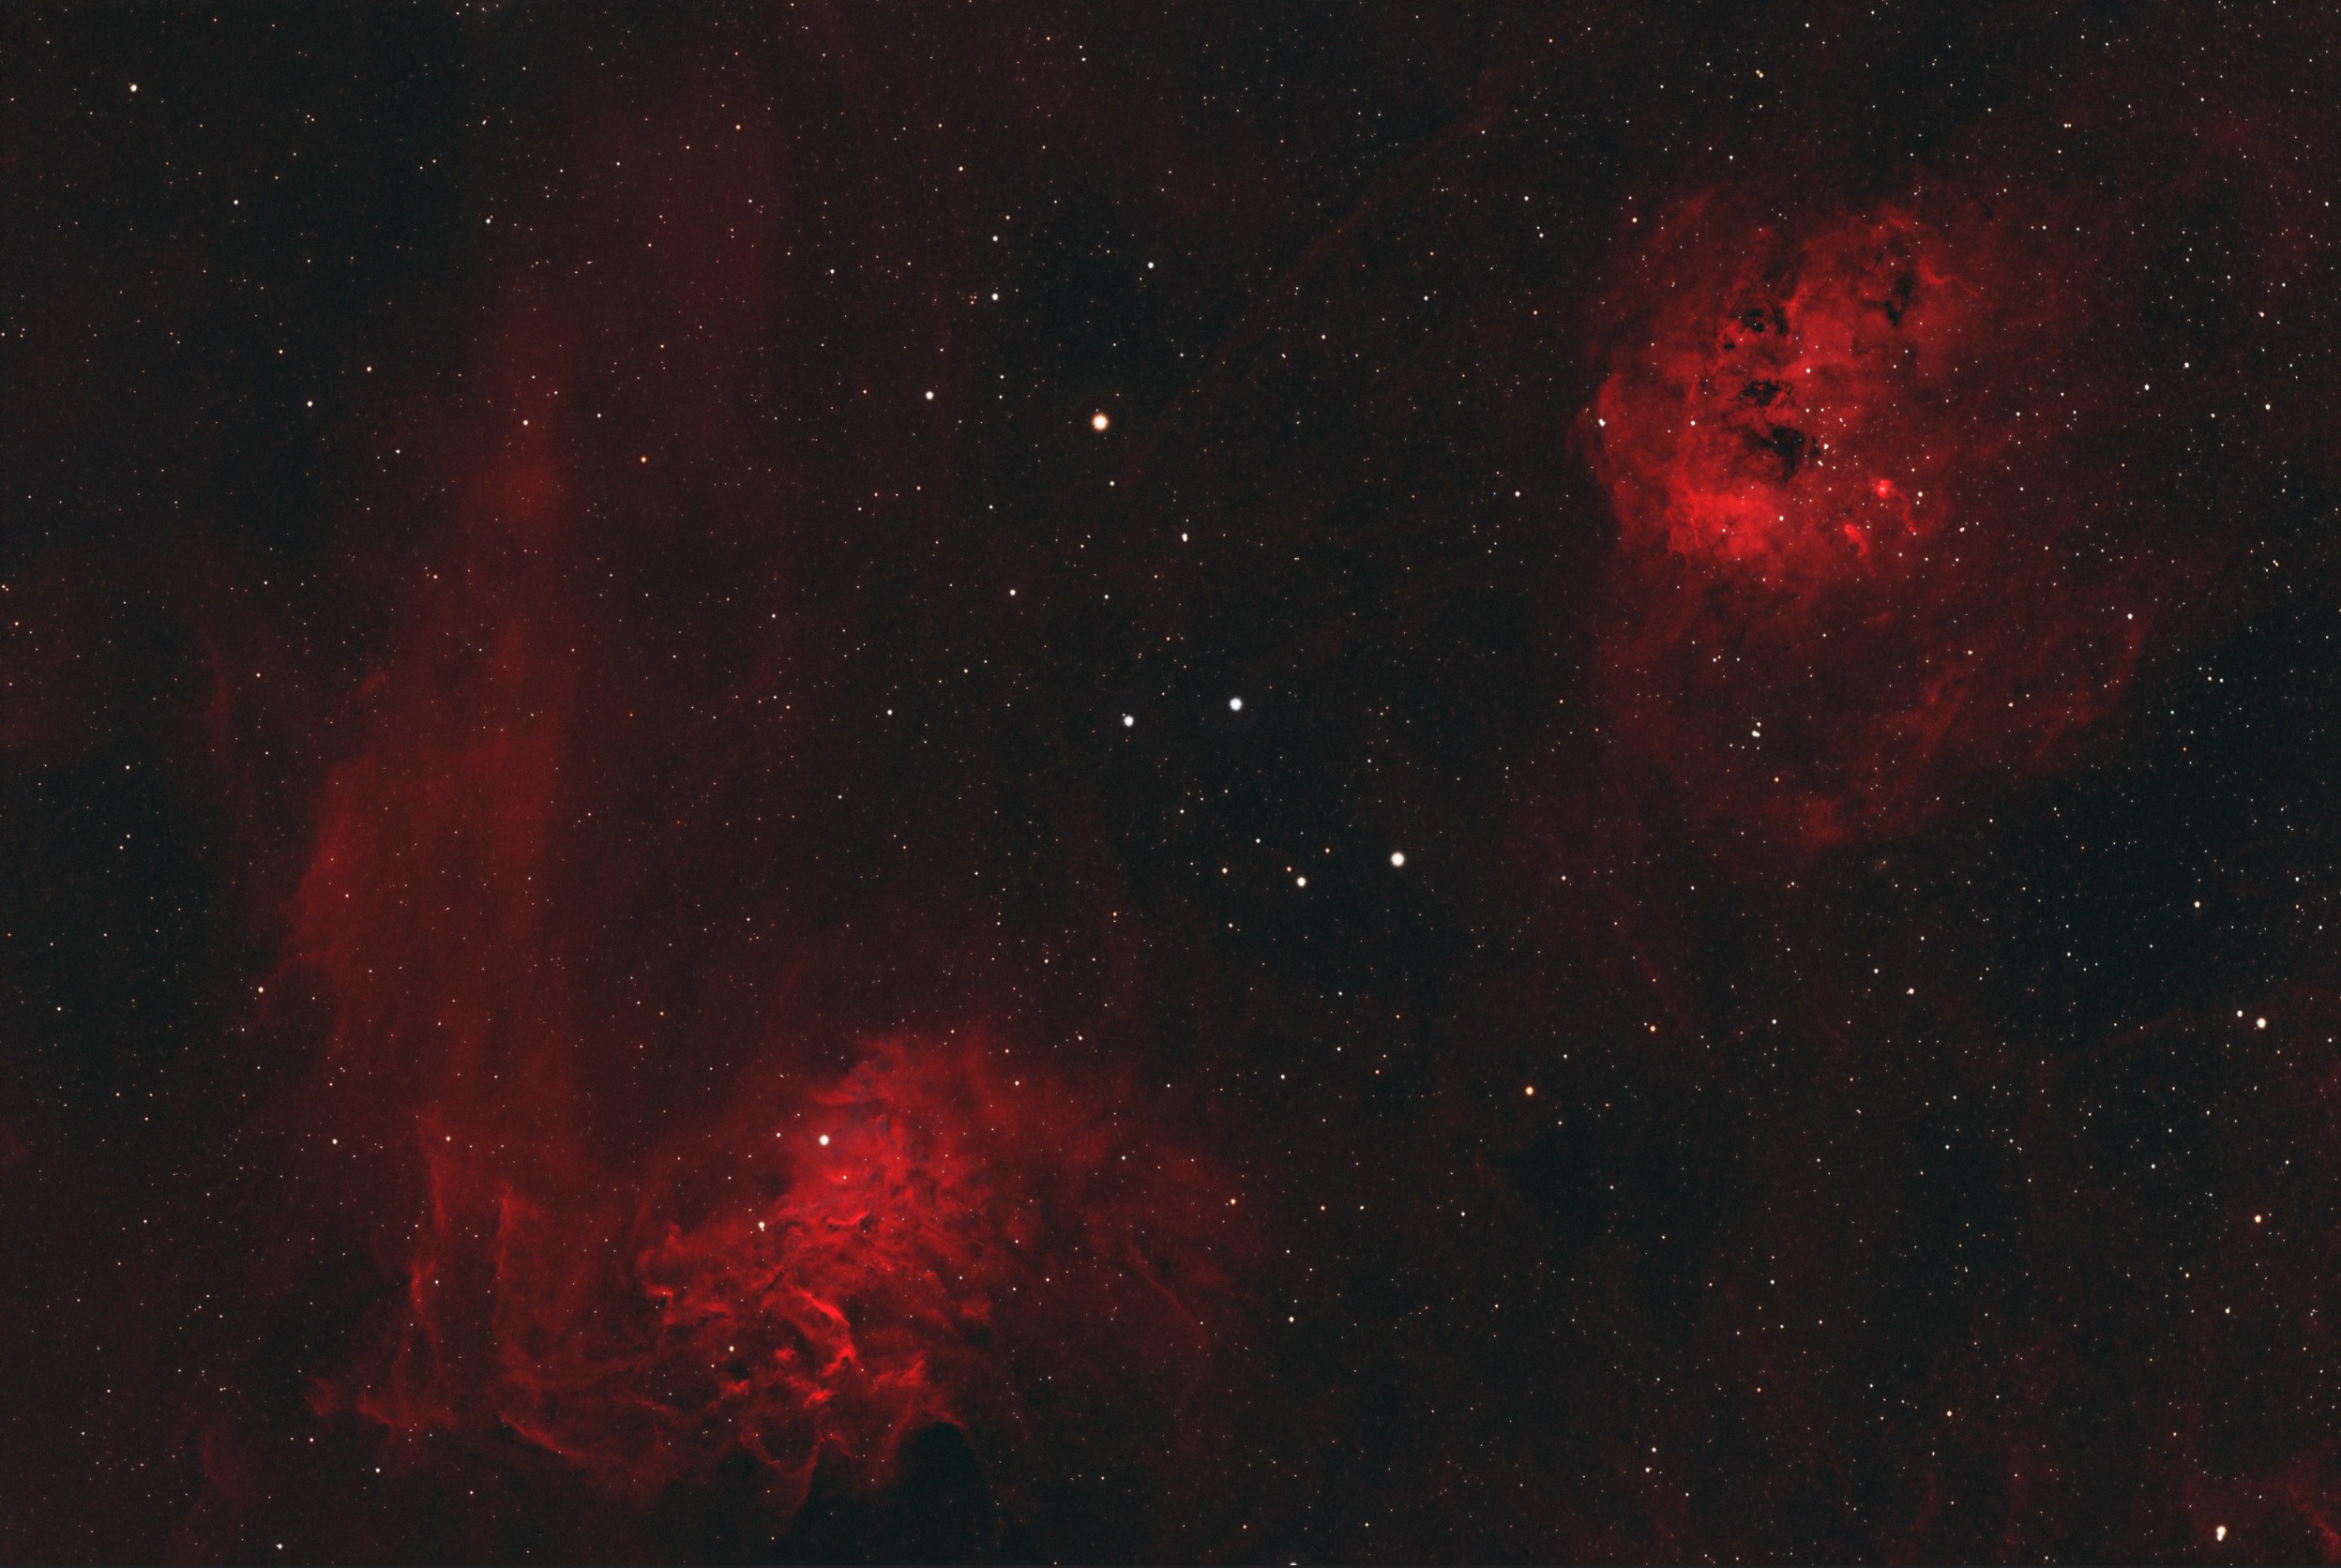
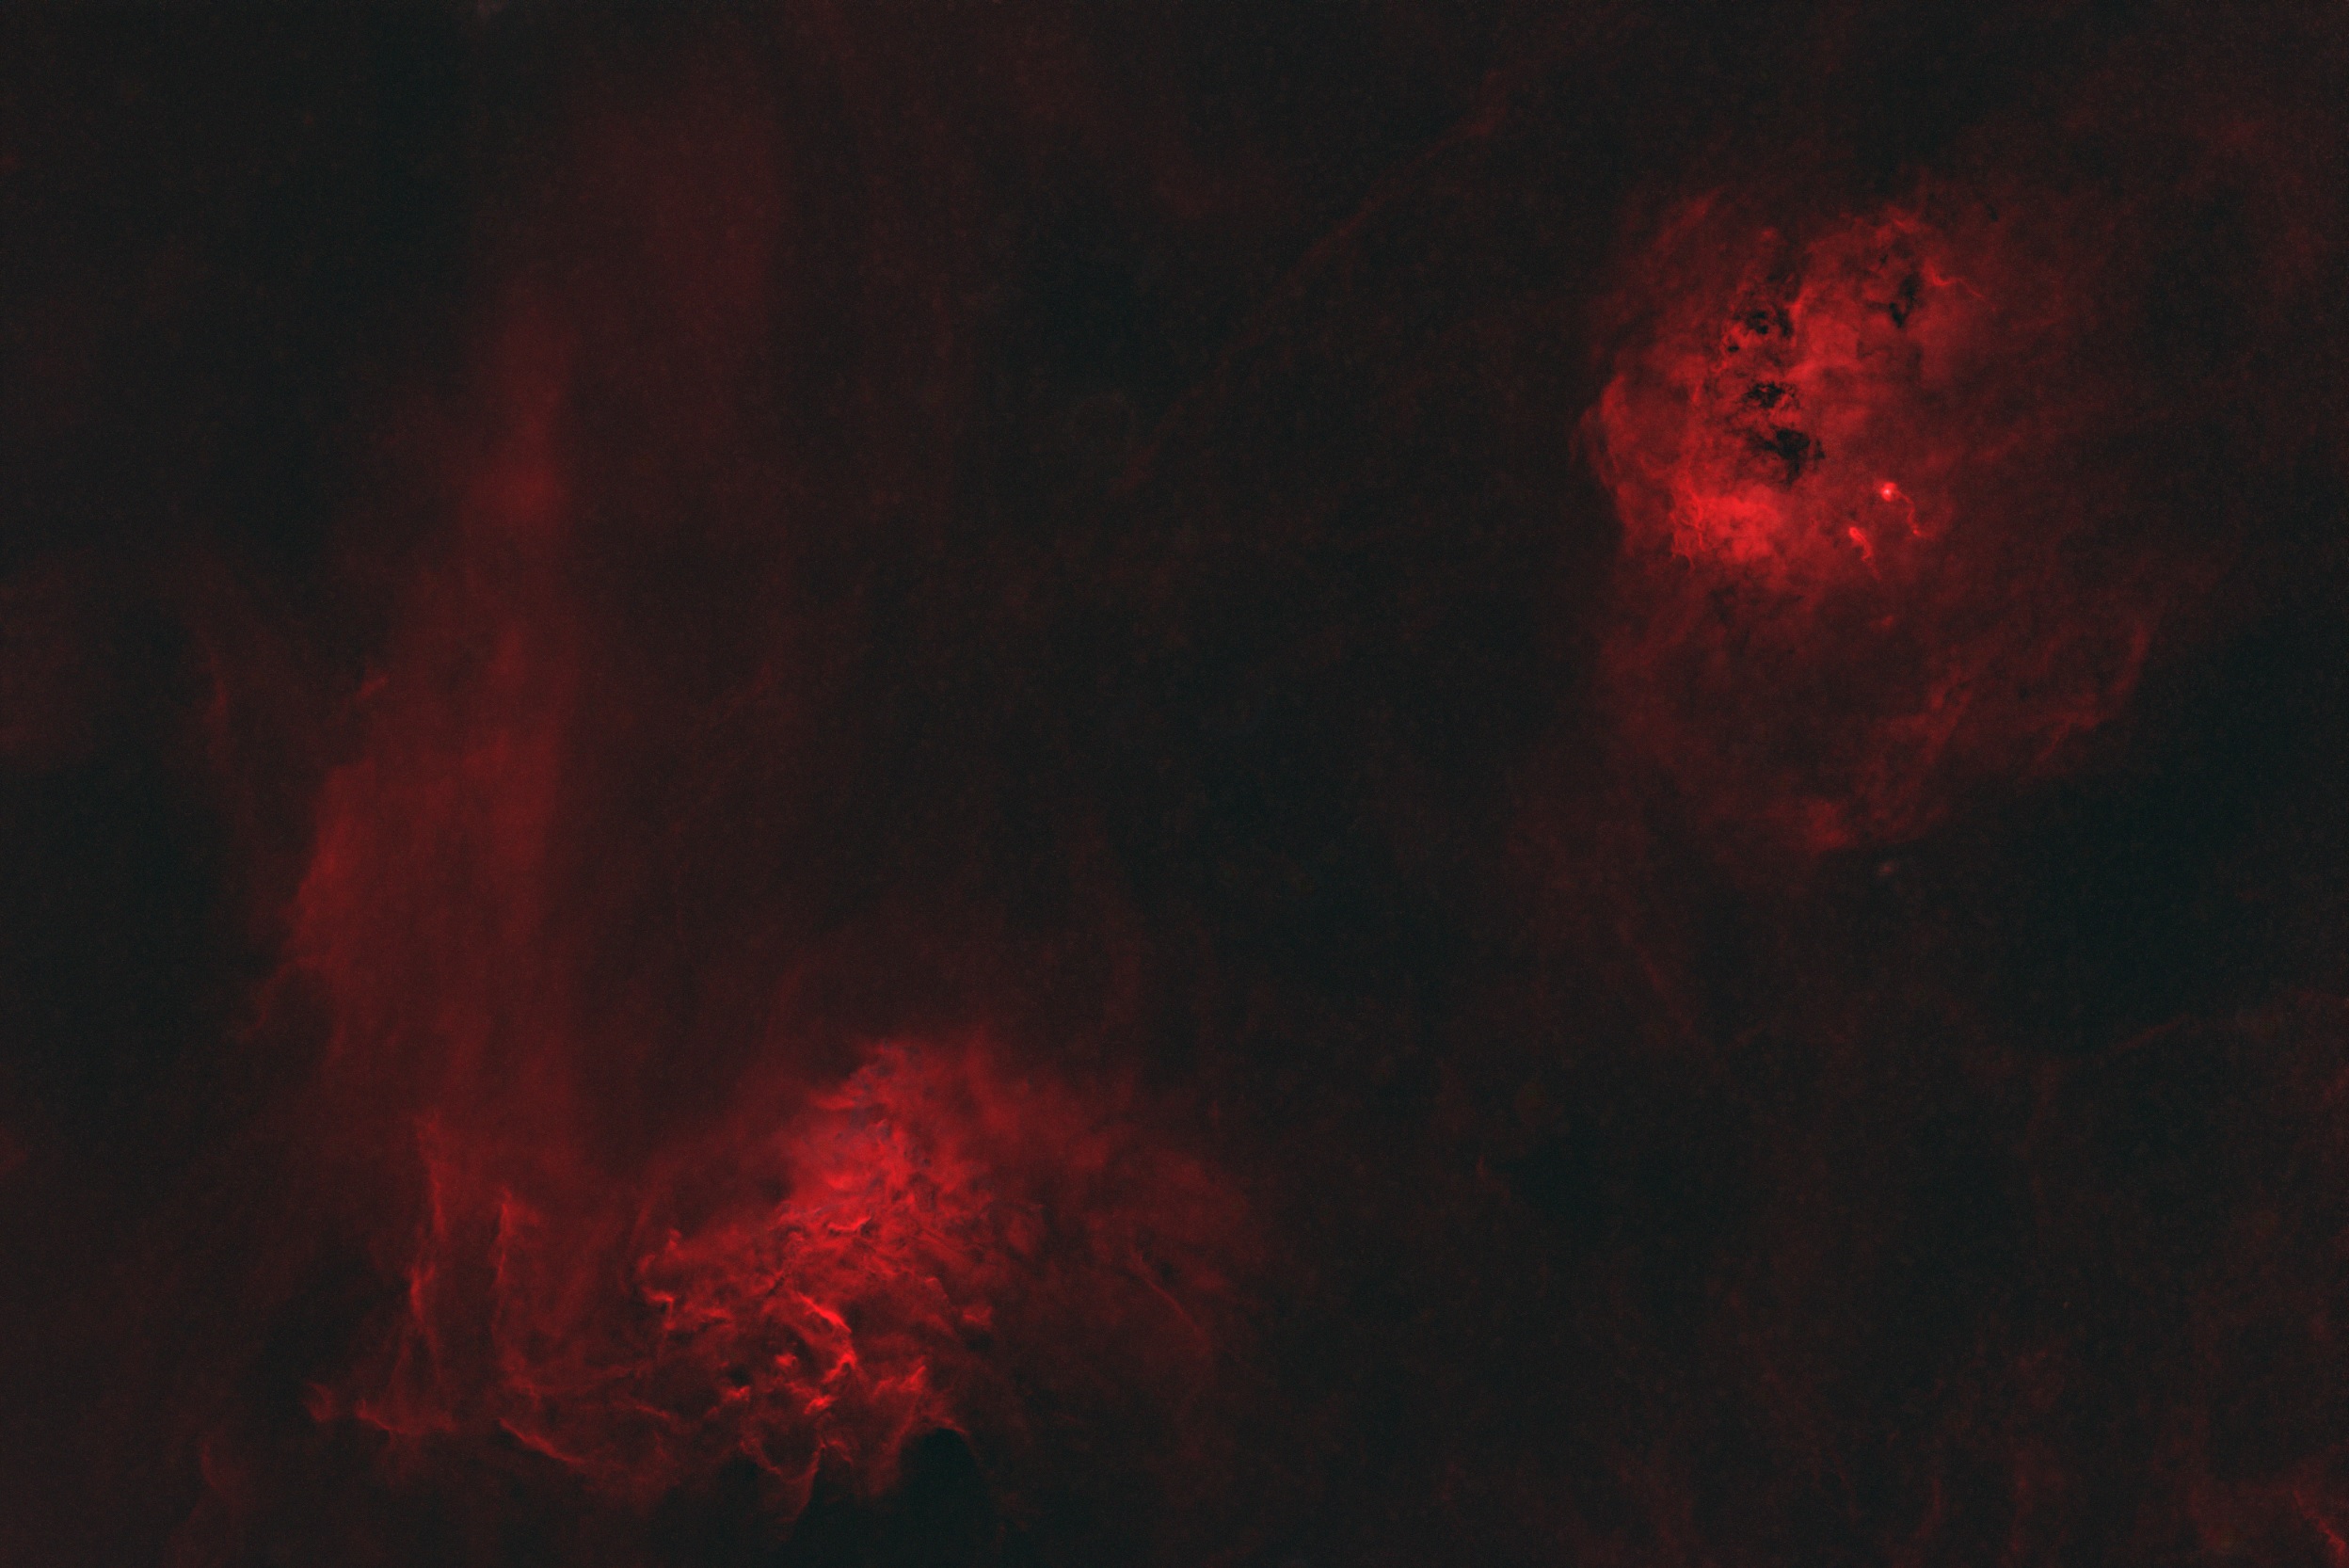
I won’t really talk about PixInsight or Photoshop here, as they are for processing once I get the images/data to my main PC. But PixInsight is a pretty awesome piece of commercial software. Almost everything it does is implemented as a javascript script, and possibly some DLLs. Folks add on to it all the time. For example, I wanted to process a nebula without messing up the colors or size of the stars. There’s a script, available in PixInsight, which uses machine learning to handle star removal. Here it is on the Flaming Star nebula photo I was working on. I wanted to add in the hydrogen alpha data (which is much stronger than the RGB data) without turning all the stars red.
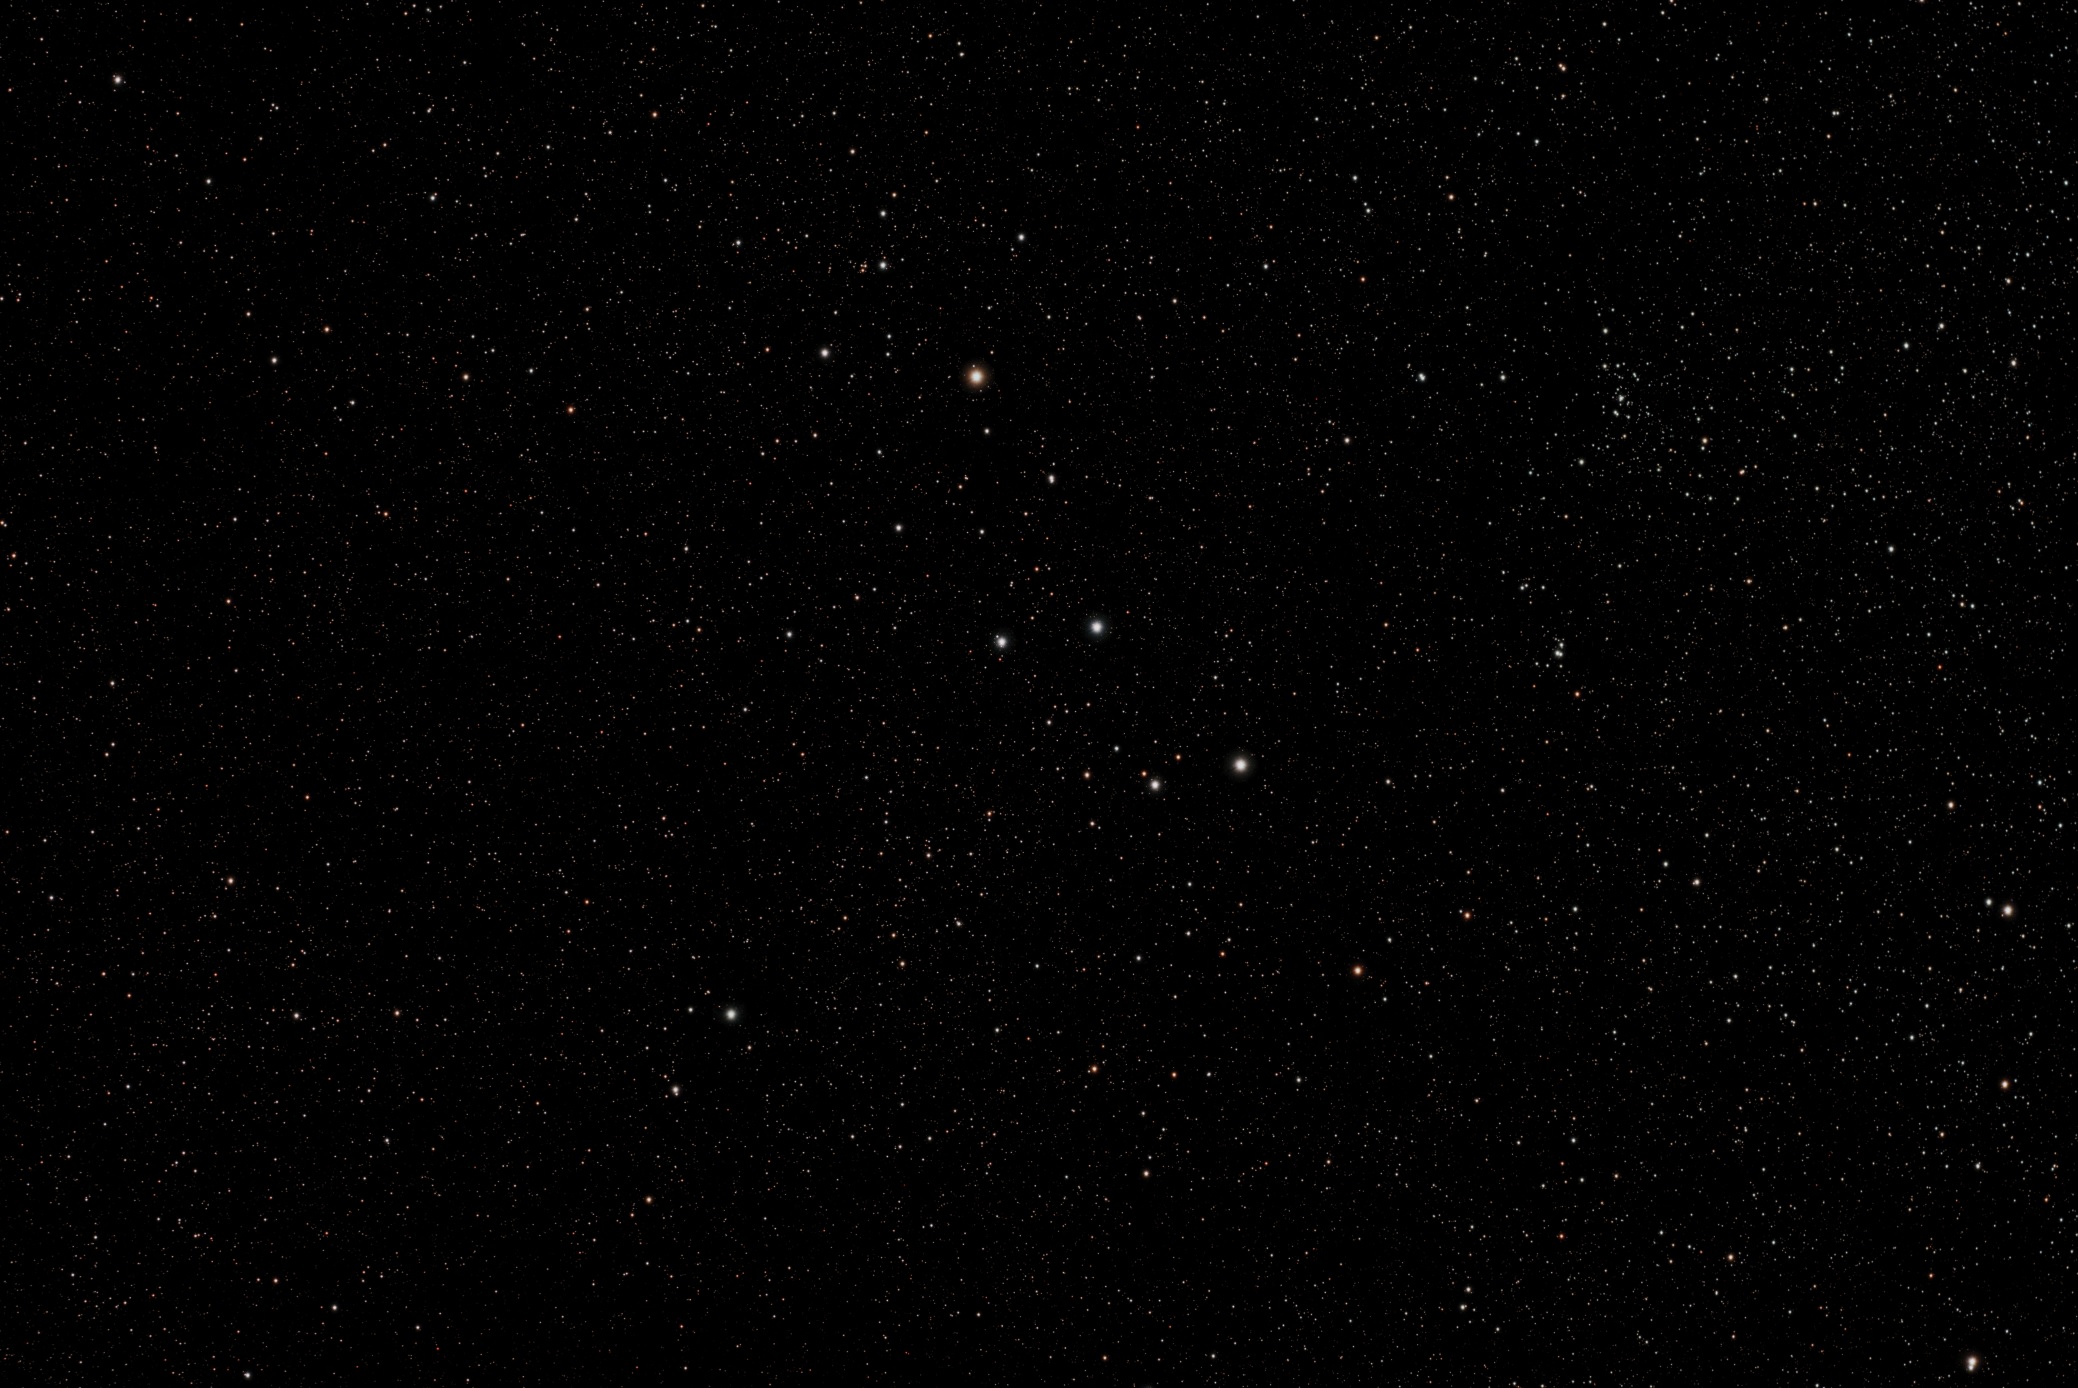
Here’s the original
Here’s the version without stars, and also the extracted stars
I could then use PixInsight or, in my case, Photoshop, to add the stars back into the photo.
PixInsight also handles stacking the individual frames (add multiple exposures together, register them so they align, subtract out noise and other calibration information, etc.)
Modern astrophotography!
Talking to the hardware
Back to the software on the telescope.
There are multiple standards for astronomy device integration. INDI is a newer open source and very *nix-centric but otherwise cross-platform standard, with Windows support in development. There’s also a cross-platform (Windows, macOS, Linux) Alpaca standard being developed by the same folks who have created the ASCOM standard, but that is not yet mainstream (it was released as part of ASCOM 6.5, however, so this may change in the near future).
On Windows, the current and long-standing defacto standard is ASCOM. This is a COM-based API, with “drivers” written in any language or framework which understands COM, but commonly C#/VB and .NET. There are even templates for recent versions of Visual Studio and .NET. ASCOM doesn’t gracefully handle more distributed systems with communication over WiFi or network, but it does “just work” for the vast majority of common configurations.
These drivers are all responsible for exposing an API to apps like N.I.N.A. and then communicating with software or hardware devices on behalf of the app. You’ll find drivers for mounts, focusers, filter wheels, etc.
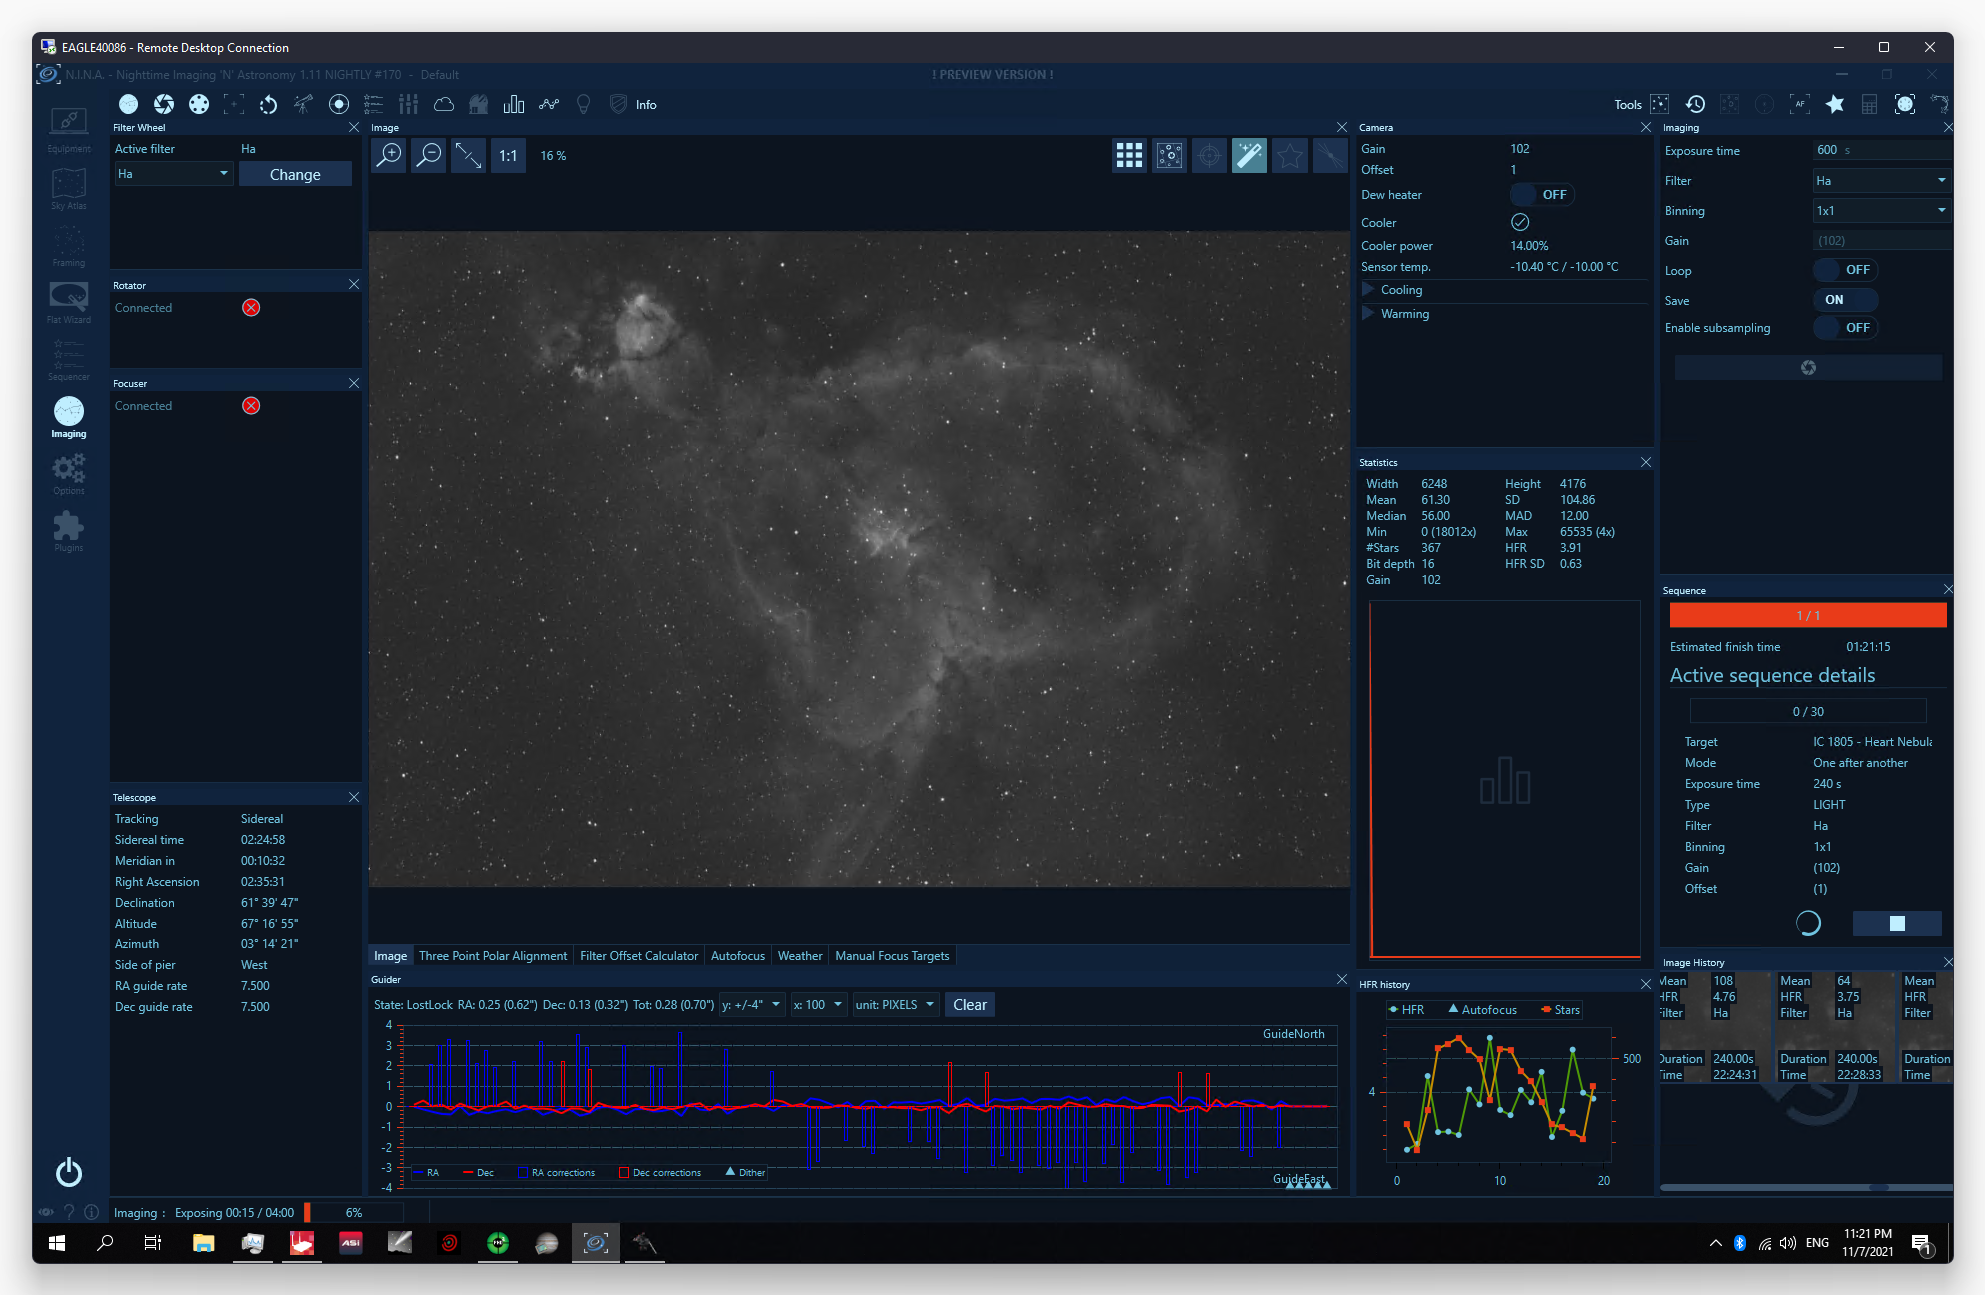
Now, let’s talk about the main control and deep-sky imaging software running on the telescope: N.I.N.A., pronounced “Nina”.
N.I.N.A – an amazing WPF app for Astrophotography
Nighttime Imaging ‘N’ Astronomy (N.I.N.A.) is an amazing piece of software which makes so much of this possible. Even better, it is build in WPF and is open source!
Although I’m getting back into WPF in the latest .NET, it’s been quite a while since I last took a real look look through a WPF project, especially a .NET Framework one with some history, so this is bringing back some memories.
N.I.N.A. currently uses .NET Framework 4.7.2 with a WPF XAML UI. The app follows the MVVM pattern, with very thin views and the majority of logic in the viewmodels and additional classes. The UI is highly customizable using Visual Studio-like docking windows as well UI themes. It uses EntityFramework and SQLite for data storage, and Ninject for IoC.
There are tons of third-party dependencies plus third-party hardware interface driver DLLs. This makes sense given that its primary task is to interface with and control a number of third-party devices and software. One of the important pieces of software it has to interface with is a plate solver. Plate solving is an astronomy process which involves figuring out the exact position in the sky the scope is pointed to, by analyzing the stars in an image.
Plate Solving
There are various third-party plate solvers available. Some are online and require an internet connection. They are nice, however, in that they require minimal local resources. Because I do not have an Internet connection when I image out in the field, I use the ASCOM plate solver, which involves integrating with an additional app using the command line. The app uses a local database and the local processor to analyze the image.
There’s a breakdown of different plate solving methods here.
Here’s the code which integrates with the ASCOM command-line plate solver.
Base class CLISolver
 protected async Task StartCLI(string imageFilePath, string outputFilePath, PlateSolveParameter parameter, PlateSolveImageProperties imageProperties, IProgress<ApplicationStatus> progress, CancellationToken ct) {
    if (executableLocation != "cmd.exe" && !File.Exists(executableLocation)) {
        throw new FileNotFoundException("Executable not found", executableLocation);
    }

    System.Diagnostics.Process process = new System.Diagnostics.Process();
    System.Diagnostics.ProcessStartInfo startInfo = new System.Diagnostics.ProcessStartInfo();

    startInfo.WindowStyle = System.Diagnostics.ProcessWindowStyle.Normal;
    startInfo.FileName = executableLocation;
    startInfo.UseShellExecute = false;
    startInfo.RedirectStandardOutput = true;
    startInfo.CreateNoWindow = true;
    startInfo.Arguments = GetArguments(imageFilePath, outputFilePath, parameter, imageProperties);
    process.StartInfo = startInfo;
    process.EnableRaisingEvents = true;

    process.OutputDataReceived += (object sender, System.Diagnostics.DataReceivedEventArgs e) => {
        progress.Report(new ApplicationStatus() { Status = e.Data });
    };

    process.ErrorDataReceived += (object sender, System.Diagnostics.DataReceivedEventArgs e) => {
        progress.Report(new ApplicationStatus() { Status = e.Data });
    };
    Logger.Debug($"Starting process '{executableLocation}' with args '{startInfo.Arguments}'");
    process.Start();
    await process.WaitForExitAsync(ct);
}
The derived class, in this case for ASCOM plate solving, builds the command line arguments, and interprets the results which were written to a file in key-value pairs. This kind of file IO-based app integration is common in the sciences and on *nix systems, but not so much in the Windows world (although it certainly does exist).
protected override PlateSolveResult ReadResult(
    string outputFilePath,
    PlateSolveParameter parameter,
    PlateSolveImageProperties imageProperties) {
    var result = new PlateSolveResult() { Success = false };
    if (!File.Exists(outputFilePath)) {
        Notification.ShowError("ASTAP - Plate solve failed. No output file found.");
        return result;
    }

    var dict = File.ReadLines(outputFilePath)
        .Where(line => !string.IsNullOrWhiteSpace(line))
        .Select(line => line.Split(new char[] { '=' }, 2, 0))
        .ToDictionary(parts => parts[0], parts => parts[1]);

    dict.TryGetValue("WARNING", out var warning);

    if (!dict.ContainsKey("PLTSOLVD") || dict["PLTSOLVD"] != "T") {
        dict.TryGetValue("ERROR", out var error);
        Notification.ShowError($"ASTAP - Plate solve failed.{Environment.NewLine}{warning}{Environment.NewLine}{error}");
        return result;
    }

    if (!string.IsNullOrWhiteSpace(warning)) {
        Notification.ShowWarning($"ASTAP - {warning}");
    }

    var wcs = new WorldCoordinateSystem(
        double.Parse(dict["CRVAL1"], CultureInfo.InvariantCulture),
        double.Parse(dict["CRVAL2"], CultureInfo.InvariantCulture),
        double.Parse(dict["CRPIX1"], CultureInfo.InvariantCulture),
        double.Parse(dict["CRPIX2"], CultureInfo.InvariantCulture),
        double.Parse(dict["CD1_1"], CultureInfo.InvariantCulture),
        double.Parse(dict["CD1_2"], CultureInfo.InvariantCulture),
        double.Parse(dict["CD2_1"], CultureInfo.InvariantCulture),
        double.Parse(dict["CD2_2"], CultureInfo.InvariantCulture)
    );

    result.Success = true;
    result.Coordinates = new Coordinates(
        double.Parse(dict["CRVAL1"], CultureInfo.InvariantCulture),
        double.Parse(dict["CRVAL2"], CultureInfo.InvariantCulture),
        Epoch.J2000,
        Coordinates.RAType.Degrees
    );

    result.Orientation = double.Parse(dict["CROTA2"], CultureInfo.InvariantCulture);

    /*
        * CDELT1 and CDELT2 are obsolete.
        * To calculate pixel scale, we should add the squares of CD1_2 and CD2_2 and take the square root to get degrees.
        */
    if (dict.ContainsKey("CD1_2") && dict.ContainsKey("CD2_2")) {
        double.TryParse(dict["CD1_2"], NumberStyles.Any, CultureInfo.InvariantCulture, out double cr1y);
        double.TryParse(dict["CD2_2"], NumberStyles.Any, CultureInfo.InvariantCulture, out double cr2y);

        result.Pixscale = Astrometry.DegreeToArcsec(Math.Sqrt(Math.Pow(cr1y, 2) + Math.Pow(cr2y, 2)));
    }

    /* Due to the way N.I.N.A. writes FITS files, the orientation is mirrored on the x-axis */
    result.Orientation = wcs.Rotation - 180;
    result.Flipped = !wcs.Flipped;

    return result;
}
Full source for the ASTAP solver integration is here.
When using N.I.N.A, you can’t really tell that it’s a different app as the experience is all integrated, with the exception of the ASTAP UI showing when a solve is taking a while, or fails. Even in that case, it’s just an informational dialog in the corner of the screen.
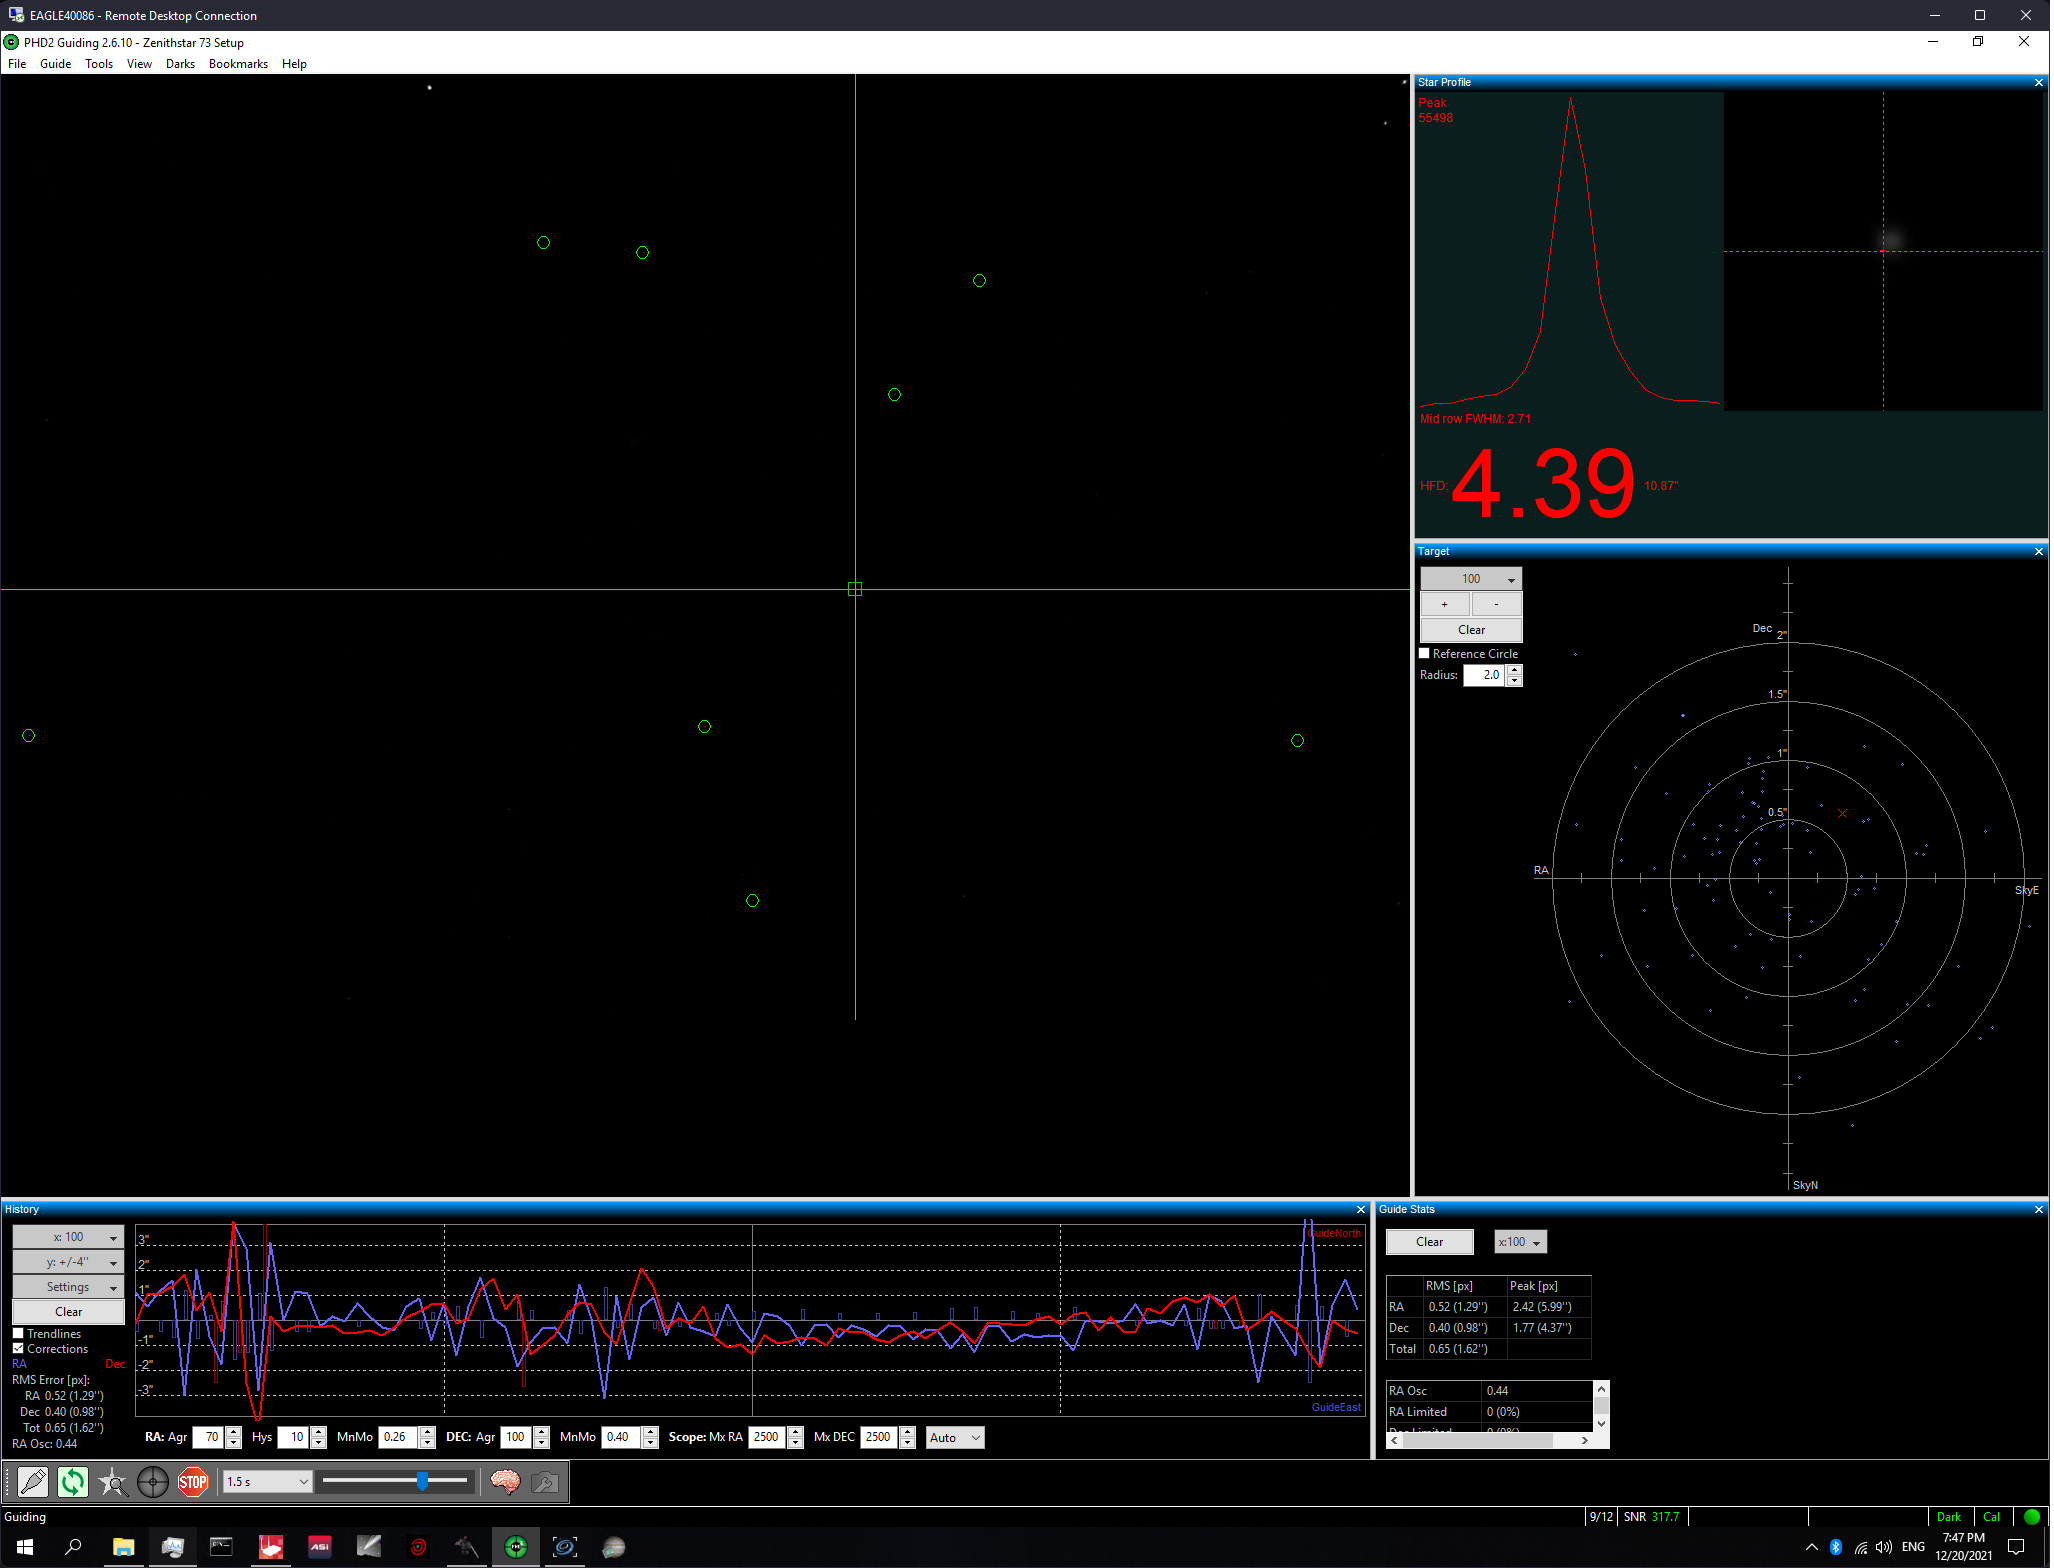
Plots and graphs
There are a number of places where N.I.N.A. needs to show data plots. The app uses a portable class library named OxyPlot.
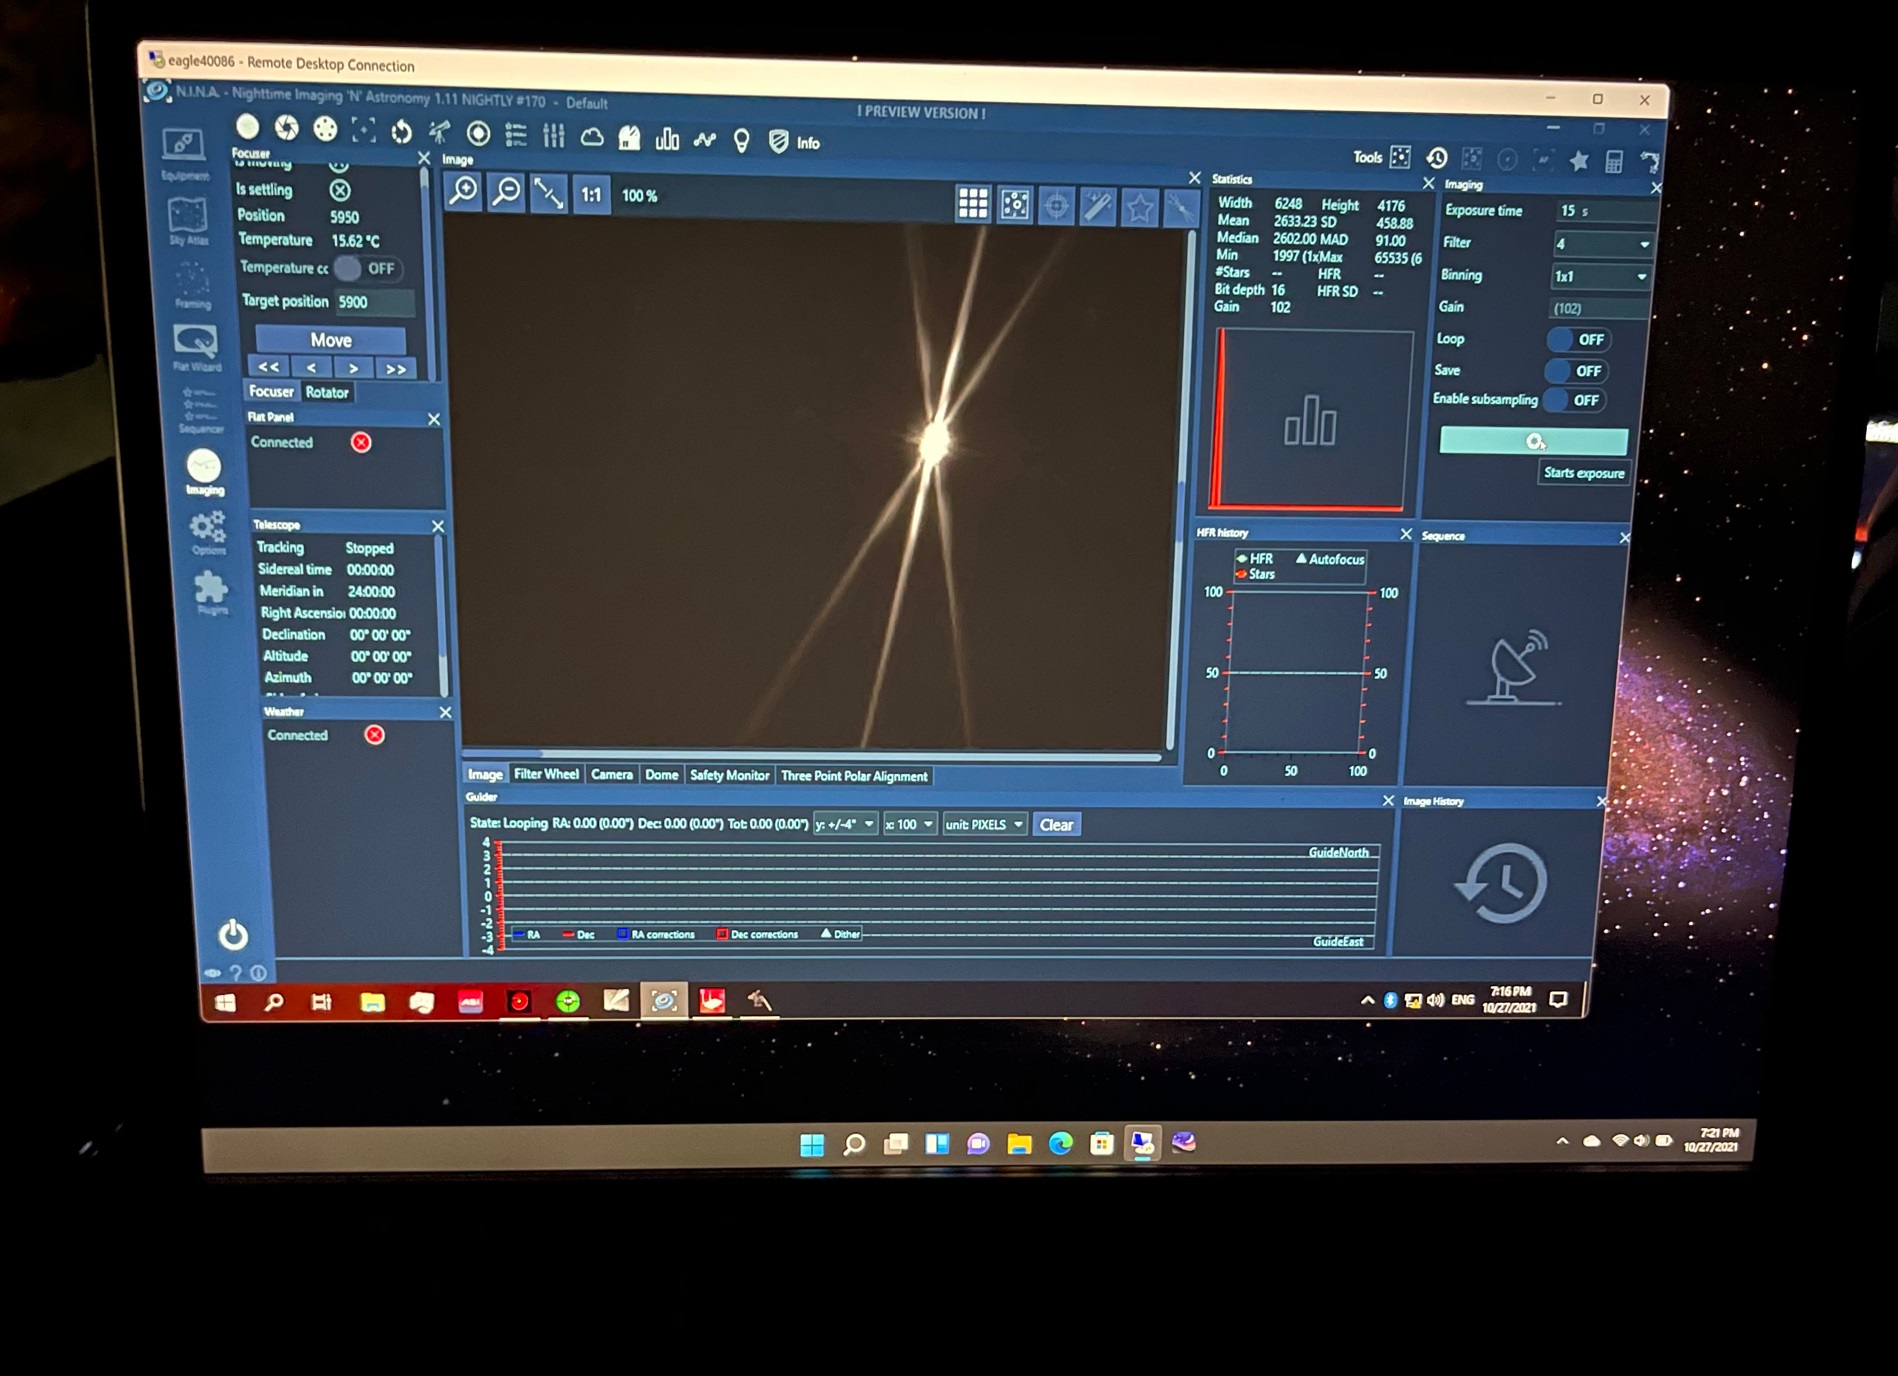
Here’s an example of where it’s used, in the image history plot view. This is the part of the UI which helps you figure out if your focus is ok, if clouds have rolled in, etc. because it tells you how “fuzzy” your stars are.
Here’s what it looks like on the screen, to the right of the guiding view. It wasn’t a super clear night that night. :

And here’s how the OxyPlot control is used in ImageHistoryPlotView.xaml :
        <oxy:Plot
            Background="{StaticResource BackgroundBrush}"
            LegendBackground="{Binding Path=Color, Source={StaticResource BackgroundBrush}}"
            LegendBorder="{Binding Path=Color, Source={StaticResource BorderBrush}}"
            LegendOrientation="Vertical"
            LegendPosition="LeftTop"
            LegendTextColor="{Binding Path=Color, Source={StaticResource PrimaryBrush}}"
            PlotAreaBackground="{StaticResource BackgroundBrush}"
            PlotAreaBorderColor="{Binding Path=Color, Source={StaticResource BorderBrush}}">
            <oxy:Plot.Axes>
                <oxy:LinearAxis
                    AxislineColor="{Binding Path=Color, Source={StaticResource PrimaryBrush}}"
                    IntervalLength="25"
                    IsPanEnabled="False"
                    IsZoomEnabled="False"
                    MajorGridlineColor="{Binding Path=Color, Source={StaticResource PrimaryBrush}, Converter={StaticResource SetAlphaToColorConverter}, ConverterParameter=100}"
                    MajorGridlineStyle="Solid"
                    Maximum="10"
                    Minimum="0"
                    Position="Left"
                    TextColor="{Binding Path=Color, Source={StaticResource PrimaryBrush}}" />
                <oxy:LinearAxis
                    Key="Secondary"
                    AxislineColor="{Binding Path=Color, Source={StaticResource PrimaryBrush}}"
                    IntervalLength="25"
                    IsPanEnabled="False"
                    IsZoomEnabled="False"
                    MajorGridlineColor="{Binding Path=Color, Source={StaticResource PrimaryBrush}, Converter={StaticResource SetAlphaToColorConverter}, ConverterParameter=100}"
                    MajorGridlineStyle="Solid"
                    Maximum="400"
                    Minimum="0"
                    Position="Right"
                    TextColor="{Binding Path=Color, Source={StaticResource PrimaryBrush}}" />
                <oxy:LinearAxis
                    AxislineColor="{Binding Path=Color, Source={StaticResource PrimaryBrush}}"
                    IntervalLength="100"
                    IsPanEnabled="False"
                    IsZoomEnabled="False"
                    Position="Bottom"
                    TextColor="{Binding Path=Color, Source={StaticResource PrimaryBrush}}" />
            </oxy:Plot.Axes>
            <oxy:Plot.Series>
                <oxy:LineSeries
                    Title="{ns:Loc LblHFR}"
                    DataFieldX="Id"
                    DataFieldY="HFR"
                    ItemsSource="{Binding LimitedImageHistoryStack}"
                    MarkerFill="{Binding Path=Color, Source={StaticResource PrimaryBrush}}"
                    MarkerType="Circle" />
                <oxy:LineSeries
                    Title="{ns:Loc LblDetectedStars}"
                    DataFieldX="Id"
                    DataFieldY="DetectedStars"
                    ItemsSource="{Binding LimitedImageHistoryStack}"
                    MarkerFill="{Binding Path=Color, Source={StaticResource SecondaryBrush}}"
                    MarkerType="Circle"
                    YAxisKey="Secondary" />
            </oxy:Plot.Series>
        </oxy:Plot>
You’ll notice that the text fields are all using a Loc namespace:
<oxy:LineSeries Title="{ns:Loc LblHFR}" ... />
<oxy:LineSeries Title="{ns:Loc LblDetectedStars}" ... />
Localization
Every label in the app is localized. The N.I.N.A. team crowd-sources the translations using crowdin.com. You can view that or even contribute to the translation work on the site here. Once the translations have been created, they are put in various .resx files using an automated process.
Here’s the en-US translation for the above two labels:
  <data name="LblHFR" xml:space="preserve">
    <value>HFR</value>
  </data>
    <data name="LblDetectedStars" xml:space="preserve">
    <value>Detected Stars</value>
  </data>
And in French
  <data name="LblHFR" xml:space="preserve">
    <value>HFR</value>
  </data>
  <data name="LblDetectedStars" xml:space="preserve">
    <value>Étoiles Détectées</value>
  </data>
They are then wrapped using the Loc class which handles the resource lookup and validation.
namespace NINA.Locale {

    public class Loc : BaseINPC, ILoc {
        private ResourceManager _locale;
        private CultureInfo _activeCulture;

        private static readonly Lazy<Loc> lazy =
         new Lazy<Loc>(() => new Loc());

        private Loc() {
            _locale = new ResourceManager("NINA.Locale.Locale", typeof(Loc).Assembly);
        }

        public void ReloadLocale(string culture) {
            using (MyStopWatch.Measure()) {
                try {
                    _activeCulture = new CultureInfo(culture);
                } catch (Exception ex) {
                    Logger.Error(ex);
                }
                RaiseAllPropertiesChanged();
            }
        }

        public static Loc Instance { get { return lazy.Value; } }

        public string this[string key] {
            get {
                if (key == null) {
                    return string.Empty;
                }
                return this._locale?.GetString(key, this._activeCulture) ?? $"MISSING LABEL {key}";
            }
        }
    }

    public class LocExtension : Binding {

        public LocExtension(string name) : base($"[{name}]") {
            this.Mode = BindingMode.OneWay;
            this.Source = Loc.Instance;
        }
    }
}We won’t talk about how the N.I.N.A. developers use Ritchie-style braces when we all know that Pascal/Allman-style is the way to go for C-based languages, despite what One-true-brace-style folks will tell you. I’m not judging. Really. 😅
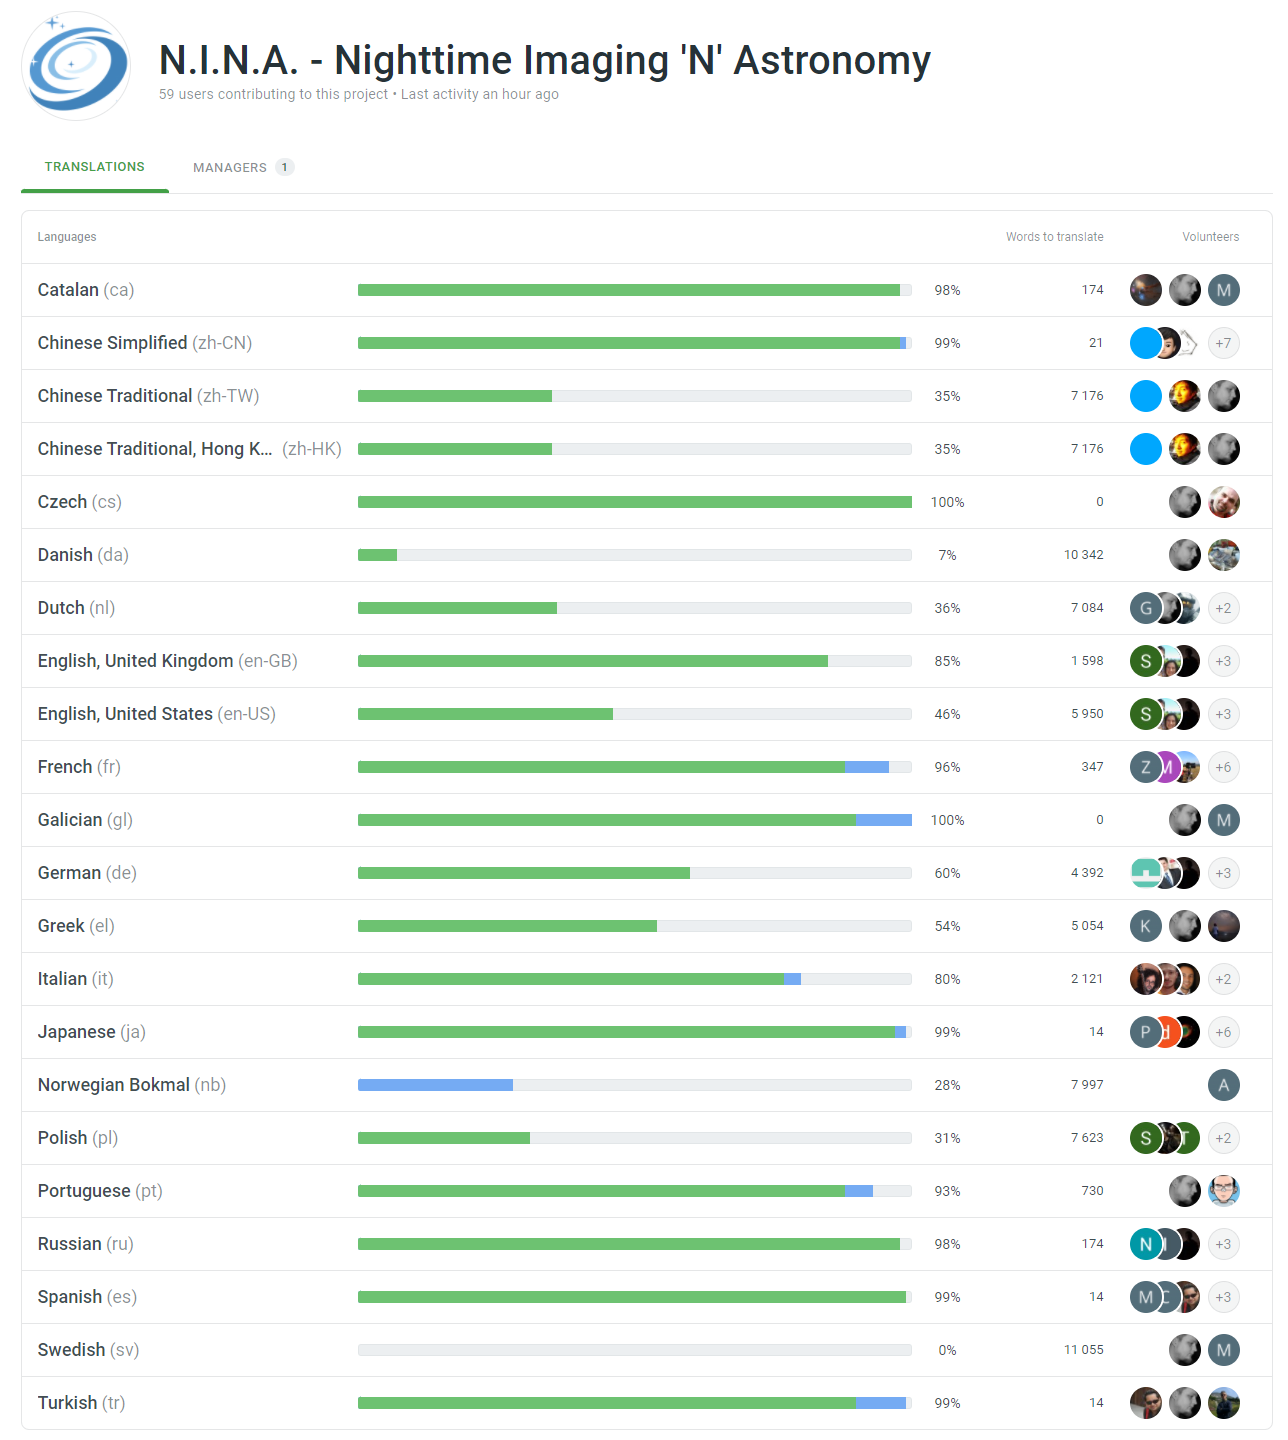
Localizing text in an app is a best practice, but not something everyone is able to do. I like how the N.I.N.A. folks have cleanly architected this, and how they use crowd-sourcing to get those translations done. Of course, they can still use help here, as there are thousands of words left to translate in languages like Dutch, Danish, and Swedish, and many other partial translations needing help to finish them up. If you are interested in astrophotography and are fluent in one of those languages, I encourage you to consider chipping in.
ASCOM integration
N.I.N.A. needs to interface with external devices. As I mentioned above, one way to do that, and the primary way on Windows, is through ASCOM. Most of this is called from the NINA/ViewModel/ImagingVM.cs file. The interfaces which define the devices are found primarily in the NINA/Model folder and have names like MyFilterWheel, MyCamera, etc.
The Filter Wheel is one of the simpler implementations. What a Filter Wheel does is contain a bunch of filters (typically between 5 and 9) and, in the case of an automatic wheel, a motor and sensor which are able to index to any one of the filters. Here’s a photo of my filter wheel, opened up while I install filters:

N.I.N.A. defines an interface, IFilterWheel, and then several implementation classes (AscomFilterWheel, FLIFilterWheel, ManualFilterWheel, QHYFilterWheel) which cover different supported devices, both those with and those without ASCOM drivers. It also has an internal model class, FilterWheelInfo, which is used for state information (whether or not it is moving, what the selected filter is), and information on each filter in the FilterInfo class (position in the wheel, focus offset, etc.)
Beyond that, it simply calls the ASCOM APIs. In this case, calling filterwheel.Position (set) to change the current position of the wheel. The ASCOM documentation even includes .NET examples for how to access devices:
using System;
using ASCOM.DeviceInterface;
using ASCOM.Utilities;
using ASCOM.DriverAccess;

#region FilterWheel
Console.WriteLine("rnFilterWheel:");
progID = FilterWheel.Choose("ASCOM.Simulator.FilterWheel");
if (progID != "")
{
    FilterWheel fw = new FilterWheel(progID);
    fw.Connected = true;
    Console.WriteLine("  Position = " + fw.Position);
    string[] names = fw.Names;
    Console.WriteLine("  There are " + names.Length + " filters:rn  ");
    for (int i = 0; i < names.Length; i++)
    {
        Console.Write(names[i] + " " );
    }
    Console.WriteLine("");
    fw.Connected = false;
    fw.Dispose();
}
#endregionThere are lots of other interesting aspects of N.I.N.A. including plugins, and the framing wizard, but I’ll save them for another day.
For further reading
Here are a bunch of relevant links that will help you explore further, or get started in this hobby.
Bloggers and YouTubers I like
There are a lot of folks talking about astrophotography. These are a few of the top ones I have learned from.
Relevant software and standards
Here’s software I use.
- Nighttime Imaging ‘N’ Astronomy (NINA)
- ASCOM
- FITS4Win2 (FITS file integration for Windows)
- PixInsight (astronomy image data processing)
- Open PHD Guiding (PHD2)
- ASTAP Plate Solving and other tools
- Cartes du Ciel
- Stellarium
Embedded / Tiny PCs
There are a TON of these out there, so do look around for what meets your own needs.
Telescopes and optics
My current telescope is a William Optics FLT91. However, I have a Stellarvue 102T-R coming in 2022.
Relevant online stores I’ve used (US)
Online tools
These online tools help you figure out what to shoot, and also see what objects will fit into the field of view of your equipment.
Community and informational sites for learning more
This is the main forum for astro of all types.
Photos
Photos can be inspiring.
- NASA Astronomy picture of the day
- Astronomy picture of the day app for Windows (no affiliation)
- Astrobin
- My own photos on Flickr
Programming
Of course, programming is why we’re all here, right? 🙂
This is so fun
The availability of tiny but highly capable PCs has really made it possible to create an astrophotography rig that is easily managed and is portable. Combine that with some great Windows software like N.I.N.A. and it’s easier than ever to create an advanced setup with freedom of choice of apps and peripherals. I’m really enjoying my journey into astrophotography, and excited that my Windows software and PC hardware knowledge can be applied here.
Nice work! Regarding frame integration, you might want to have a look at using GPU acceleration to speed things up. Tycho Tracker is a native Windows program which could take those 100 frames and integrate them in under 10 seconds, rather than taking a full day.
Thanks! I’ll check that out. I’ve noticed that other PixInsight scripts aren’t using the GPU by default, and I need to take extra steps to enable that. (StarNet, for example).