In the world of artificial intelligence (AI), creating secure and robust applications is essential. Integrating powerful AI models, such as those offered by Azure’s OpenAI services, with secure authentication through External ID, you can confidently deploy powerful AI-driven applications. This guide shows you how to bring these capabilities together using Python and Azure’s built-in tools, as well as leveraging External ID authentication to make it easy to create an app with secure access to AI-driven functionalities.
We’ll be using a mix of Azure CLI commands (azd) and Bicep templates to get an app up and running and configured with External ID and Azure infrastructure.
Objectives
To securely access and manage AI-driven functionality, we have two main tasks:
- Implementing user authentication: We’ll take an OpenAI application and add user authentication to it so that a user can log in and securely use our app.
- Automated setup: We want the set up to be fully automated so we will use a combination of Bicep templates with the Microsoft Graph SDK using Python.
Streamlining authentication and authorization
Typically, developers would need to build custom logic on their backend to verify the authorization code flow, handle OAuth, and return an access token. This process can be time-consuming and requires considerable development effort to manage authentication.
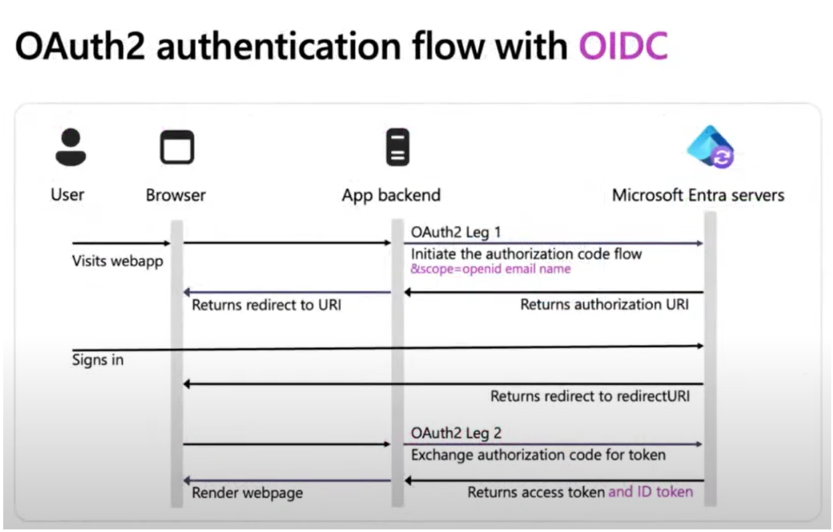
Instead, we’ll use Azure’s built-in authentication for App Service which intercepts requests, figures out which users are not logged in, manages token issuance, and redirects users back to the application upon successful sign in. This allows you to focus on building application features while the platform manages authentication and authorization.
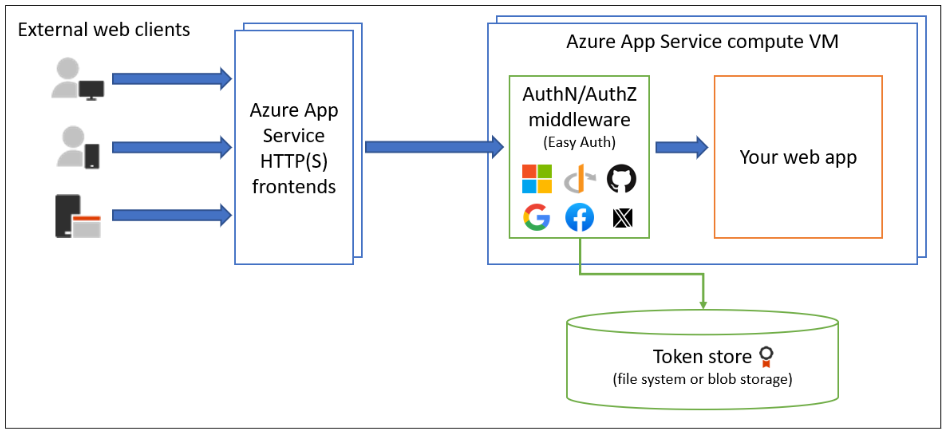
Setting up and running the application
Prerequisites
- Install Python (Python 3+ recommended).
- After installing Python, install pip if it doesn’t exist.
- Docker for Windows/Linux.
- An external tenant with a subscription.
- If you don’t have one, you can create one using our 30-day free trial or create an external tenant with an Azure subscription.
- (Optional): Quota increase on open AI. This can be done by going to the quotas tab and asking for an increase in gpt-4o-mini.
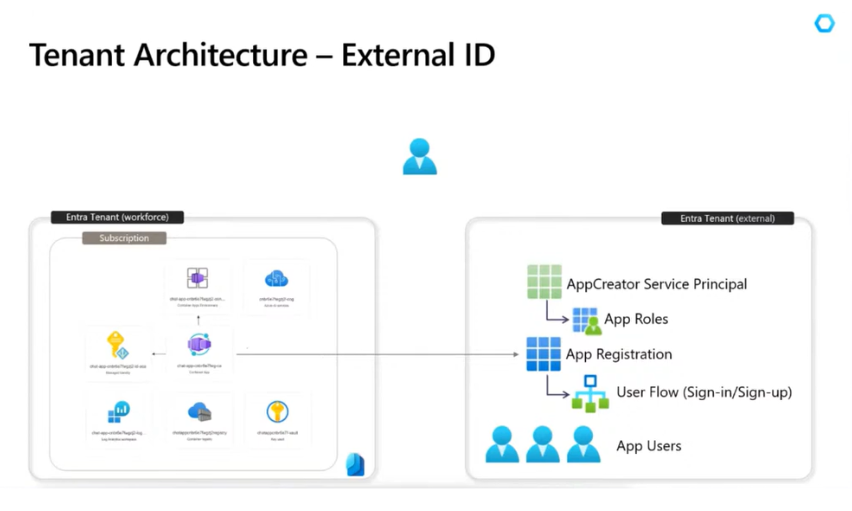
We are going to set up our architecture using two tenants:
- a workforce/default tenant where we will create the Azure infrastructure, and
- an external tenant where we will work on creating all the Entra resources.
Setting up the virtual environment
You will install all dependencies and set up the environment on your local machine to run the Python scripts.
-
Clone the following repository:
git clone https://github.com/Azure-Samples/openai-chat-app-entra-auth-builtin.git
-
Cd to where the openai chat application is
cd openai-chat-app-entra-auth-builtin
-
Create a Python virtual environment. This will create
tutorial-envif it doesn’t exist and create directories inside it containing a copy of the Python interpreter and various supporting files.python -m venv tutorial-env
-
Now, activate the environment by running:
Windows
tutorial-env\Scripts\activate
Linux/MacOS
source tutorial-env/bin/activate
-
Install the requirements:
python -m pip install -r requirements-dev.txt
Setting up Microsoft Entra External ID
You will create an app and an associated user flow in an external tenant.
To request tokens from the Microsoft Identity platform, you will need to create a service principal that can programmatically create an app registration, application roles, and a user flow, and link your app to the user flow. This is because azd doesn’t let you create an app and user flow directly. However, you can create a service principal with azd, which you can then use with the Microsoft Graph SDK to set up an application and user flow in Microsoft Entra.
Next, we’ll run a script that will do the following:
-
Create a service principal in the external tenant.
-
Create an application.
-
Granting application roles.
-
Creating a user flow.
-
Link the application to the user flow.
-
Create a new azd environment
azd env new
This will create the folder under .azure/ in your project to store the configuration for this deployment.
-
Set the
AZURE_AUTH_TENANT_IDazd environment variable to the external tenant you want to use for authentication. This can be found on the Entra portal under tenant properties. -
Set the
AZURE_AUTH_LOGIN_ENDPOINTfor the External ID tenant, which usually appears asTenantName.ciamlogin.com. You can find it on the Entra portal, under Settings ⚙️. Simply pick the tenantname and add .ciamlogin.comazd env set AZURE_AUTH_TENANT_ID your-tenant-id
-
Login to azd CLI with the External ID tenant ID:
azd auth login –tenant-id AUTH-TENANT-ID
Run the script that will set up the app registration, service principals, roles, and permissions on Entra:
Linux
./scripts/setup_for_external_id.ps1

./scripts/setup_for_external_id.sh
Windows
In PowerShell, run:
.\setup_for_external_id.ps1
In Git Bash, run the shell script:
./setup_for_external_id.sh
Deploying the application
You will deploy resources in the workforce (or default) tenant using a Bicep file which will include the provisioning of a resource group, Azure Key Vault, Log Analytics, and your application as an Azure Container App.
Once you have set up Microsoft Entra External ID you can now log in to your Azure tenant to deploy your app.
-
Log in to the default or workforce tenant on the Azure portal where you want to deploy your application. This will be a different tenant from your external tenant.
azd auth login –tenant-id AZURE-TENANT-ID
-
Set your quota capacity to 8 as that’s currently the max quota available , unless you request an increase.
azd env set AZURE_OPENAI_DEPLOYMENT_CAPACITY 8
-
You can customize the deployment by setting the environment variables to use existing Azure resources.
-
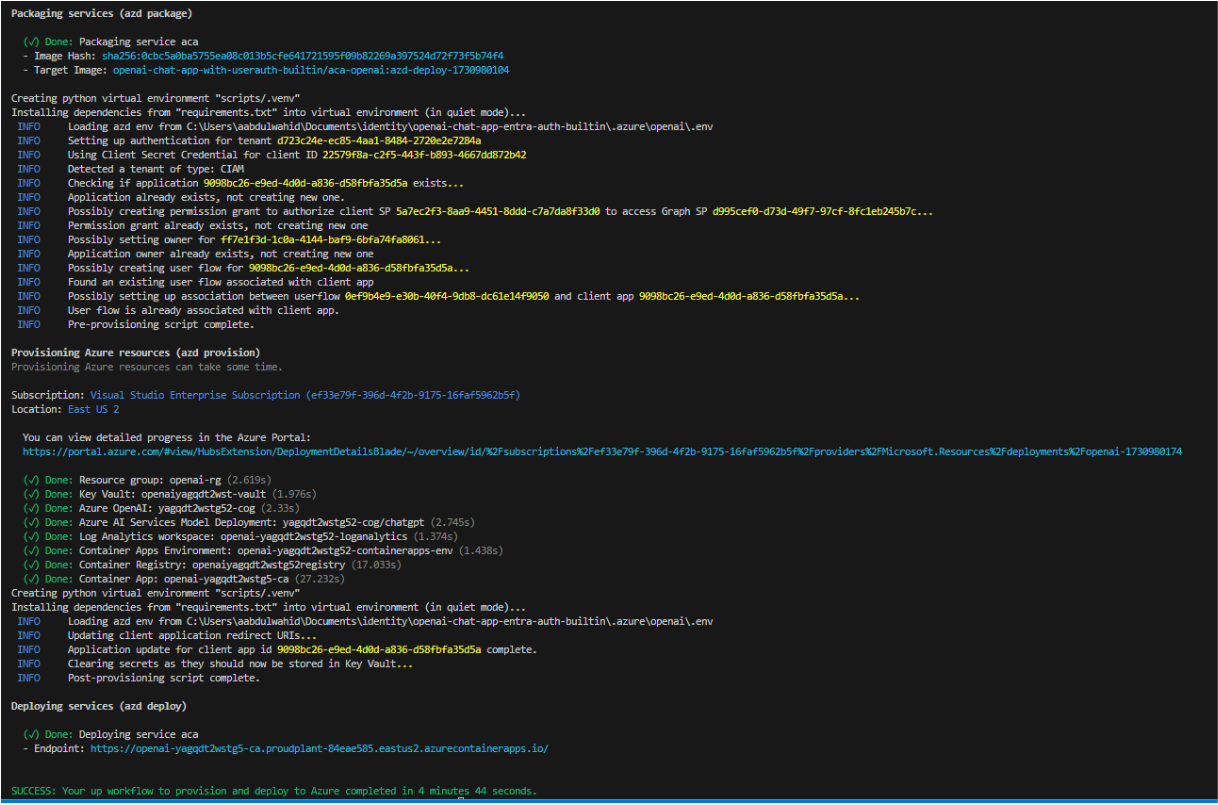
Provision and deploy all the resources.
azd up
-
When azd has finished deploying you will see an endpoint URL in the command output. Visit the URL and you should see the chat app running with External ID.
-
When you make any changes to the app, you can run:
azd deploy
Running the application
Once deployment has completed, you will be able to run your application using the endpoint provided after the azd deployment.

-
Run the endpoint in the browser. It should look like:
https://containername.randomname.
.azurecontainerapps.io -
In the browser, sign up or sign in to your Open AI application with a user within your external tenant.
-
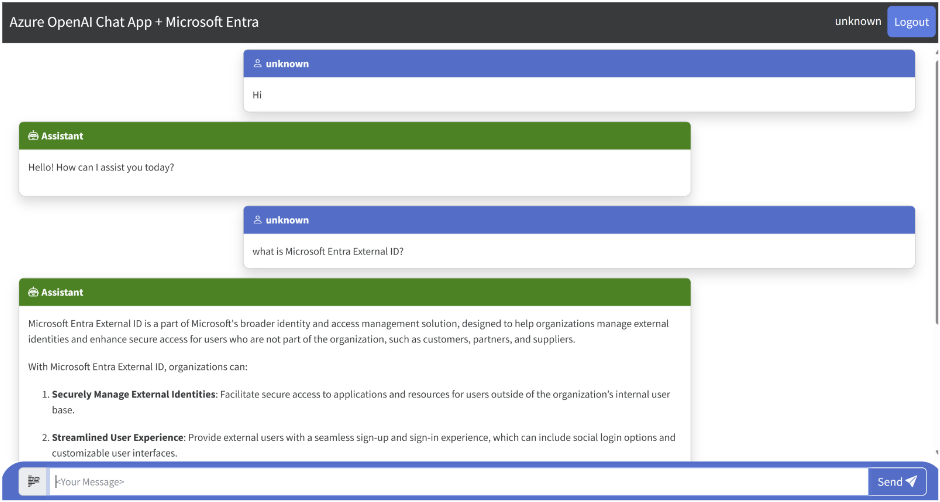
Once signed in, you can now interact with the app as shown below:
Let’s recap
You have now successfully set up External ID as an identity provider for your container application using Open AI and Python.
In this blog post, you have learned how to:
- create an OpenAI application using Python.
- add authentication to your Function App using External ID.
- configure external authentication by creating and adding a user flow with customized branding.
- sign up and sign in an External ID user with email and password on your website.
Stay connected
To learn more or test out features in the Microsoft Entra portfolio, visit our developer center. Make sure you subscribe to the Identity developer blog for more insights and to keep up with the latest on all things Identity. And, follow us on YouTube for video overviews, tutorials, and deep dives.
Join our research panel to receive occasional invites to participate in customer research.


0 comments