Over the last few months, the Browser Link team has worked on delivering these new features in the Visual Studio 2013 RC release:
- Browser Link Dashboard
- APIs for extension authoring
For those who are not familiar with Browser Link, please look at our introductory blog here.
Browser Link Dashboard
The Browser Link Dashboard is a tool window in VS that shows all active browser link connections.
You can invoke the dashboard by clicking on the little arrow next to the Refresh Linked Browser icon.
Clicking on the Browser Link Dashboard menu item will bring up the tool window.
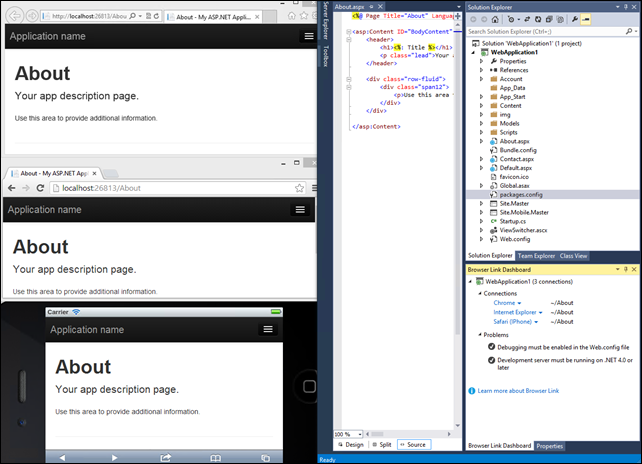
As you can see in the image below, the dashboard shows all active connections related to your solution. These include connections that were opened via F5 (run with debugger), Ctrl+F5 (run), View in Browser or even just by opening any browser and pasting the url.
For example, in the image below, you can see that connections to About.aspx in IE, Chrome and IPad emulator are all listed in the Browser Link Dashboard. The connections also give you details of the url.
A Problems node exists to tell you if there is a problem. In our case, we are good as the debug flag is set to true and we are on a 4.5 project.
APIs for extension authoring
With the RC release, we now support the authoring of Browser Link Extensions via a public API. The rest of this post describes what a Browser Link Extension is and how you can write one.
A Browser Link Extension is a VS extension that will let you talk to all Browsers connected with any web project that is open in Visual Studio. Your extension will have a CSharp part and a JavaScript part. The CSharp part is run in the context of Visual Studio. The Javascript part gets injected in the browser when a user makes a requests to that page. There are APIs on both sides that allow them to talk to each other.
Let us start off with writing a simple Browser link Extension.
To get started you will need the following:
1. Visual Studio Ultimate 2013 RC from here.
2. VSSDK from here.
3. The Visual Studio Template for Browser Link Extension from the VS Gallery. This is available here.
Here is a step by step explanation of how to author a simple extension:
Step 1: Create a Browser Link Project by going to:
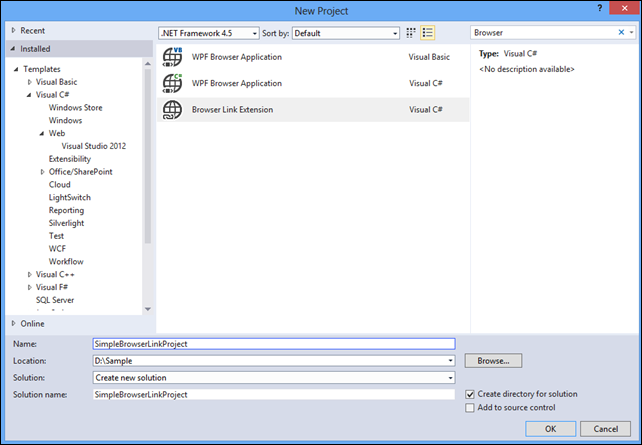
File –>New Project ->Visual C# –>Extensibility. Search for Browser Link Extension, select it and click the OK button.
Step 2: The project is created for you at this point.
Step 3: Open SimpleBrowserLinkProject.js under the scripts folder. Copy and paste the following. I have added a simple HelloWorld function that can be called from Visual Studio.
- /// <reference path="../intellisense/browserlink.intellisense.js" />
- (function (browserLink, $) {
- /// <param name="browserLink" value="bl" />
- /// <param name="$" value="jQuery" />
- function output(message) { // Helper for the 'greeting' function
- alert(message);
- if (console) {
- console.log(message);
- }
- }
- return {
- HelloWorld: function(message)
- {
- var topDiv = document.createElement("div");
- topDiv.id = "SimpleDiv";
- var textElement = document.createTextNode(message);
- topDiv.appendChild(textElement);
- $("body").prepend(topDiv);
- }
- ,
- name: "SimpleBrowserLinkProject",
- greeting: function (message) { // Can be called from the server-side extension
- output(message);
- },
- onInit: function () { // Optional. Is called when a connection is established
- }
- };
- });
Step 4: Open SimpleBrowserLinkProject.cs and copy and paste the following under OnConnected.
- public override void OnConnected(BrowserLinkConnection connection)
- {
- Clients.Call(connection,"HelloWorld", "This is a simple Browser link extension!!");
- }
Step 5: Ctrl + F5 and this will open the experimental instance of Visual Studio. Now, Create a Web Application Project and View About.aspx in IE and Chrome. In each of these new connections, we are calling the javascript function “HelloWorld” which adds a div at the top of your page.
This is a simple extension which shows how VS can talk to all browsers.
Step 6: To talk from the browser to VS, make the following changes. Copy and paste this code into your OnInit function in SimpleBrowserLinkProject.js.
- onInit: function () { // Optional. Is called when a connection is established
- browserLink.call("SendText", "Hello from JS to VS")
- }
Step 7: In your SimpleBrowserLinkProject.cs file you should have a SendText method which has a BrowserLinkCallBack Attribute. This attribute suggests that this can be called from JavaScript.
- [BrowserLinkCallback] // This method can be called from JavaScript
- public void SendText(string message)
- {
- MessageBox.Show(message);
- }
Step 8: Ctrl + F5 and this will open the experimental instance of Visual Studio. Create a Web Application Project in your experimental instance and invoke Browse with multiple browsers. Now each of these will pop up a VS Message box as shown below.
So that was a quick introduction to the new Browser Link feature in RC.
You can look at Mad’s Web essentials for Visual Studio 2013 (source) for some cool Browser Link Extensions. Stay tuned for more posts around knowing your Browser Link APIs.
Thanks,
Reshmi Mangalore


0 comments