
In the earlier post I highlighted various investments that we are making in Visual Studio 2010 and IIS to make Web Deployment easier. You can read that post below:
Deploying a web project with all its correct dependencies is not a trivial task. Some of the assets which need to be considered during deployment are:
- Web Content (.aspx, .ascx, images, xml files, PDBs, Binaries etc)
- IIS Settings (Directory browsing, Error pages, Default Documents etc)
- Databases that the web project uses
- GAC Assemblies and COM components which the web project depends upon
- Registry Settings that may be used within the web project
- Security Certificates
- App Pools
In an enterprise environment a web application with all of its dependencies needs to move across various environments before being finally being deployed to a production server. A typical set of transition servers are development, testing/QA, staging/pre-production and production. Also on the production environment there are web farms where these webs need to be replicated. Today doing all these things is more or less a manual process and involves a tons of documentation that both developers and server admins have to deal with. Even with all the documentation the steps are certainly very much prone to errors.
To aid all these scenarios we are introducing the concept of a "Web Package". Web Package is an atomic, transparent, self describing unit representing your web which can be easily hydrated onto any IIS Web server to reproduce your web. VS 2010 uses MSDeploy to create the web package from your web application.
In today’s post I will be primarily focusing on creating a web package from VS 2010 which has IIS Settings as well as web content.
The package created by VS can be installed using UI in IIS Manager as well as command line, we anticipate that developers eventually will give the web packages to server administrators who will be able to inspect/verify the package and then install them on the server… I will cover package installation topic in subsequent post… But for now let us learn how to create a web package
Step 1: Configure your Web Application Project (WAP) to use IIS Settings
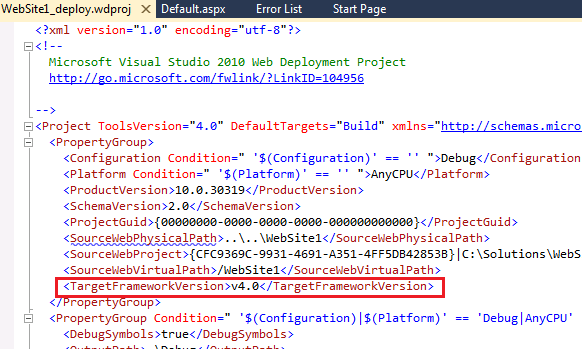
For this discussion we have BlogEngine.Web downloaded from codeplex and converted it into a WAP. Then this project was opened in VS 2010 and the VS10 migration wizard moved the project into VS10 format. Thanks to the multi-targeting features in VS 2010 which can support .NET versions 2.0 till 4.0; hence it is up to you which Framework version you want to run your web against. I have also configured this blog application to use IIS Web Server for development (Learn how to do so by clicking here).
At the end of this step my solution explorer looks as below:
Step 2: Configure IIS Settings in IIS Manager
Most IIS 7 web applications use IIS integrated pipeline which is configured with "Default App Pool" of IIS. Blog Engine .web does not use integrated mode and will throw an error shown below if made to run under "Default App Pool".
To get rid of this error I changed the App Pool of this application to "Classic App Pool" (Learn how to do so by clicking here) and then the application runs great as shown below:
App Pool mapping is just one of the IIS setting which your app may use, there are various other IIS Settings which you can configure using IIS Manager (e.g. Default document, Error pages etc etc); all of these settings are relevant based on your application scenario… The good news is that VS 10 & MSDeploy will auto detect all the changes you make to the default IIS settings and pick it up for deployment…
Essentially, at the end of this step you should have your web application up and running with all the IIS settings configured in IIS Manager.
Step 3: Configure Package Settings
In VS 2010 we have introduced one additional property page for WAPs called "Publish" as shown below:
Let us look at various properties of the this tab to understand how it works:
Configuration Aware Tab: Note that the Publish tab is build configuration aware:
- The Publish tab is made configuration aware as deployment settings tend to change from environment to environment; for e.g. many a times developers want to deploy their “Debug” configuration on a Test Server and include PDBs as part of this deployment. When the same web is deployed in “Release” configuration on a production server the deployment may exclude PDBs. (Learn how to manage build configurations by clicking here)
Items to Package/Publish – This section will help you decide what type of content you would really like to package/deploy.
- Types of Files: By default this option is set to "Only files needed to run this application" . This is usually sufficient for your deployment as it includes all the files from your project except source code, project files and other crud files not required to be deployed… But apart from that there are two additional options available as shown below…
"All files in this project" and "All files in this project folder" options are very similar to what Publish WAP options were in VS 2008… I had written an earlier post explaining these options here… In subsequent posts I will also dig into various other interesting ways of using these options.
- Exclude Files from App_Data folder – “App_Data” folder is a special ASP.NET folder where many developers like to put their SQL Express DBs (.mdf/.ldf files), XML files and other content which they consider Data. In many situations on production web server a full version of SQL Server is available and using SQL Express is not all that relevant. In such scenario (and for the corresponding build configuration e.g “Release” ) a user can check the “Exclude Files from App_Data”.

- Exclude Generated Debug Symbols – It is important to understand that generation of debug symbols is different from deployment of the same. This check box will tell VS 10 whether you would like to package/deploy the already generated Debug Symbols (Learn more about deploying debug Symbols here).
Package Items

- IIS Settings – Checking this checkbox informs VS10 that you are ready to take all of your IIS Settings configured for your application in IIS Manager as a part of your web package. I am glad to tell you that IIS 5.1, IIS 6 as well as IIS 7 environments are supported as part of this feature hence whether you are working on XP, Win2K, Win2K3, Vista or Win2K8 you should have no issue with packaging IIS Settings…
These setting includes the "App Pool mapping" your web is configured to run against (e.g. "Classic App Pool" mapping discussed in Step 2)
- Additional Settings – The items in this grid are advanced properties. It is still good to know about these coz it impacts what will be included in your package. Most of the properties in this grid are related to the entire server and not just to your application so you should use them very carefully.
Currently VS10 only displays "Application Pool Settings" but behind the scene it is possible to configure VS10 to support packaging root web.config, machine config , security certificates, ACLs etc…
I wrote a small tips & trick about differences between Application Pool Mapping and Application Pool Settings which will help clarify the implications of such advanced settings; you can read more about it here.
Package Settings

- Create MSDeploy Package as a ZIP file – This checkbox allows you to decide whether you would like to create your web package as a .zip file or as a folder structure. If you are concerned about the size and are moving the web package around very often then I can see you using .zip format for the package; on the other hand if you care to compare two packages using diff commands (either of source control or independently) then I can see you using the folder format.
- Package Location – This is an important and required property as it defines the path at which Visual Studio will place your web package. If you choose to change this path make sure that you have write access to the location. Do note that the Package Location is modified based on whether you choose to create the web package as a .ZIP file or vs a folder structure.
- Destination IIS Application Path/Name – This property allows you to give IIS Application name that you will use at the destination Web Server.
- Destination Application Physical Path – One of the most important information which is embedded inside the web package is the physical location where the package should be installed. This property allows you to pre-specify this embedded information. You will have an opportunity change both IIS Application Physical Path as well as Application Name at the time of deployment but in this property page you are given an opportunity to choose a default value.
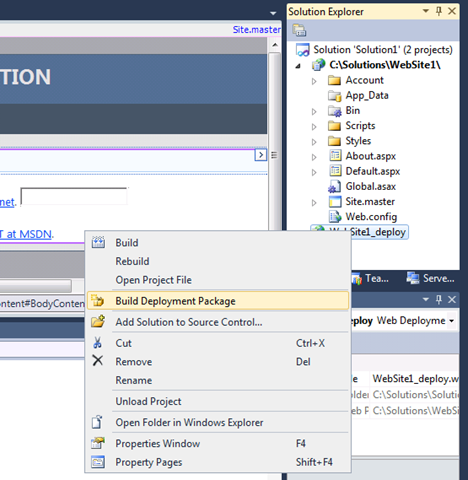
Step 4: Create the "Web Package"
This is the last step in creating the web package and the simplest too… The idea is that once you configure the above settings creating a package should be easy; in fact even if you do not go to the "Publish" tab we have tried to set smart defaults so that in most normal circumstances creating web package should be just the below two steps:
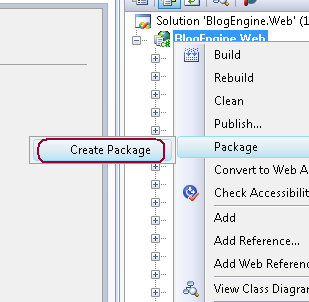
- Right Click on your "Project"
- Click on Package –> Create Package
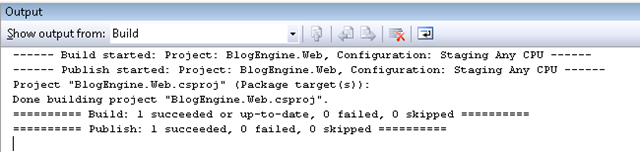
Once you click on this command you should start getting output messages around your package creation pumped into your output window…
When you see “Publish Succeeded” as below in the output window then your package is successfully created.
To access the package go to the location specified in the “Package Location” textbox. By default this is in obj/Configuration/Package folder under your project root directory (Configuration here implies Active Configuration like Debug/Release etc).
Note: "Create Package" command creates web package only for Active configuration. By default “Debug” is the active configuration inside Visual Studio. If you would like to change the Active configuration you can do so by using Build –> Configuration Manager as described here. You can certainly set properties for all available configurations by switching the configuration on top of the “Publish” tab but that action does not change the Active configuration

Finally, you can also automate creation of web packages via your team build environment as everything discussed above is supported via MSBuild Tasks. In subsequent posts we will get into the details of these areas too…
Hope this helps…
Vishal R. Joshi | Program Manager | Visual Studio Web Developer
0 comments