Azure WebJobs is a great way for running any kind of script or executable as a background process in connection with an Azure App Service Web Site or App. You can upload an executable or script as a WebJob and run it either on a schedule or continuously. The WebJob can perform any function you can stick into a command line script or program and using the Azure WebJobs SDK, you can trigger actions to happen as a result of inputs from a number of sources, for example:
- A message arriving on an Azure Storage queue;
- An Azure Storage blob being created or updated;
- A message arriving on an Azure Service Bus queue.
WebHooks provide a simple mechanism for sending event notification across web applications and external services. For example, you can receive a WebHook when someone sends money to your PayPal account, or when a message is posted to Slack, or a picture is posted to Instagram. The opportunities for integrating services using WebHooks are endless. ASP.NET WebHooks provide support for both sending and receiving WebHooks allowing your ASP.NET applications to easily integrate with other services.
If you are new to ASP.NET WebHooks, then check out the blog Introducing Microsoft ASP.NET WebHooks Preview. For an introduction for how to use ASP.NET WebHooks for sending WebHooks, please see Sending WebHooks with ASP.NET WebHooks Preview. For scaling up and out when sending WebHooks, please see the blog New Year Updates to ASP.NET WebHooks Preview.
In this blog we will describe how to send ASP.NET WebHooks from inside an Azure WebJob as a result of a message arriving on an Azure Storage Queue. However, there are many more possibilities for using these two technologies together.
The functionality described in this blog is available in the Microsoft ASP.NET WebHooks Nuget packages version 1.2.0-beta6a – remember to set the preview flag when looking for them in Visual Studio.
Sending WebHooks from Web Server
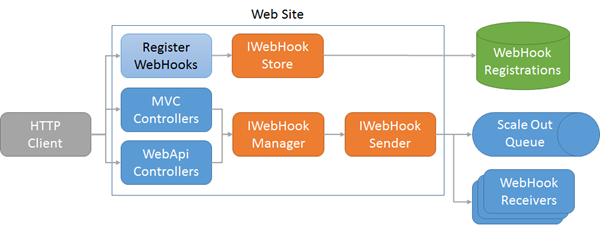
As described in the blog Sending WebHooks with ASP.NET WebHooks Preview, the basic model for sending WebHooks works as illustrated in this diagram:
Here we have a regular Web site (for example deployed in Azure) with support for registering WebHooks. WebHooks are triggered as a result of incoming HTTP requests, typically through an MVC controller or a WebAPI controller. The orange blocks are the core abstractions provided by ASP.NET WebHooks:
- IWebHookStore: An abstraction for storing WebHook registrations persistently. Out of the box we provide support for Azure Table Storage and SQL but the list is open-ended.
- IWebHookManager: An abstraction for determining which WebHooks should be sent as a result of an event notification being generated. The manager can match event notifications with registered WebHooks as well as applying filters.
- IWebHookSender: An abstraction for sending WebHooks determining the retry policy and error handling as well as the actual shape of the WebHook HTTP requests. Out of the box we provide support for immediate transmission of WebHooks as well as a queuing model which can be used for scaling up and out, see the blog New Year Updates to ASP.NET WebHooks Preview for details.
The registration process can happen through any number of mechanisms as well. Out of the box we support registering WebHooks through a REST API but you can also build registration support as an MVC controller or anything else you like.
Sending WebHooks From WebJobs
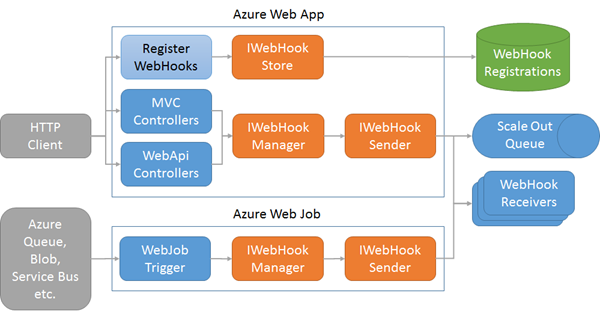
The WebHook abstractions for the WebJob are the same as for the Web site allowing you to manage and send WebHooks in an identical manner. The difference is that you can now send WebHooks not just as a result of incoming HTTP requests but also as a result of messages being sent on a queue, a blob being created, or anything else that can trigger a WebJob:
Creating an Azure WebJob
In the blog New Developer and Debugging Features for Azure WebJobs in Visual Studio, you will find a great overview of how to create an Azure WebJob using Visual Studio. This can be used to set up a Command Line project including the Microsoft.Azure.WebJobs Nuget package. Alternatively you can see this sample project which contains the code below:
The project contains three pieces:
- An App.config file where we configure the WebJob;
- The usual Program static class with a Main entry method to the application;
- A Function class where we will add a method to be invoked when a message arrives on a given Azure Storage Queue.
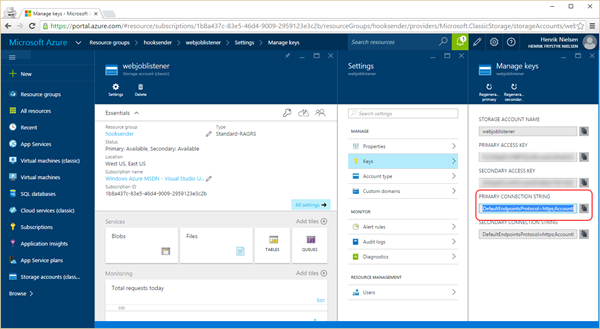
To configure the WebJob, we set three connection strings in the App.config file:
<connectionStrings>
  <add name="AzureWebJobsDashboard" connectionString="DefaultEndpointsProtocol=https;…" />
  <add name="WebHookListener" connectionString="DefaultEndpointsProtocol=https;…" />
  <add name="MS_AzureStoreConnectionString" connectionString="UseDevelopmentStorage=true;" />
</connectionStrings>
internal class Program
{
    /// <summary>
    /// Gets or sets the <see cref="IWebHookManager"/> instance to use.
    /// </summary>
    public static IWebHookManager Manager { get; set; }

    public static void Main(string[] args)
    {
        // Set up default WebHook logger
        ILogger logger = new TraceLogger();

        // Set the WebHook Store we want to get WebHook subscriptions from. Azure store requires
        // a valid Azure Storage connection string named MS_AzureStoreConnectionString.
        IWebHookStore store = AzureWebHookStore.CreateStore(logger);

        // Set the sender we want to actually send out the WebHooks. We could also
        // enqueue messages for scale out.
        IWebHookSender sender = new DataflowWebHookSender(logger);

        // Set up WebHook manager which we use for creating notifications.
        Manager = new WebHookManager(store, sender, logger);

        // Initialize WebJob
        var listener = ConfigurationManager.ConnectionStrings["WebHookListener"].ConnectionString;
        JobHostConfiguration config = new JobHostConfiguration
        {
            StorageConnectionString = listener
        };
        JobHost host = new JobHost(config);
        host.RunAndBlock();
    }
}
public class Functions
{
    /// <summary>
    /// This method is triggered when a message arrives on the 'listener' queue on the
    /// the 'WebHookListener' Azure Storage Account.
    /// </summary>
    public static async Task ProcessAsync([QueueTrigger("listener")] string message, TextWriter logger)
    {
        await logger.WriteLineAsync(message);

        // Send message to all subscribers as WebHooks. Use a predicate to filter
        // which receivers should get a WebHook request.
        await Program.Manager.NotifyAllAsync("event1", new { Message = message });
    }
}
Trying It Out
As there are several moving parts in getting this up and running, we will focus on the already existing sample code that you can find in the Microsoft ASP.NET WebHooks GitHub repository:
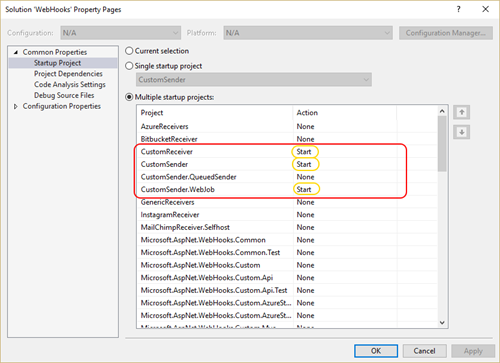
- CustomSender.WebJob: The WebJob project described above.
- CustomSender: A Web project having been set up to register and generate WebHooks as described in Sending WebHooks with ASP.NET WebHooks Preview.
- CustomReceiver: A WebHooks receiver project which can receive WebHooks sent by the WebJob and the Web Application.
To get the pieces put together, clone the ASP.NET WebHooks repository and open the WebHooks solution in Visual Studio. Configure the connection string settings for the WebJob as described above by editing the App.config file.
Now right-click on the solution in the Solution Explorer, select Set Startup Projects to include all three projects like this:
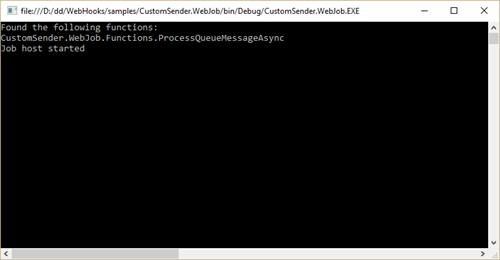
Now hit F5 to start the projects. You should see the WebJob starting up in a command line shell:
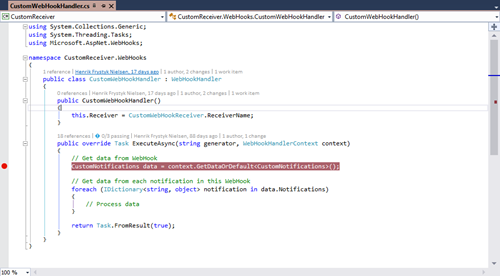
To verify that you receive WebHooks in the CustomReceiver project, set a breakpoint in the CustomWebHookHandler class like this:
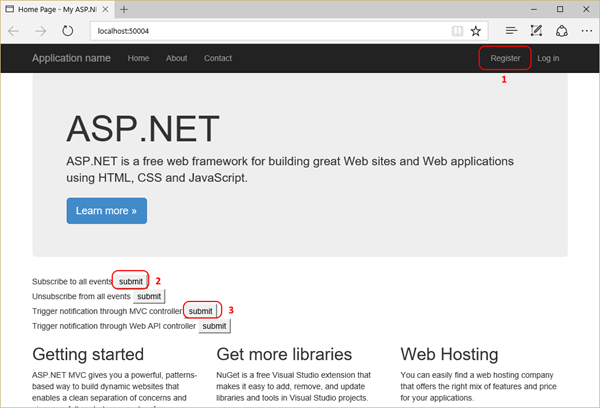
Similarly you should see CustomSender project starting up with a Web page like this. Click on the buttons marked in red in the order illustrated here:
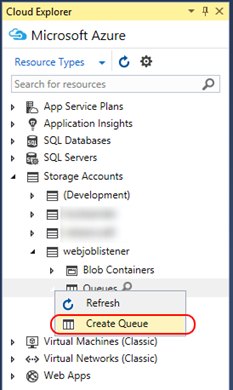
If everything is working OK, then the debugger should hit the breakpoint in the WebHook handler. This means that sending WebHooks from the Web Application works. Next, let’s try and generate a WebHook from the WebJob. First we need to create a queue called listener in the Azure Storage Account we provided in the App.config file. You can do that from the Cloud Explorer in Visual Studio by right-clicking on the Azure Storage Account and create a queue:
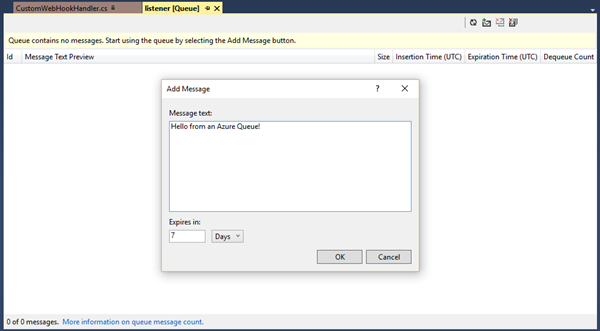
With the queue in place we can submit a message by double clicking on it and then add a message:
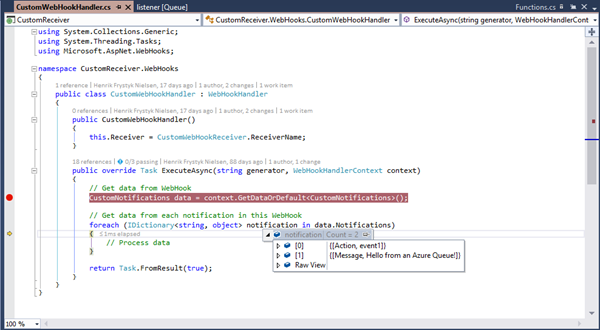
Once added, it will take some seconds but then you should see the message being sent to the WebHook receiver:
That is, now you can send WebHooks from WebJobs as well as from Web Applications!
Have fun!
Henrik

0 comments